


When you don't feel like talking, let your iPhone do all the work.
Yes, your iPhone can speak for you, and it works over phone calls and FaceTime calls. It will even work its magic over your iPhone's speaker for in-person conversations. While Apple created this feature to support people who are unable to speak and people who have lost or are losing their speech abilities, anyone can use it.
Have a sore throat during a cold? Make your iPhone do your talking. Need to save your singing voice? Get your iPhone to speak your words. Better at writing than vocal communication? Yep, have your iPhone say what you want out loud.
What's even more impressive about this text-to-speech feature is that you can have your iPhone use your real voice instead of having to use one of Siri's default computer-generated voices. Here's how it all works:
Enable Live Speech
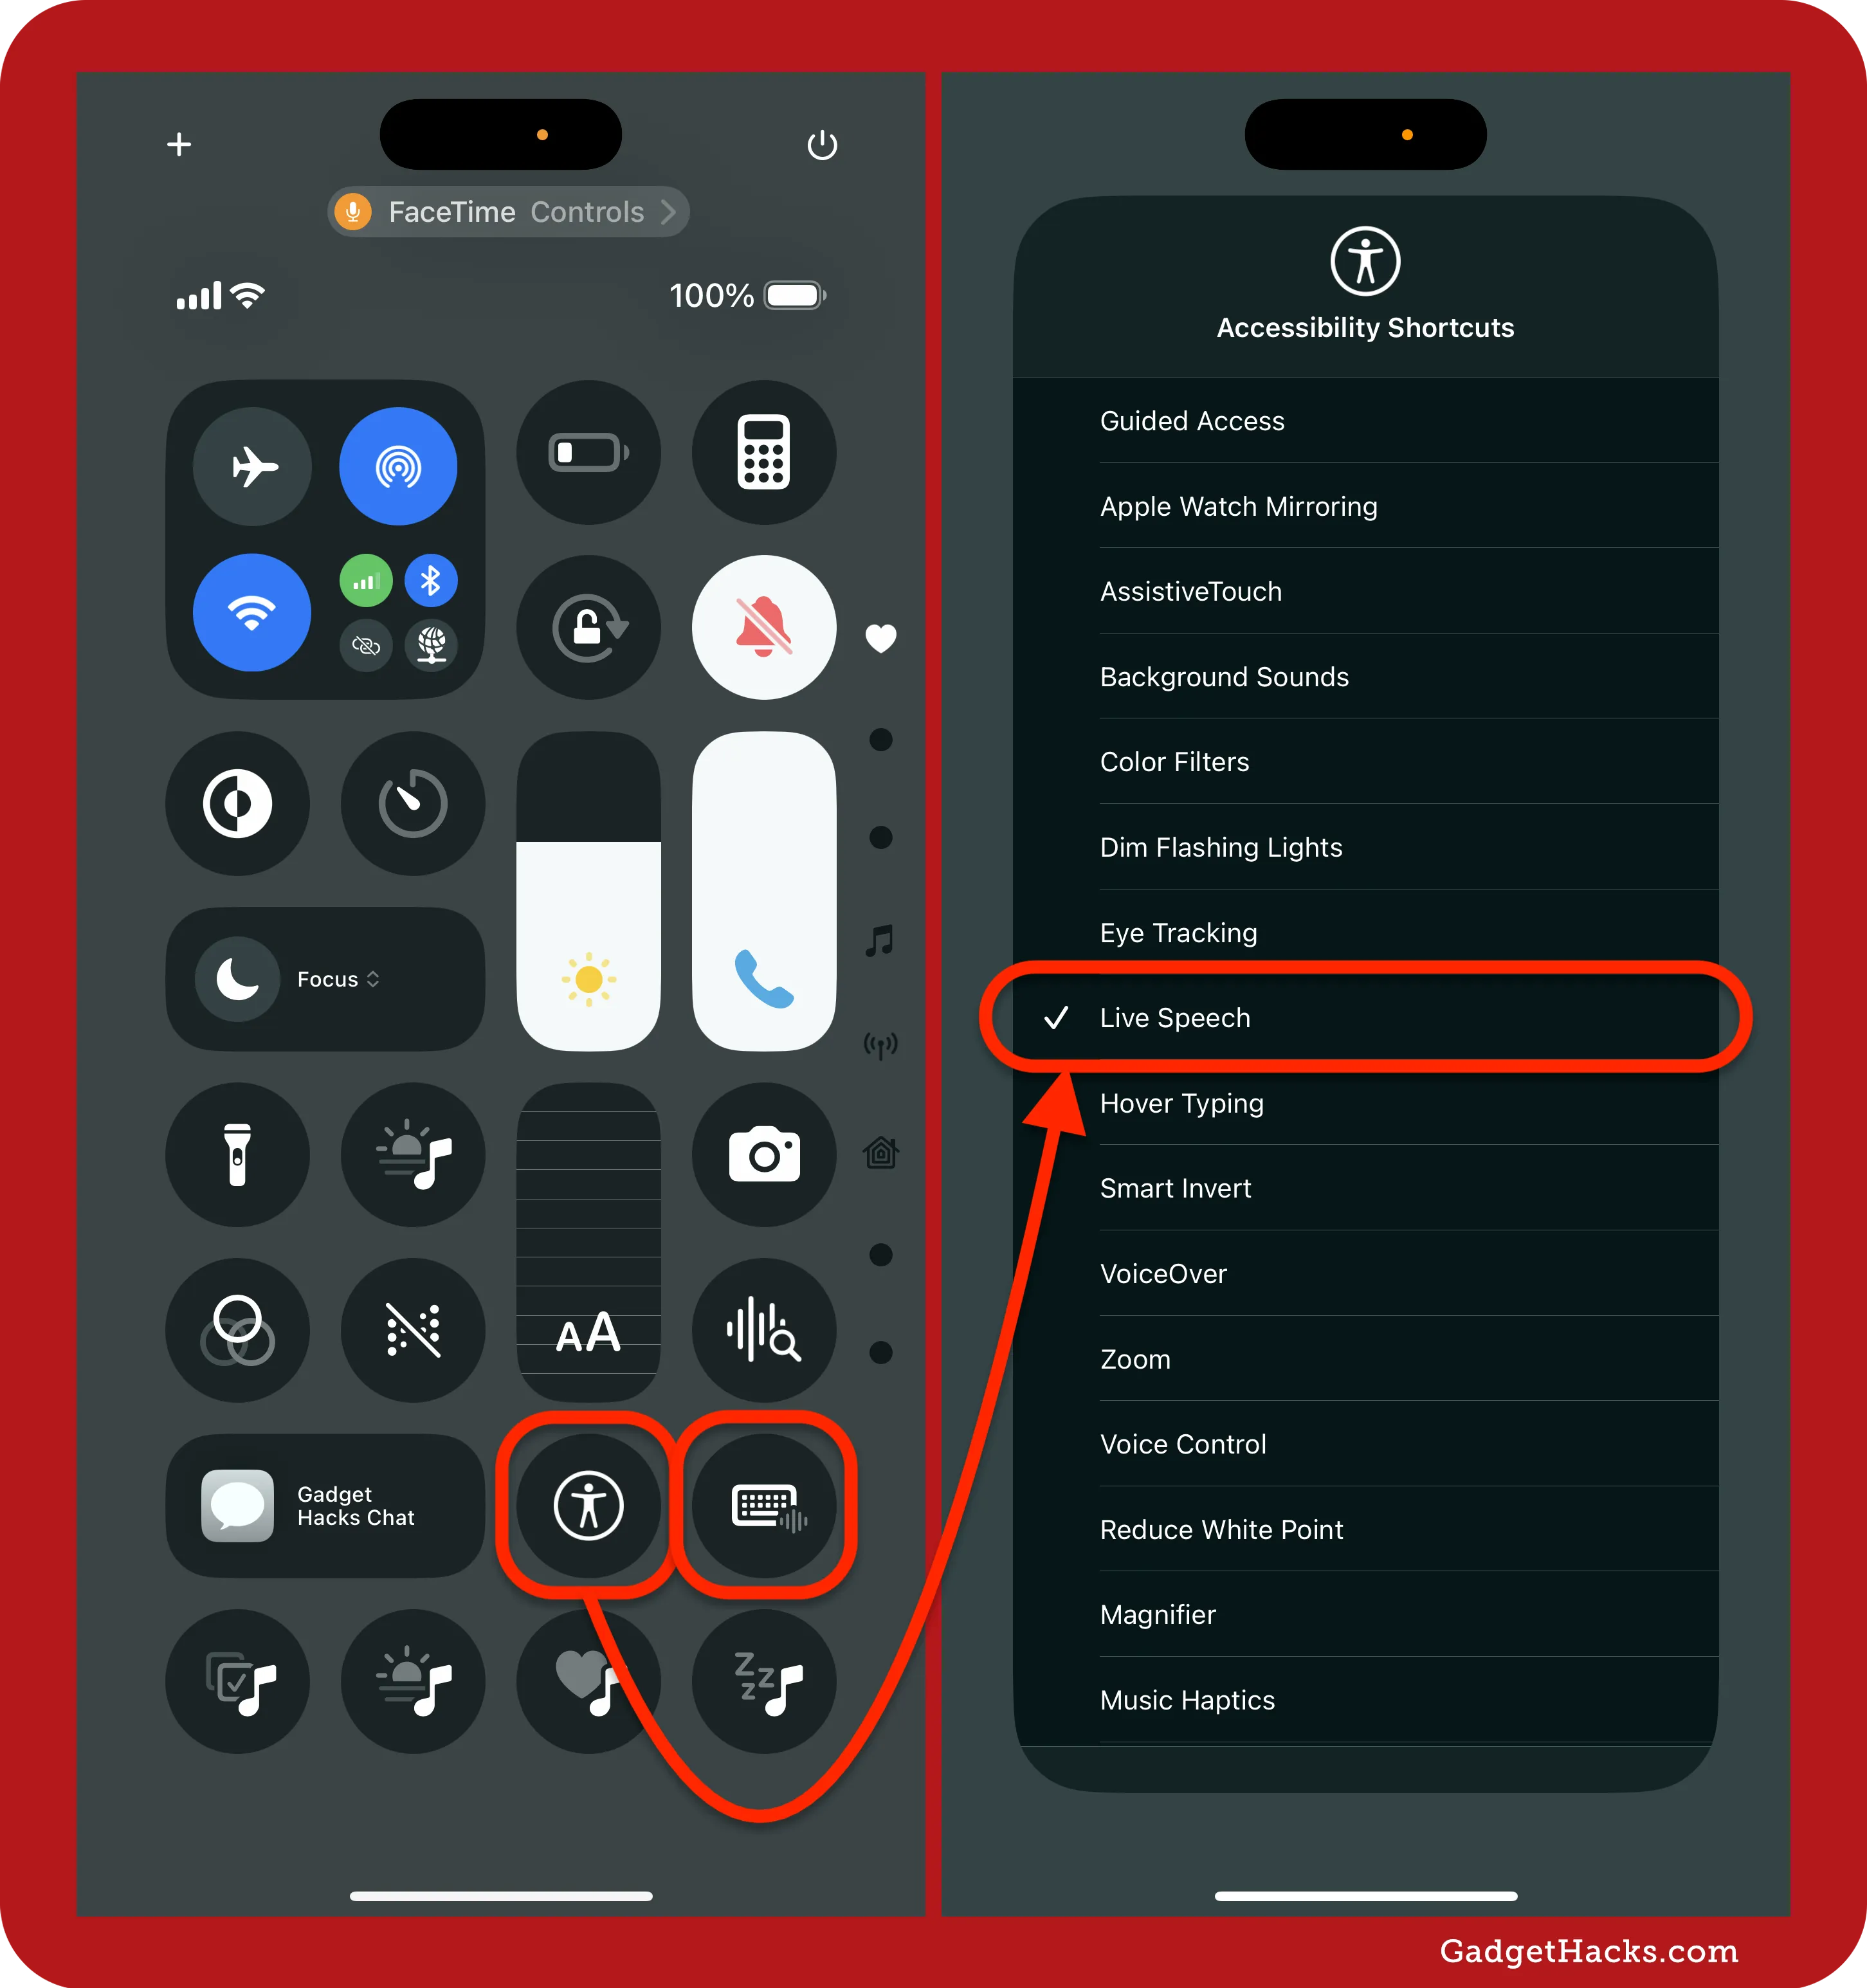
On your iPhone running iOS 17 or later, head to Settings » Accessibility » Live Speech, then toggle on the "Live Speech" switch to make it accessible whenever you need or want to use it. You can also enable it by going to Settings » Accessibility » Accessibility Shortcut and checking "Live Speech."

Live Speech settings (left) and Accessibility Shortcut settings (right).
Activate Live Speech
Before we customize your Live Speech experience, let's get right into using it. To activate the Live Speech UI, triple-click your Side or Home button. If you don't have Guided Access enabled and have not set any other features to your Accessibility Shortcut, triple-clicking should open the Live Speech interface right away. Otherwise, choose "Live Speech" from the menu that appears.

Alternatively, if you've added Accessibility Shortcut to Control Center, you can use that to activate Live Speech. Open Control Center and tap the Accessibility Shortcut control. Again, if no other features use the triple-click shortcut, Live Speech will start immediately. Otherwise, choose "Live Speech" from the list.
However, it's easier to just use the Live Speech control, which looks like a keyboard with a sound wave symbol on it.
If you don't see either of these, long-press the background, then find whichever control you prefer.
Make Live Speech talk for you
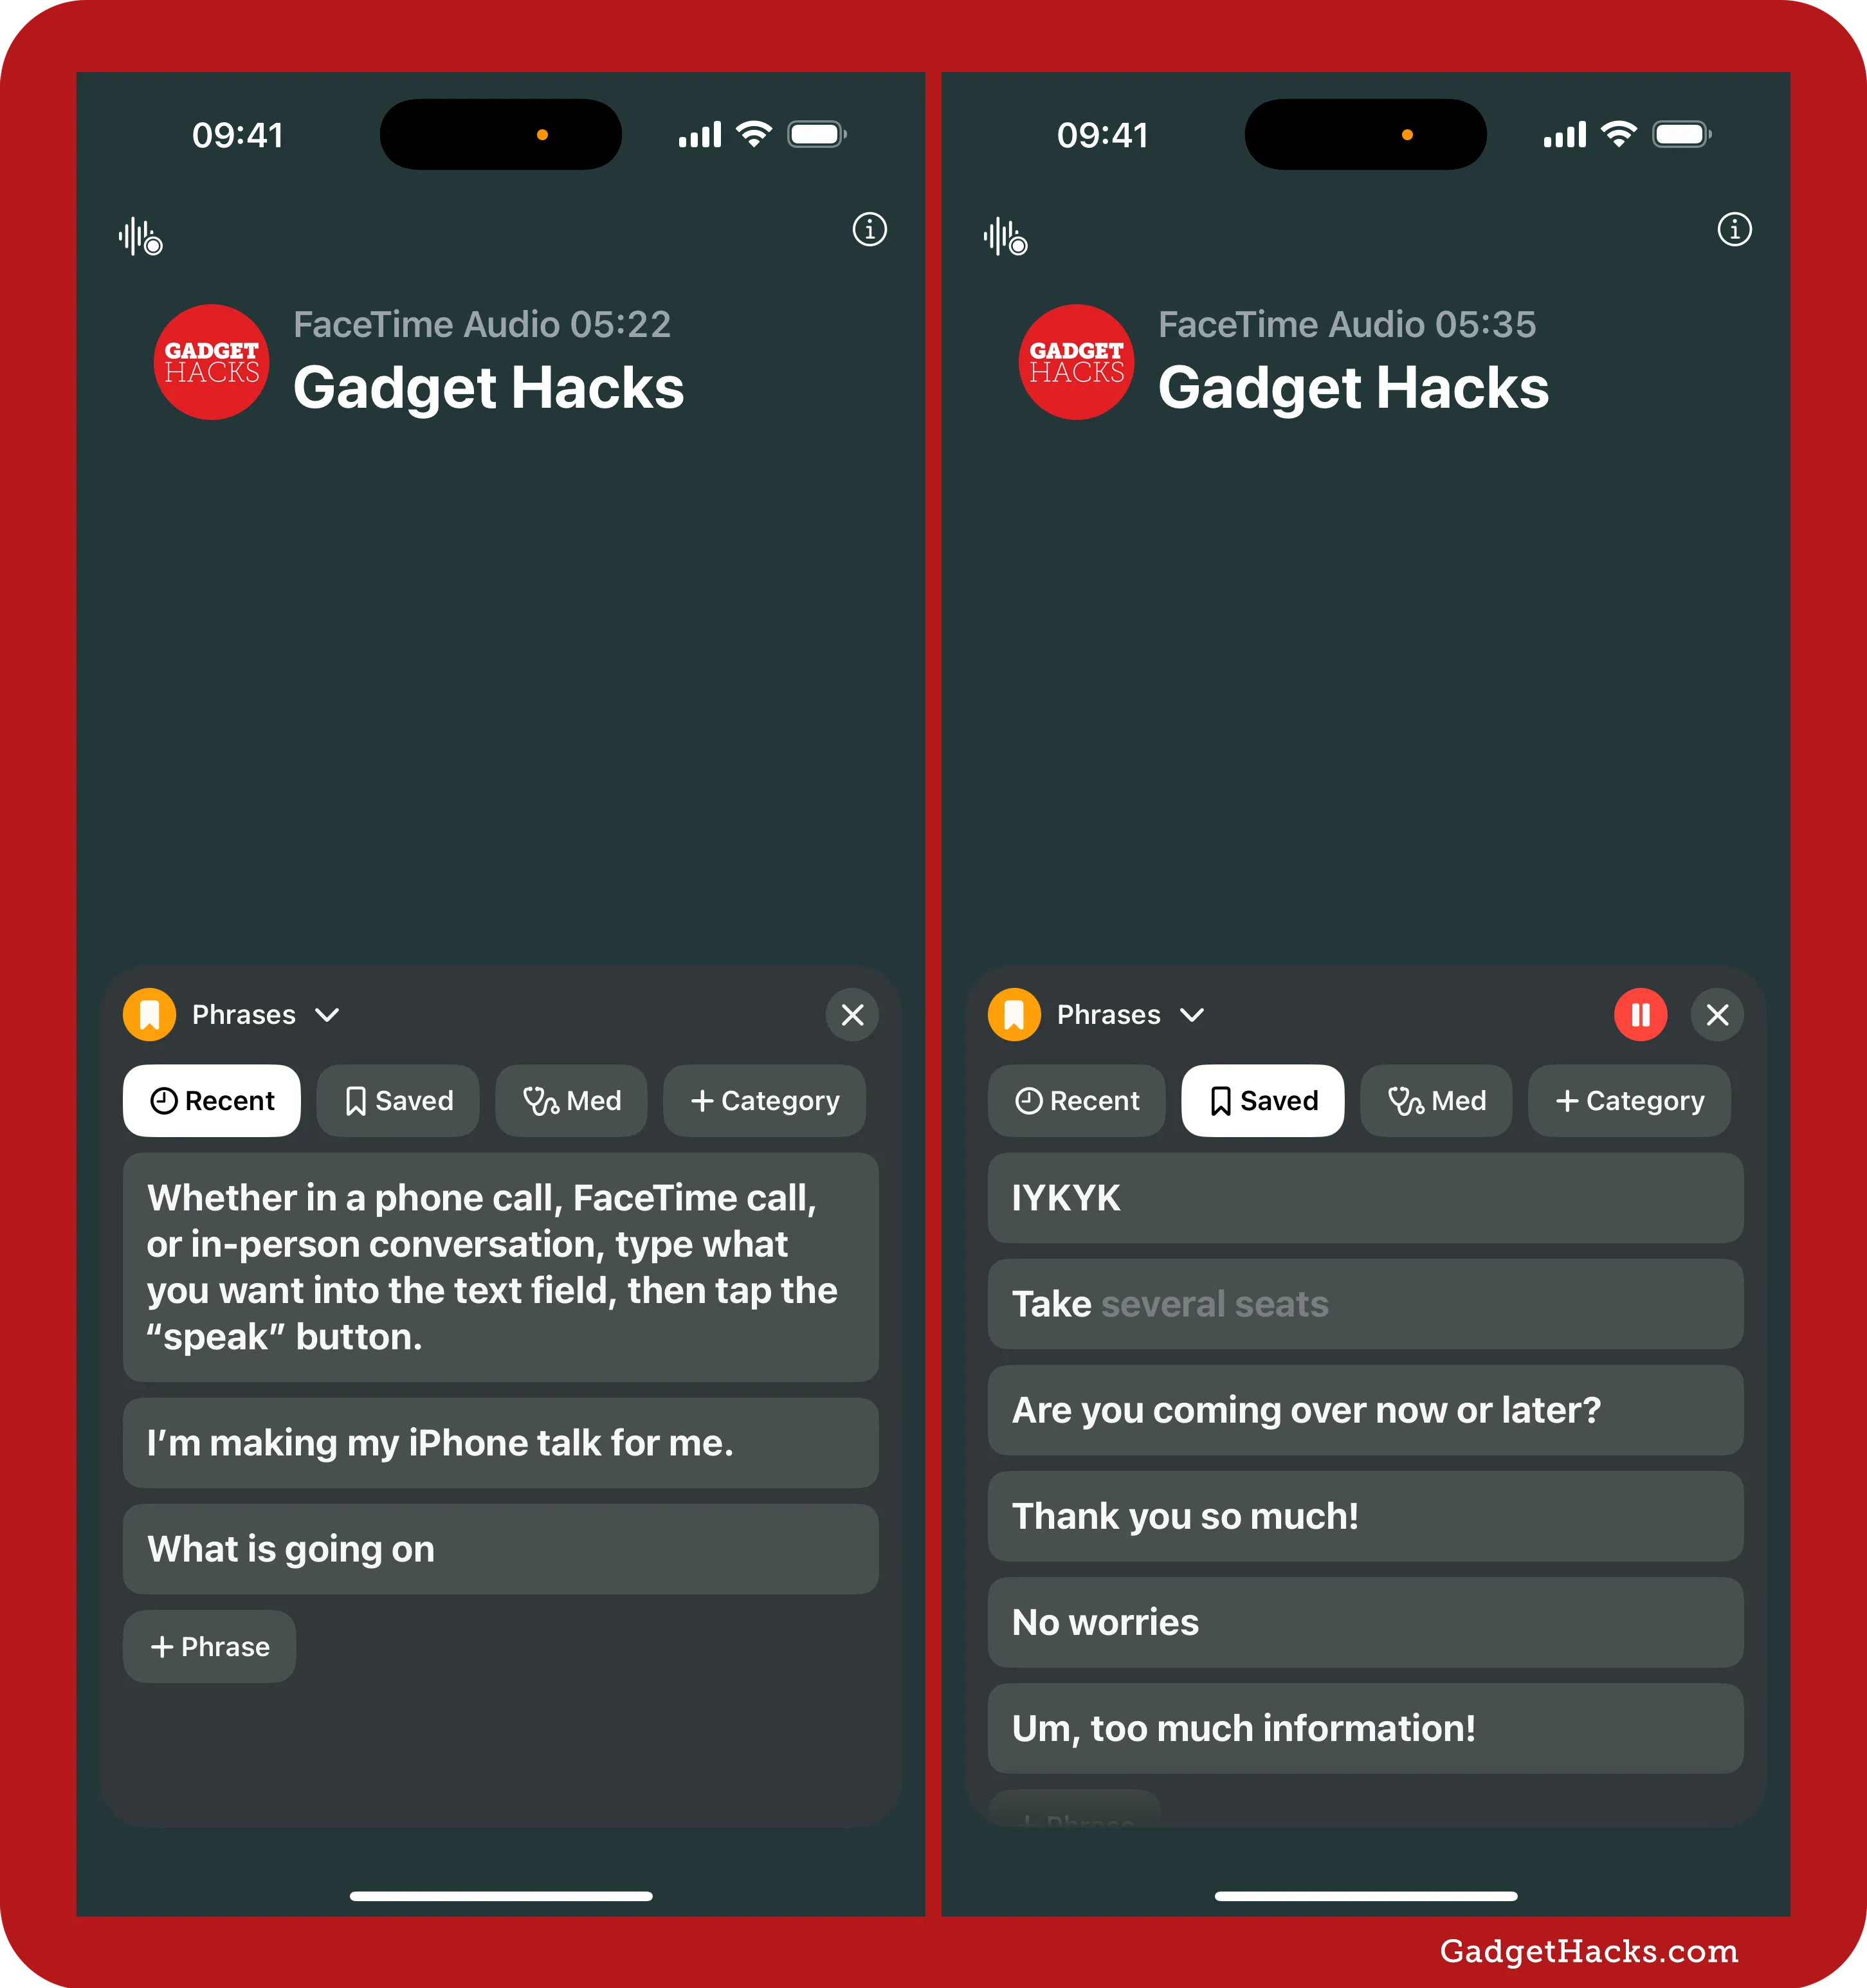
Whether in a phone call, FaceTime call, or in-person conversation, type what you want or paste copied text from your clipboard into the text field, then tap the "speak" button on the keyboard.
If you're on a call, you won't hear anything, but the other people on the line will. When using it for in-person chats, you'll hear the default Live Speech voice read your text out loud over the speakers. Use your volume buttons to adjust the levels if necessary. If you have AirPods or other headphones on, you'll hear it through them, but it doesn't help unless you want to talk to yourself.

In the text field, you'll see each word highlighted as it's spoken, so you know exactly where it's at in your message. There's also a pause (⏸) button you can tap if another person is interrupting your speech. It also comes in handy if you change your mind about what you typed. In that case, tap the "Clear" button that appears. Otherwise, you can continue the statement with the play (⏵) button.
Tapping the Ⓧ will close Live Speech altogether.

By default, you should be in the keyboard interface, but you can hit the Keyboard button to switch to Phrase mode. This is where you can access frequently used phrases you tend to say, as well as recently used ones, so you don't have to type them out every time. There will be sections for Recent and Saved and any custom ones you've made. To play a phrase, just tap it.
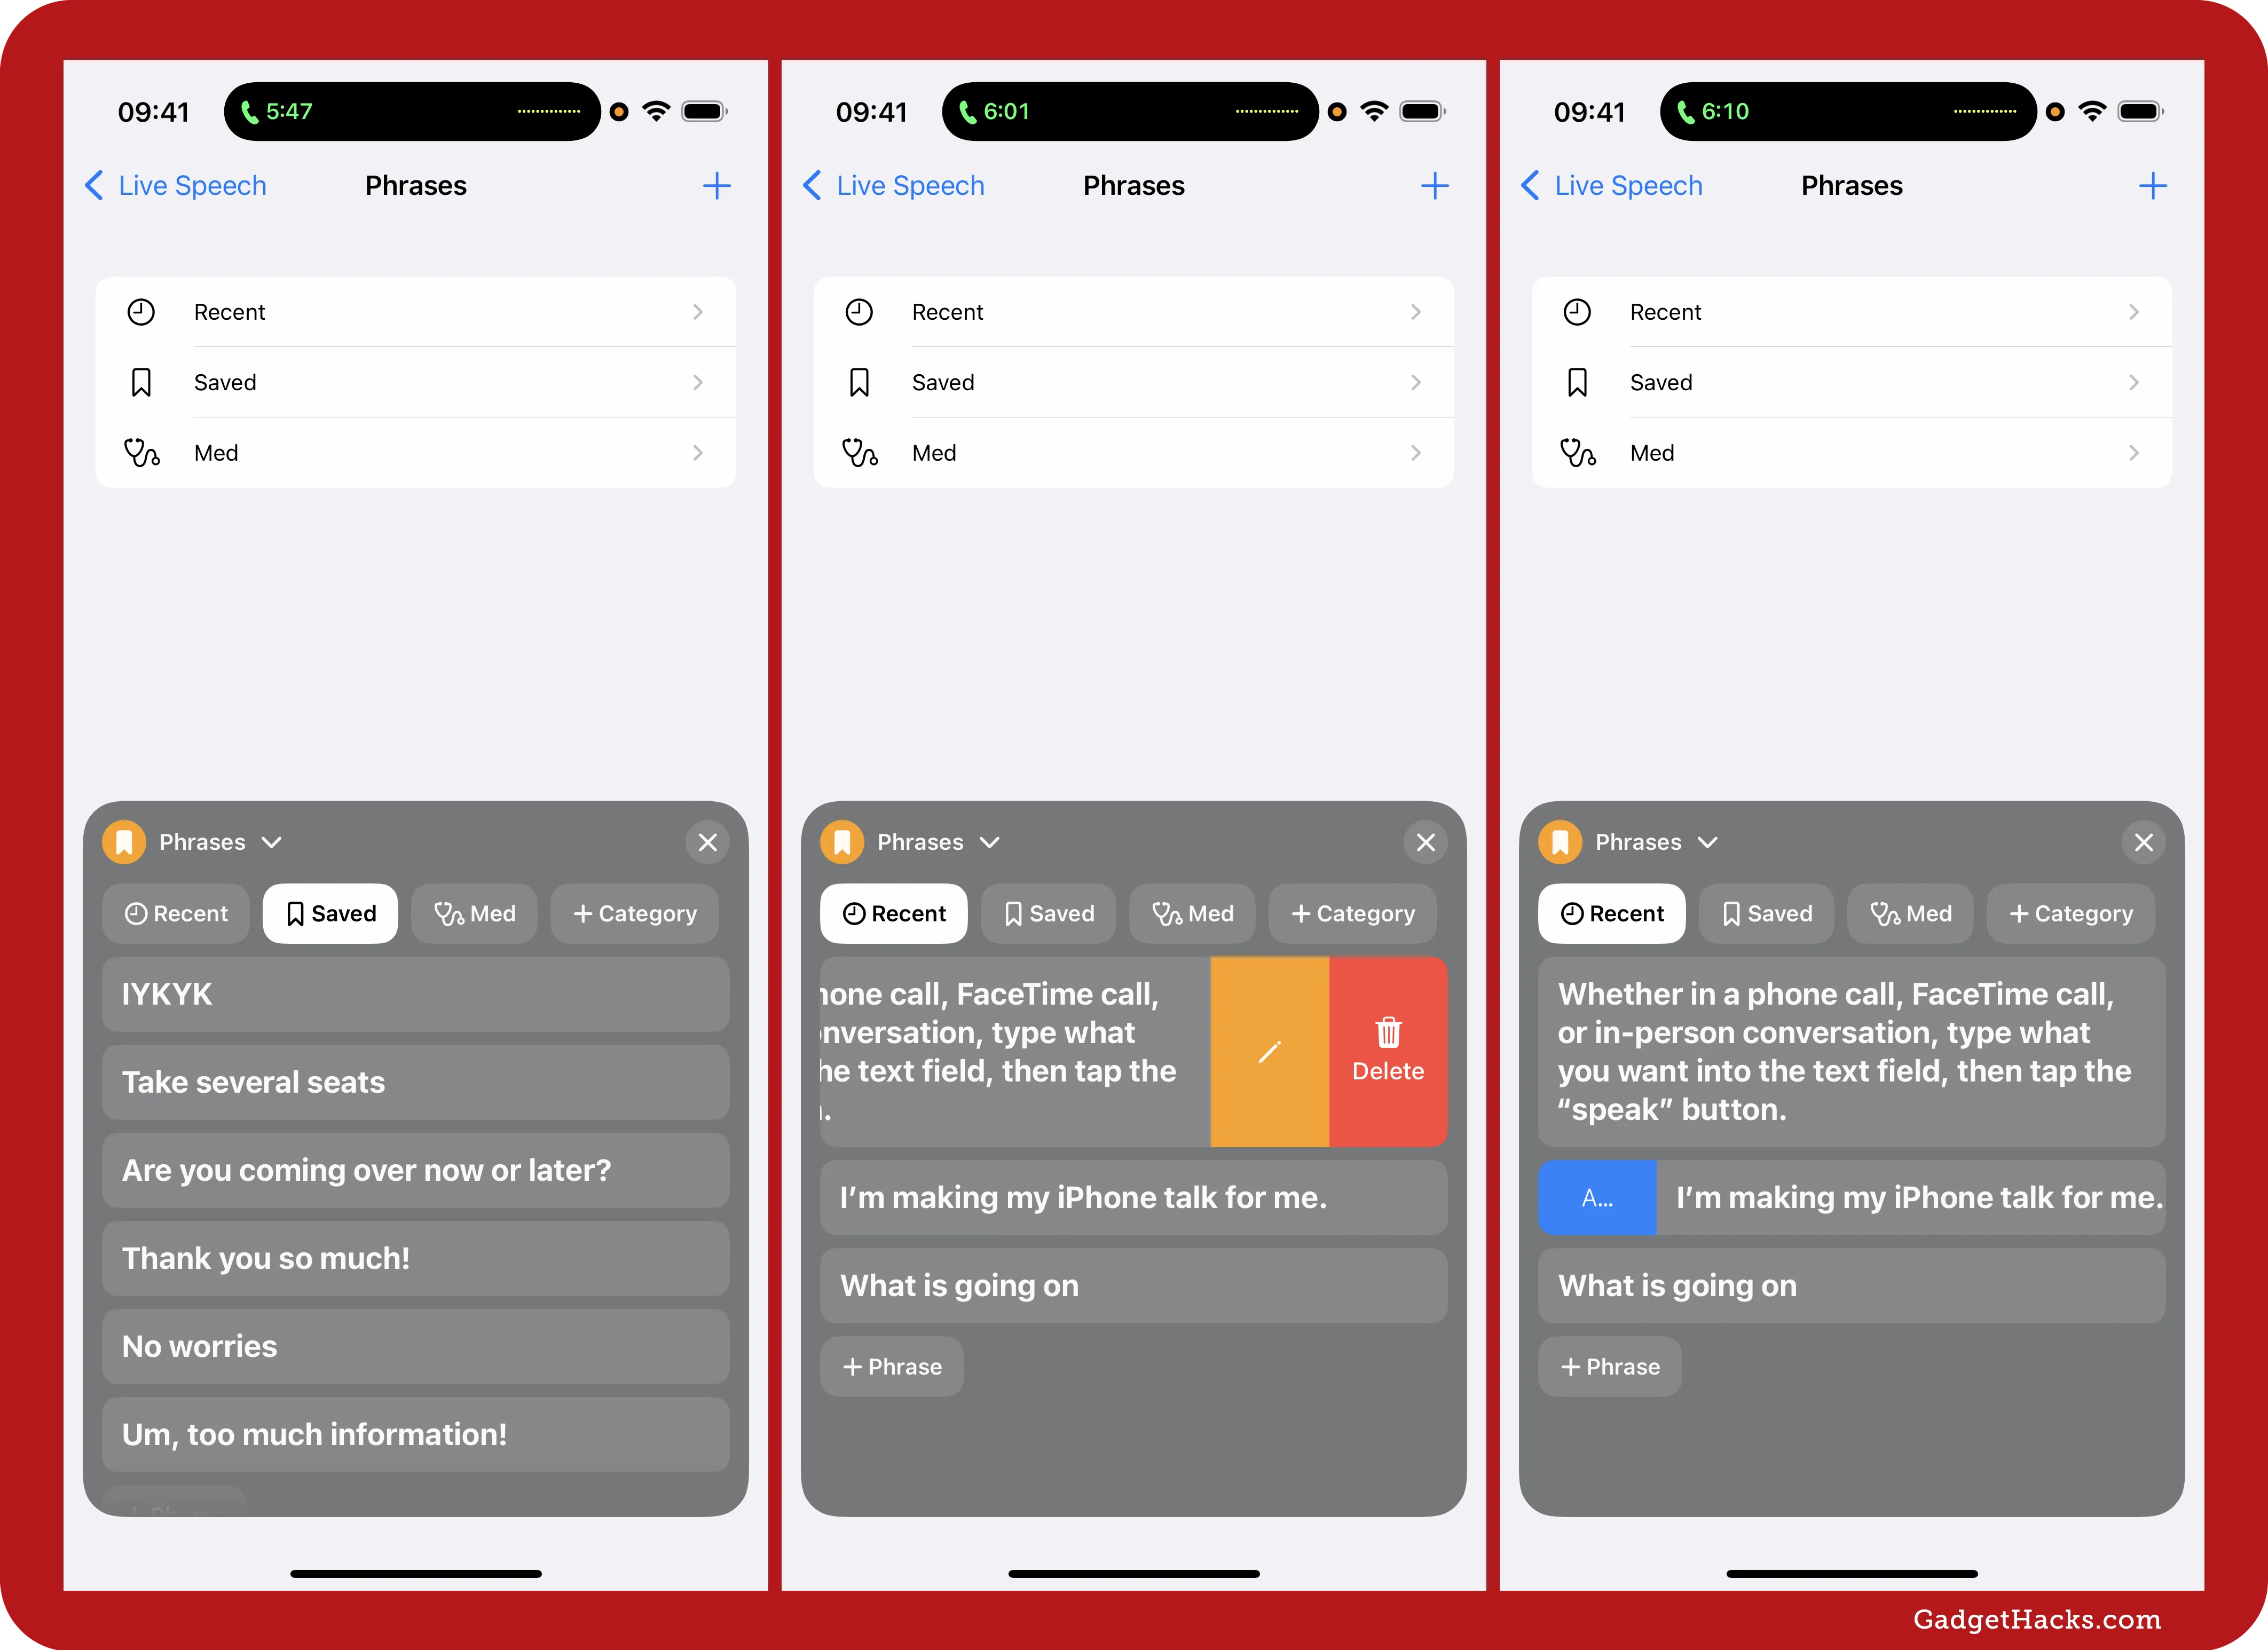
From the Phrase view, you can right-swipe a phrase to reveal the keyboard icon (A…). Tap that to open the phrase up in Keyboard mode. You can also left-swipe a phrase to reveal the edit and delete options.
Add phrases to Live Speech
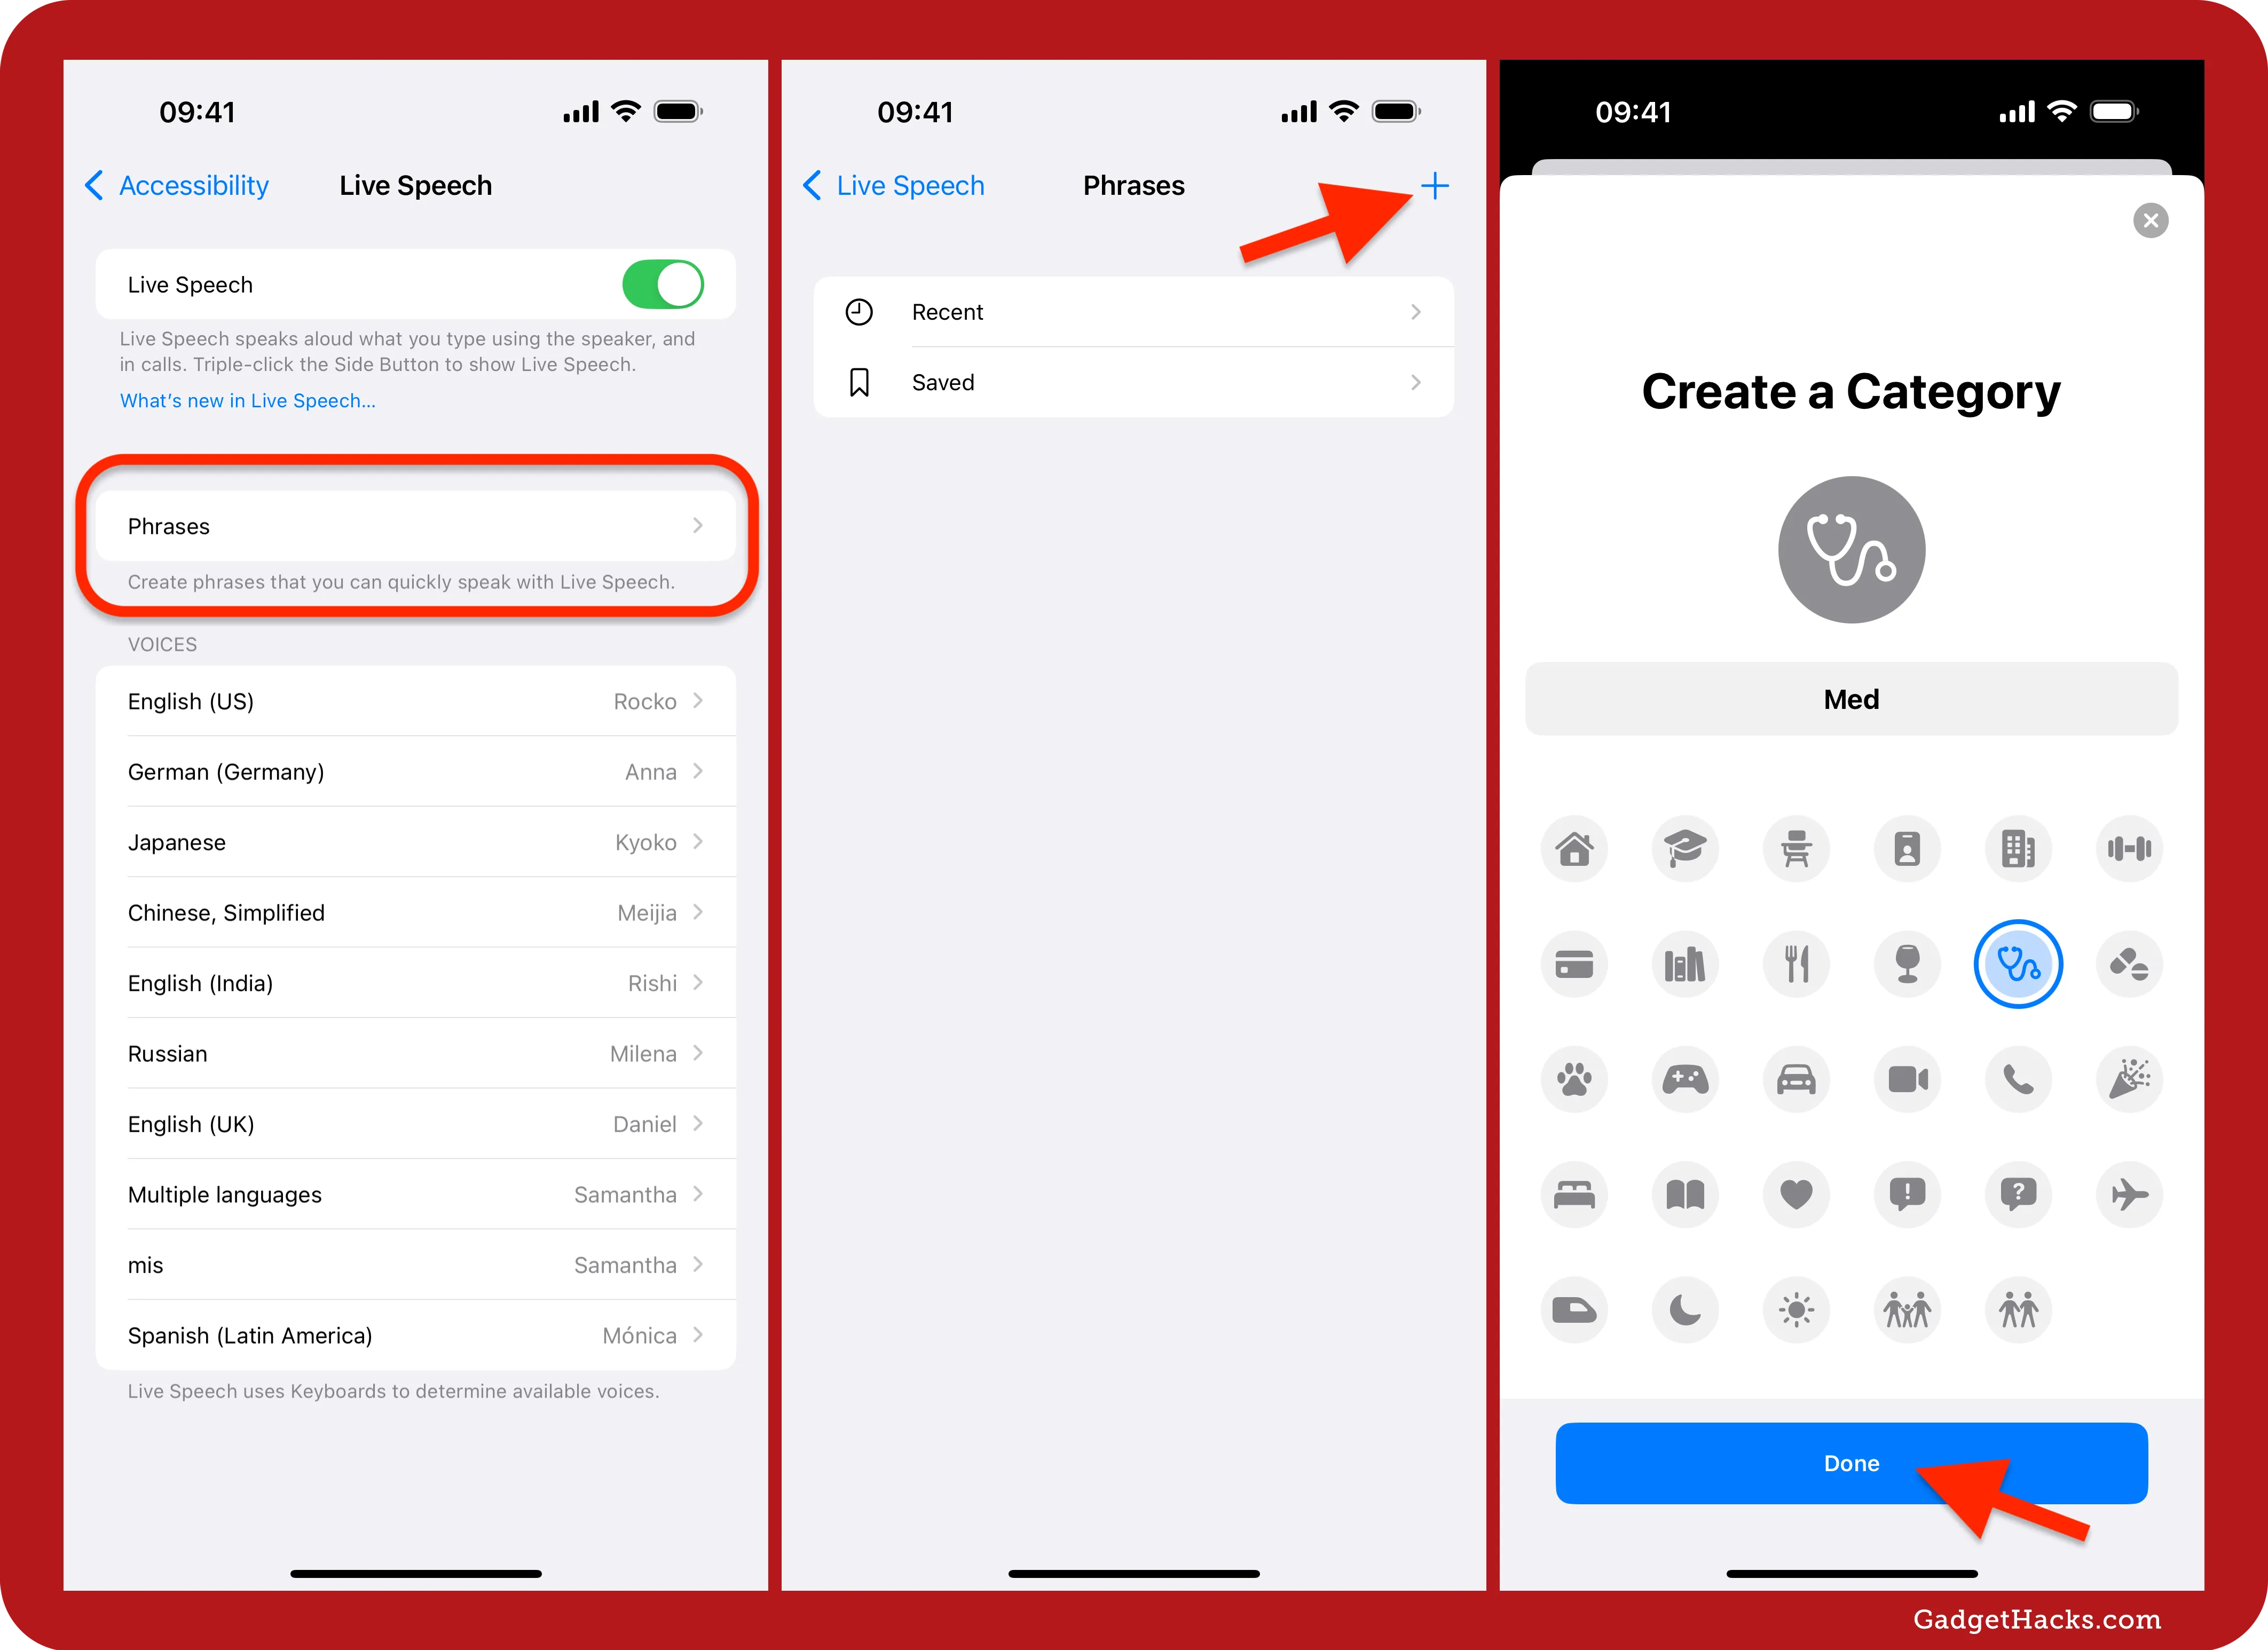
If you'd like to select other short phrases you use often in speech from the Live Speech interface, you'll have to create them first. If you're already in the Live Speech interface, you can tap "➕ Phrase" from any category to open the text field. Then, just type in your phrase and hit "done." To create a new category, tap "➕ Category," which will open up Live Speech's settings where you can set it up.

To create a new category in Settings » Accessibility » Live Speech, tap "Phrases," then ➕ (the plus button). Next, type the category name, pick an icon for it, and press "Done."
To add a phrase from the Live Speech settings, select a category from the Phrases list, then tap ➕ (the plus button). Type your acronym, phrase, saying, sentence, or whatever in the Phrase field and tap "Save."
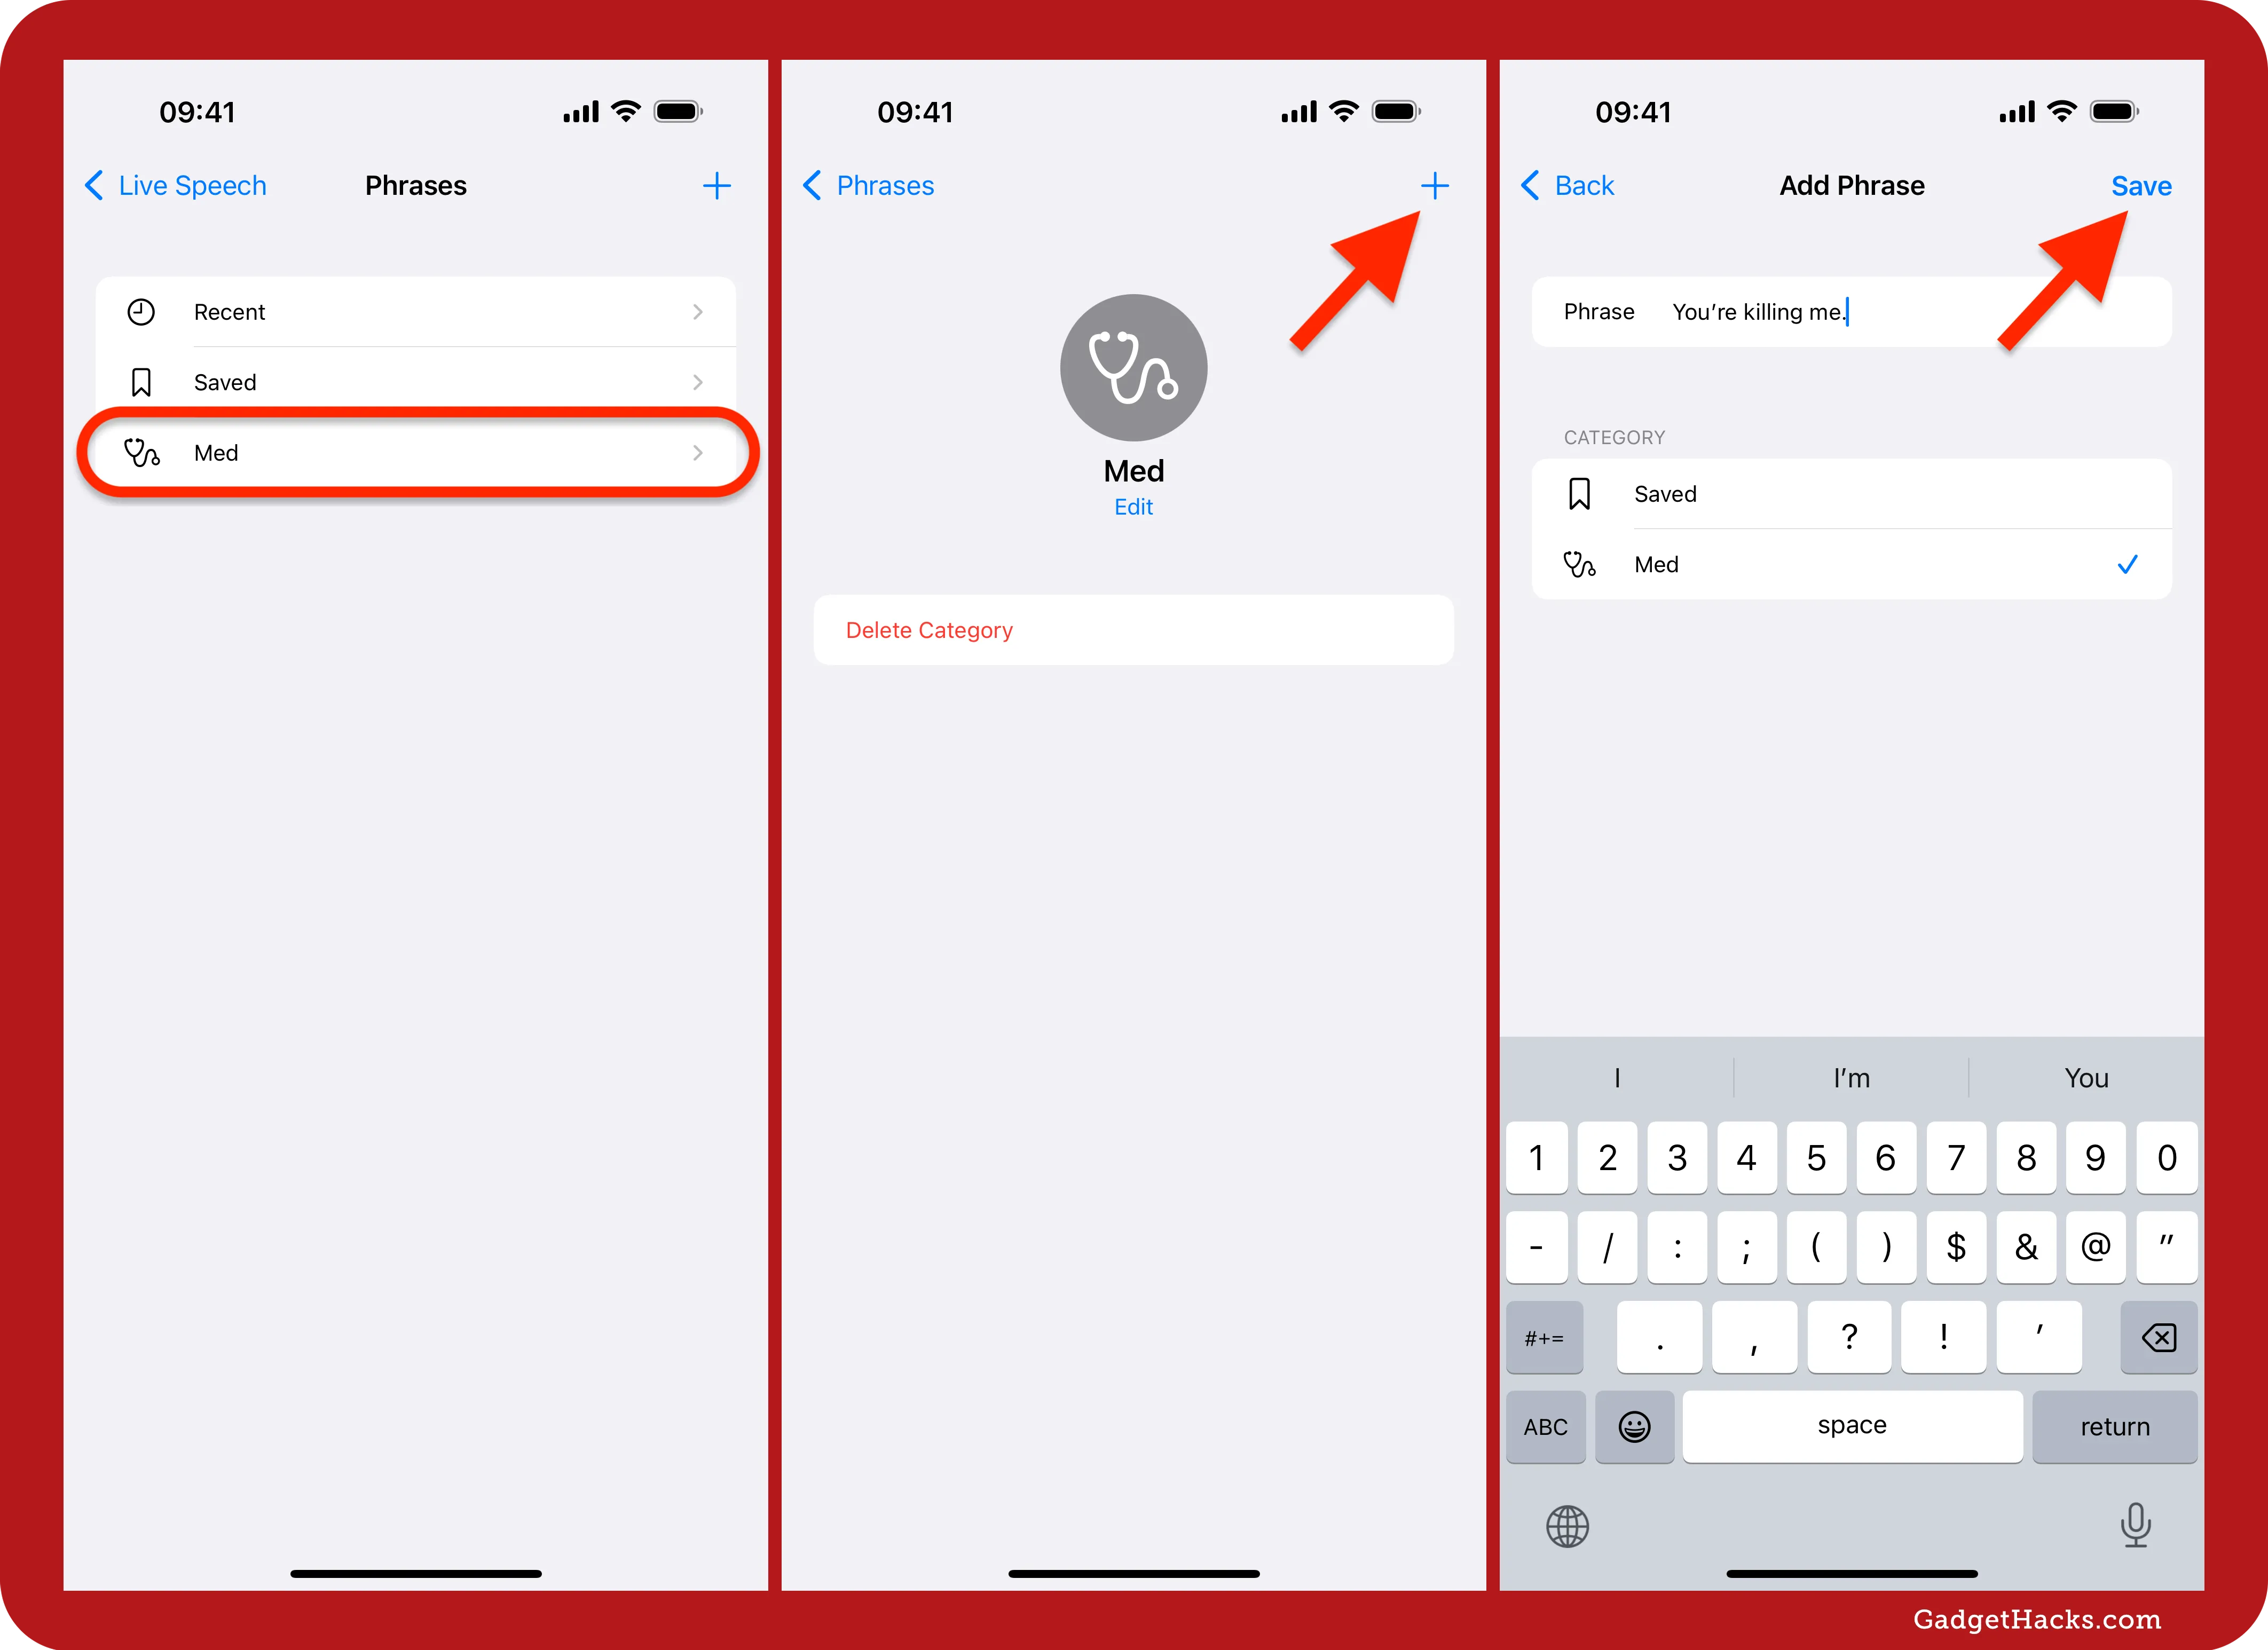
Add as many as you'd like. You can delete any category or phrase you create if you don't want to use it anymore.
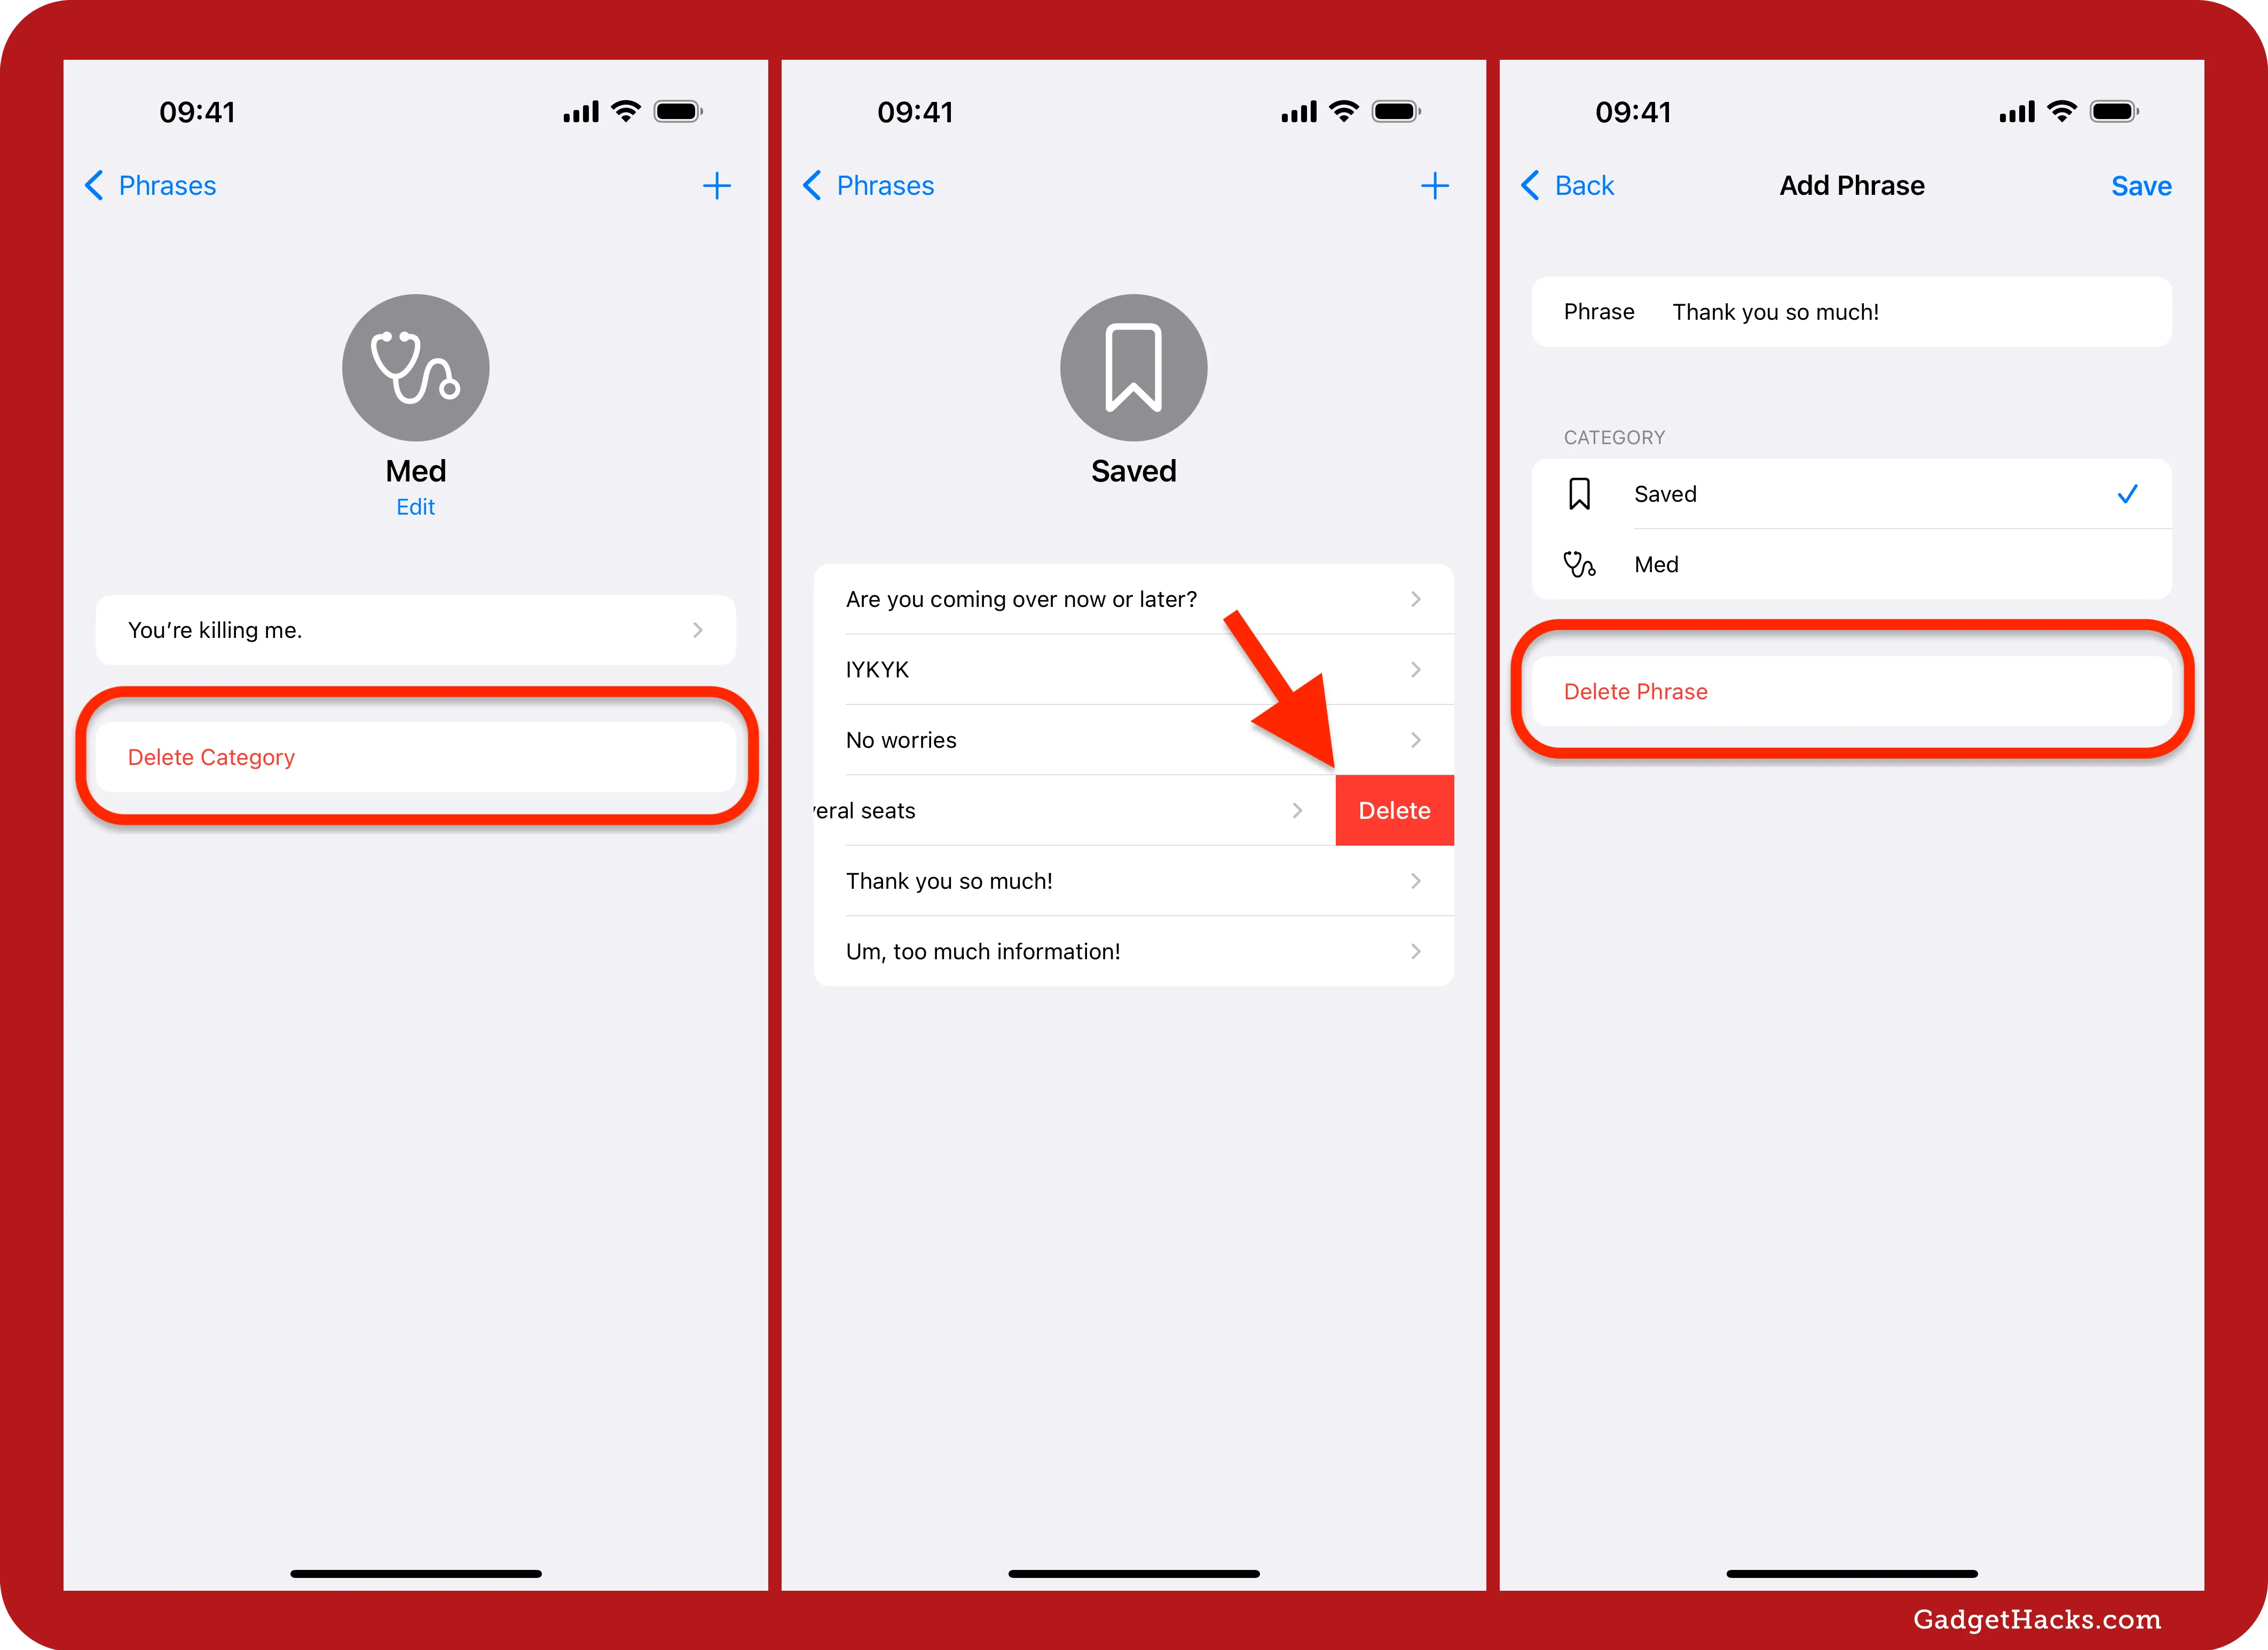
To delete a category, open it up from the Phrases menu, then hit "Delete Category."
To delete a phrase, select a category, then long-swipe left on the phrase you want to delete or short-swipe left and tap "Delete" when it appears. Alternatively, tap the phrase name and then hit "Delete Phrase."
Change Live Speech's voice
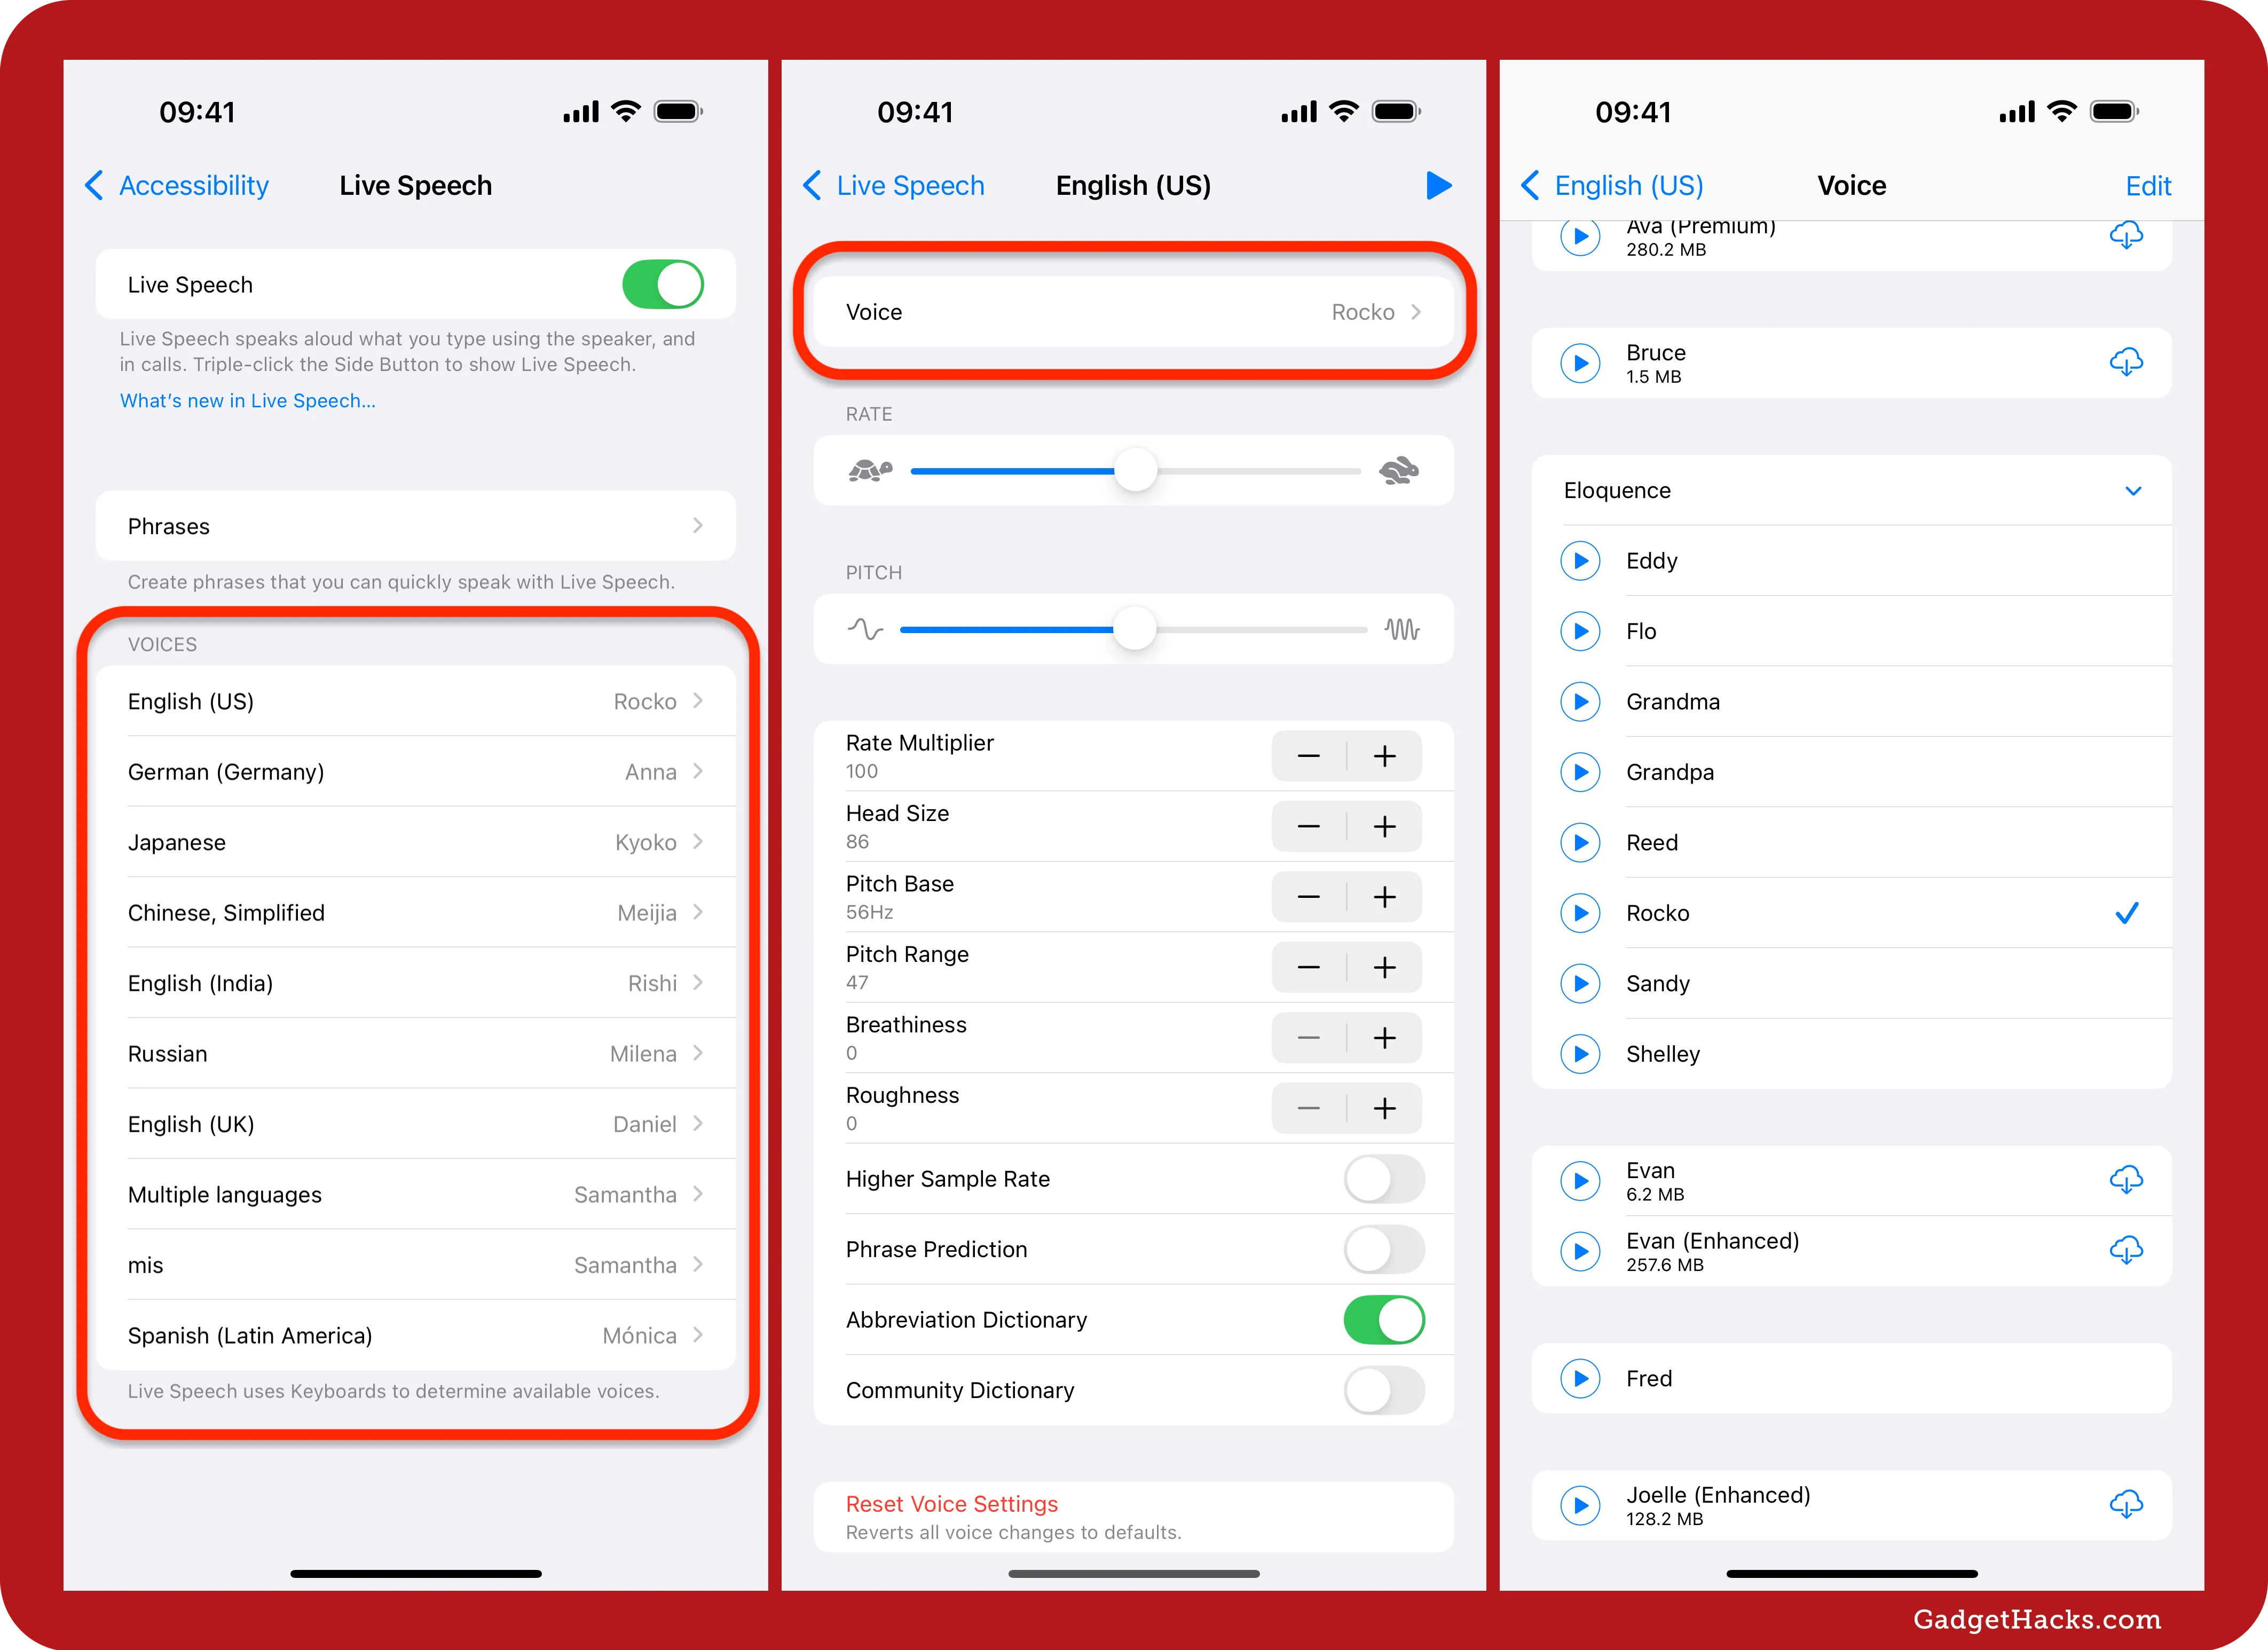
If you don't like the voice, go back to the Live Speech settings and tap the appropriate language under Voices. In my case, that's "English (US)." Next, hit "Voice," and then pick a character from the list that appears. Some voices may have multiple versions to choose from. You can tap the play button next to each one to preview them.
In the language settings, you can adjust many different factors for the voice:
Rate
Pitch
Rate Multiplier
Head Size
Pitch Base
Pitch Range
Breathiness
Roughness
Higher Sample Rate
Phrase prediction
Abbreviation Dictionary
Community Dictionary
Reset Voice Settings
Make Live Speech use your own voice
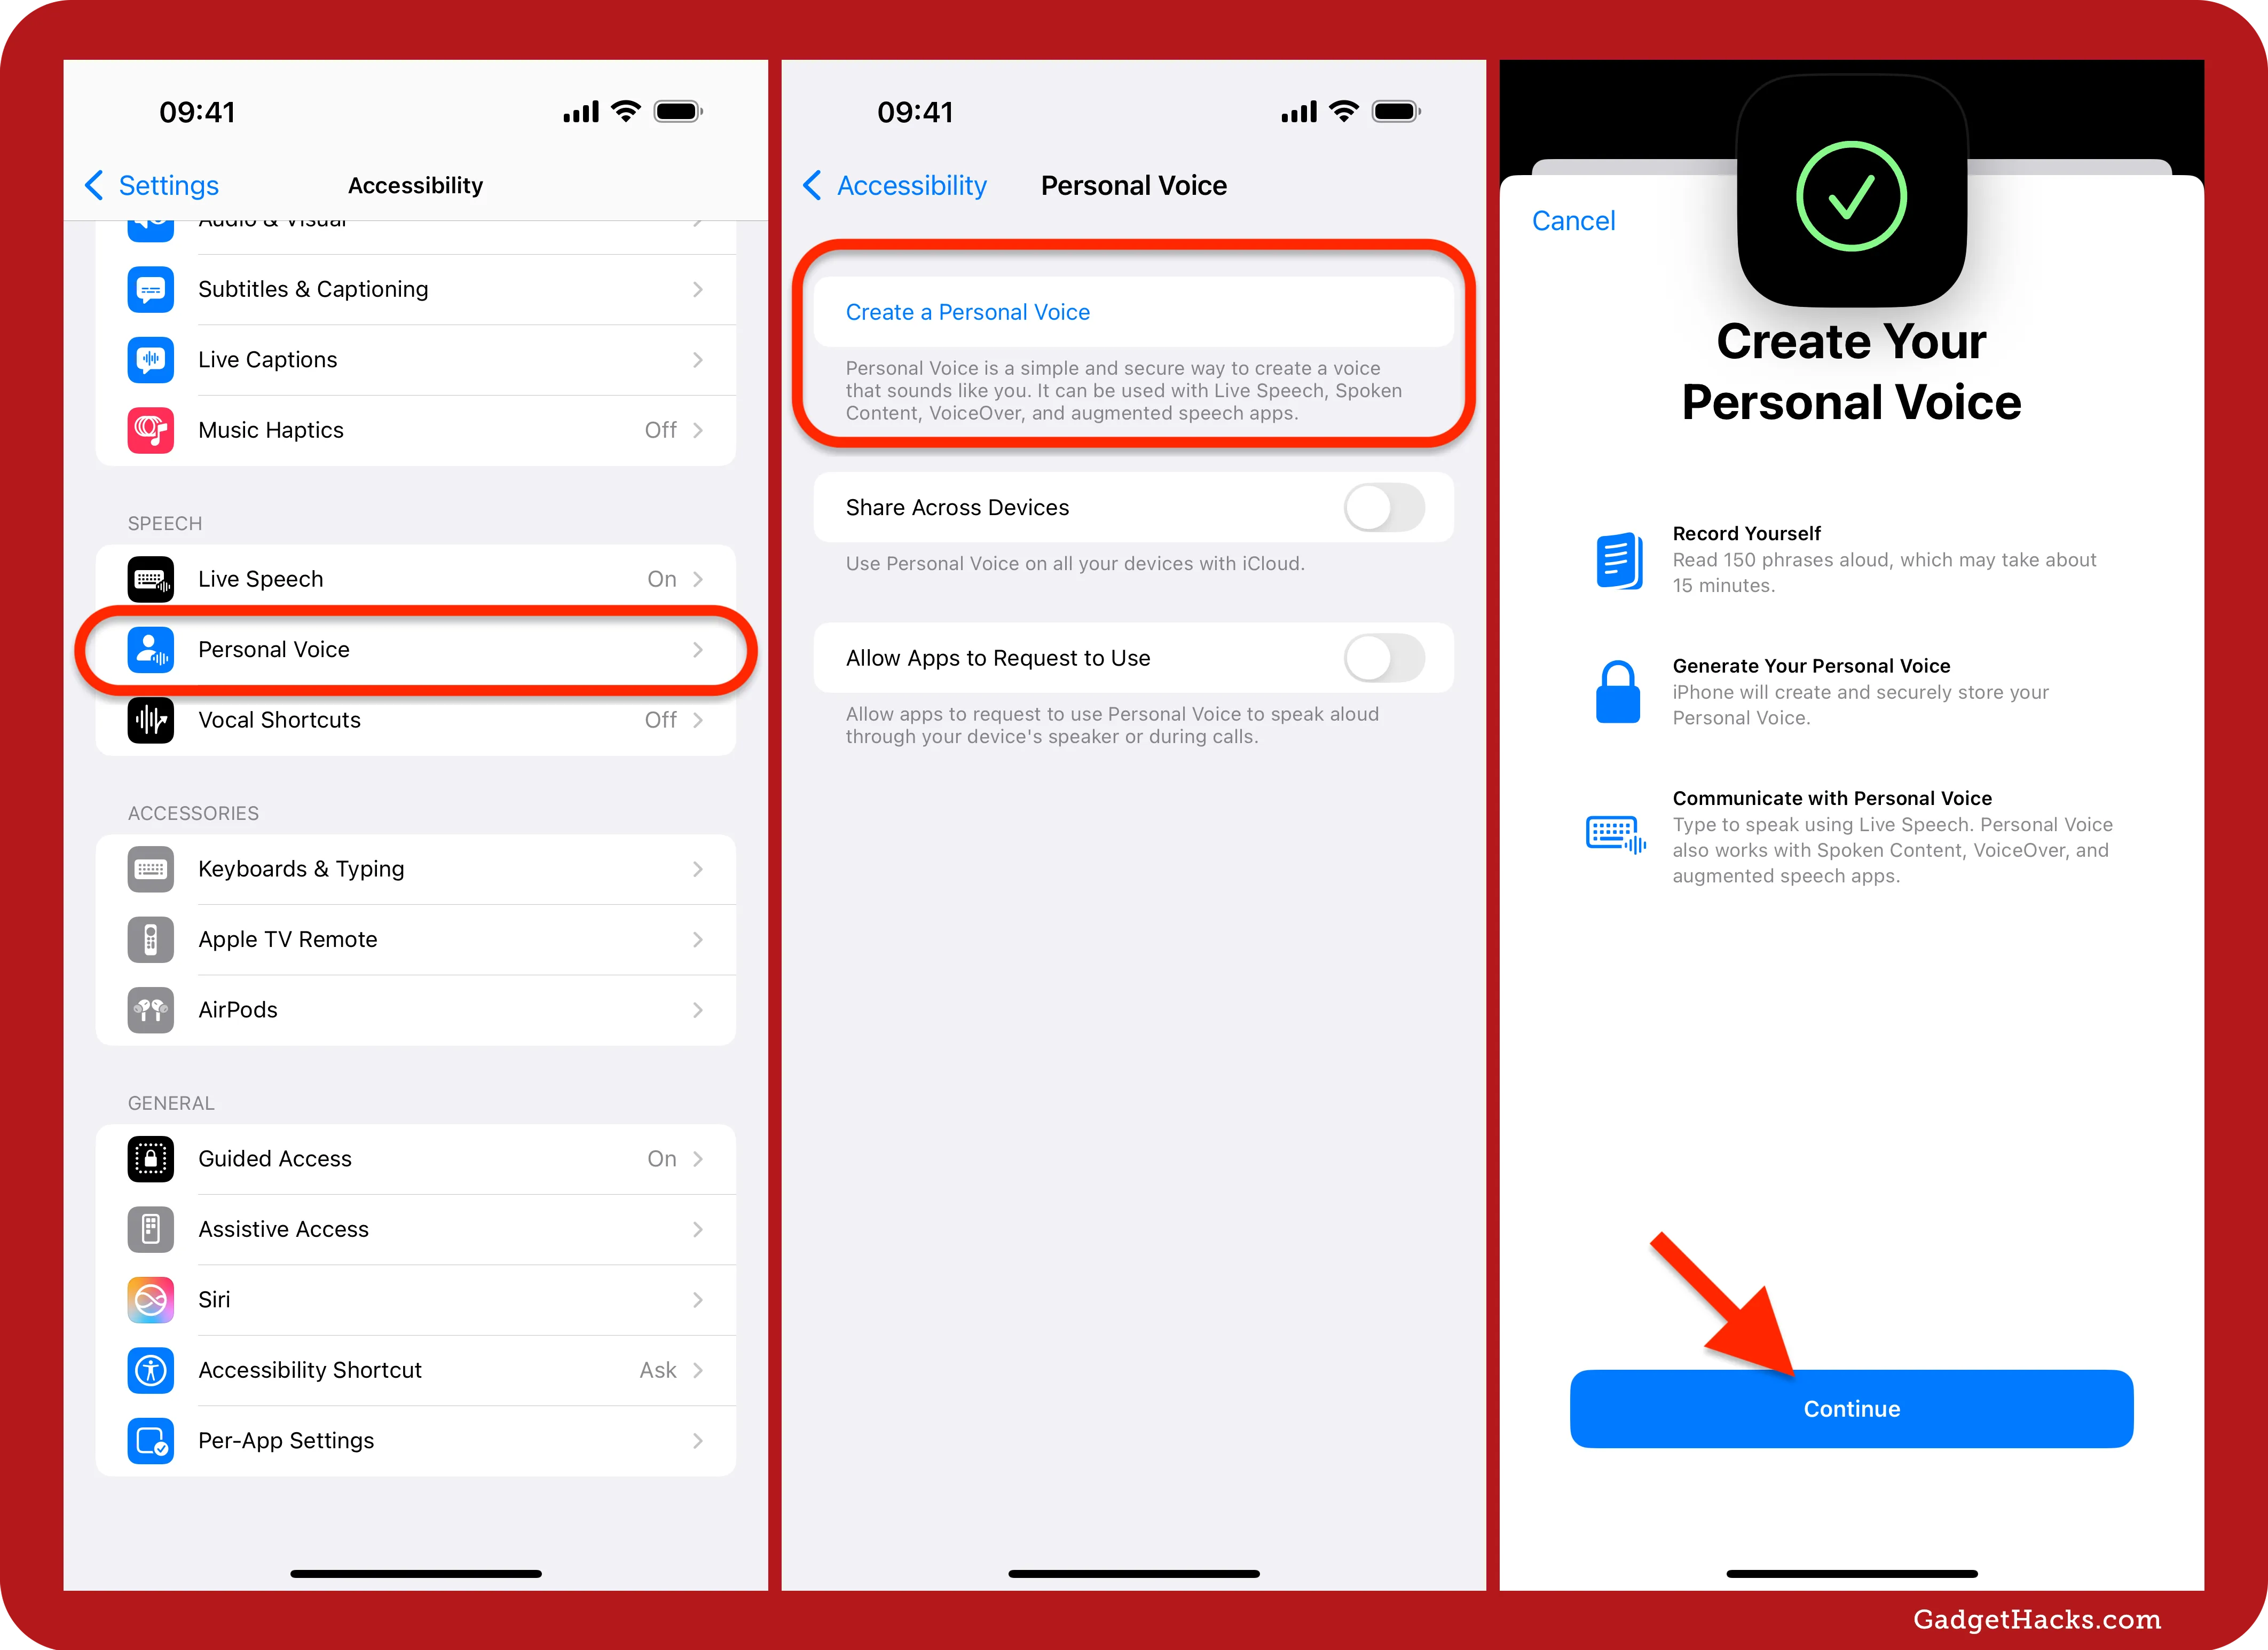
If you'd rather Live Speech use your actual voice, or a synthesized version of it, you'll have to go to Settings » Accessibility » Personal Voice. Don't see the preference? While Live Speech works on any iPhone model that supports iOS 17 and later, Personal Voice only works on iPhone 12 and newer models.
In the Personal Voice menu, tap "Create a Personal Voice," authenticate yourself with Face ID, Touch ID, or your passcode, and read about what you'll go through before tapping "Continue." Here's what it'll tell you:
Record Yourself: Read 150 phrases aloud, which may take about 15 minutes.
Generate Your Personal Voice: iPhone will create and securely store your Personal Voice.
Communicate with Personal Voice: Type to speak using Live Speech. Personal Voice also works with Spoken Content, VoiceOver, and augmented speech apps.
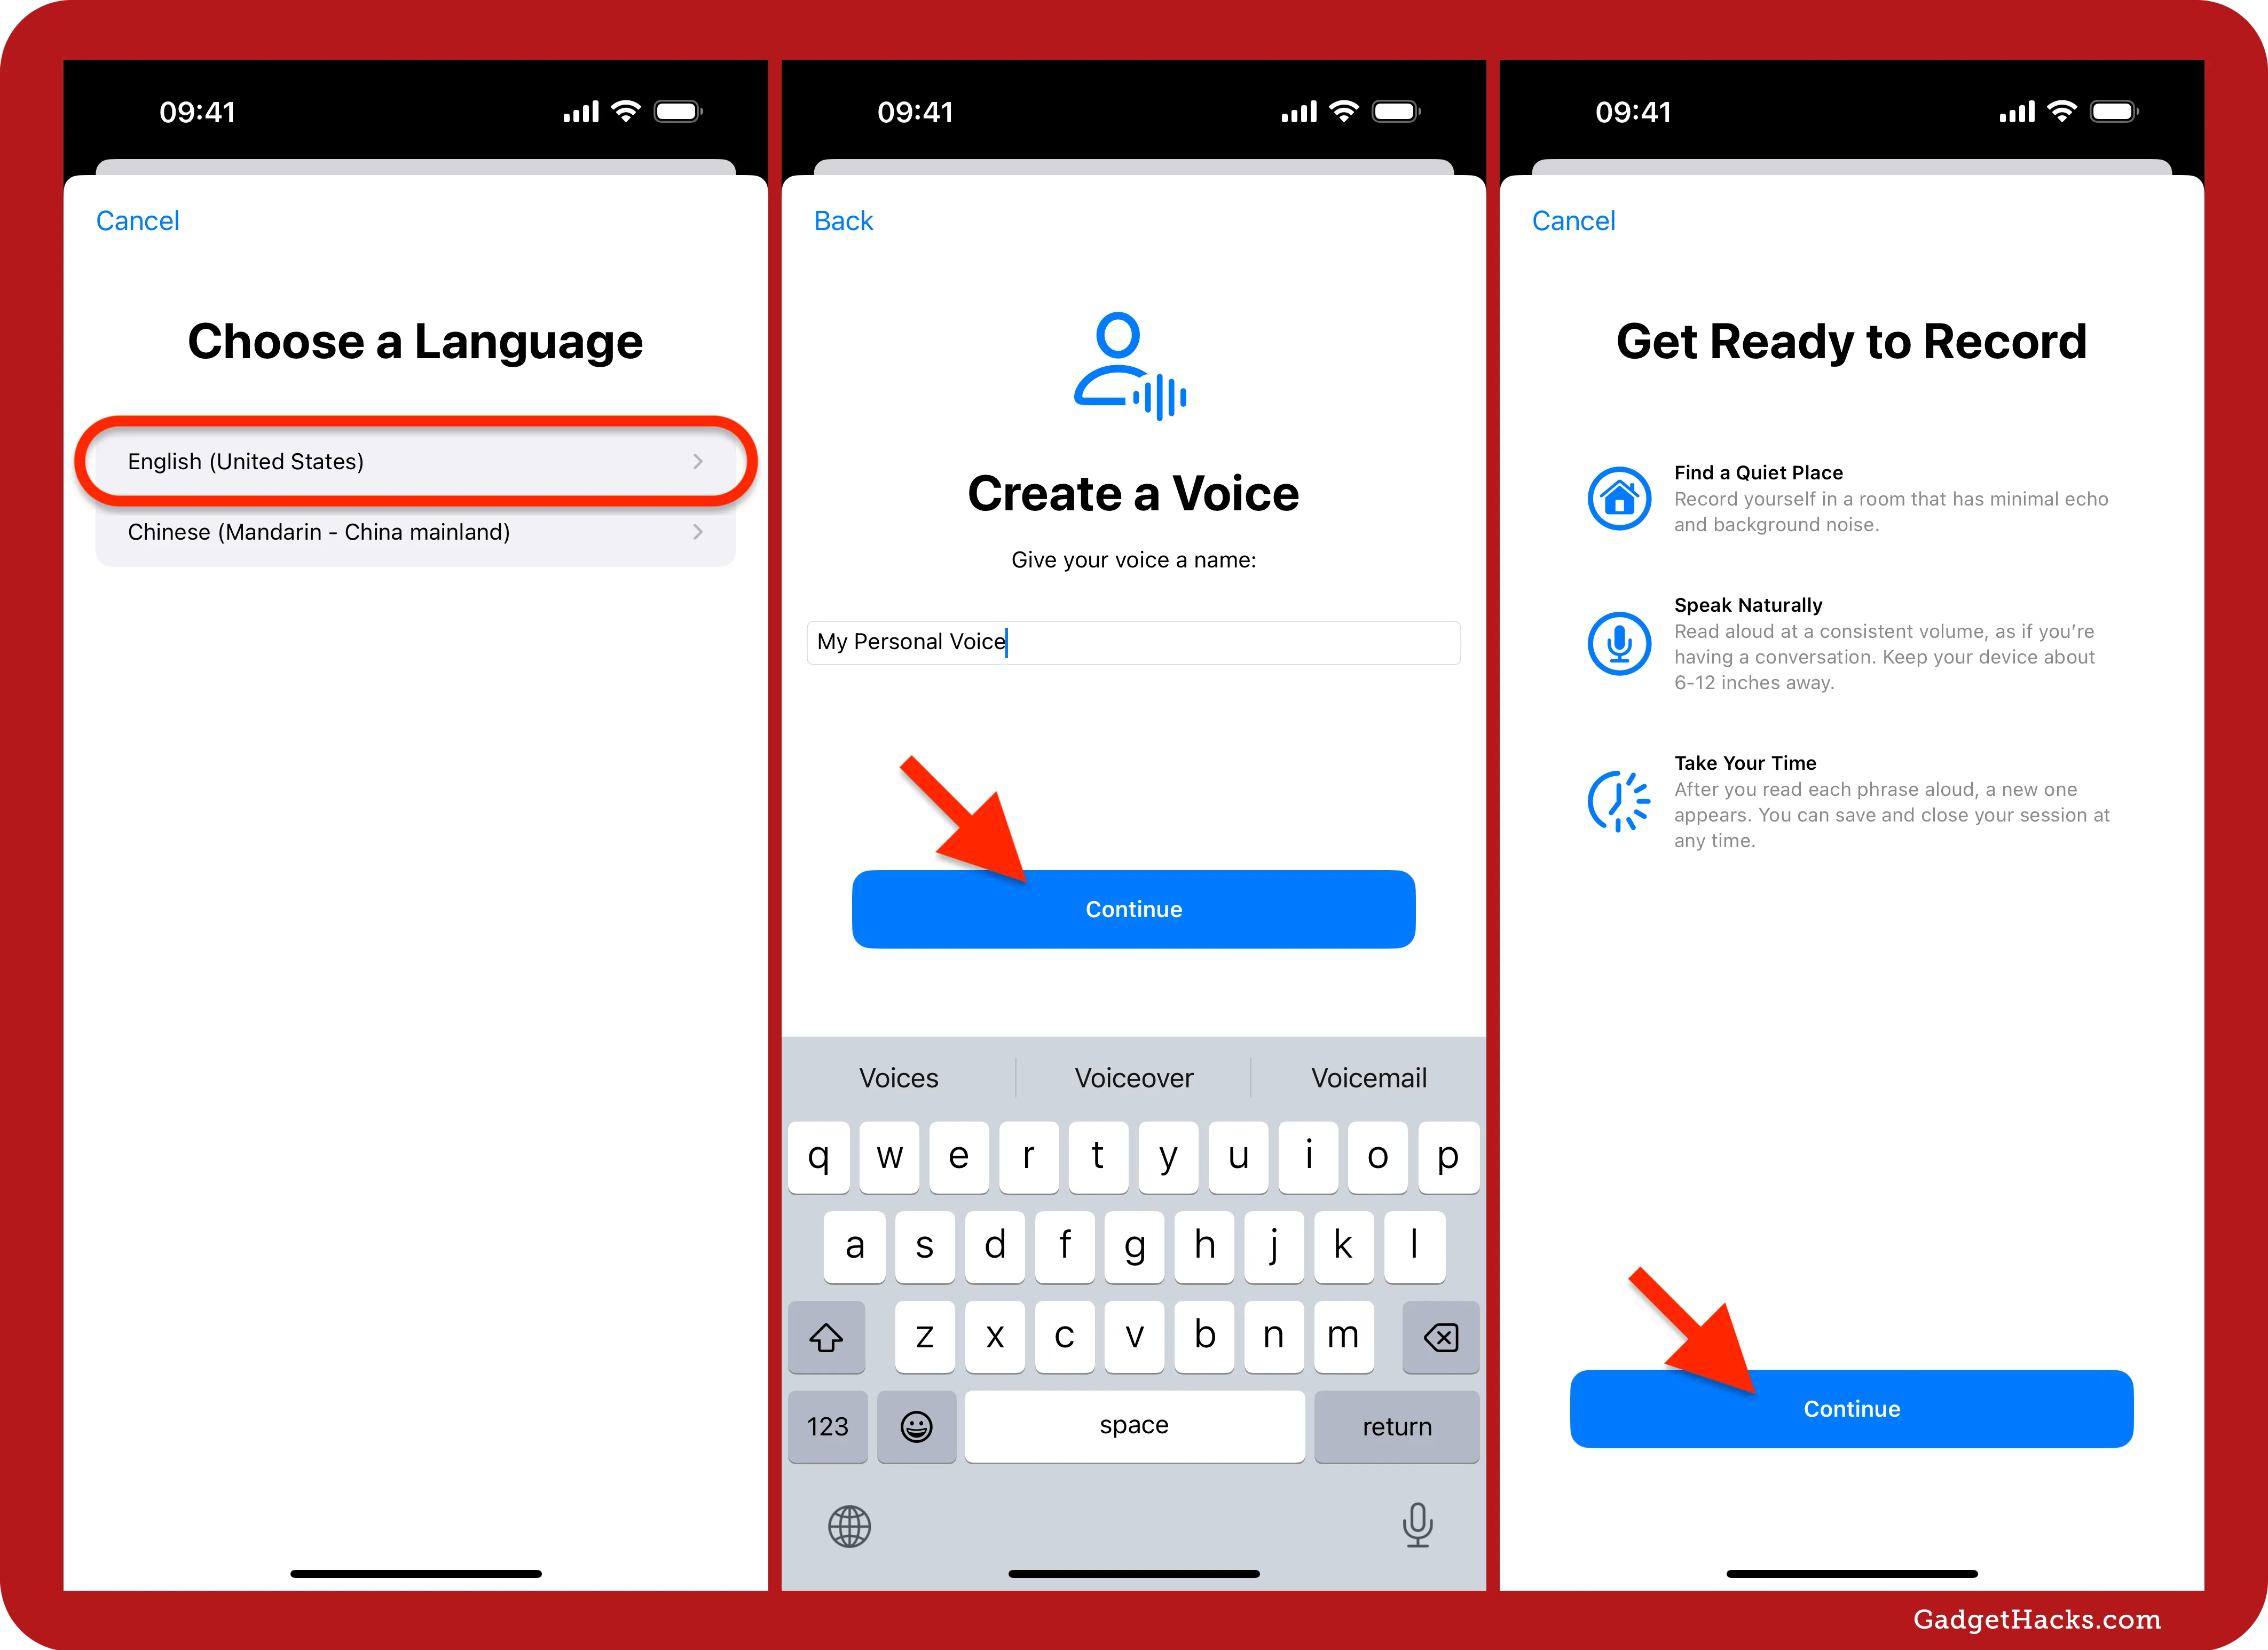
Next, if you have more than one supported language used on your iPhone, it will ask you to choose a language. Then, you can rename your personal voice and hit "Continue." It will prepare you to record your phrases.
Find a Quite Place: Record yourself in a room that has minimal echo and background noise.
Speak Naturally: Read aloud at a consistent volume, as if you're having a conversation. Keep your device about 6–12 inches away.
Take Your Time: After you read each phrase aloud, a new one appears. You can save and close your session at any time.
Tap "Continue" to start.
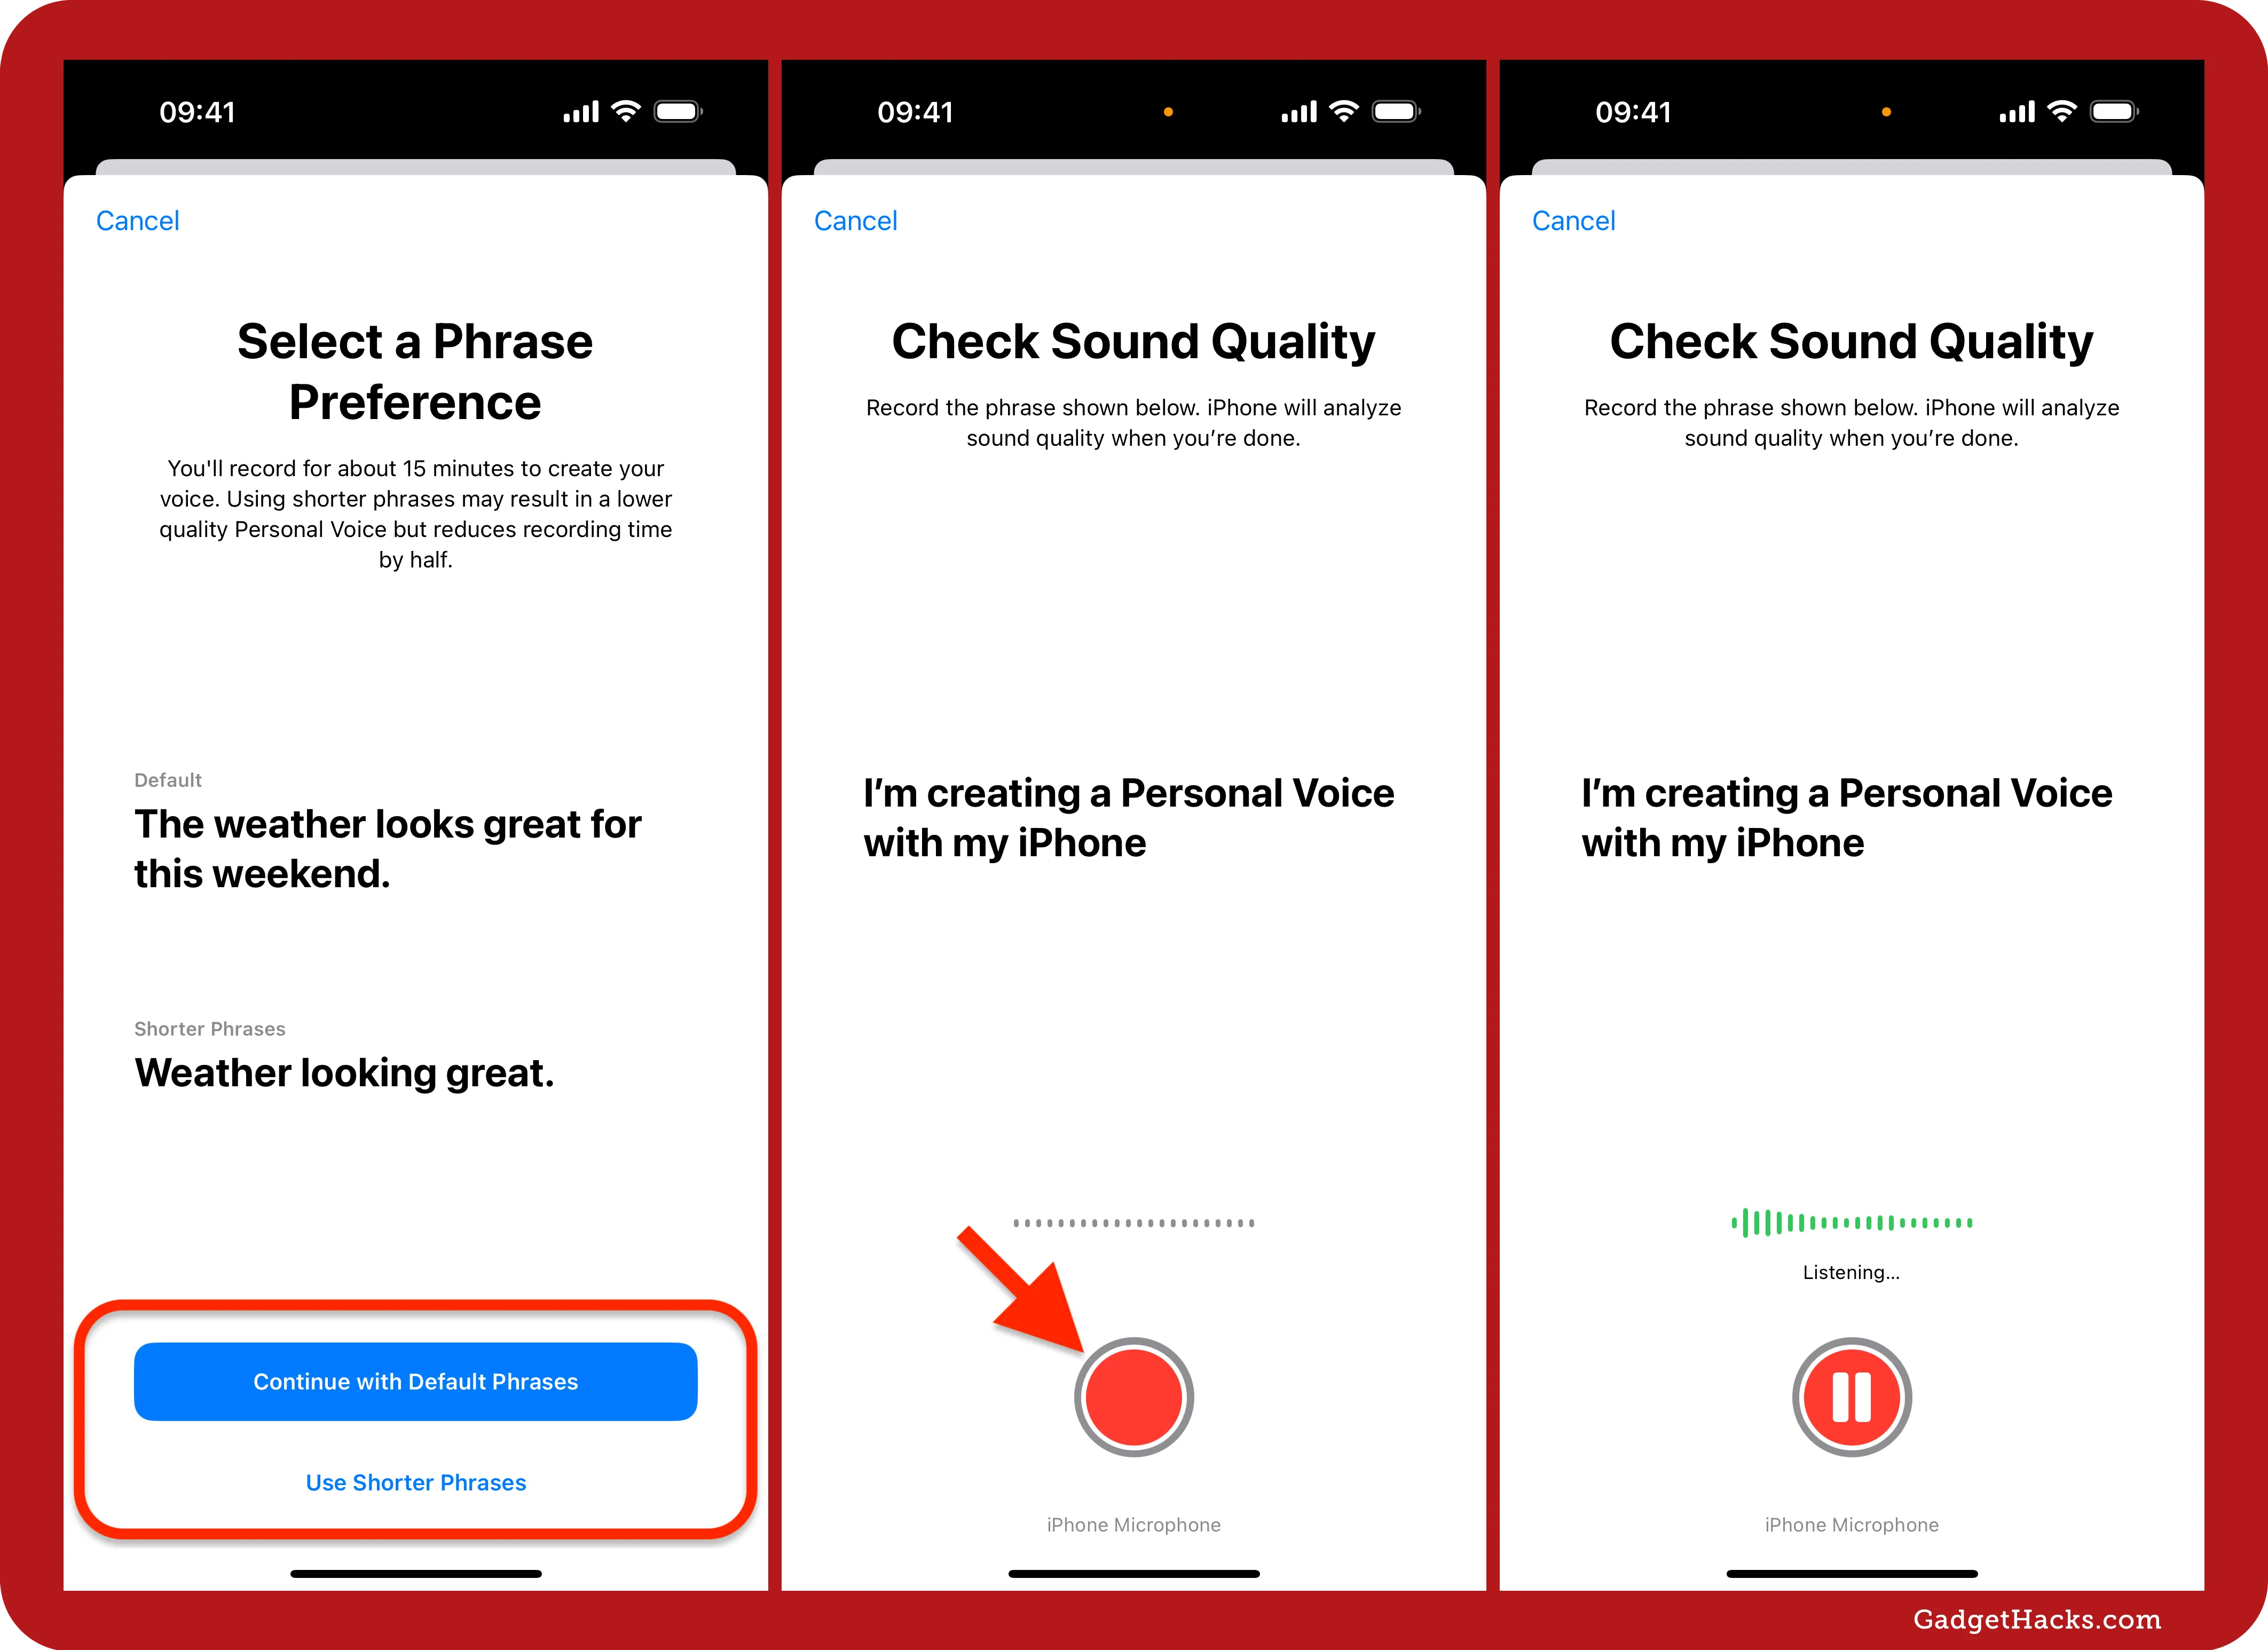
It will then ask you to "Continue with Default Phrases" or "Use Shorter Phrases." It will take about 15 minutes to record with the longer, default phrases, while shorter ones reduces the recording time by half. However, shorter phrases could result in a lower quality voice and higher processing time when finished.
Next, tap the record button to say the phrase your iPhone uses to analyze the sound quality. This checks to make sure it can accurately record your voice.
If it's all good, hit "Continue." Then, tap the record button and start reading the 150 phrases one by one. With continuous recording, the default method, you won't have to hit the record button each time. It may be hard to get through them all in one sitting, but you can pick it back up in the Personal Voice menu later so you don't have to start all over again.
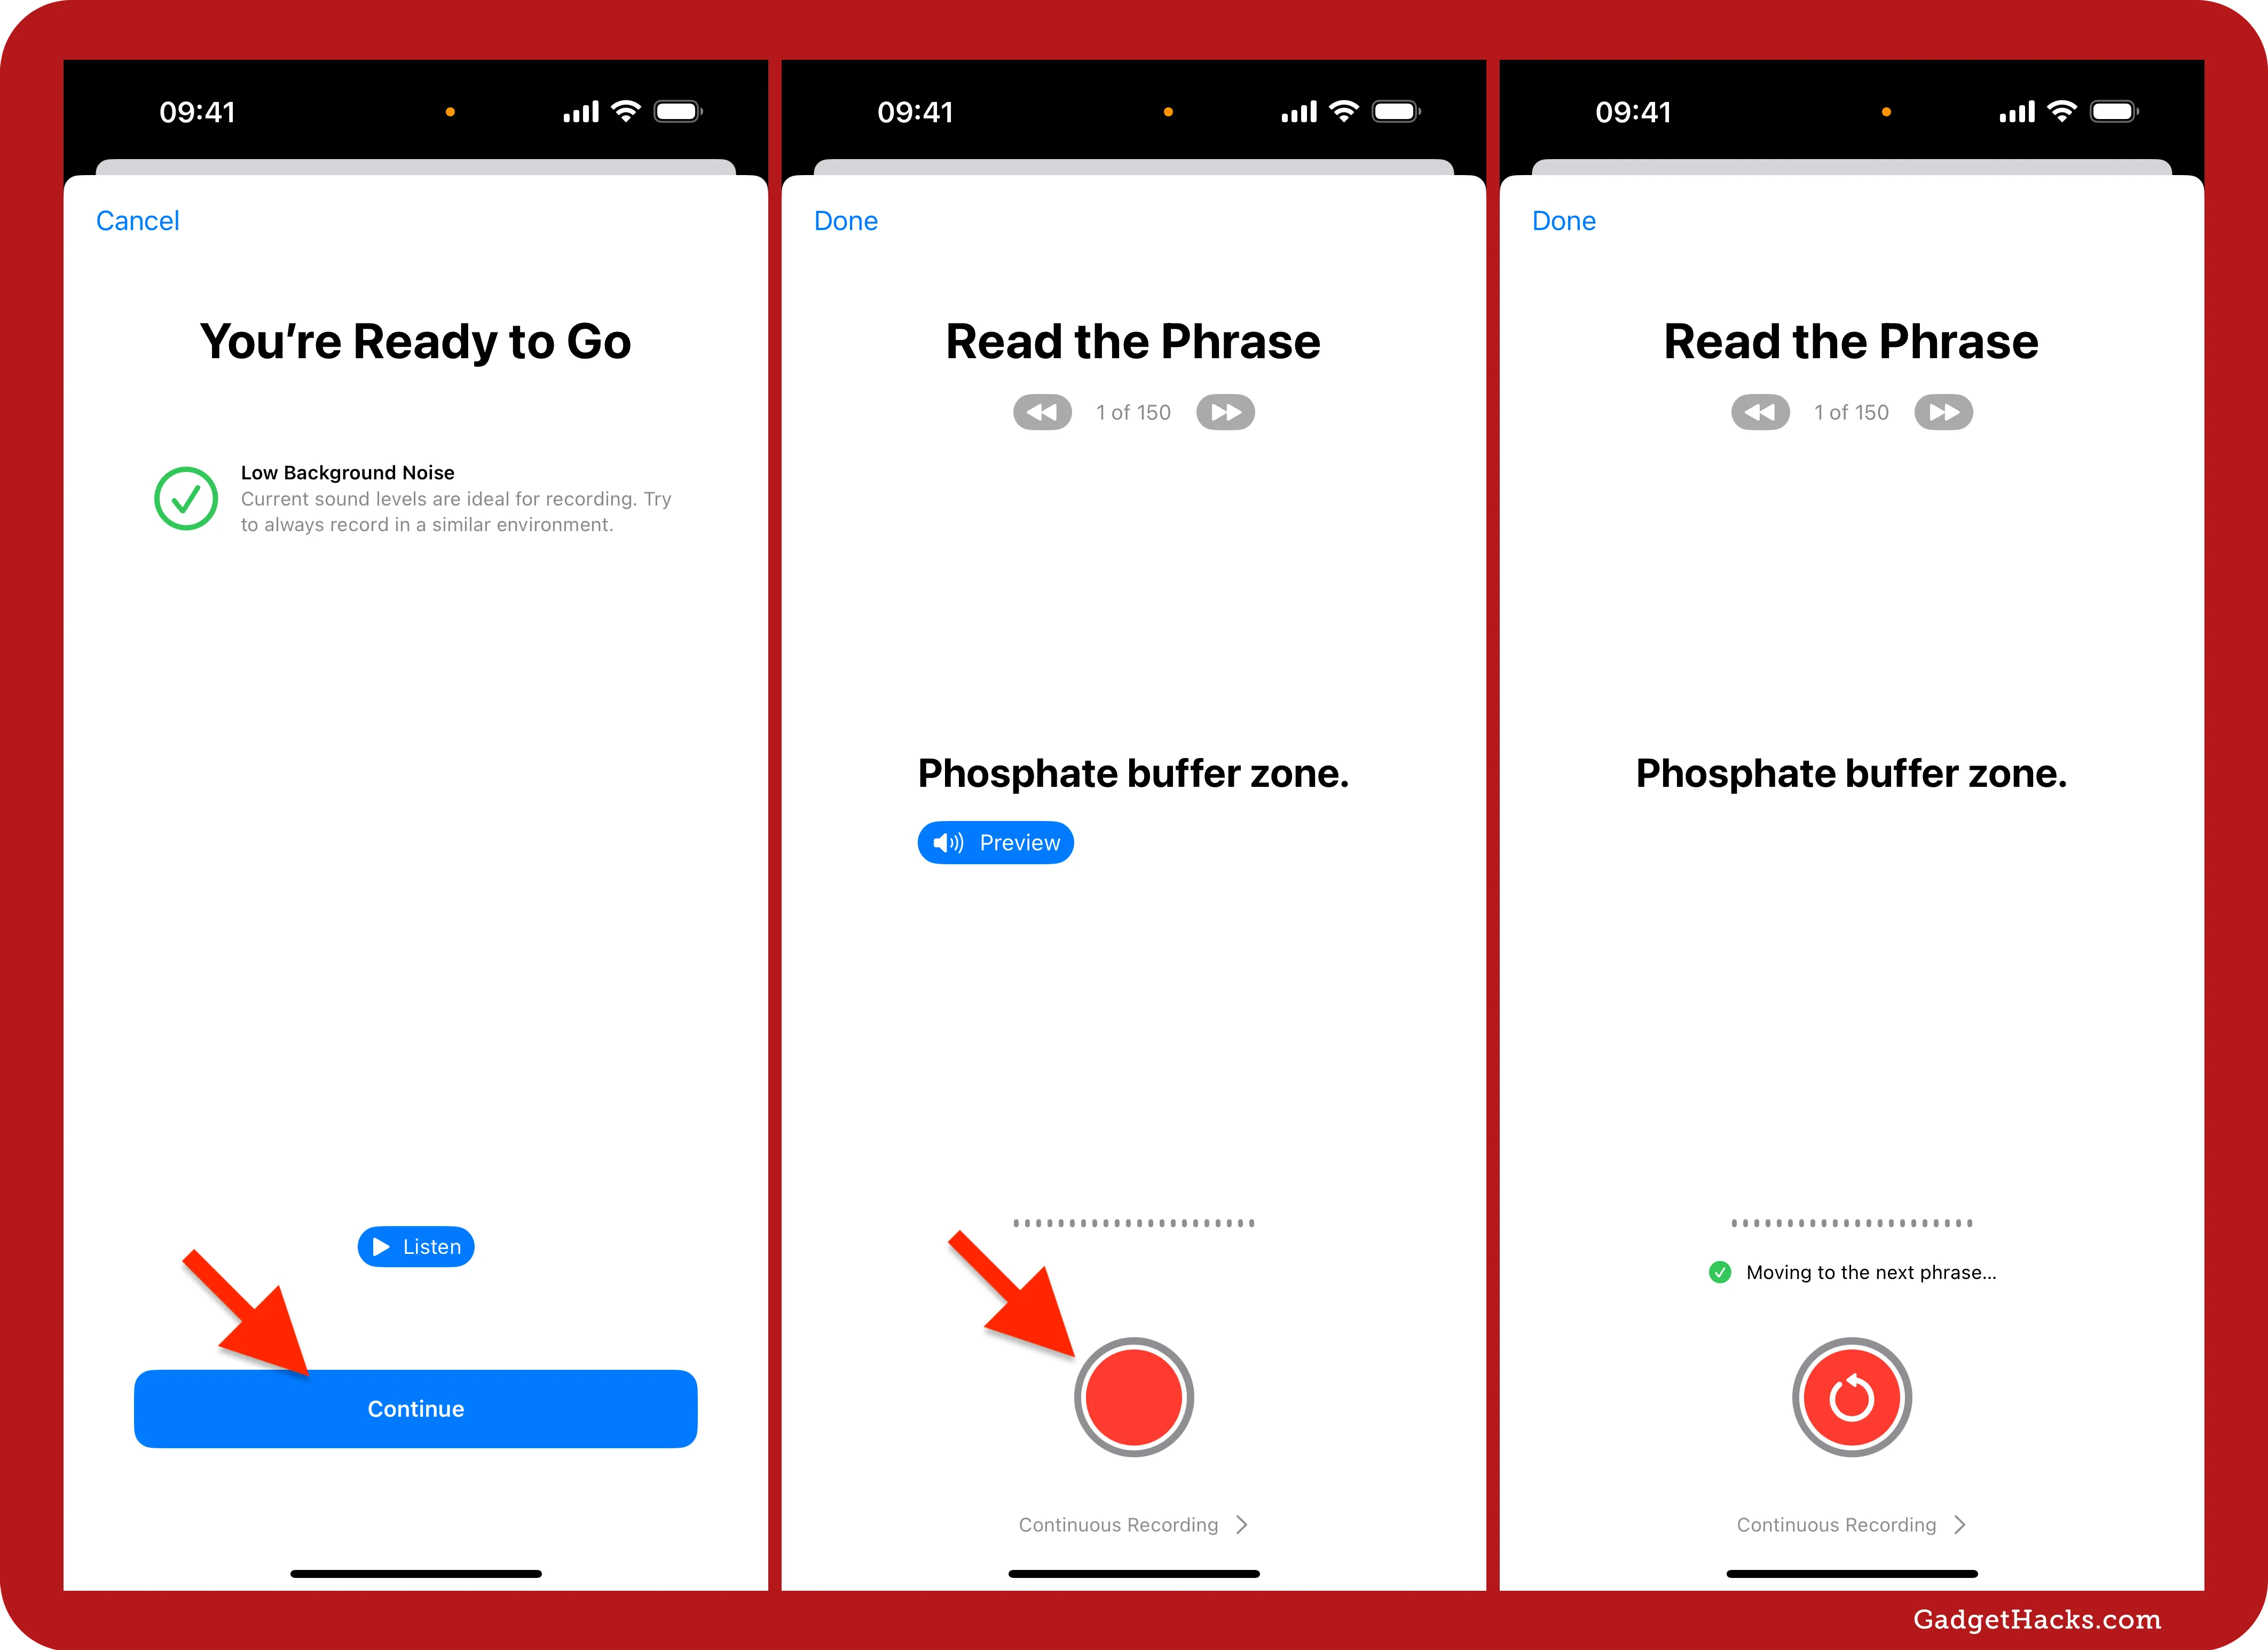
Once your iPhone has captured your voice from all the prompts tap "Continue."

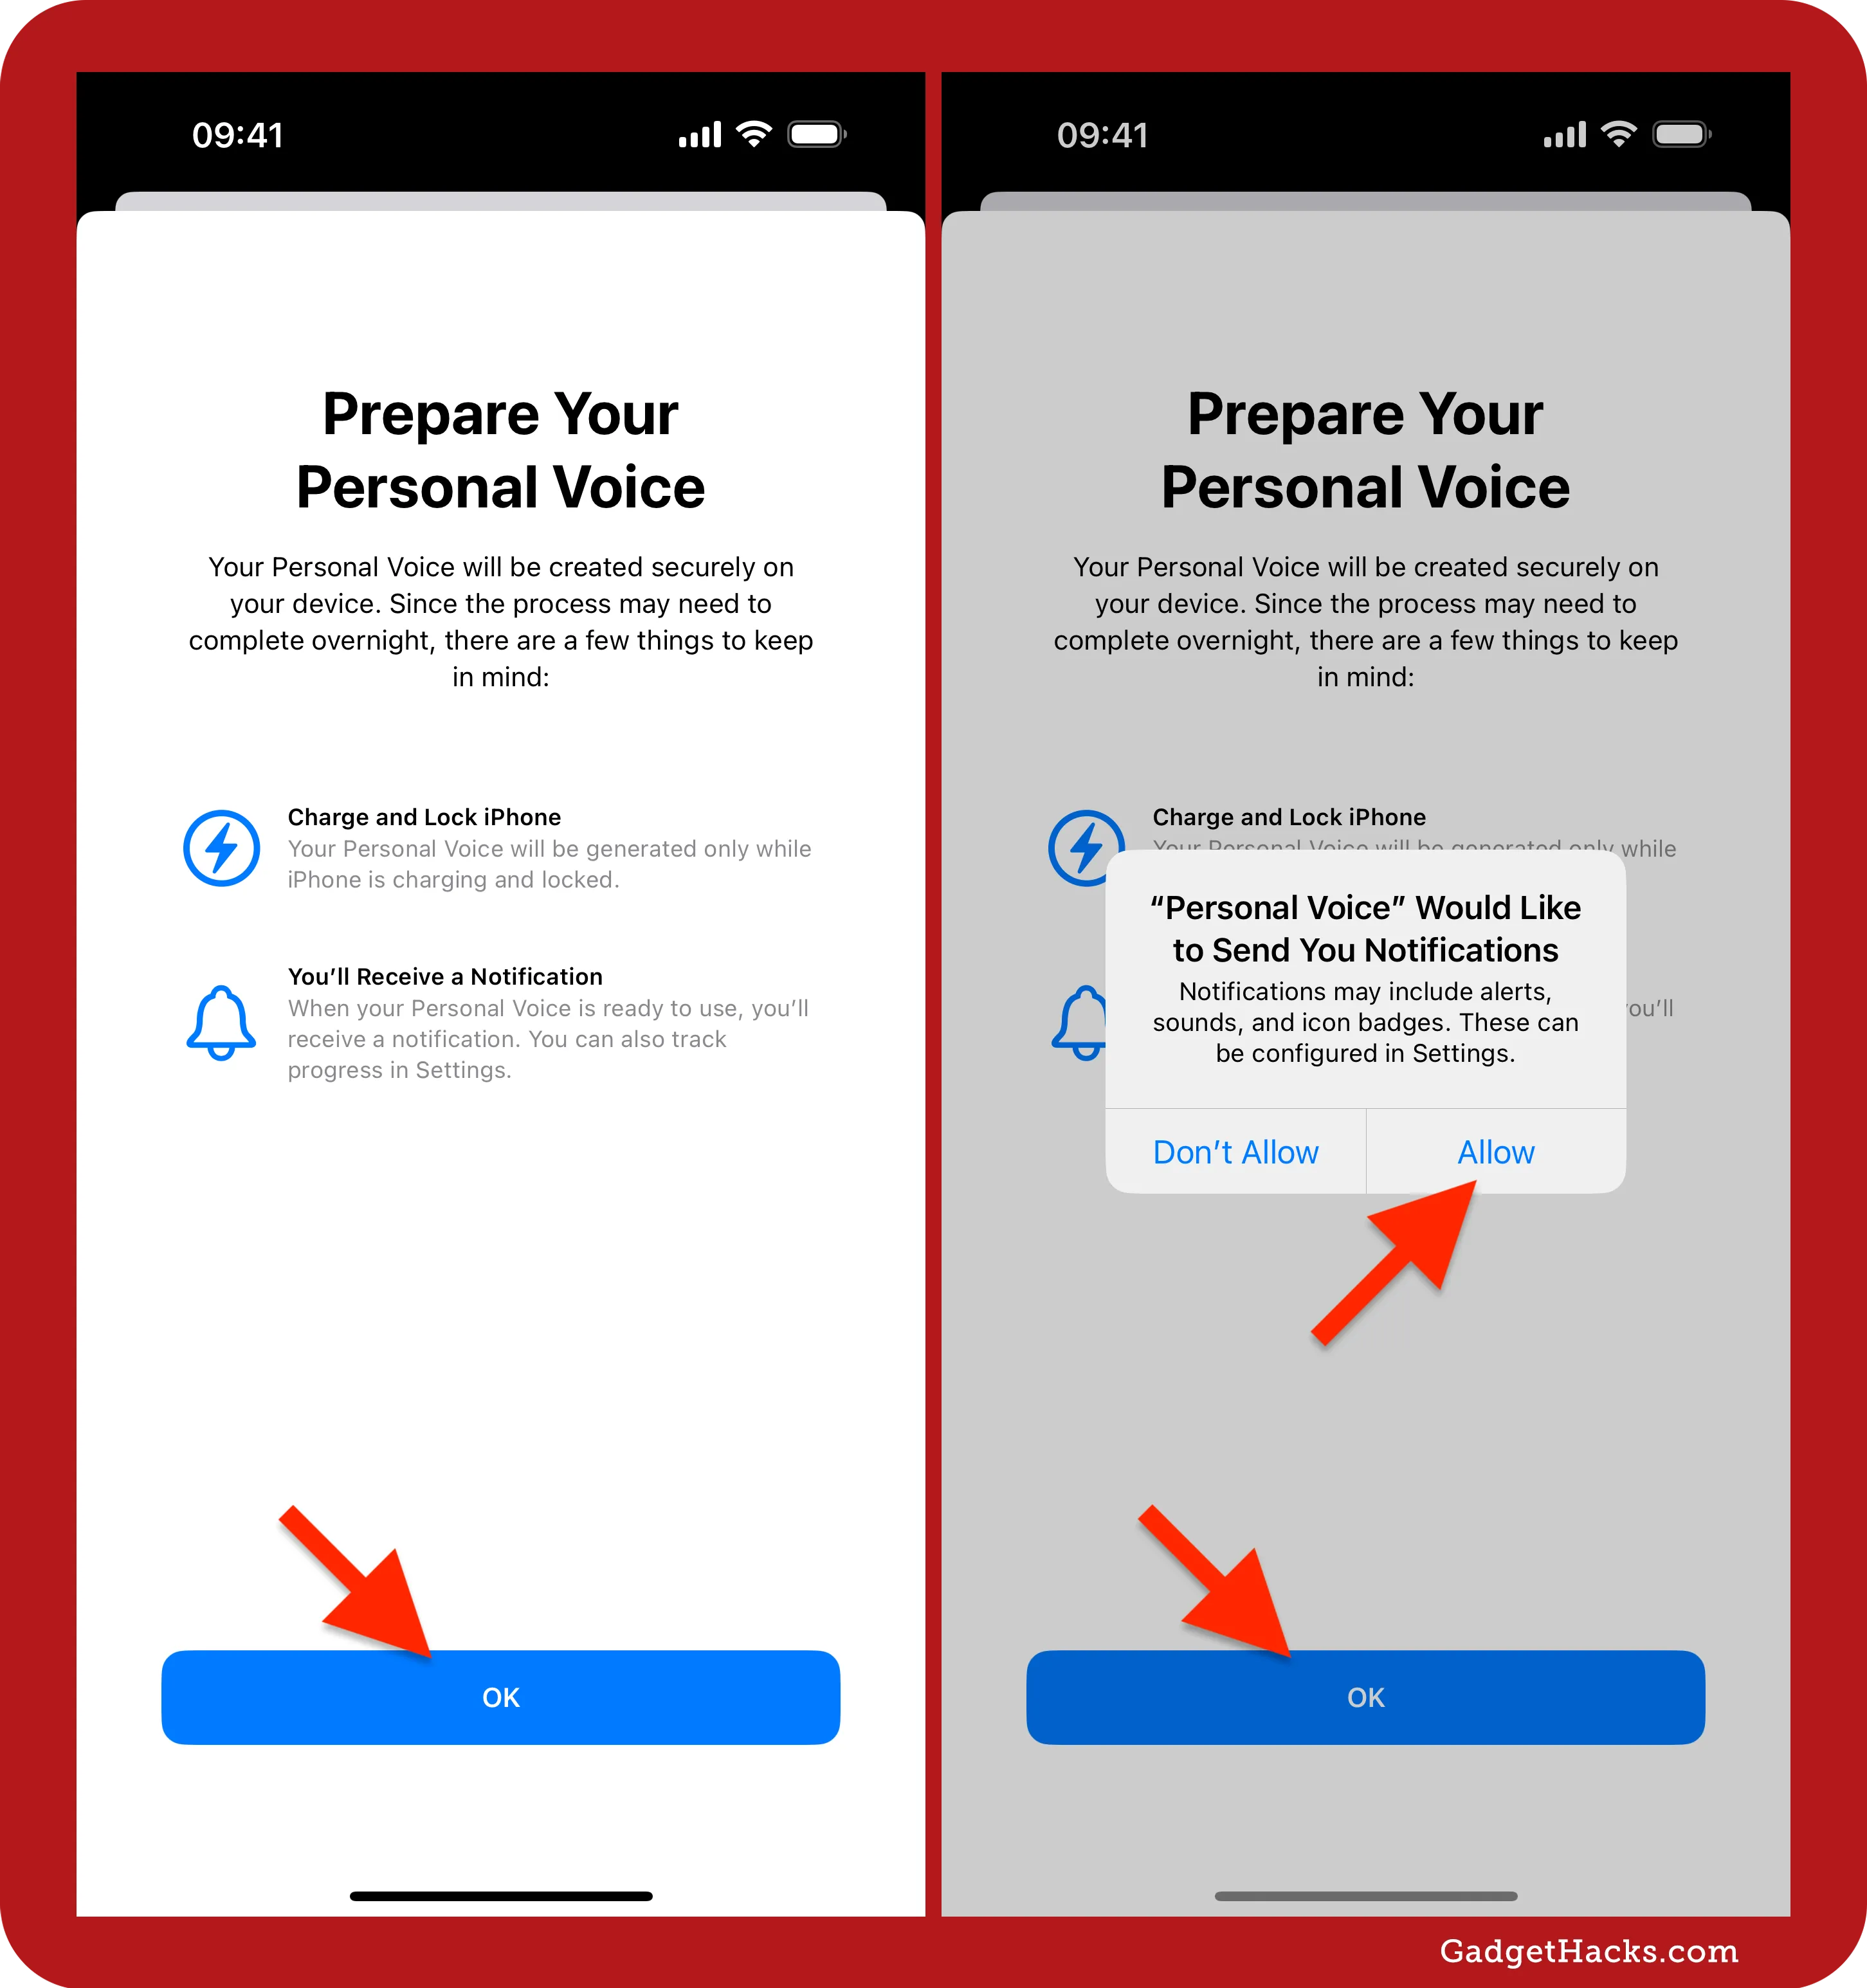
You'll need to wait for Personal Voice to prepare it for use. To do this, your iPhone must be plugged in and charging, and it needs to be locked. If you get a prompt asking you to let Personal Voice send you notifications, hit "Allow" so that it can tell you whenever it's halted processing or finished. The preparation time could be relatively fast or painstakingly slow. Be patient.
Once Personal Voice is ready, go back to the Live Speech settings, tap the language you use, then "Personal Voice," and select whatever you called your voice, such as "My Personal Voice." Now, you're ready to use Live Speech with a voice of close likeness to yourself.
Don't Miss: Keep Your Night Vision Sharp with the iPhone's Hidden Red Screen
Cover photo and screenshots by Gadget Hacks.


Comments
Be the first, drop a comment!