


For all of its many perks — from the best iPhone camera system money can buy, to arguably the best smartphone display on the market — the iPhone 12 Pro Max is undeniably huge. It has the largest iPhone screen to date despite being 0.46 cubic inches smaller than the iPhone 11 Pro Max in overall size. If you're finding it a little too much to handle with one hand, there are ways to make it much easier to use.
Just to set expectations, there won't be a tip in this article about physically shrinking the size of your 12 Pro Max. Although the technology exists, Apple will undoubtedly never use it during this decade, and your iPhone will remain a brick-sized smartphone for as long as you own it. And it won't cover obvious solutions such as buying shirts, jeans, and jackets with larger pockets.
Feeling some buyer's remorse? You could always consider the smaller iPhone 12 or iPhone 12 Pro, or even the tiny iPhone 12 mini, if you're still within your store's return policy.
Use Reachability
Meet your new best friend: Reachability. It's a feature that shifts your display down, making items at the top of the screen temporarily within reach for one-handed use. It's a must-use for anyone with an iPhone 12 Pro Max, as there's really no other way to open notifications when unlocked, the Control Center, or anything in the top third or quarter of the display for the average-sized hand.
If the feature sounds familiar, that's because it's not a 12 Pro Max original. Apple first added Reachability way back with the iPhone 6 and 6 Plus, its first "large" iPhones. Before those products, Apple literally advertised the iPhone as a one-handed device. Go figure.
Reachability may be enabled by default on your iPhone 12 Pro Max. All you need to do to trigger it is to swipe down on the display's bottom edge. To go back to full-screen mode, swipe the edge back up to return, tap the chevron up top, or wait for it to return after a few seconds. It takes some getting used to, but once you get the hang of it, you'll never want to go back.
Use the One-Handed Keyboard
Meet your other new best friend: the one-handed keyboard mode. The feature in Apple's stock keyboard makes the keyboard about the same size, if not smaller, as those famously one-handed iPhones of the past. Like Reachability, the one-handed mode is available on all iPhones, not just the 12 Pro Max, but you'll likely agree Apple's 6.7-inch model is most in-need of the feature.
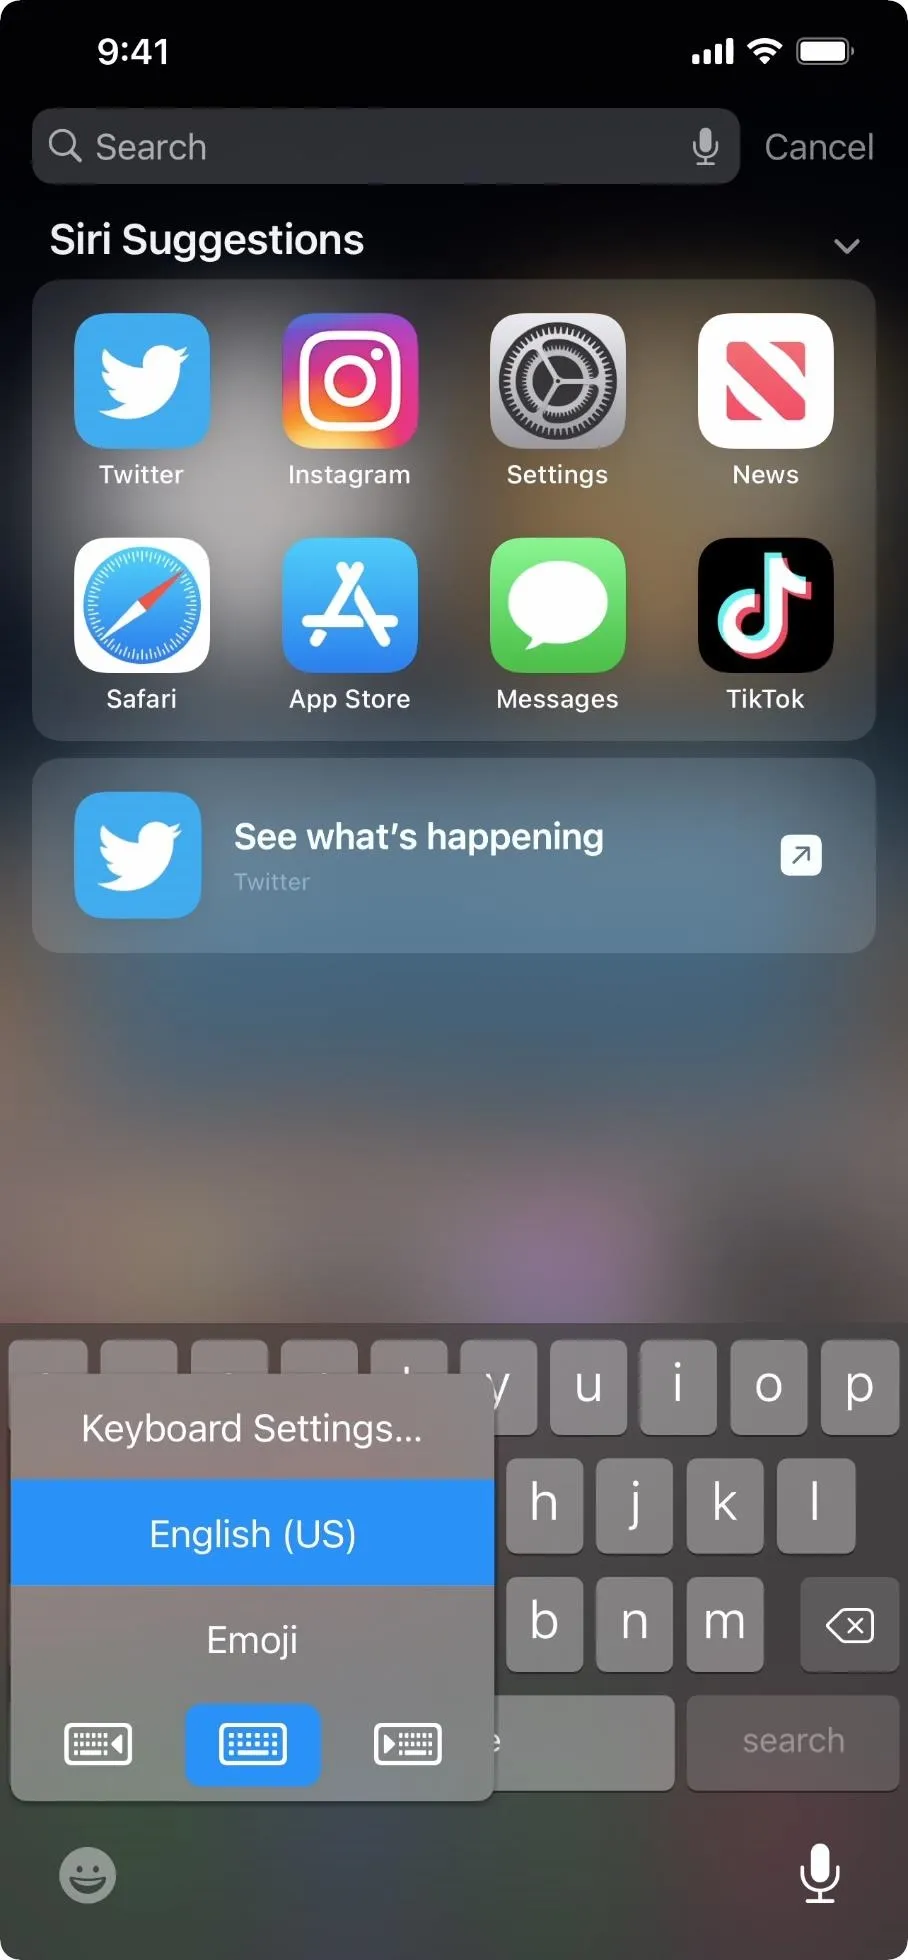
To trigger one-handed mode on your 12 Pro Max, open the keyboard, and then long-press the globe, emoji, or ABC button. The globe appears if you use multiple keyboards, such as third-party ones or different languages. The emoji button appears if you use only one of Apple's keyboards plus the Emoji keyboard. The ABC button appears when you're on the Emoji keyboard. If you only have one keyboard, sans emoji, you cannot enable one-handed mode.
A pop-up menu will appear, with three keyboard icons on the bottom of the display. If you tap the left-most icon, it will shift the keyboard to the left for left-handed use. Likewise, the right-most icon shifts the keyboard to the right side of the display. The middle icon will restore the keyboard to normal, and you can also use the arrow that appears on either the right or left side of the empty keyboard space.
Note that some third-party keyboards also have one-handed modes, such as Google's Gboard app, but enabling it will vary from keyboard to keyboard.
Place Your Most-Used Apps Within Reach
This tip is a favorite among Android users, believe it or not. Android people have had smartphones with larger and larger displays longer than iOS users, and they can place app icons wherever they want. It's only natural, then, to plop favorite apps on the bottom of the display, where things are easier to reach, versus the top of the display, which is where iOS starts placing apps by default.
While there are tricks to placing app icons wherever you want on your iPhone's home screen, you also don't need to go through the trouble, so long as you don't mind a full page of apps and widgets.
Instead of placing your most-used apps like Messages, Photos, Phone, Instagram, Snapchat, etc., on the top of the display, place them in the dock. Then, put the rest of the apps you want easier access to in the bottom row or two rows. If you want to avoid 20 apps, folders, bookmarks, and shortcuts on a single page, consider filling some of that space with widgets.

Place Your Most-Used Controls Near the Bottom
In a similar vein, you should place your most-used Control Center tiles on the bottom of the list to make them easier to reach.
There's nothing you can do about the default controls, like the connections window, Now Playing window, and brightness and volume sliders, as those options are all static. However, you can at least place useful tiles like Flashlight, Calculator, Camera, Screen Recording, Dark Mode, and Shazam within reach.
We recommend filling out your Control Center to at least 16 tiles — that will fill the whole bottom portion of the display, making the tiles you add to the bottom rest in the same space as the bottom apps on your home screen. Feel free to add more than that, just know that the app will be placed underneath the bottom row, forcing you to scroll to see them. Scrolling is easy enough, but you still have to open Control Center from the top right of the display. However, using Reachability above makes it less of a stretch.
Use AssistiveTouch
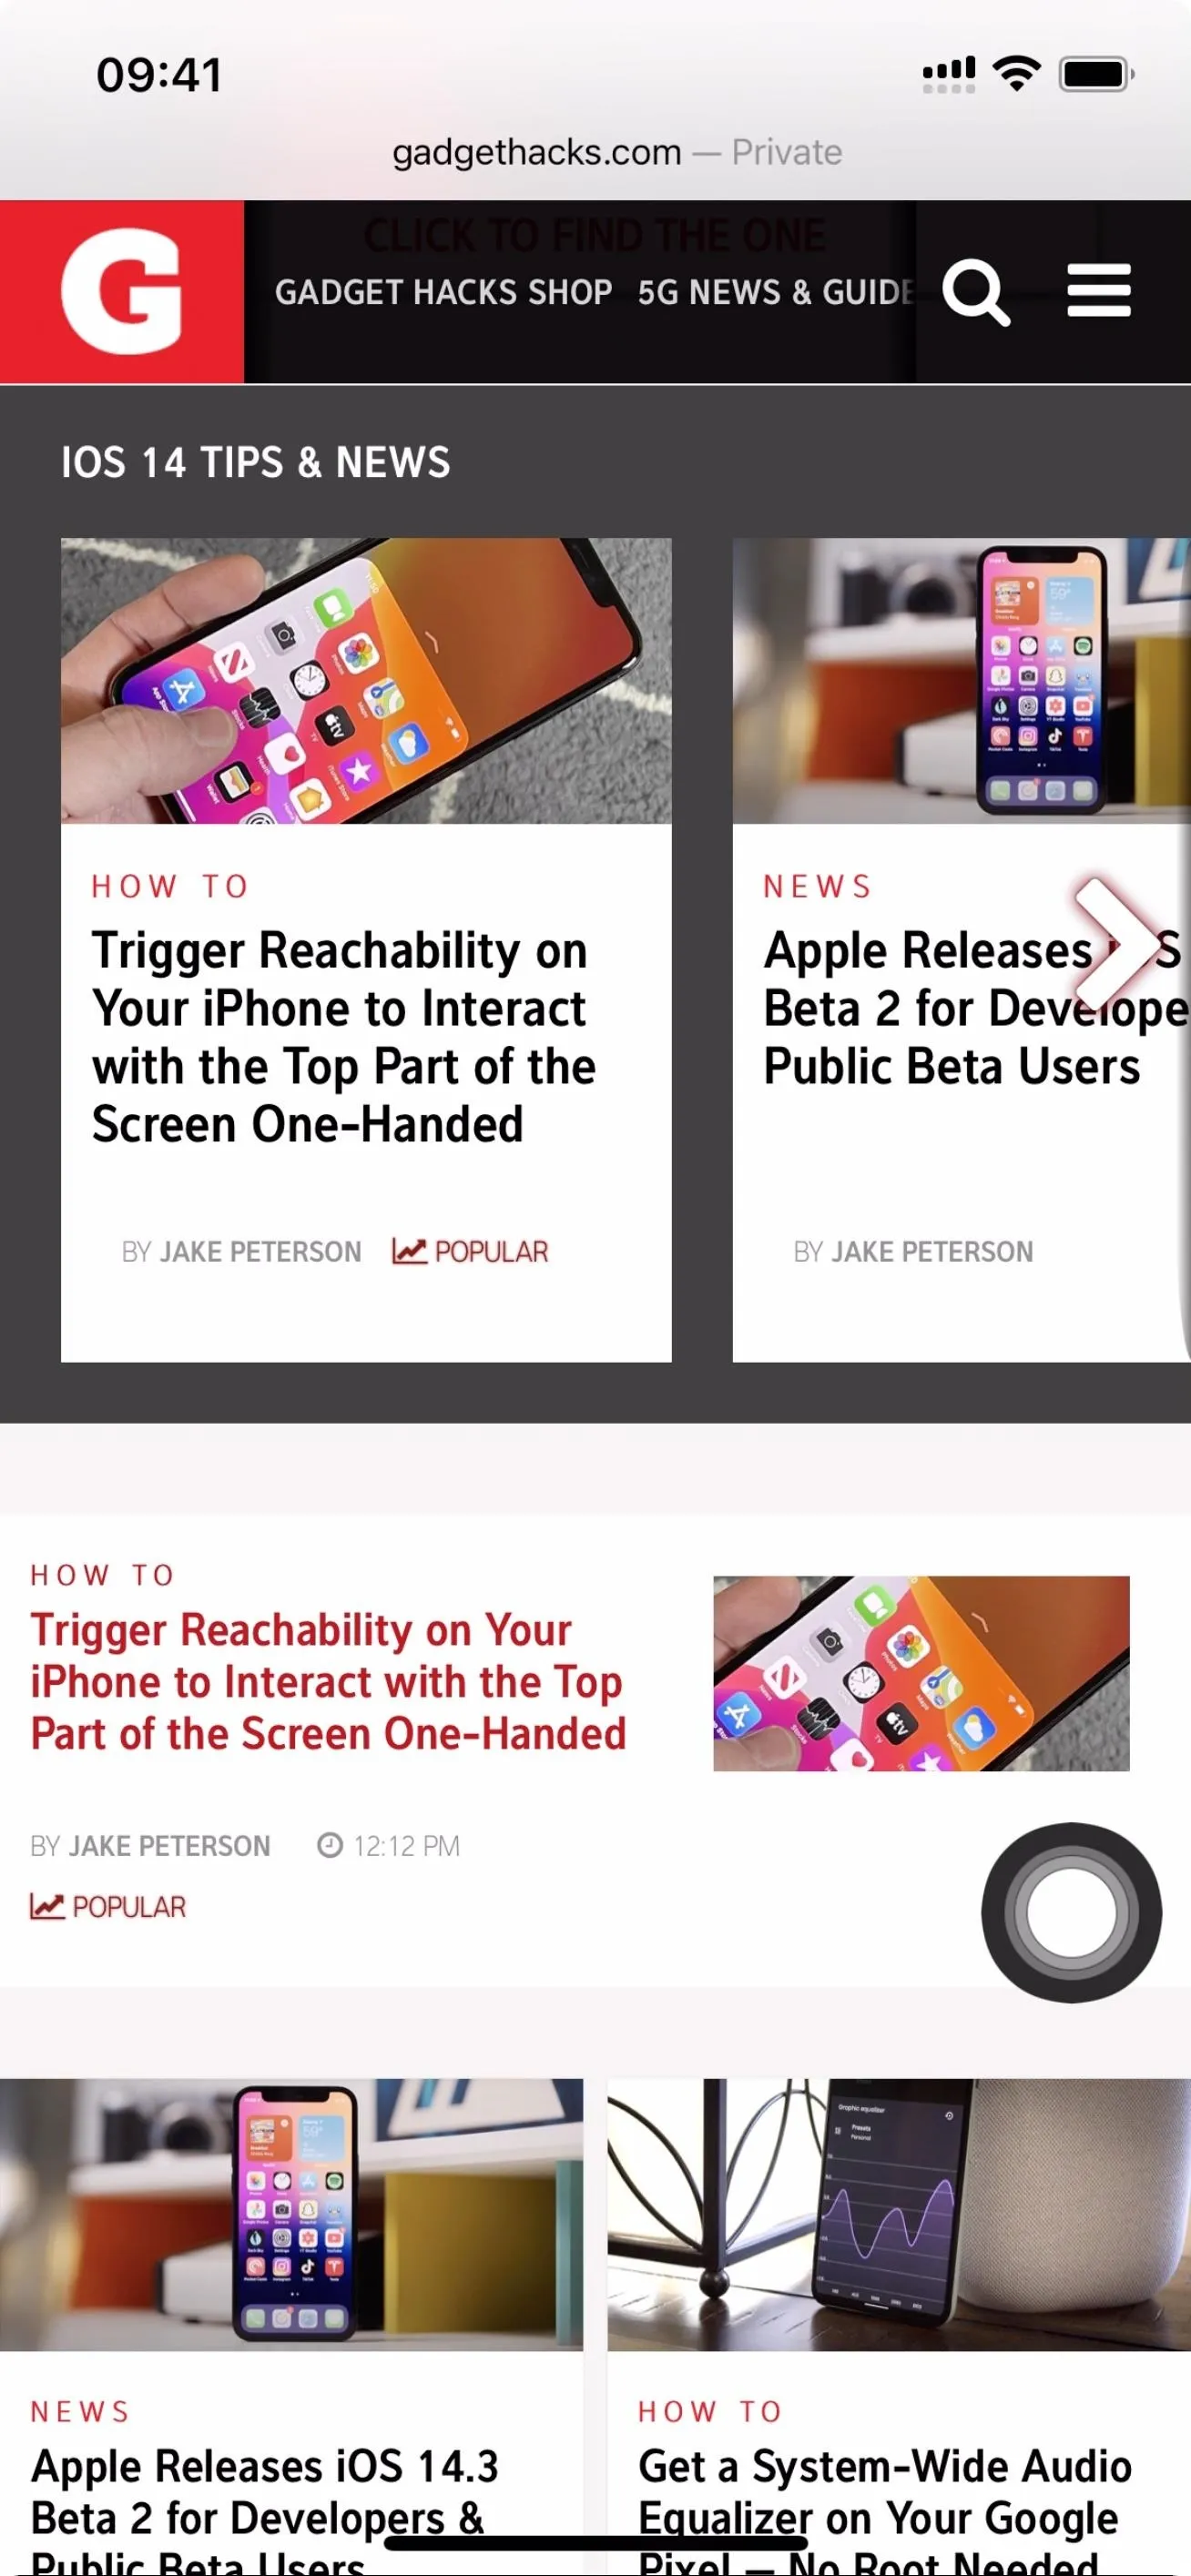
Remember how I said that you "still have to open Control Center from the top right of the display" just a second ago? That's not entirely true. There's an Accessibility feature called AssistiveTouch that puts a button anywhere you want on the display, and that button can do many things.
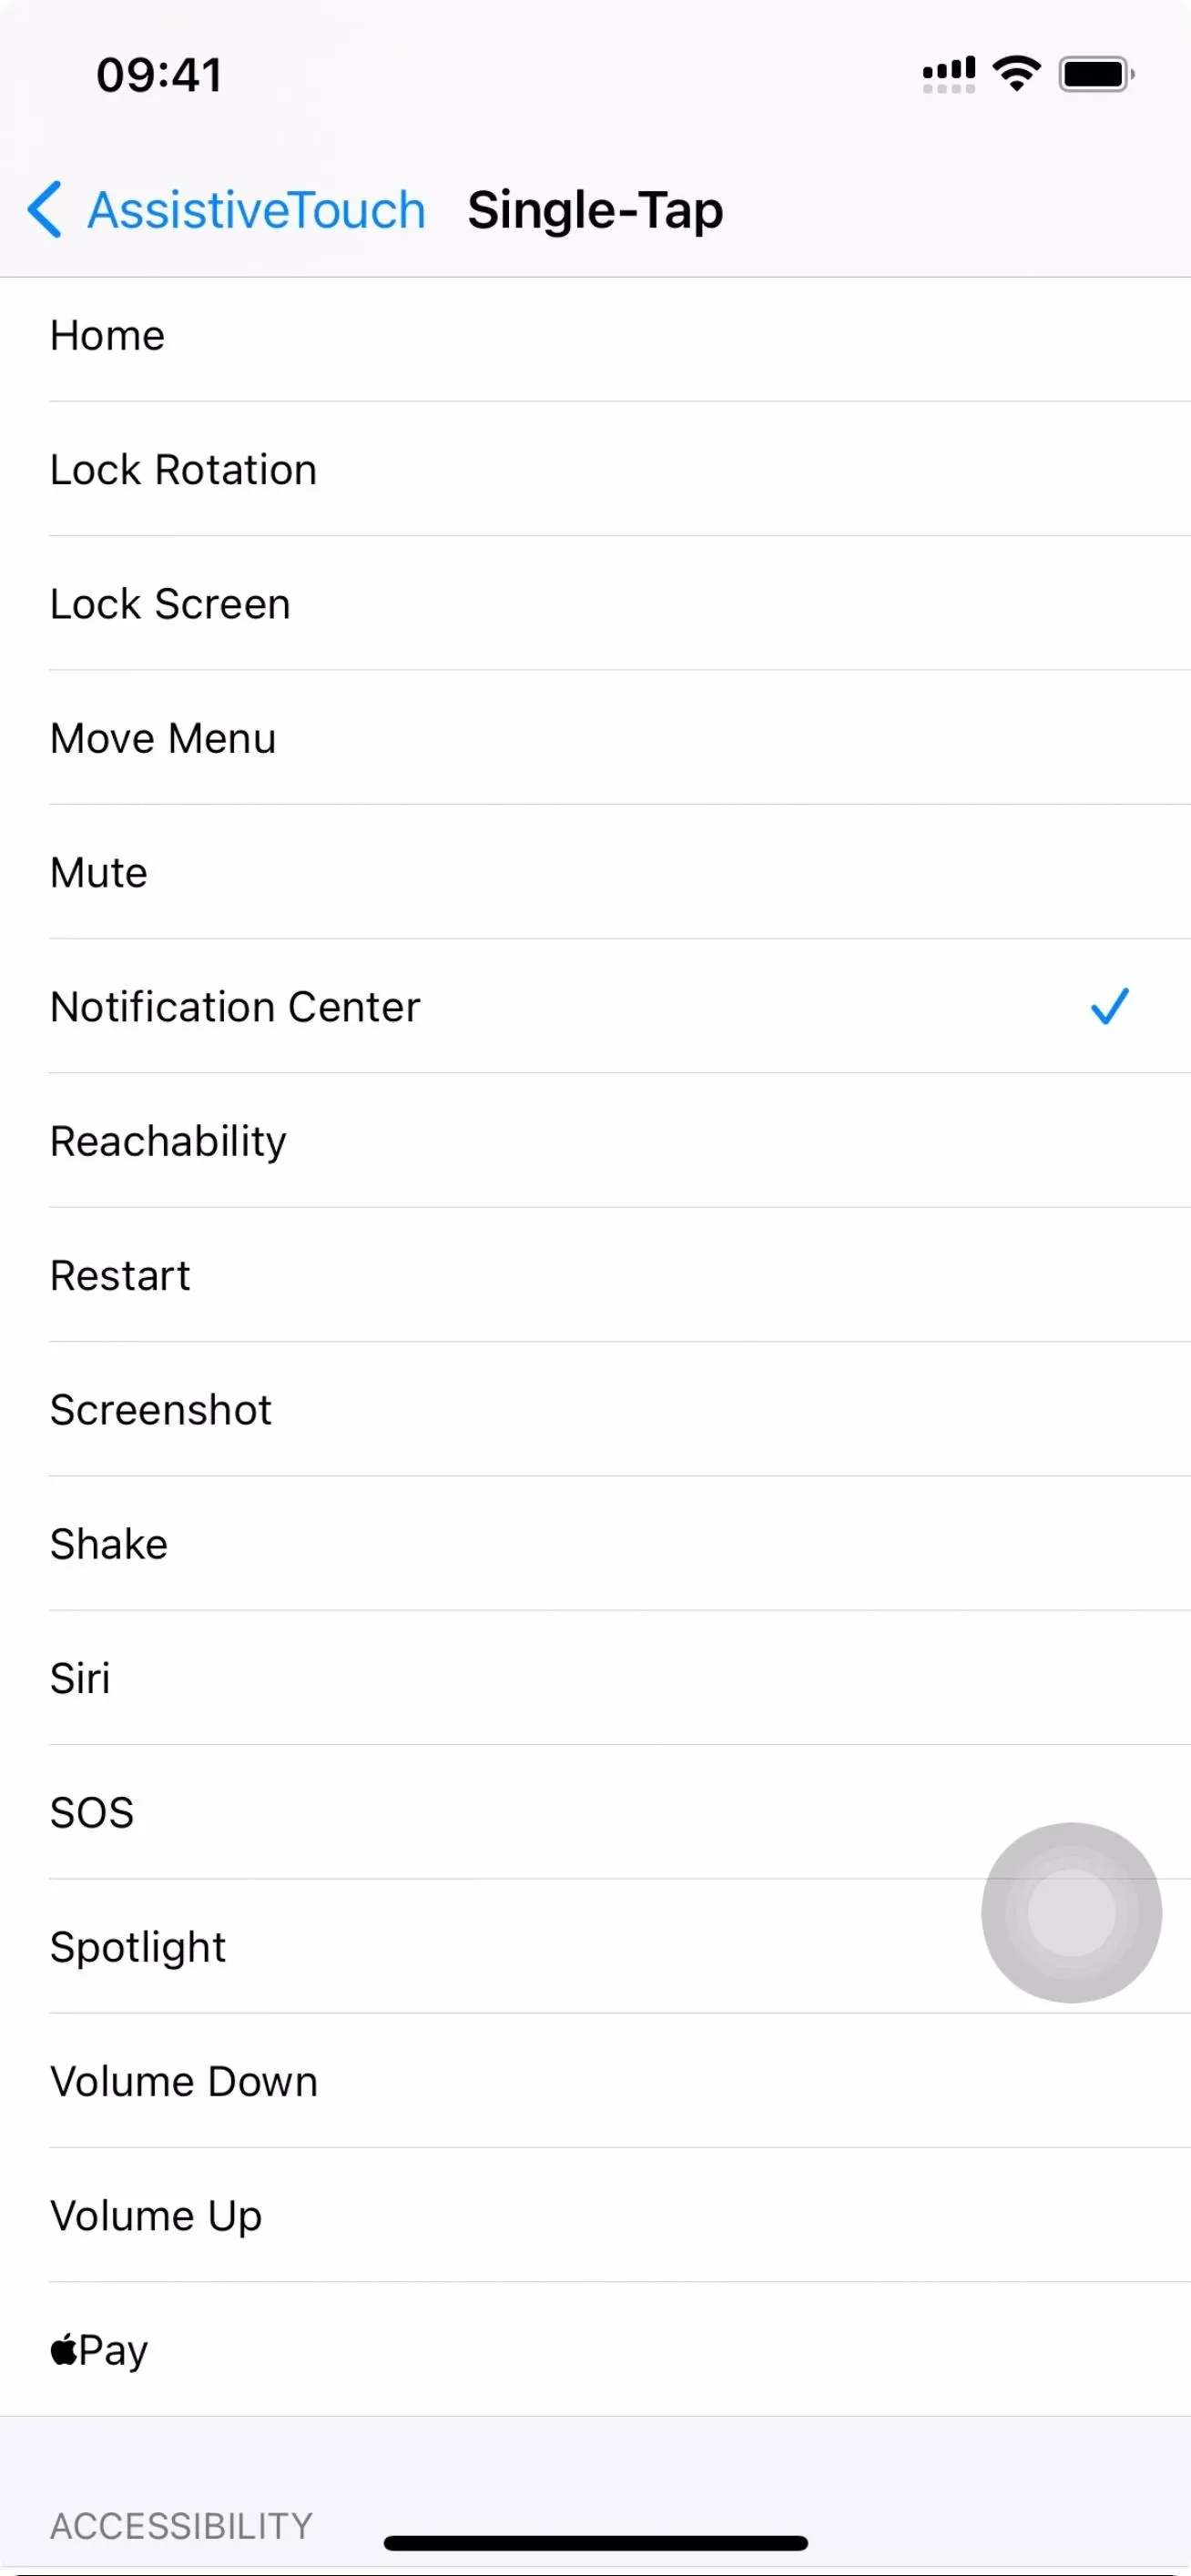
First, enable AssistiveTouch in Settings –> Accessibility –> Touch –> AssistiveTouch. Then, below the toggle, set custom actions for when you single-tap the AssistiveTouch button, double-tap it, or long-press it. Those shortcuts can be for hard-to-reach things, such as Control Center and Notification Center, and can even help with hardware buttons. For instance, you could set a shortcut to turn the volume up or down, restart your iPhone, or take a screenshot.
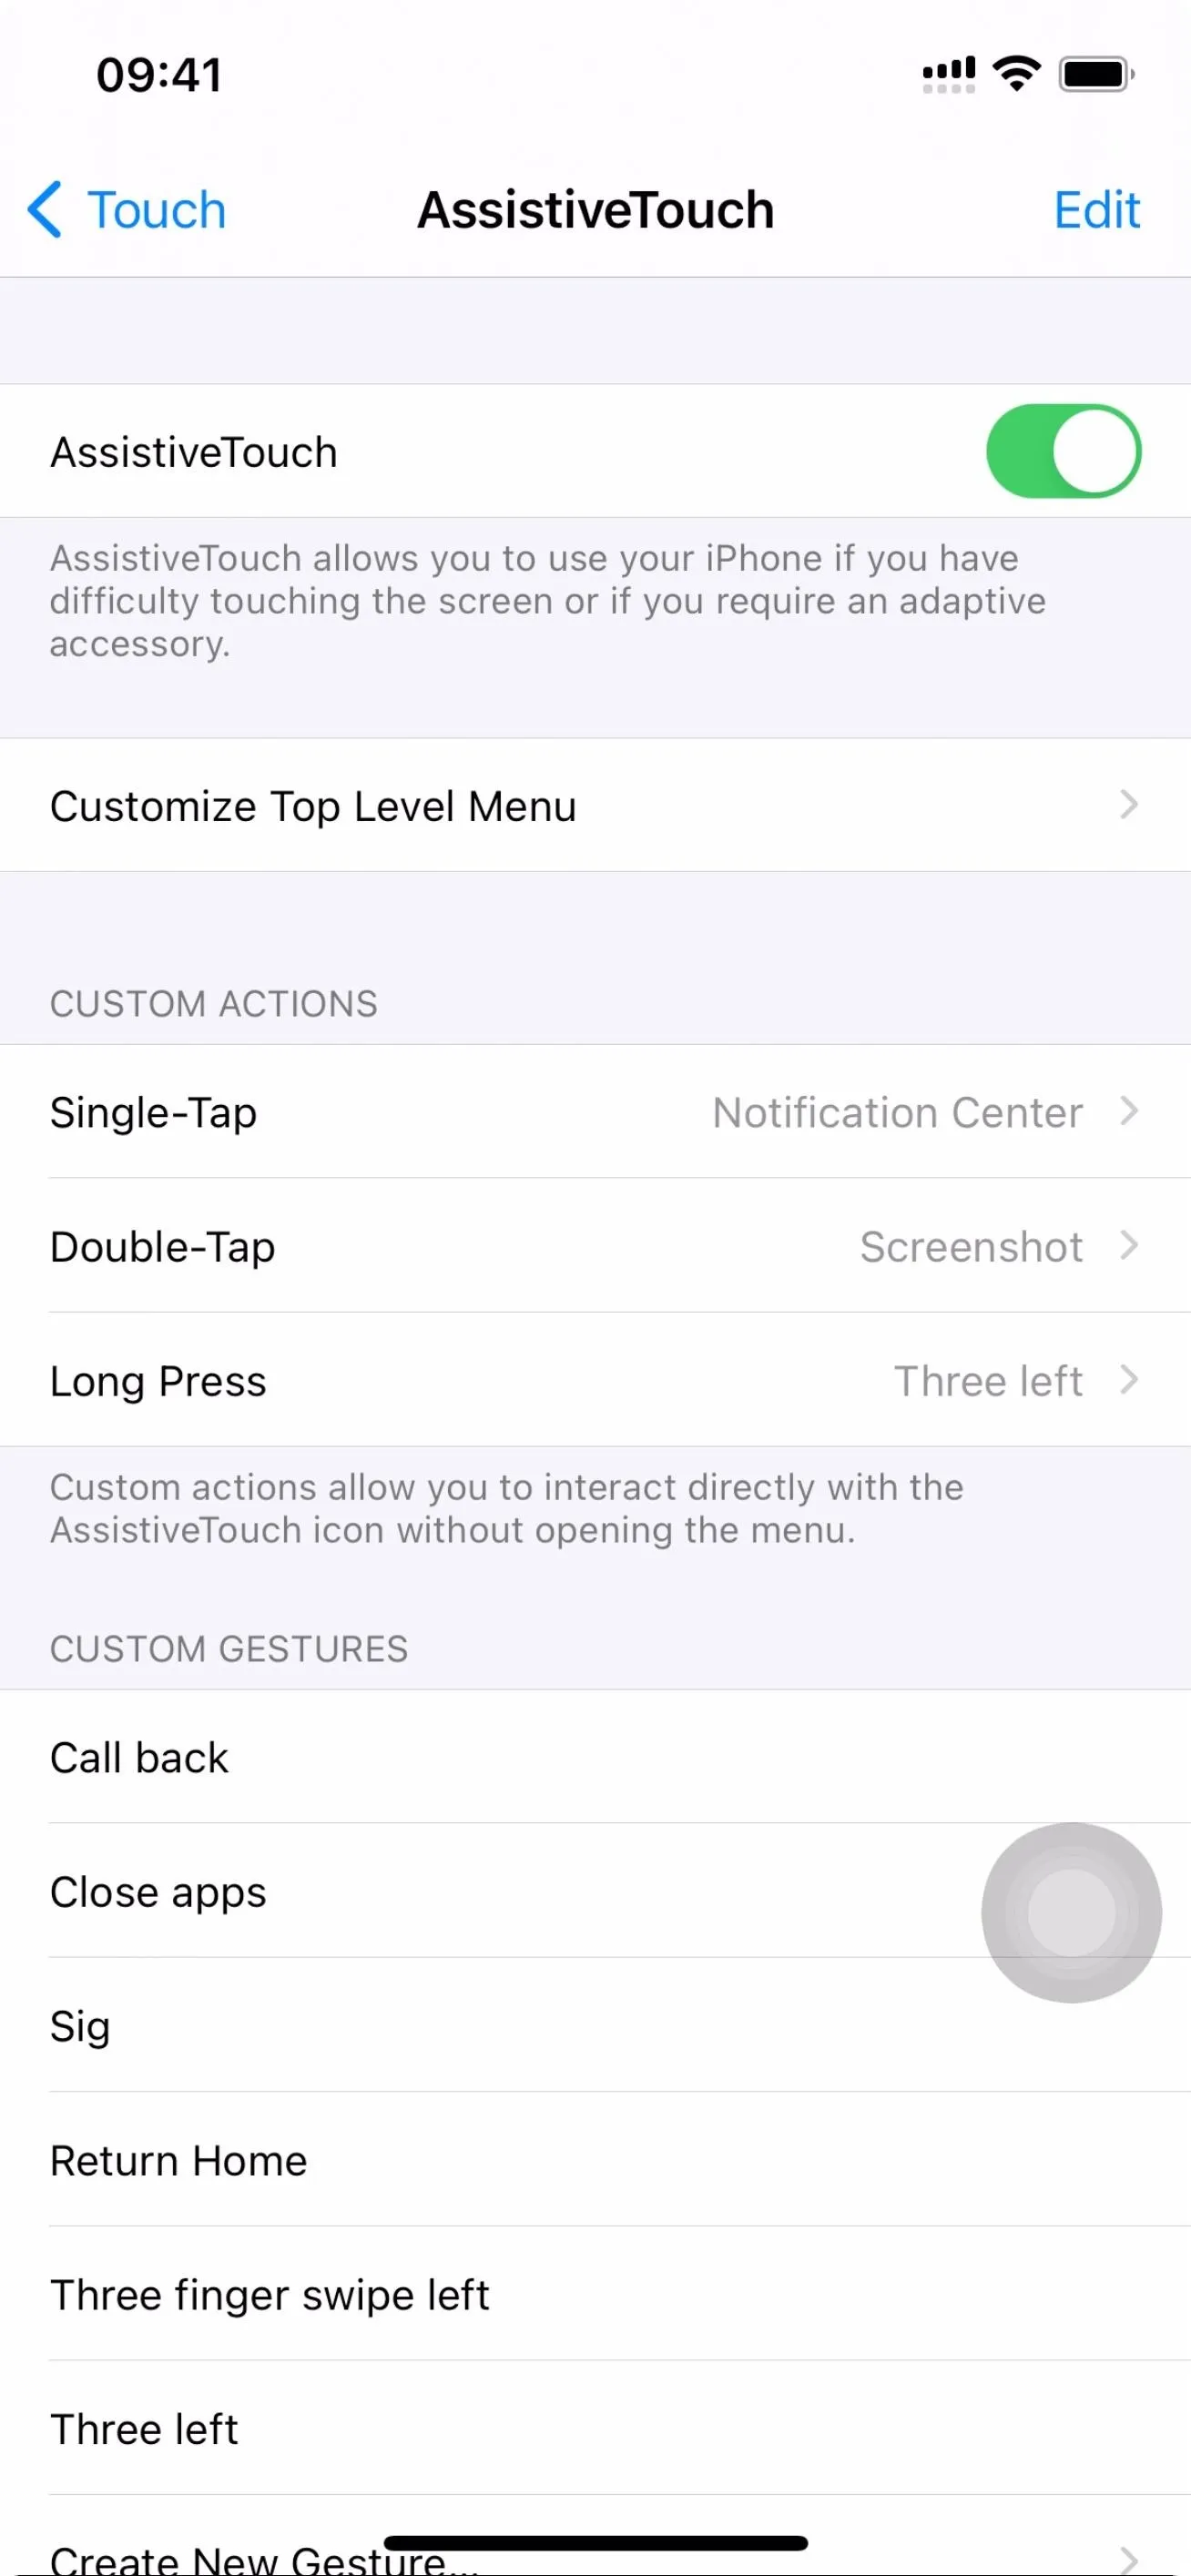
You can even hit "Customize Top Level Menu" to add important actions in the menu that appears when you tap the AssistiveTouch button once. Also, if you don't like clicking the Side button, you can set AssistiveTouch to do all that double-clicking for you with the "Confirm with AssistiveTouch" option.

Back in the "Accessibility" menu, you can go to "Accessibility Shortcut" and make sure "AssistiveTouch" is checked. That way, you can triple-click the Side button to access or hide the overlay button. But if you don't like clicking that Side button, you can always tell Siri to turn AsssistiveTouch on or off.
Use the Zoomed View for Larger Everything
Another trick is to use the "Display Zoom" feature for iOS. Zoomed view, as its name implies, "zooms" all of the elements throughout iOS. Apps, icons, text, buttons — everything is larger. And because everything is larger, that means it can be easier to tap on certain buttons that might have been out of reach using one hand in the standard view.
You'll find this feature helps most in apps. Apps like Instagram, Twitter, and Messages end up pushing their elements towards the display's bottom, making it easier to reach certain content than in standard view.
It doesn't work for all situations, though. For example, home screen app icons remain in their same positions, even though they're slightly larger. Even worse, the larger keyboard in zoom view affects one-handed mode.
Get a PopSocket
Maybe you need some help that a simple iOS fix can't give you. If you don't mind your iPhone 12 Pro Max having an attachment on the back, you might want to consider a PopSocket. It won't change the reachability issue, but in conjunction with the tips on this list, a PopSocket can make handling your iPhone 12 Pro Max just a little more secure.
PopSockets are designed for the big-iPhone problem. They stick on the back of your iPhone and act as a grip — two fingers can wrap around the PopSocket to secure your iPhone in one-handed operation, while your thumb does the rest. They even come in an endless array of colors and styles to fit any look you're going for with your 12 Pro Max.
However, while you can get a PopSocket right now, know that it uses adhesive for the base mount. That means you'll be covering up the MagSafe array, whether that's directly on the iPhone or a MagSafe-compatible case. The adhesive is easy enough to remove, but PopSockets is working on MagSafe-compatible PopSockets that attach using magnets instead of adhesive. There is no word yet on when those will be released, but if you don't plan on using MagSafe or any wireless chargers, the adhesive ones will still work great for you.

Cover image, screenshots, and GIFs by Jake Peterson/Gadget Hacks (unless otherwise noted)


Comments
Be the first, drop a comment!