


If your new 2020 iPhone SE is frozen, unresponsive, or won't load the system, and a standard power down and up procedure didn't work, there are few more things you can try. Force-restarting the device may do the trick, recovery mode is a last-ditch option, and DFU mode is your fail-safe.
The normal shutdown and start-up procedure is good at fixing minor bugs and glitches you may be experiencing. A force restart is necessary when the device's screen remains frozen and the Side button unresponsive.
Recovery Mode vs. DFU Mode
Recovery mode is useful when neither of those options worked. It also helps when your iPhone SE is stuck on the Apple logo progress bar at startup, your computer won't recognize the device, or either your iPhone or computer says it's in recovery mode already.
Apple's Finder or iTunes, depending on your computer, communicates with the iPhone's bootloader (iBoot), part of its operating system, to send it the ramdisk and kernel from the IPSW file of the most recent iOS version. When that's done and all the necessary checks are completed, the filesystem and other variables are flashed — all while trying to keep your data intact.
DFU mode, or Device Firmware Upgrade mode, is different in that your computer is working directly with the bootrom (SecureROM), which is burned directly into the hardware. Effectively, it will do the same thing as recovery mode, only it goes about it differently, and your data will not be restored automatically. It's most useful when the bootloader that recovery mode interacts with is corrupted.
Functionally, your iPhone SE's screen will remain black during the whole DFU process, while that's not the case with recovery mode. Whether the problem is big or small, both can help bring your iPhone back to life (so long as there's no significant physical damage). Then it's up to you to use factory settings or get all your data back.
- Don't Miss: 200+ Exciting New iOS 13 Features for iPhone
While your iPhone SE might be brand new, the recovery and DFU processes aren't. Apple hasn't changed the button combination to enter these modes since the iPhone 8, 8 Plus, and X. That said, if your last iPhone was a 7 or earlier, get ready for a slightly more complicated button process.
What You Need
- Up-to-date Mac or Windows computer
- Latest version of iTunes or macOS Catalina 10.15 and later
- Lightning to USB or Lightning to USB-C cable
Stop! Protect Your Data Before Proceeding
Recovery mode will try to update your iPhone so that your data remains intact, but sometimes you'll just need to start fresh. Also, a DFU mode restore means your iPhone will be wiped clean. You'll be installing a new version of iOS over your hardware, so every bit of data not backed up on your iPhone SE or in iCloud will be lost.
If your iPhone won't turn on, there's nothing you can do. But if the second-gen iPhone SE is still powering on, please, make sure to back up any critical data to iTunes or iCloud before proceeding with either a recovery update or DFU restore.
Connect Your iPhone SE to Your Mac or PC
To use either recovery mode or DFU mode, plug your 2020 iPhone SE into your Mac or PC with your Lightning to USB or Lightning to USB-C cable.
Unlock Your iPhone (Only if Possible)
In some cases, your iPhone just isn't working at all; skip to Step 4 below if that's you. Otherwise, you may want to use recovery or DFU mode even when you're iPhone is still functioning to a certain degree. So if you see the "Unlock iPhone to Use Accessories" alert on your new iPhone SE, unlock it with either Touch ID or your passcode before proceeding.
Trust Your Computer (Only if Possible)
Again, your iPhone may not be working at all. If that's you, skip to the next step. But if your iPhone is still working a little bit, you may need to "trust" the computer if it's your first time connecting the two devices. If you want to, you can untrust the computer later.
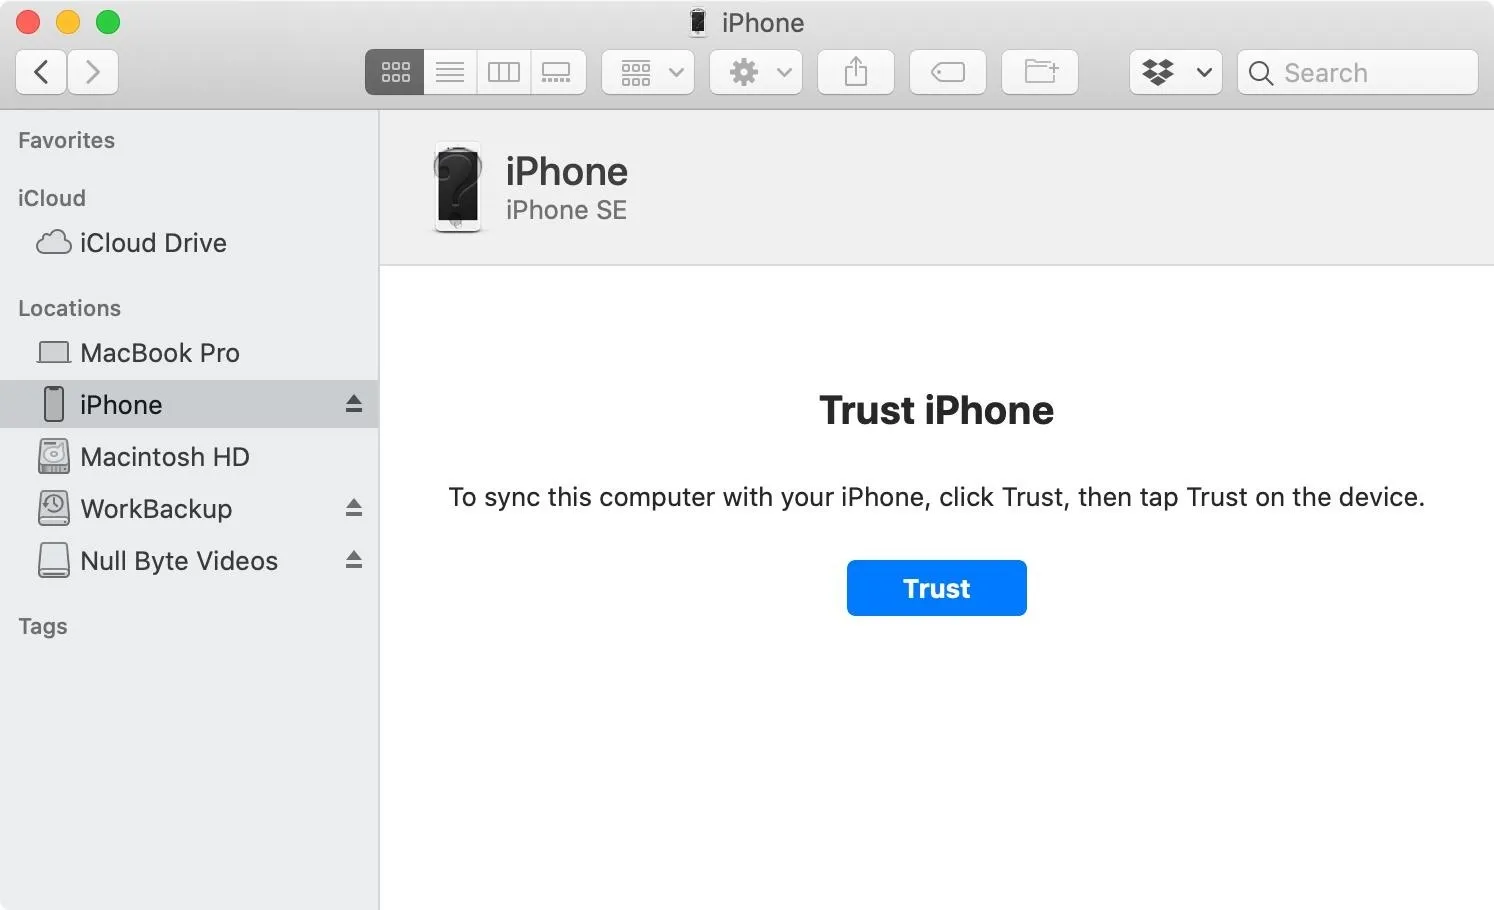
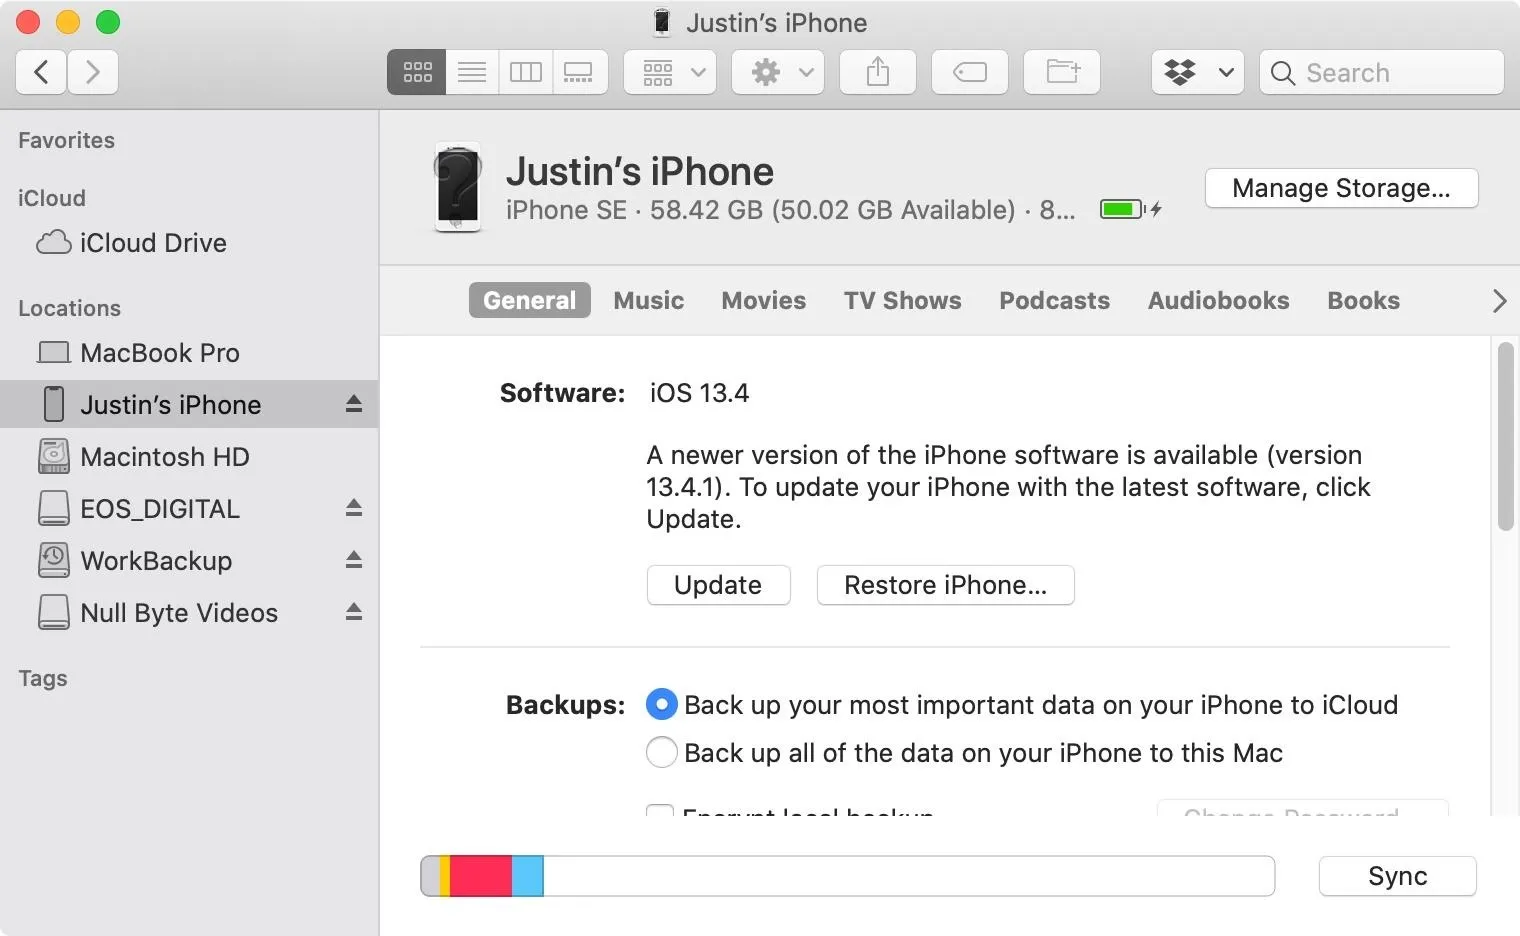
If you have a Mac running macOS Catalina 10.15 or later, open Finder. Otherwise, open iTunes on your Windows PC or Mac running macOS Mojave 10.14 or older (close it and open it again if it was already active). In some cases, iTunes may open automatically after plugging in your iPhone SE. Next, find and select your iPhone SE.
Finder tip: The iPhone SE will appear as a device under Locations in Finder's sidebar. If you don't see a Locations section there, click "Finder" in the menu bar at the top of your screen, click "Preferences," access the "Sidebar" tab, and choose the box next to "CDs, DVDs, and iOS devices."
Next, click "Trust" in Finder or iTunes when it appears on your computer screen.
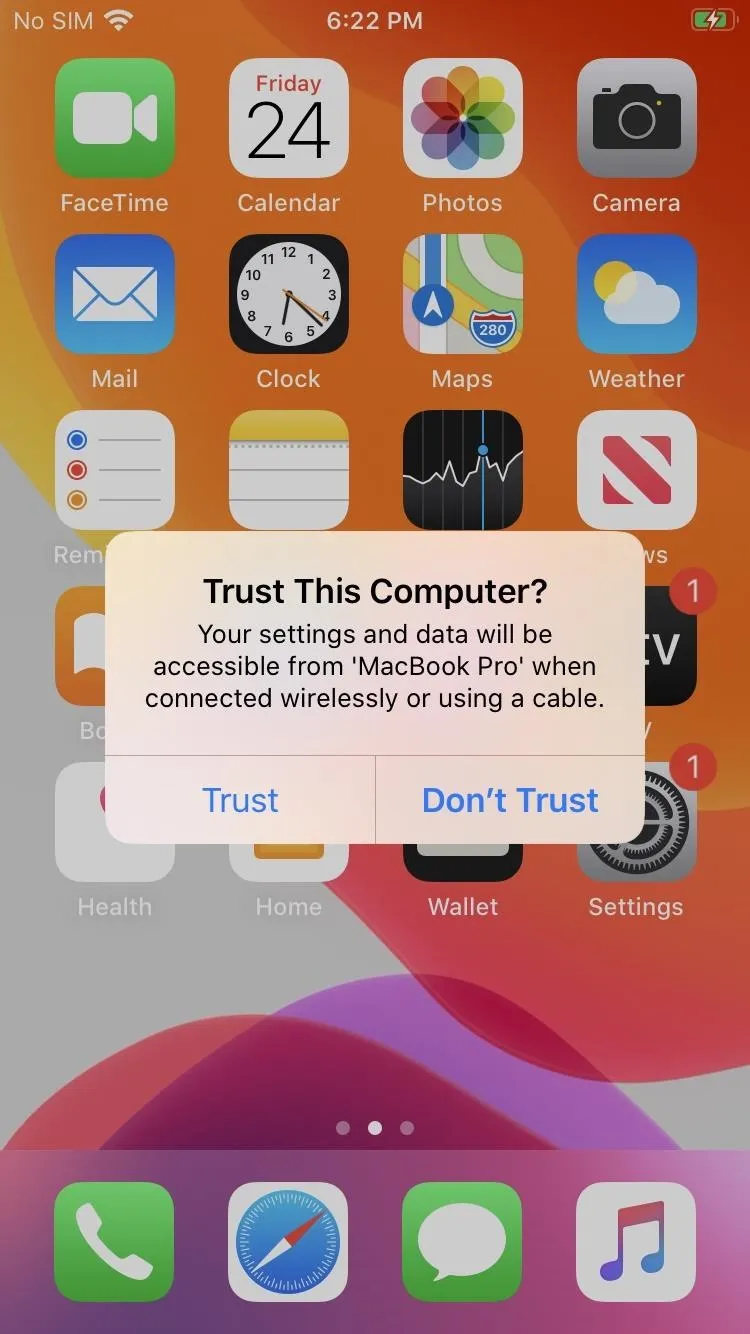
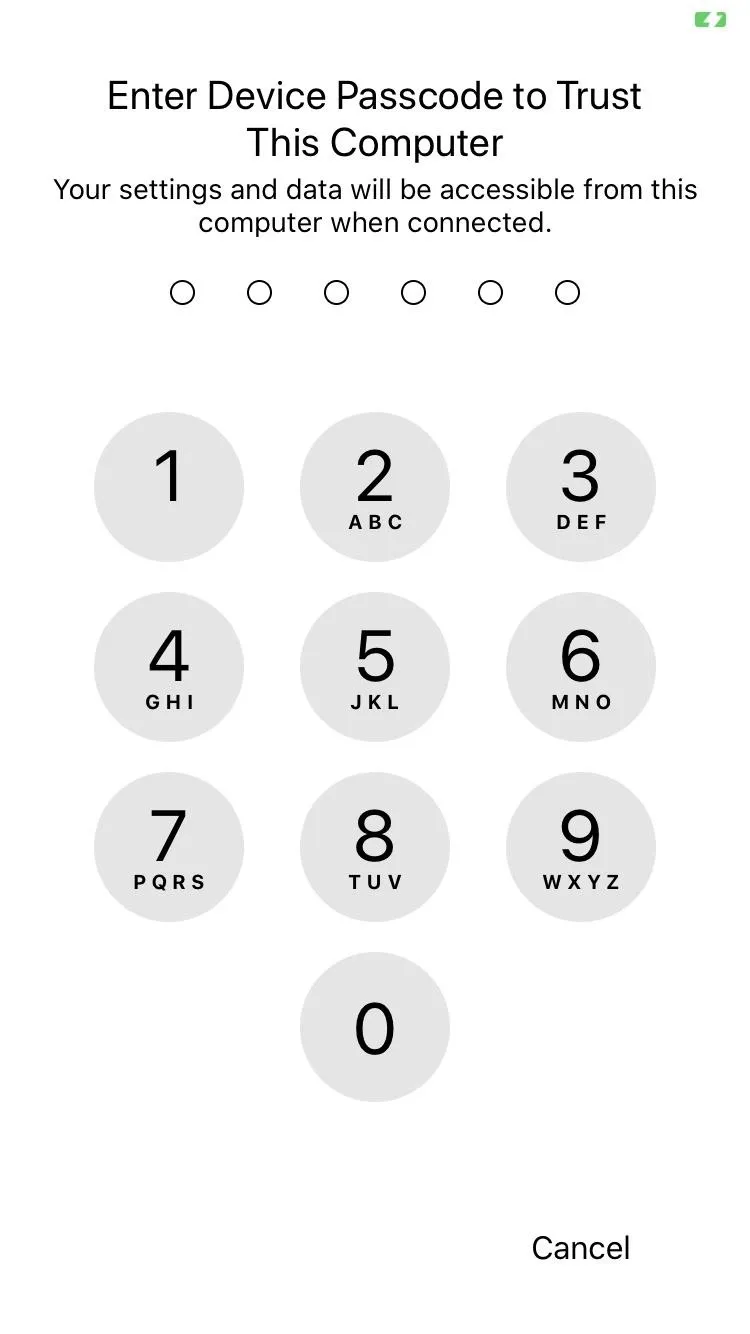
Next, unlock your iPhone SE if possible, tap "Trust" on the Trust This Computer prompt, then enter your device passcode to finish up.
Open Finder or iTunes
If you're coming from Step 3, you're already good and can skip to Step 5. Otherwise, if you have a Mac running macOS Catalina 10.15 or later, open Finder. If not, open iTunes on your Windows PC or Mac running macOS Mojave 10.14 or older (close it and open it again if it was already active). In some cases, iTunes may open automatically after plugging in your iPhone SE.
In later steps, you'll see the recovery prompt show up when your iPhone SE is selected in either Finder or iTunes. Many times that will happen all on its own, but sometimes you'll need to choose your iPhone SE manually.
Finder tip: The iPhone SE will appear as a device under Locations in Finder's sidebar. If you don't see a Locations section there, click "Finder" in the menu bar at the top of your screen, click "Preferences," access the "Sidebar" tab, and choose the box next to "CDs, DVDs, and iOS devices."
Boot into Recovery or DFU Mode
This is where the two modes split paths, as there are different button combinations needed on the iPhone SE to get recovery or DFU mode working.
If Using Recovery Mode
Jumping into recovery mode is simple, as it's just like force-restarting your iPhone SE since it uses the same sequence of button presses.
- Quickly press-and-release the Volume Up button.
- Quickly press-and-release the Volume Down button.
- Press-and-hold the Side button for about 10 seconds (your display will go black). Don't release the button when you see the Apple logo.
- Release the Side button when you see the recovery mode screen on the iPhone SE, which looks like a Lightning cable pointing toward a MacBook.
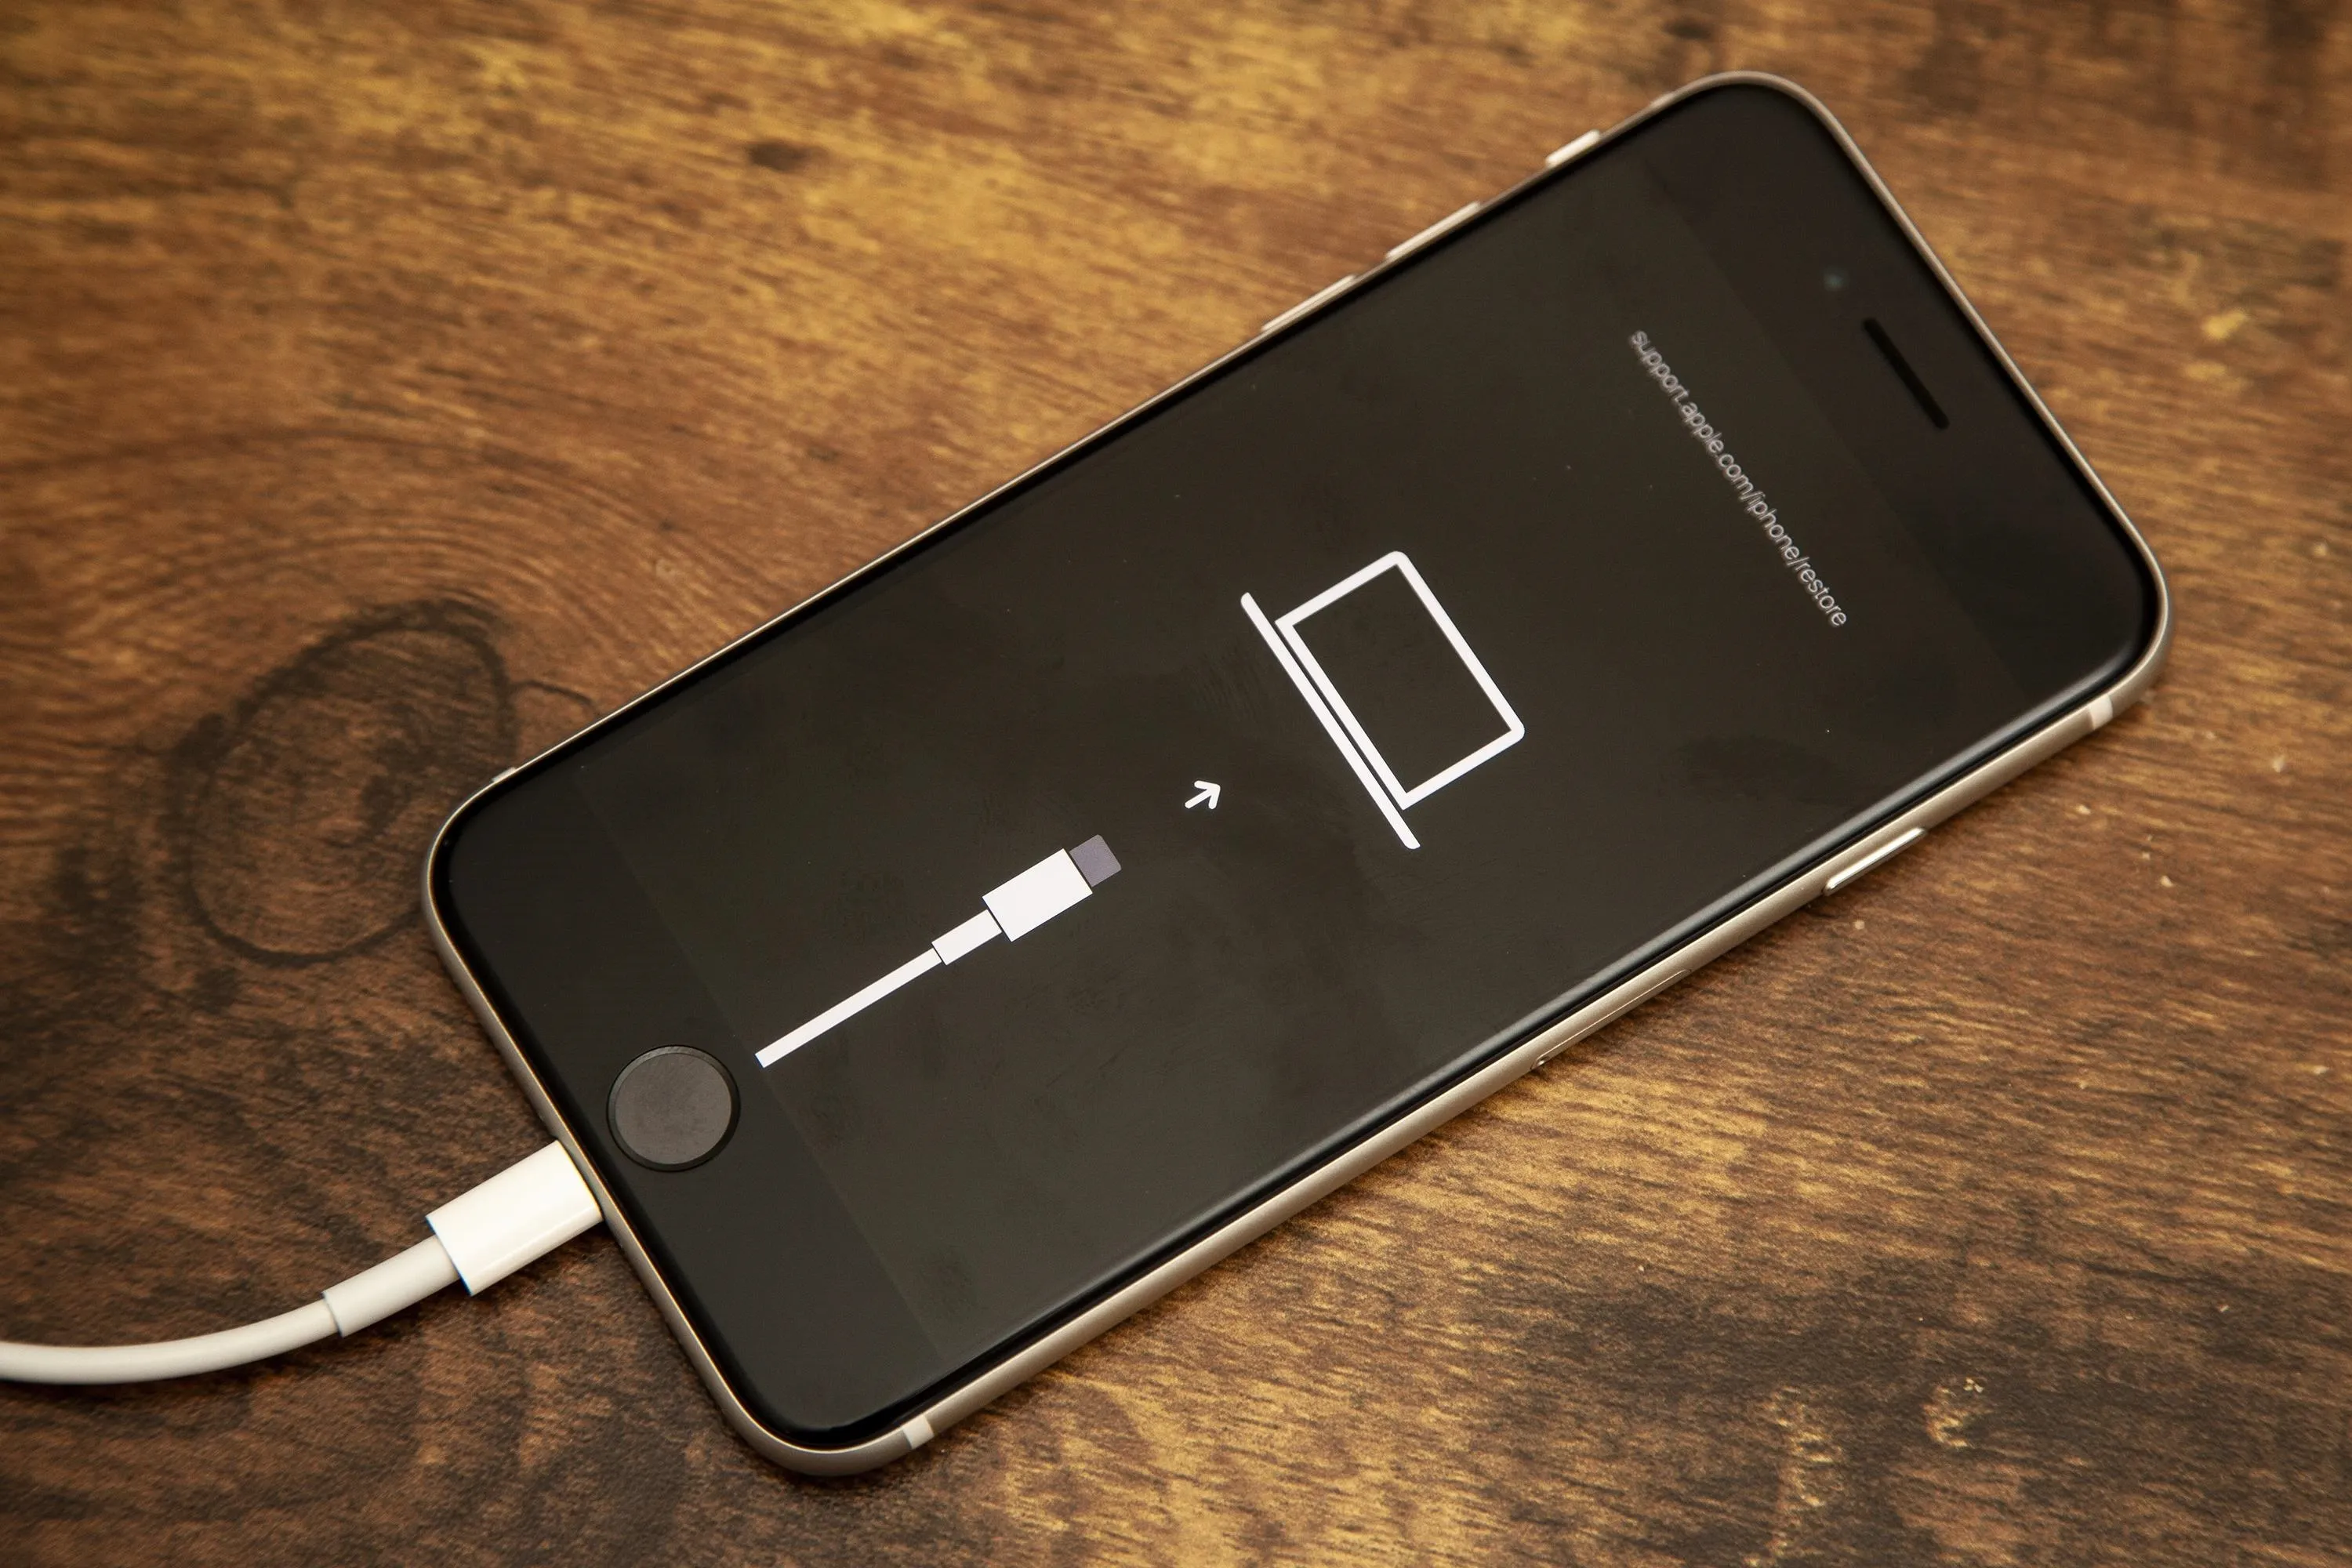
Justin Meyers/Gadget Hacks
If Using DFU Mode
Unfortunately, since DFU mode is a non-advertised feature that Apple doesn't want you playing with, the button combination procedure is more complicated. The first part is the same, but there's more to do. With your iPhone SE connected to Finder or iTunes, perform the following steps.
- Quickly press-and-release the Volume Up button.
- Quickly press-and-release the Volume Down button.
- Press-and-hold the Side button just until the screen goes black.
- Release the Side button once that happens.
- Quickly press-and-hold both the Side and Volume Down buttons together for five seconds.
- After five seconds, release the Side button without letting go of the Volume Down button.
- Continue pressing the Volume Down button for at least five more seconds.
- Release the Volume Down button when you see a pop-up in Finder or iTunes that says it detected an iPhone in recovery mode.
If your iPhone's display is black and the recovery prompt appears, you've successfully entered DFU mode. If the prompt doesn't appear in Finder or iTunes, but your iPhone SE's screen is black, exit the iPhone device in Finder or iTunes, then return to it, and you should see the prompt after a bit.
When the recovery screen on your iPhone appears, or the iPhone simply restarts as usual, one of the actions wasn't performed correctly, most likely, so try again and be careful!
Update or Restore Your iPhone
Now, the options that appear on the computer screen are different from recovery to DFU mode, so you'll need to slightly different things to continue fixing your iPhone SE.
If Using Recovery Mode
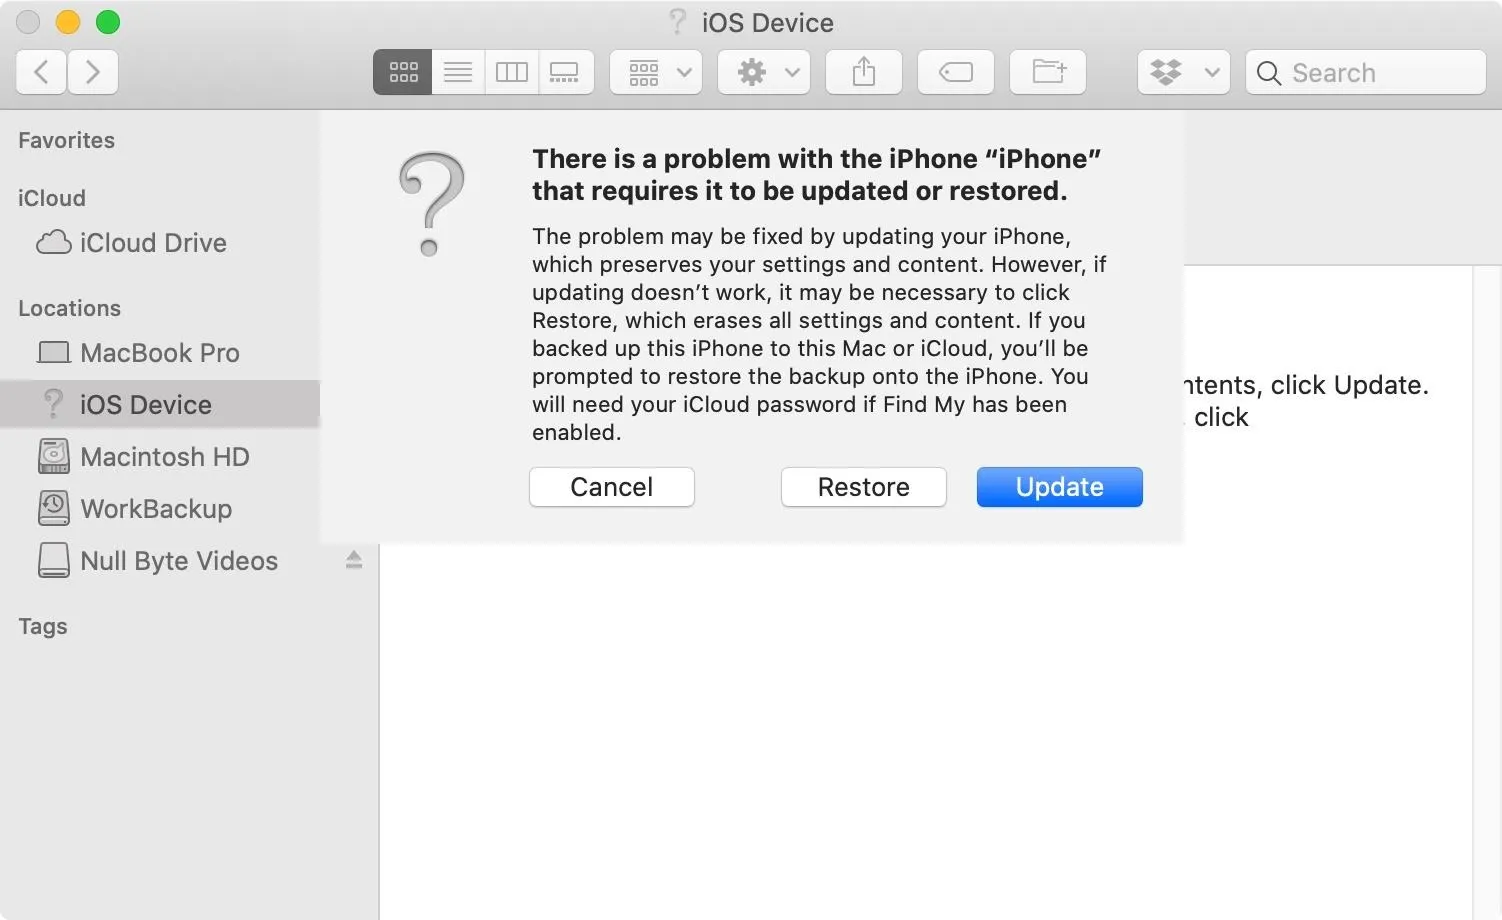
In either Finder or iTunes, click "Update" on the pop-up that says, "There is a problem with the iPhone 'iPhone' that requires it to be updated or restored." Performing an "Update" will try to fix your iPhone SE while preserving your settings and content. In a perfect world, however, that may not work for you. To go the long mile and restore your iPhone SE to factory settings, click "Restore" instead.
Either way, follow the on-screen prompts and wait for your iPhone to boot up to the first iOS welcome screen. Your computer will first download the software; then, it will push it to your device, which may take some time. From here, things may be ready to go if you chose "Update." Otherwise, you can set up your iPhone SE as a new device or restore it using a backup.
If Using DFU Mode
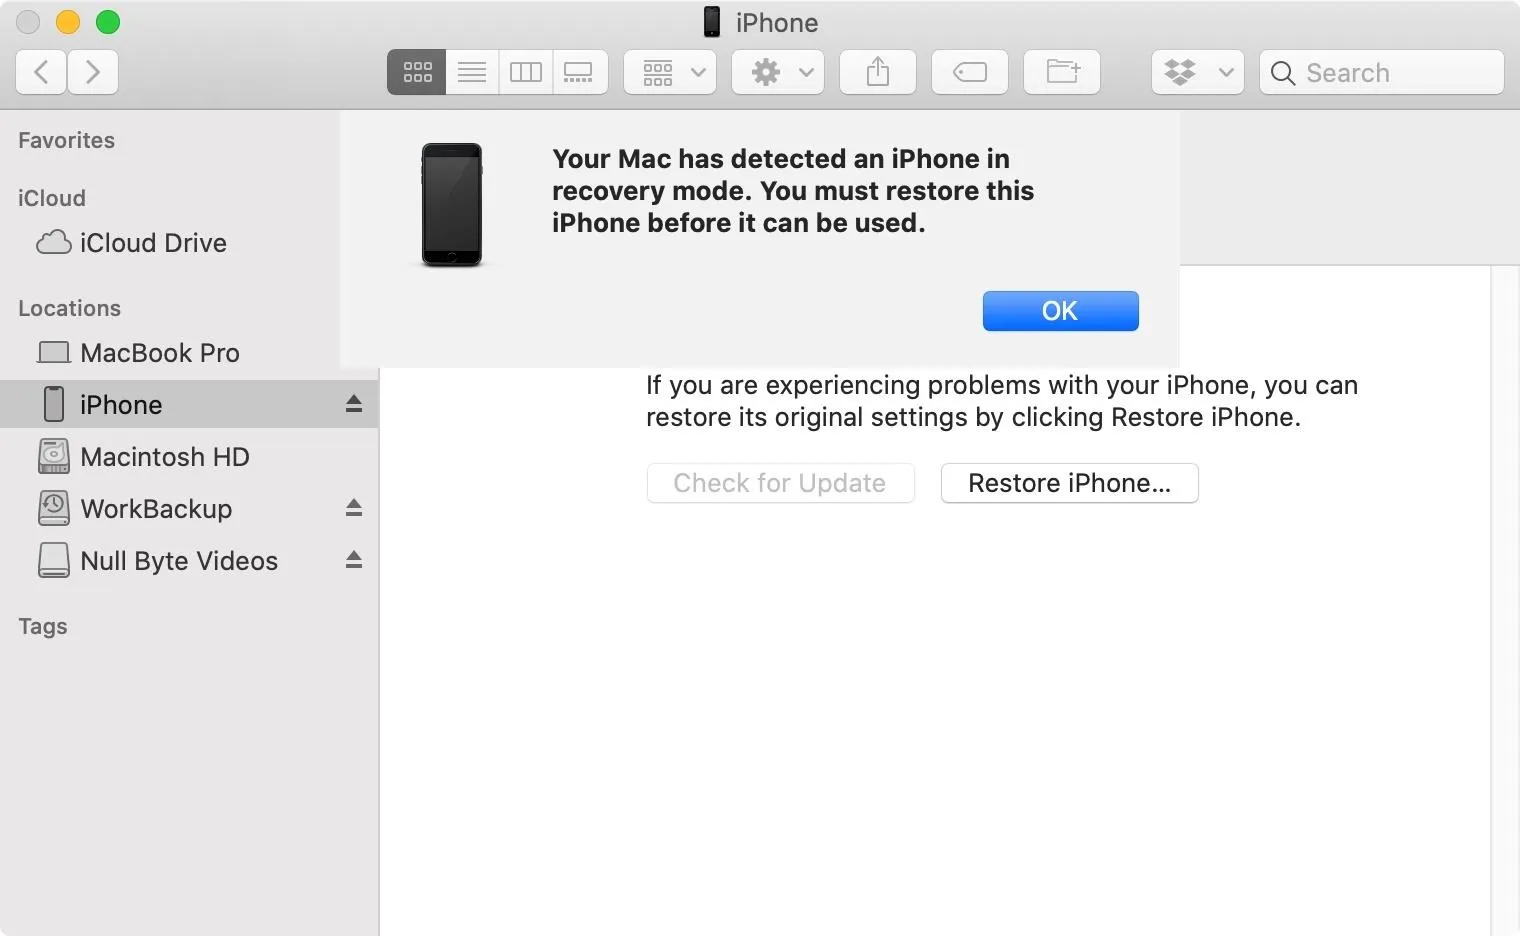
In either Finder or iTunes, click "OK" on the prompt that says, "Your Mac [or iTunes] has detected an iPhone in recovery mode. You must restore this iPhone before it can be used."
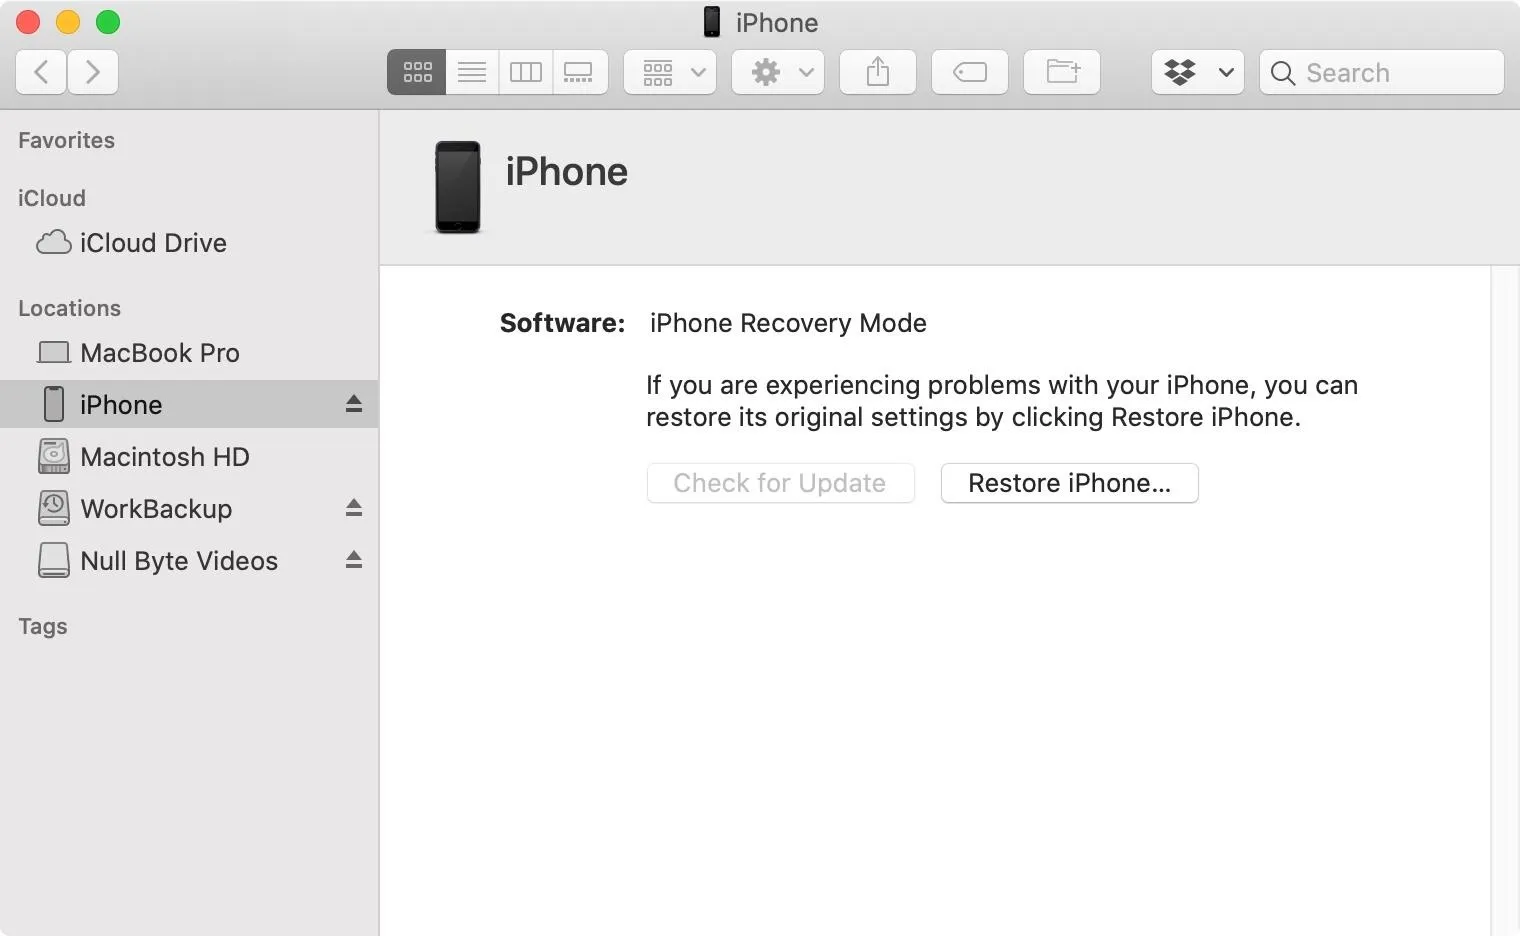
Next, under the iPhone Recovery Mode label, click on "Restore iPhone," then follow the on-screen prompts. It will download the software to your computer, then flash it onto your iPhone. It may take some time to do so. After it finishes restoring iOS on your iPhone SE, DFU mode will end, and your device will boot up to the first iOS welcome screen. You can then set up your iPhone SE as a new device or restore it using a backup.
How to Exit Recovery or DFU Mode
If you change your mind while in recovery or DFU mode, or if something went wrong when using the button combinations, you can exit and restart your device. For both, it's the same as a force-restart. So that's Volume Up, Volume Down, then hold the Side button until the Apple logo appears. To reiterate:
- Quickly press-and-release the Volume Up button.
- Quickly press-and-release the Volume Down button.
- Press-and-hold the Side button for about 10 seconds.
- Release the Side button when you see the Apple logo.
When you successfully updated or restored iOS using recovery or DFU mode, your iPhone SE should boot back up to iOS 13. Just enter your passcode, and you'll be back to using your iPhone as if nothing happened.
Cover photo and screenshots by Justin Meyers/Gadget Hacks


Comments
Be the first, drop a comment!