Performance and stability improvements, as well as new features, are just some reasons to install iOS 12, but new changes mean new battery health challenges. It can be difficult to boost battery life while taking advantage of everything this update has to offer. Luckily, there are plenty of ways to avoid unnecessary battery drain when using iOS 12 on your iPhone.
While many of the following tips involve being smart with certain settings and features you have control over, it's not all on your shoulders; Apple knows you worry about your iPhone's battery life throughout the day, and they have included new solutions in their latest iOS update to help maximum time between charges. All those tips and more are included in our list below.
1. Listen to Your iPhone's Advice
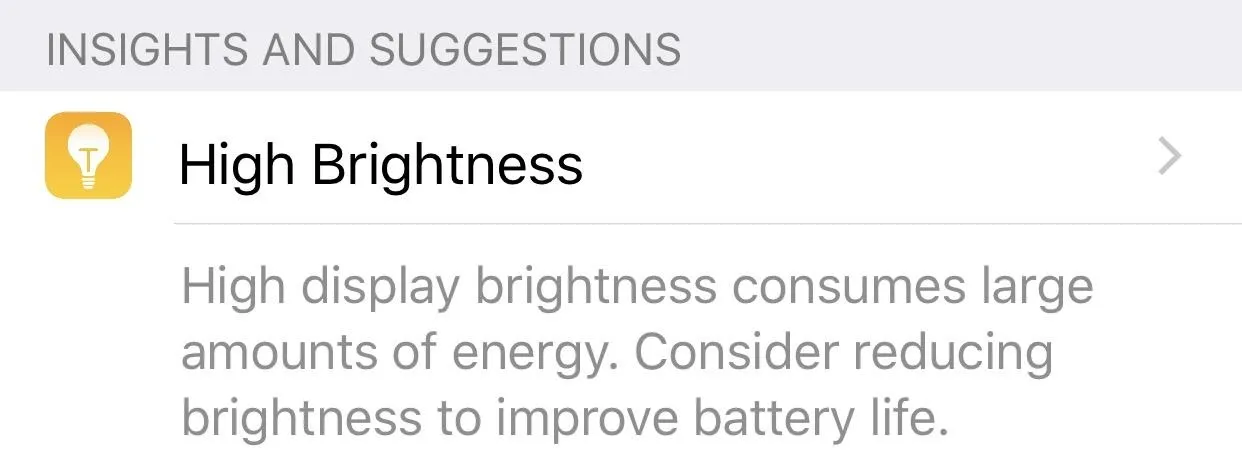
In the "Battery" section of the Settings, you'll find Insights & Suggestions. This area will provide tips on how to cut down on battery usage, tailored to your specific needs. For example, if iOS detects your iPhone is using high brightness, it might suggest you dim your display to save on battery power. It's a helpful feature that feels more personal than generic battery-saving advice.
2. Keep Track of Your Usage with New Charts
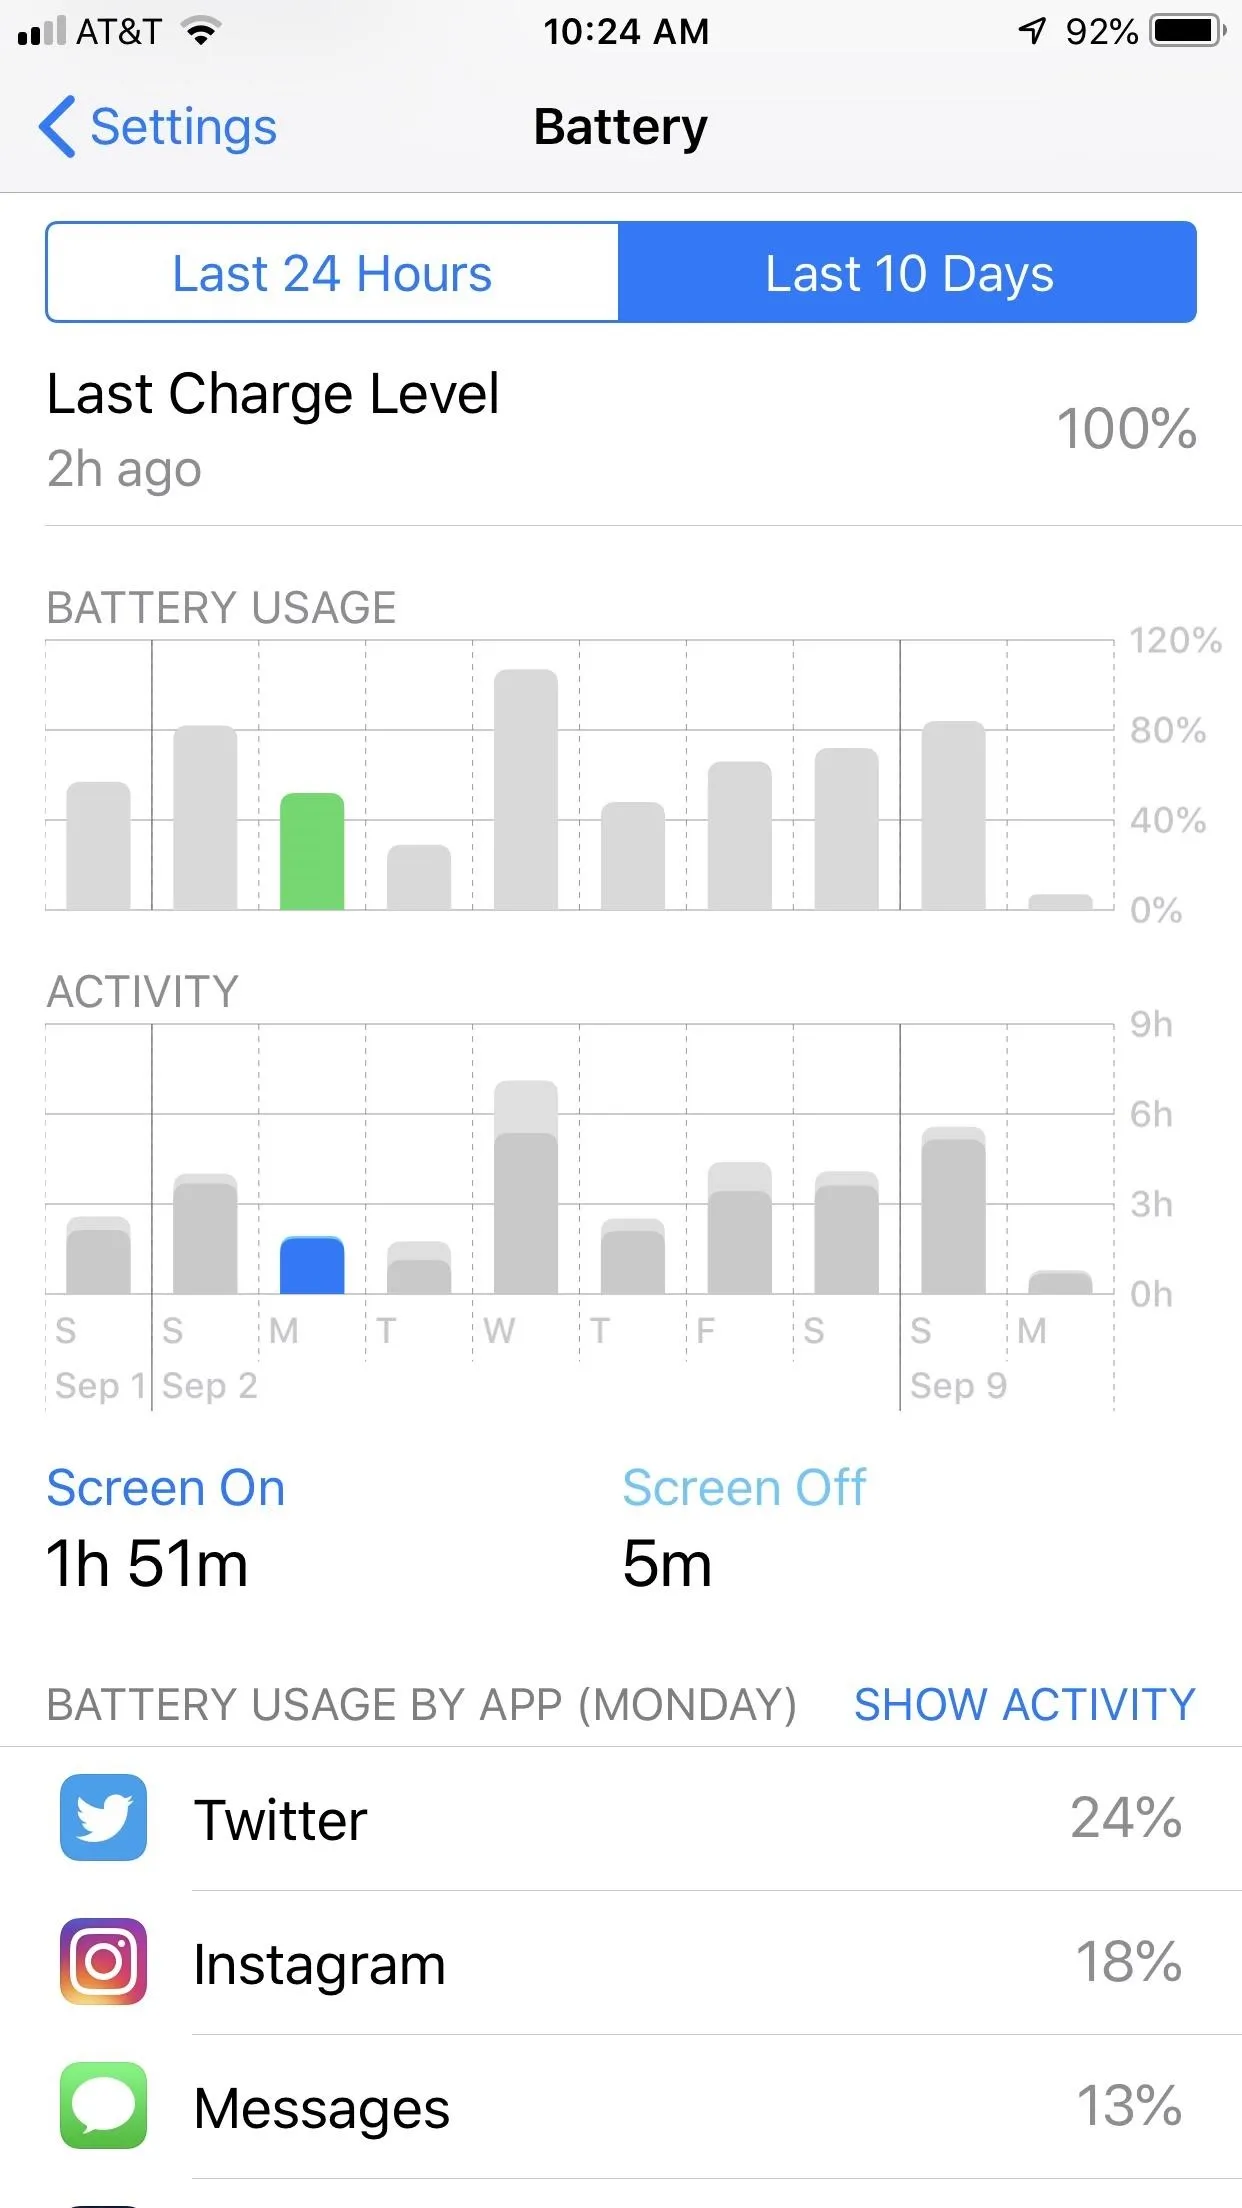
IOS 12 introduces new tools to keep your battery usage in check. Fresh this year are charts that detail both your battery usage as well as your battery activity over 24-hour and 10-day periods of time. Here, you can get a sense for how often you use your iPhone and how that impacts your overall battery life over time.
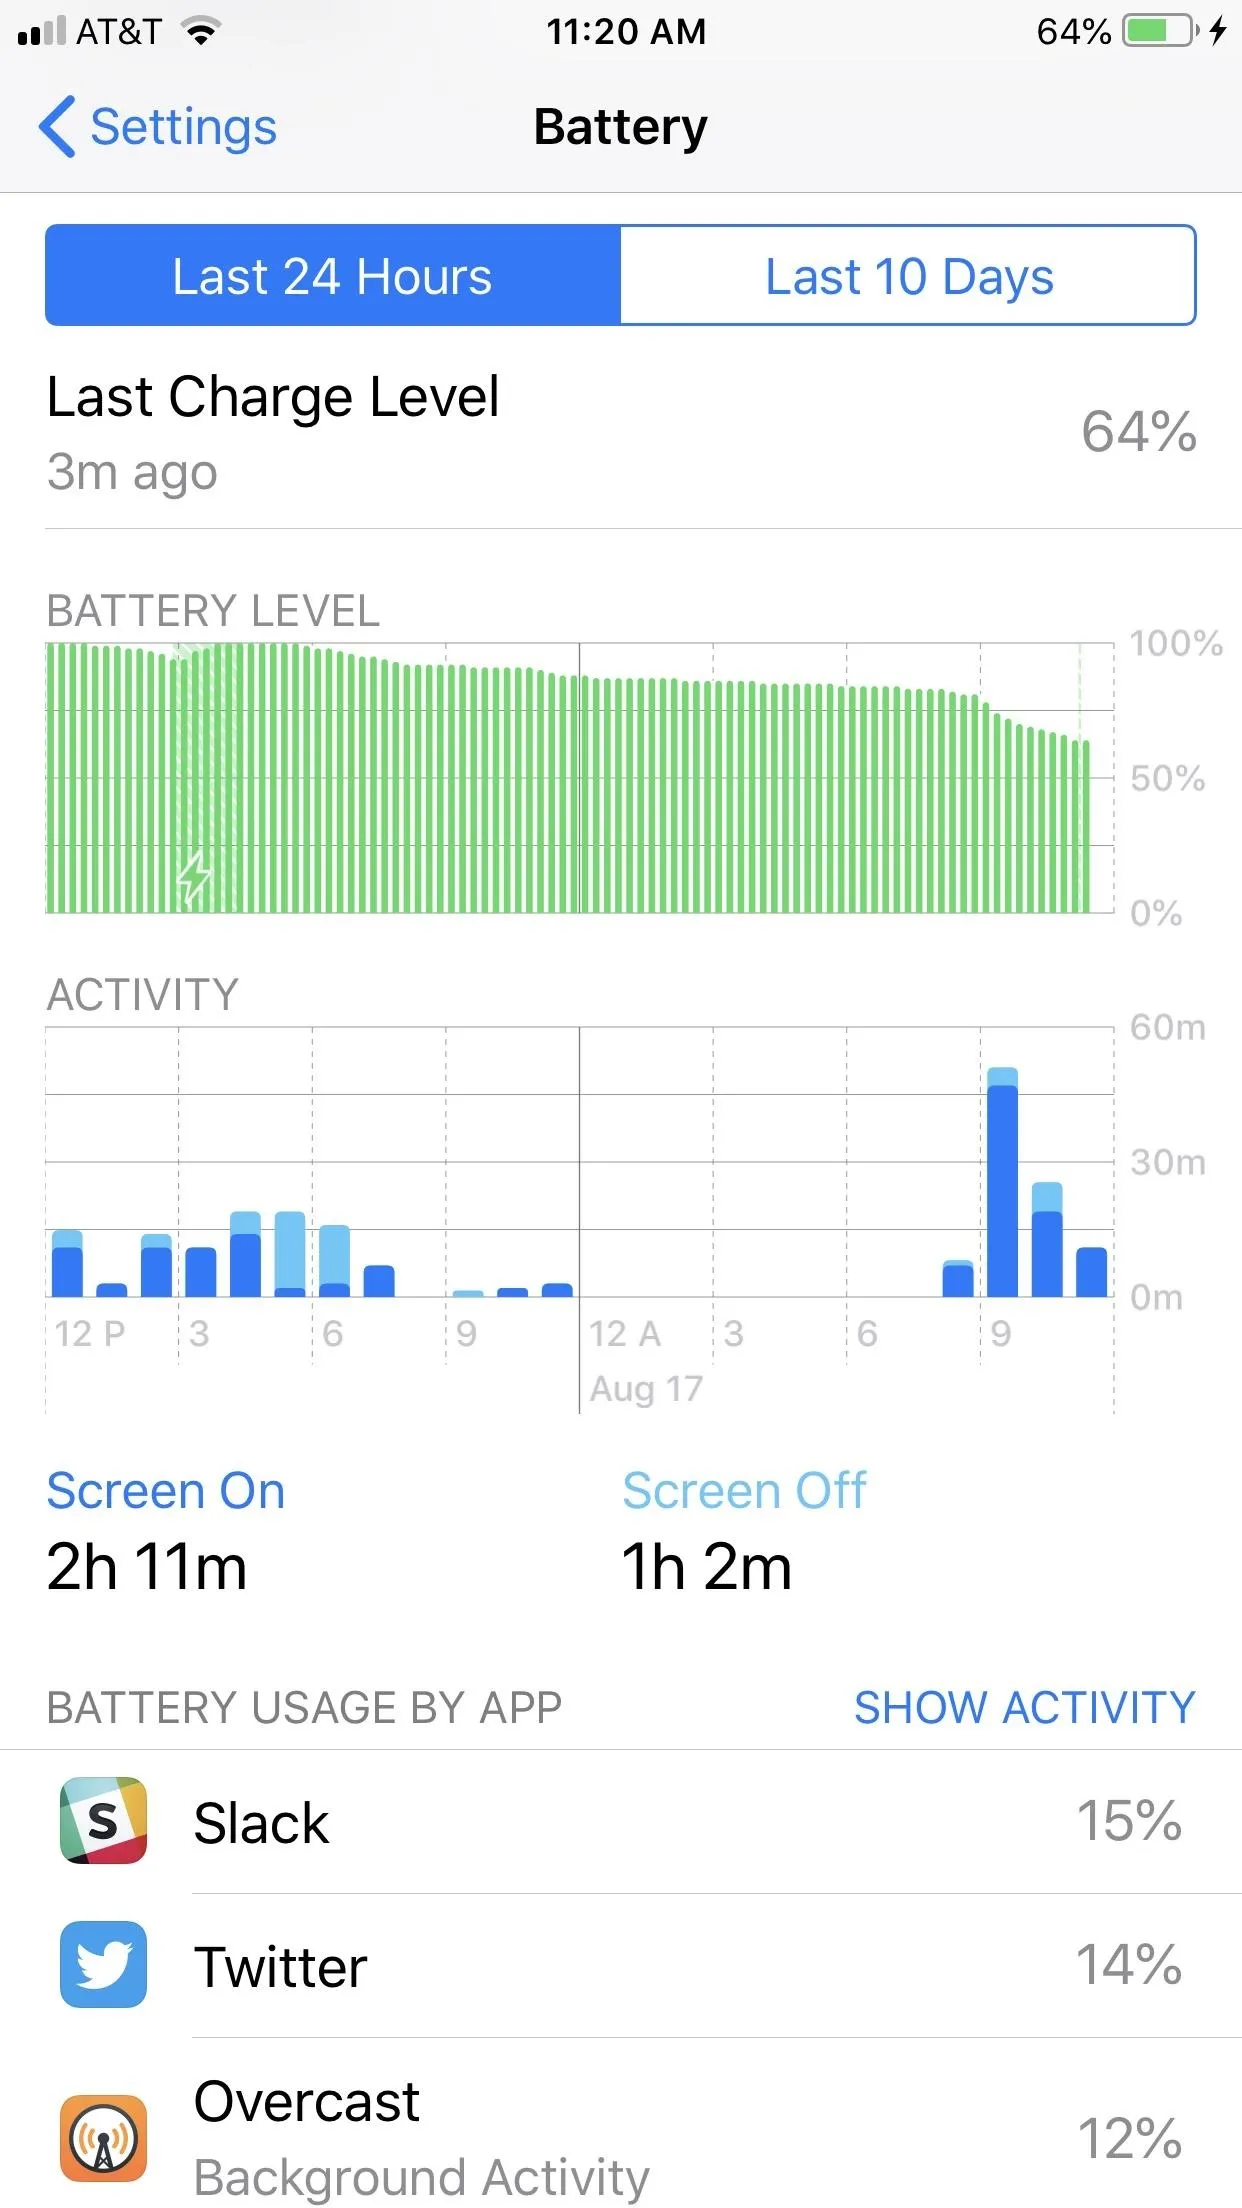
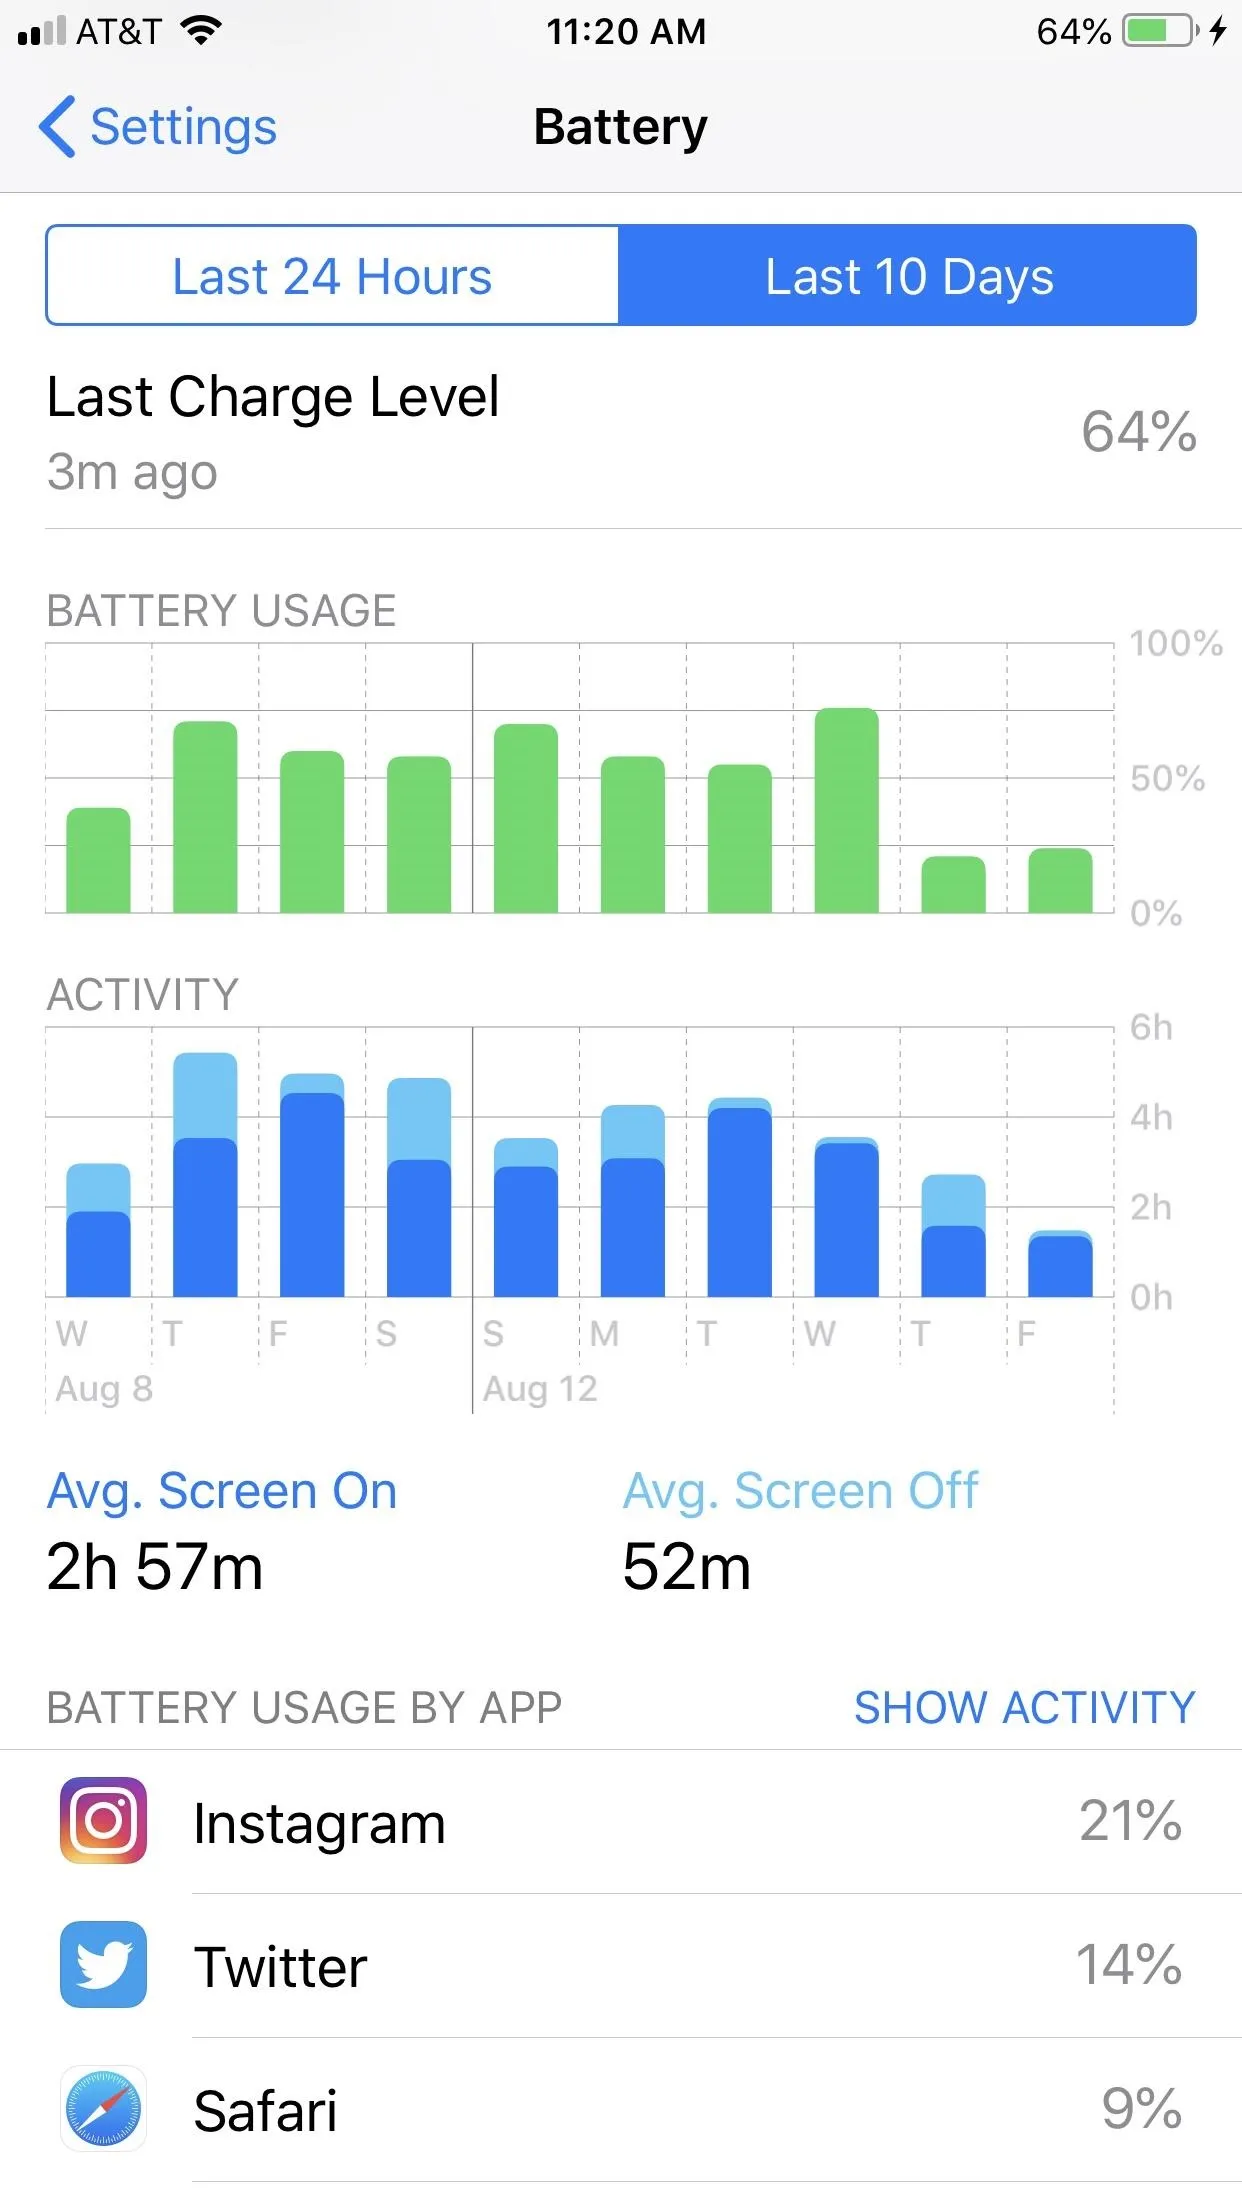


Tap anywhere on either chart to get a more detailed view of your battery data. For example, the 24-hour battery level chart will show you increments of 15 minutes in any given area you tap, while the 10-day battery usage chart will show you one day's data at a time.


3. View Battery Usage by App
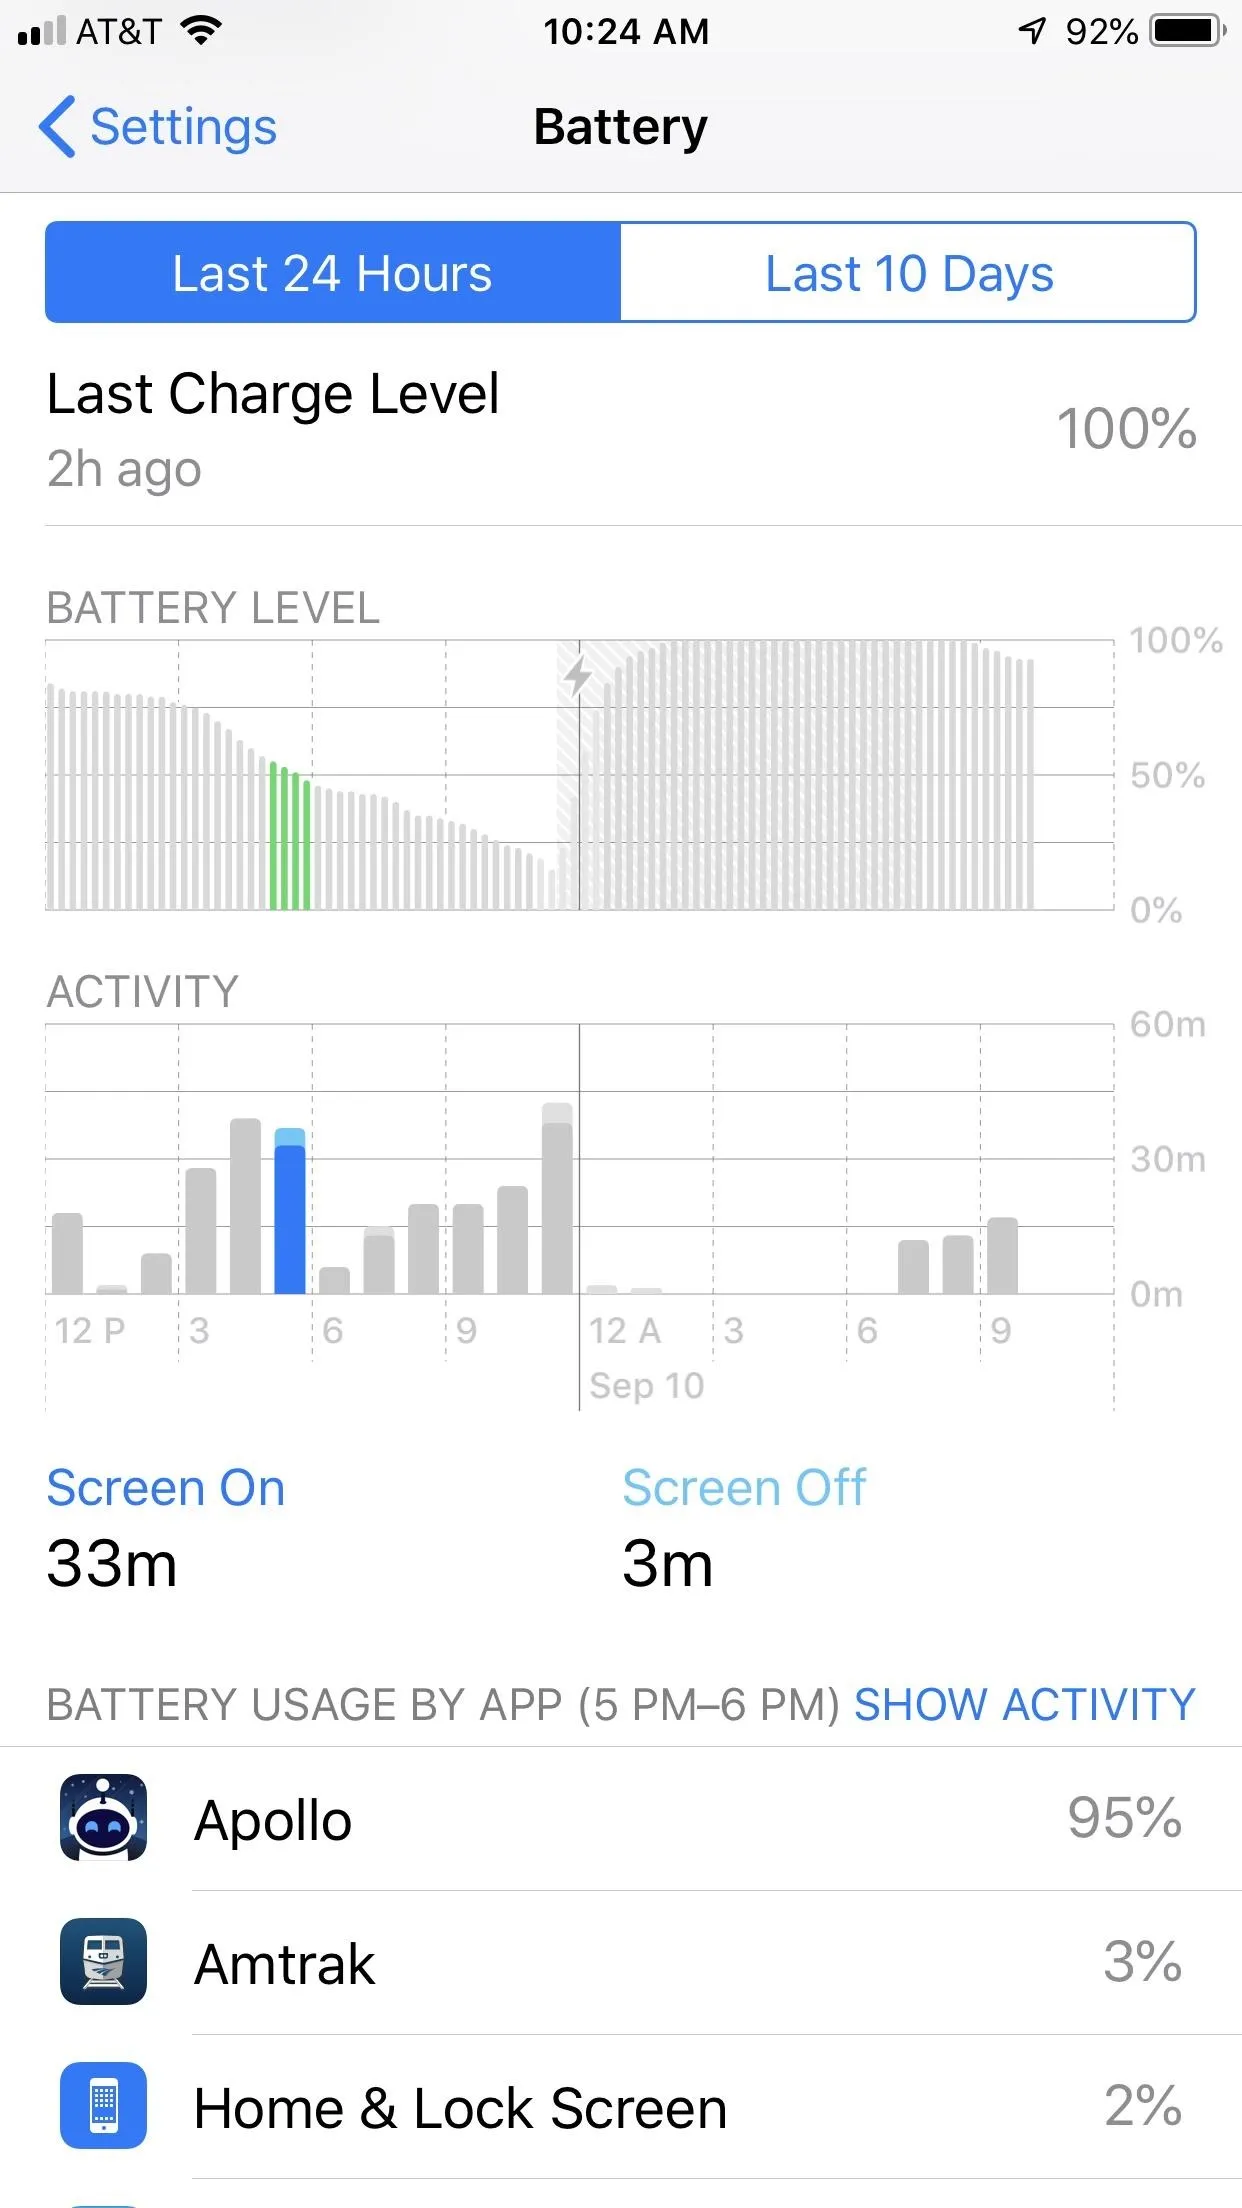
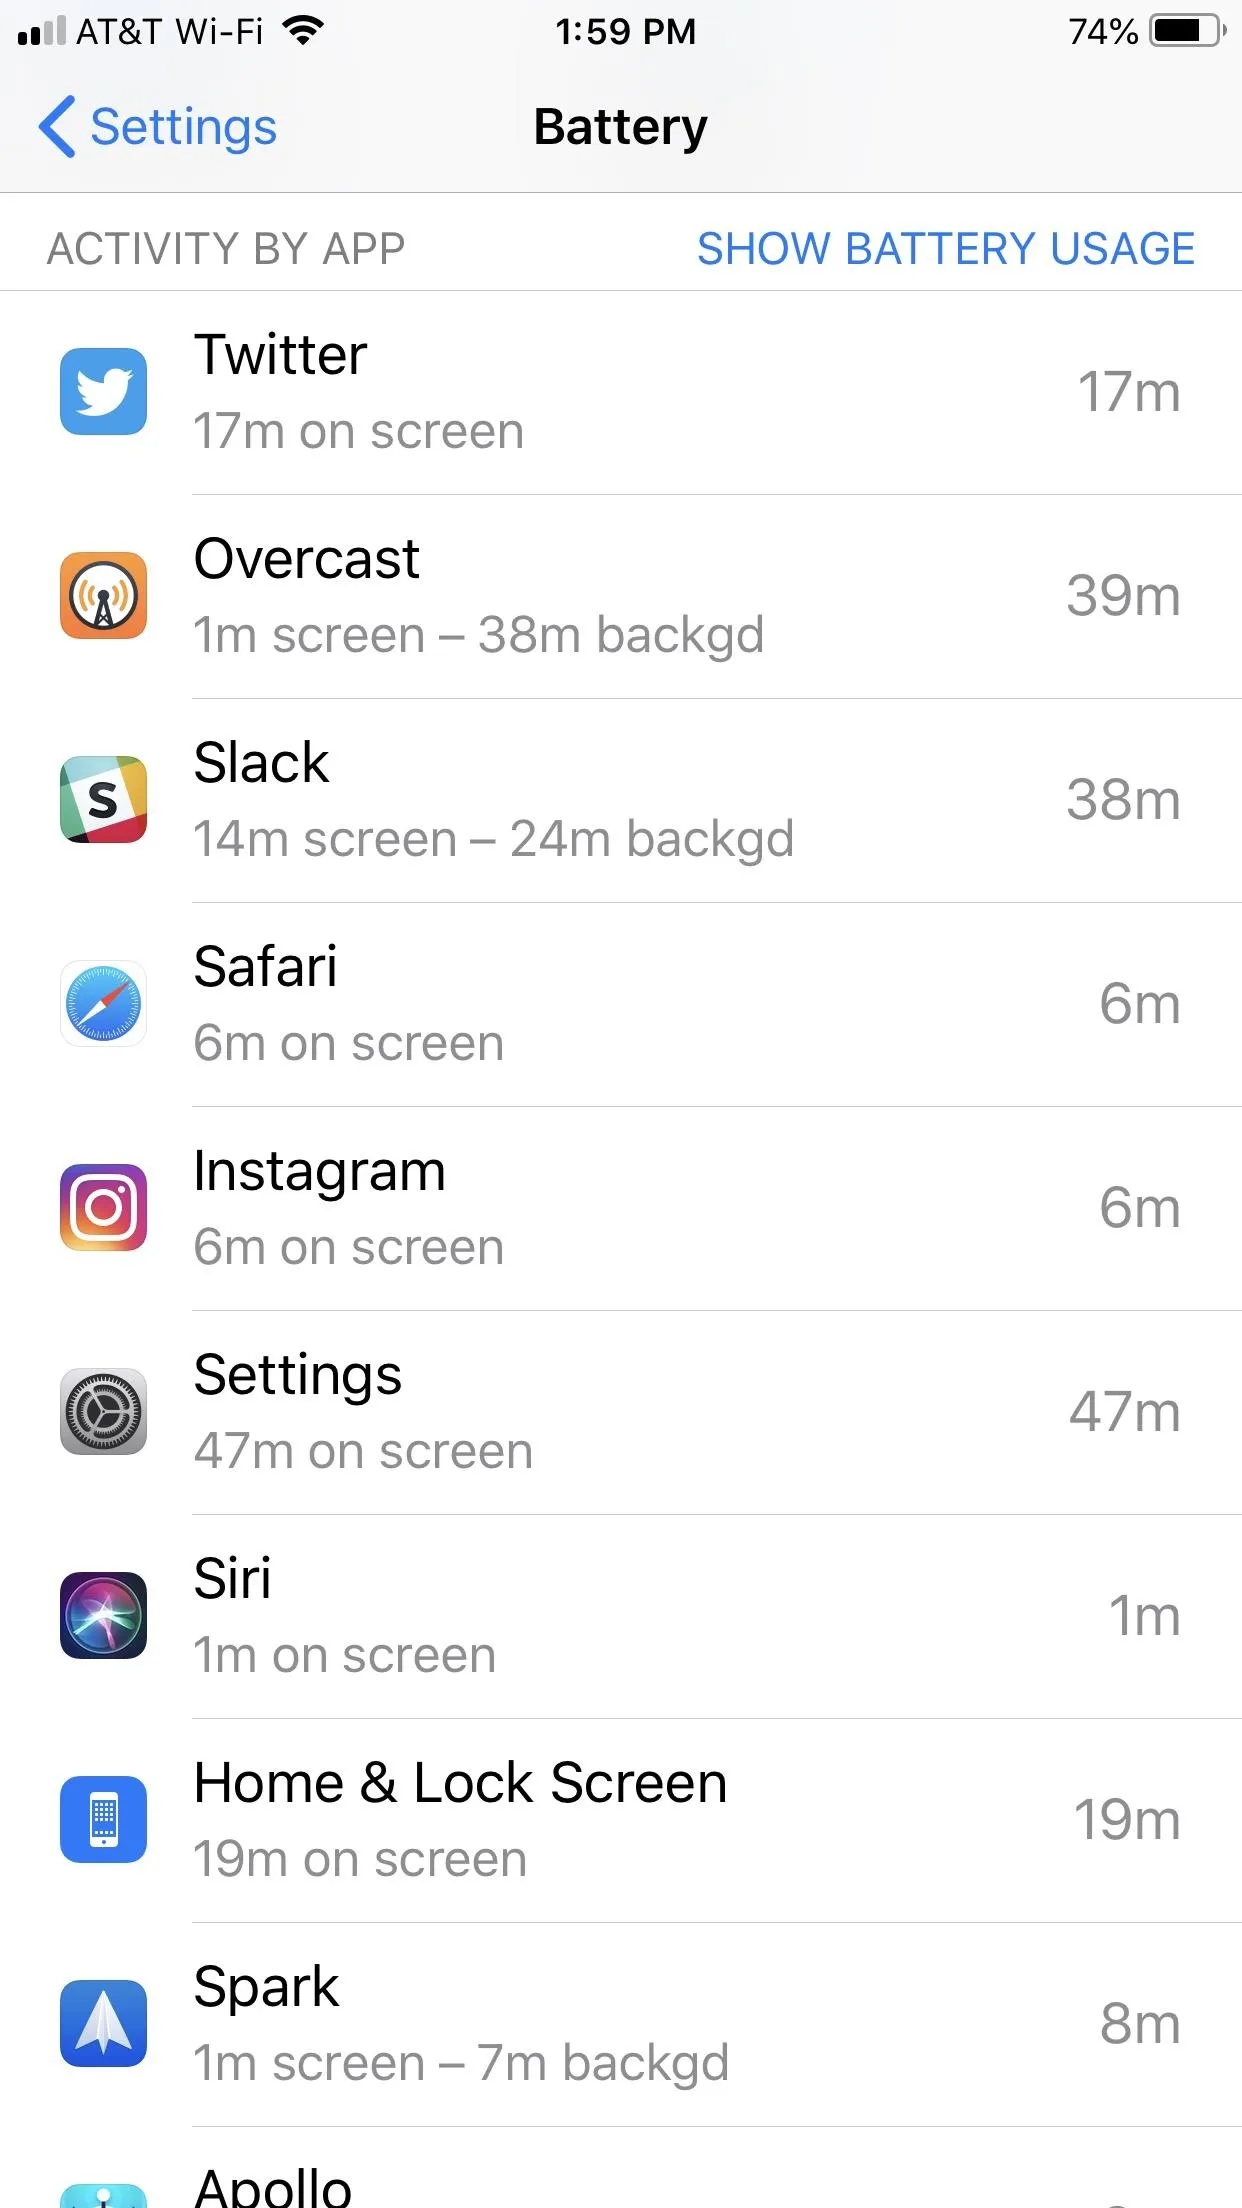
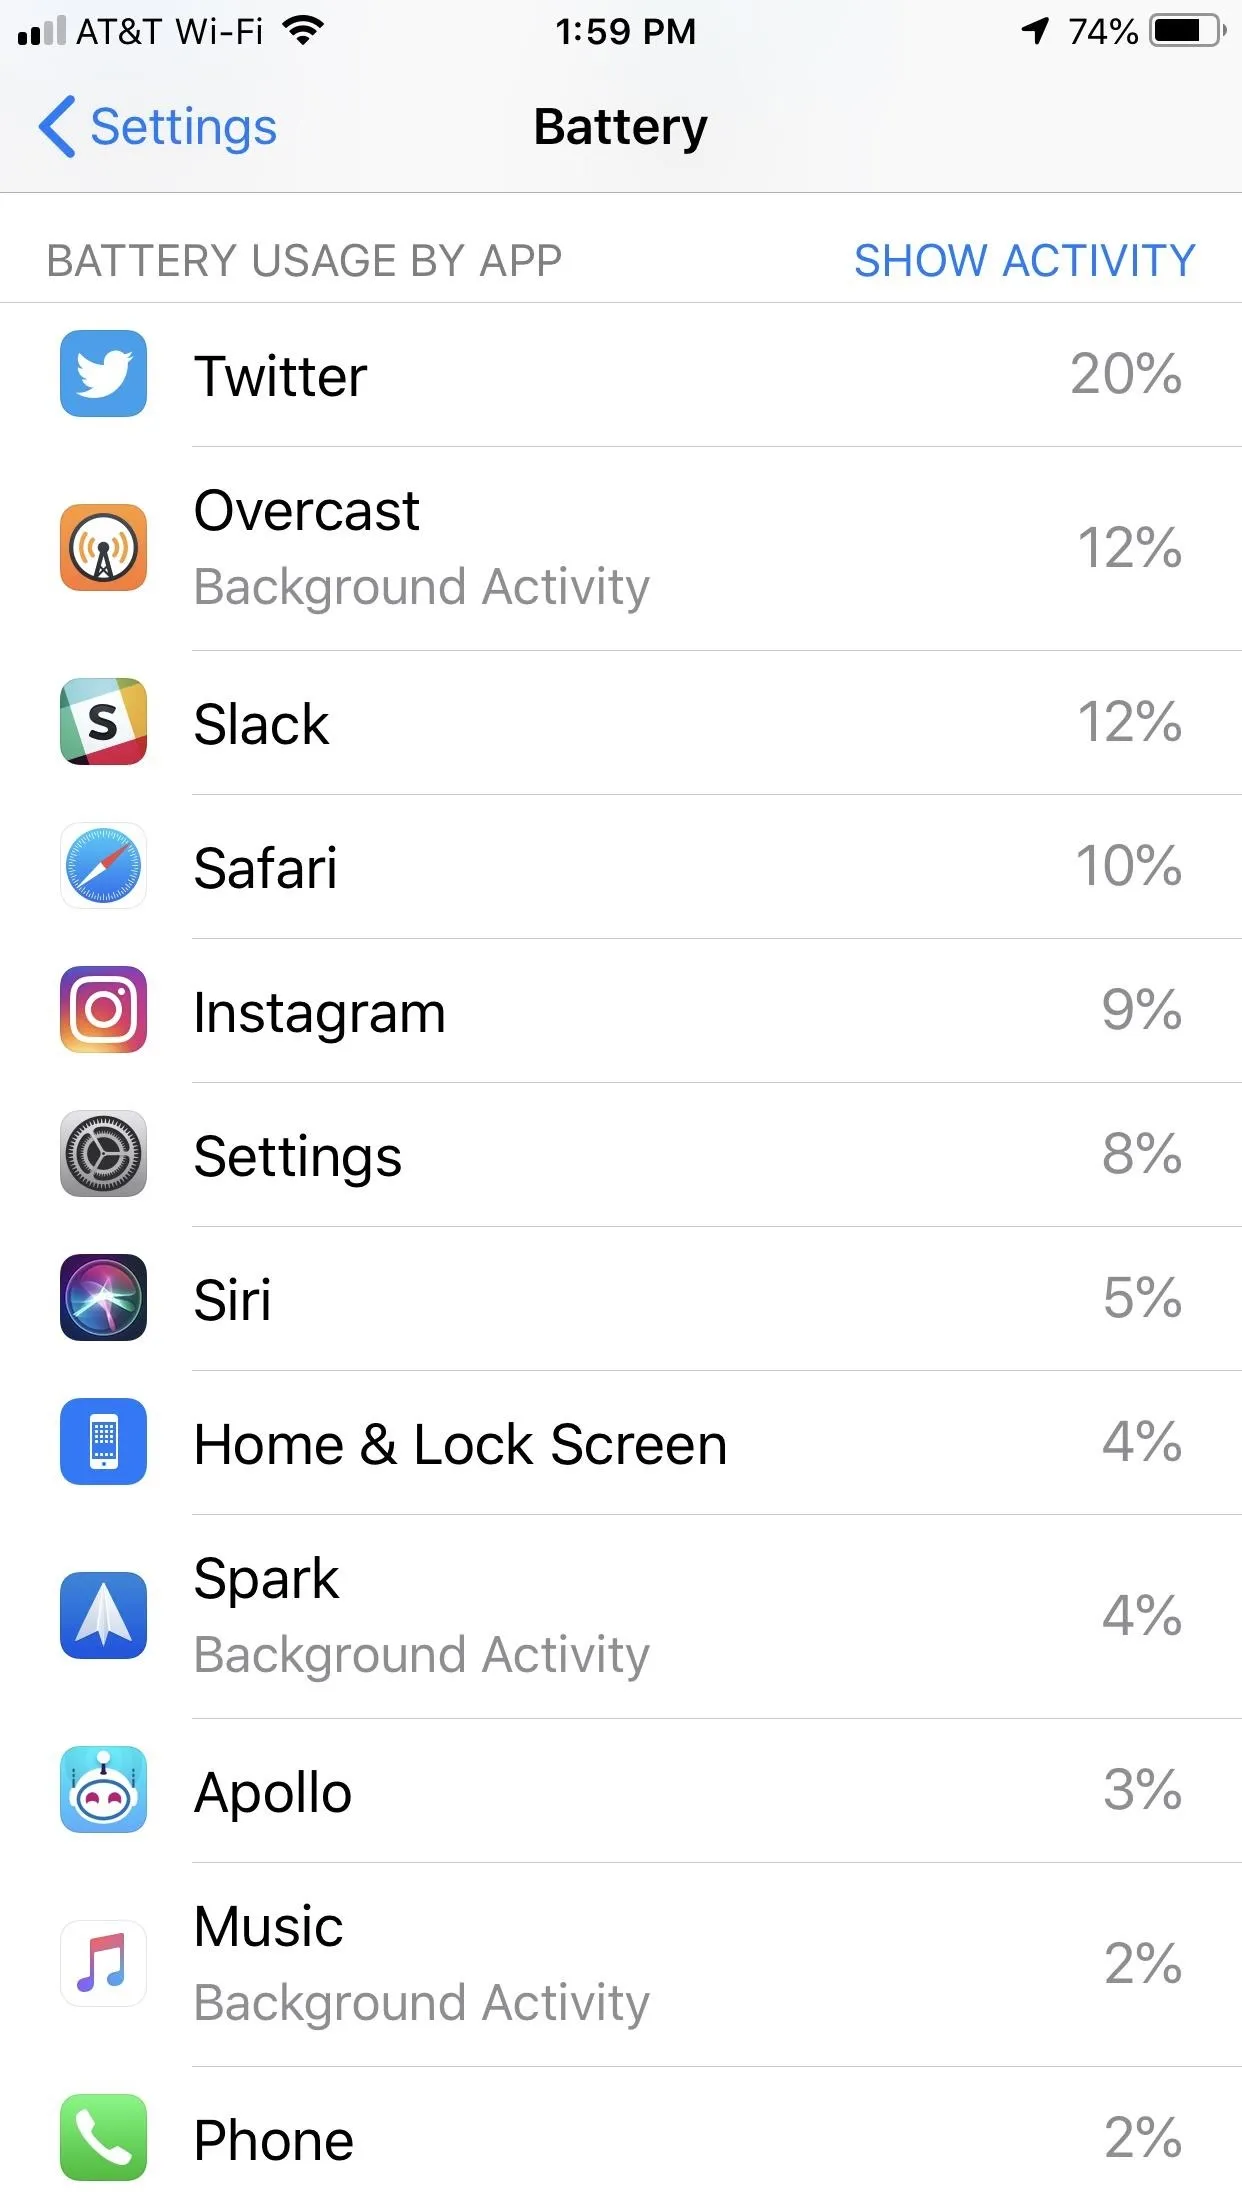
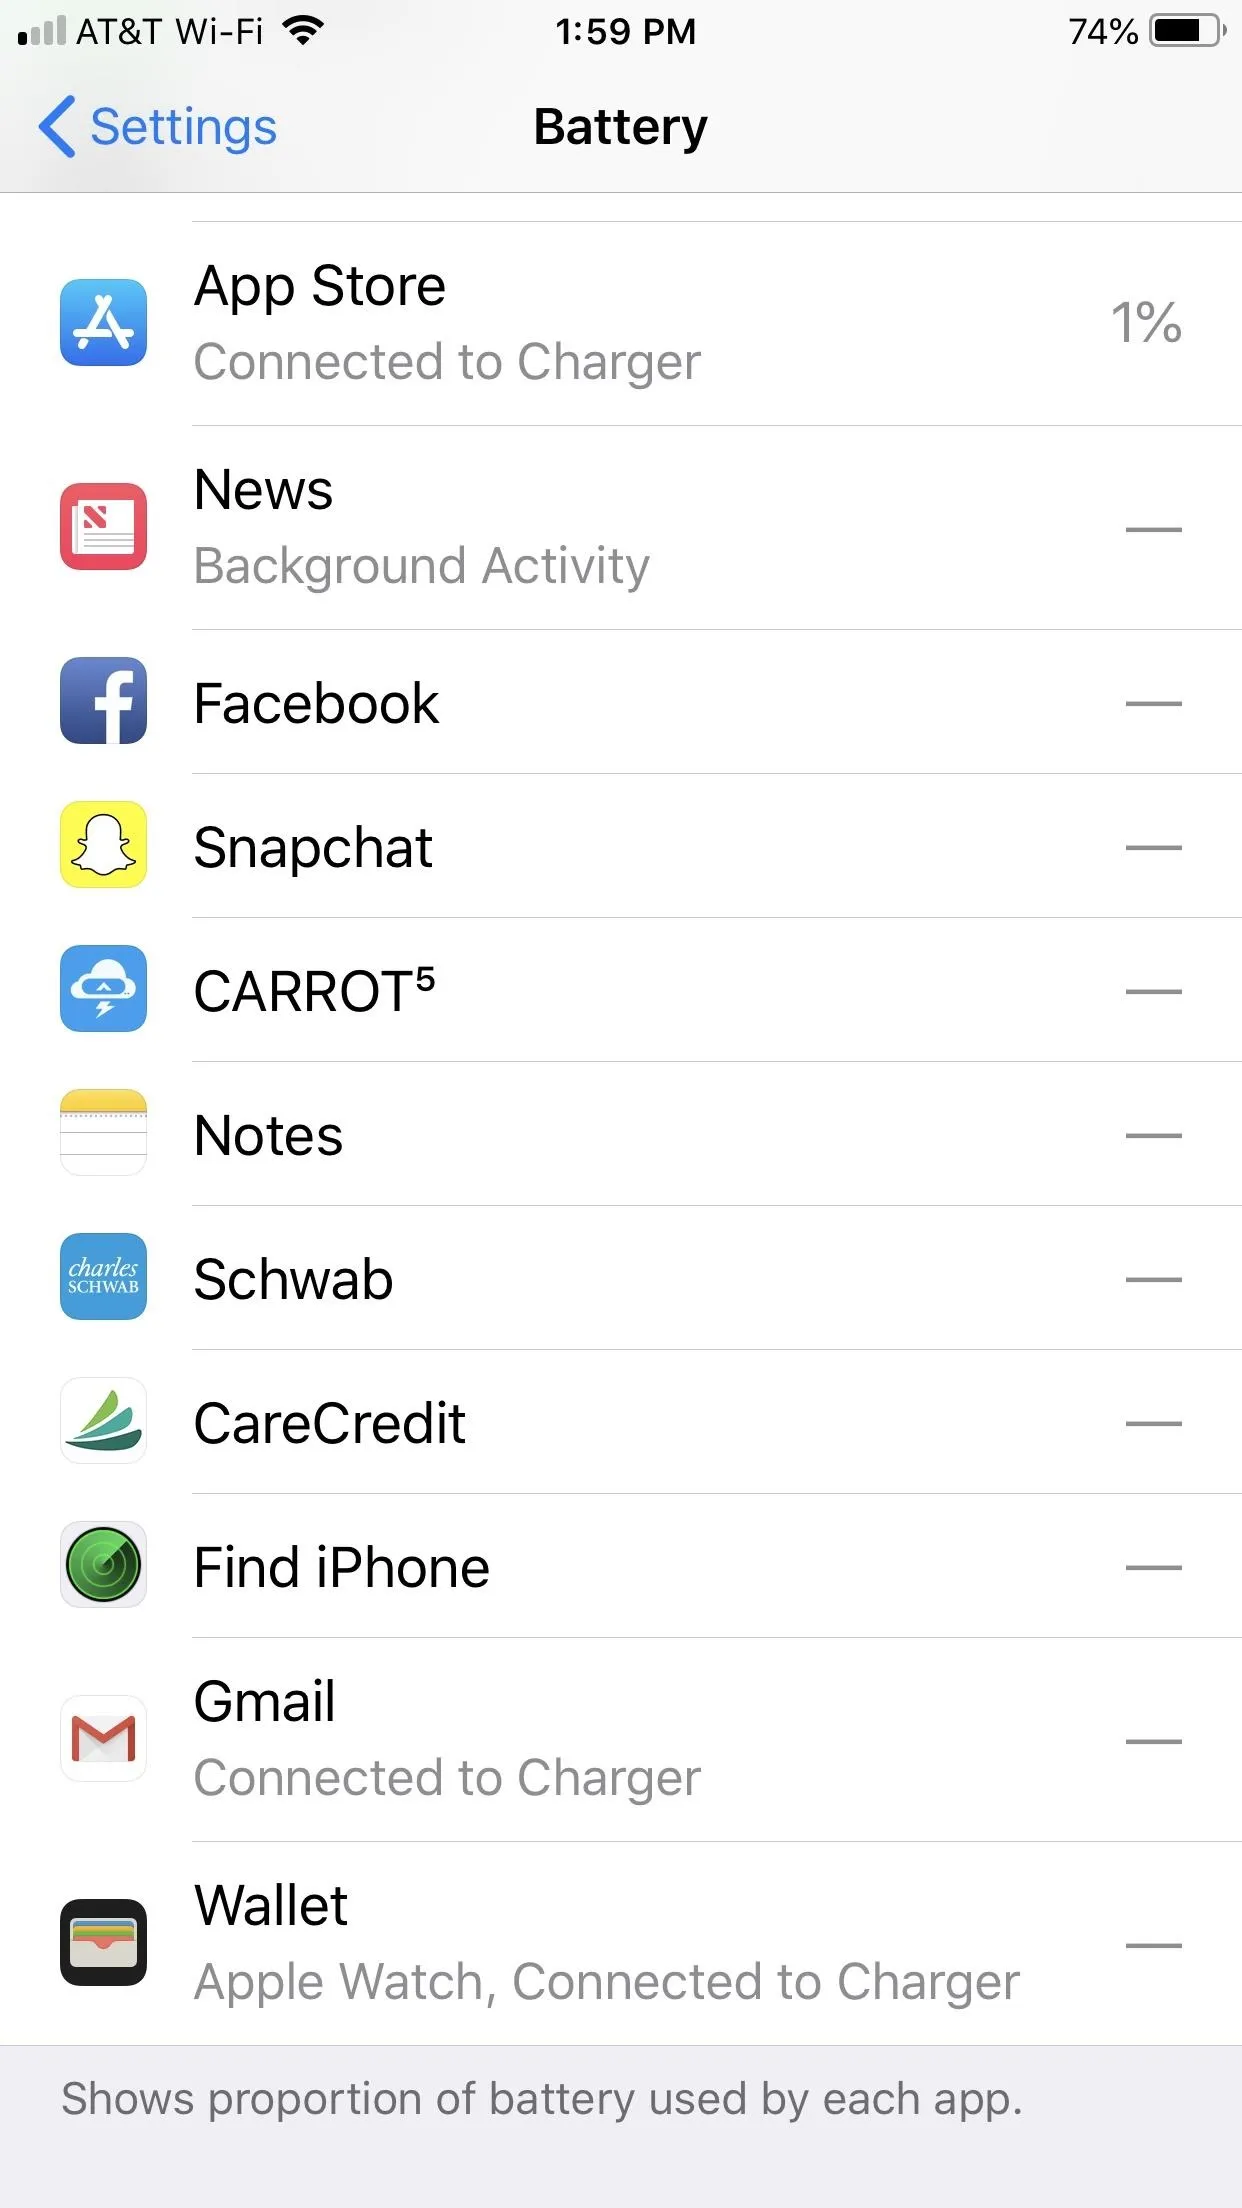
If the new charts aren't specific enough for your taste, try Battery Usage by App at the bottom of the "Battery" page. Here, iOS 12 lists all of your used apps, accompanied by both time and battery percentage used by each over either 24-hour or 10-day period.
These lists are sorted by usage, so you quickly see which of your apps is using the most of your battery. Perhaps it will encourage you to use high-powered apps less, or, if rarely-used apps make the list, dive into their settings and reduce their use.


4. Use Dark Mode in Apps When Possible
Some third-party apps have a dark theme built in since iOS doesn't have one itself. This tip is mainly for iPhones with an OLED screen, such as the iPhone X. These types of screens will display nothing in place of black colors, so if an app is using black as its background, your display is using a lot less juice.
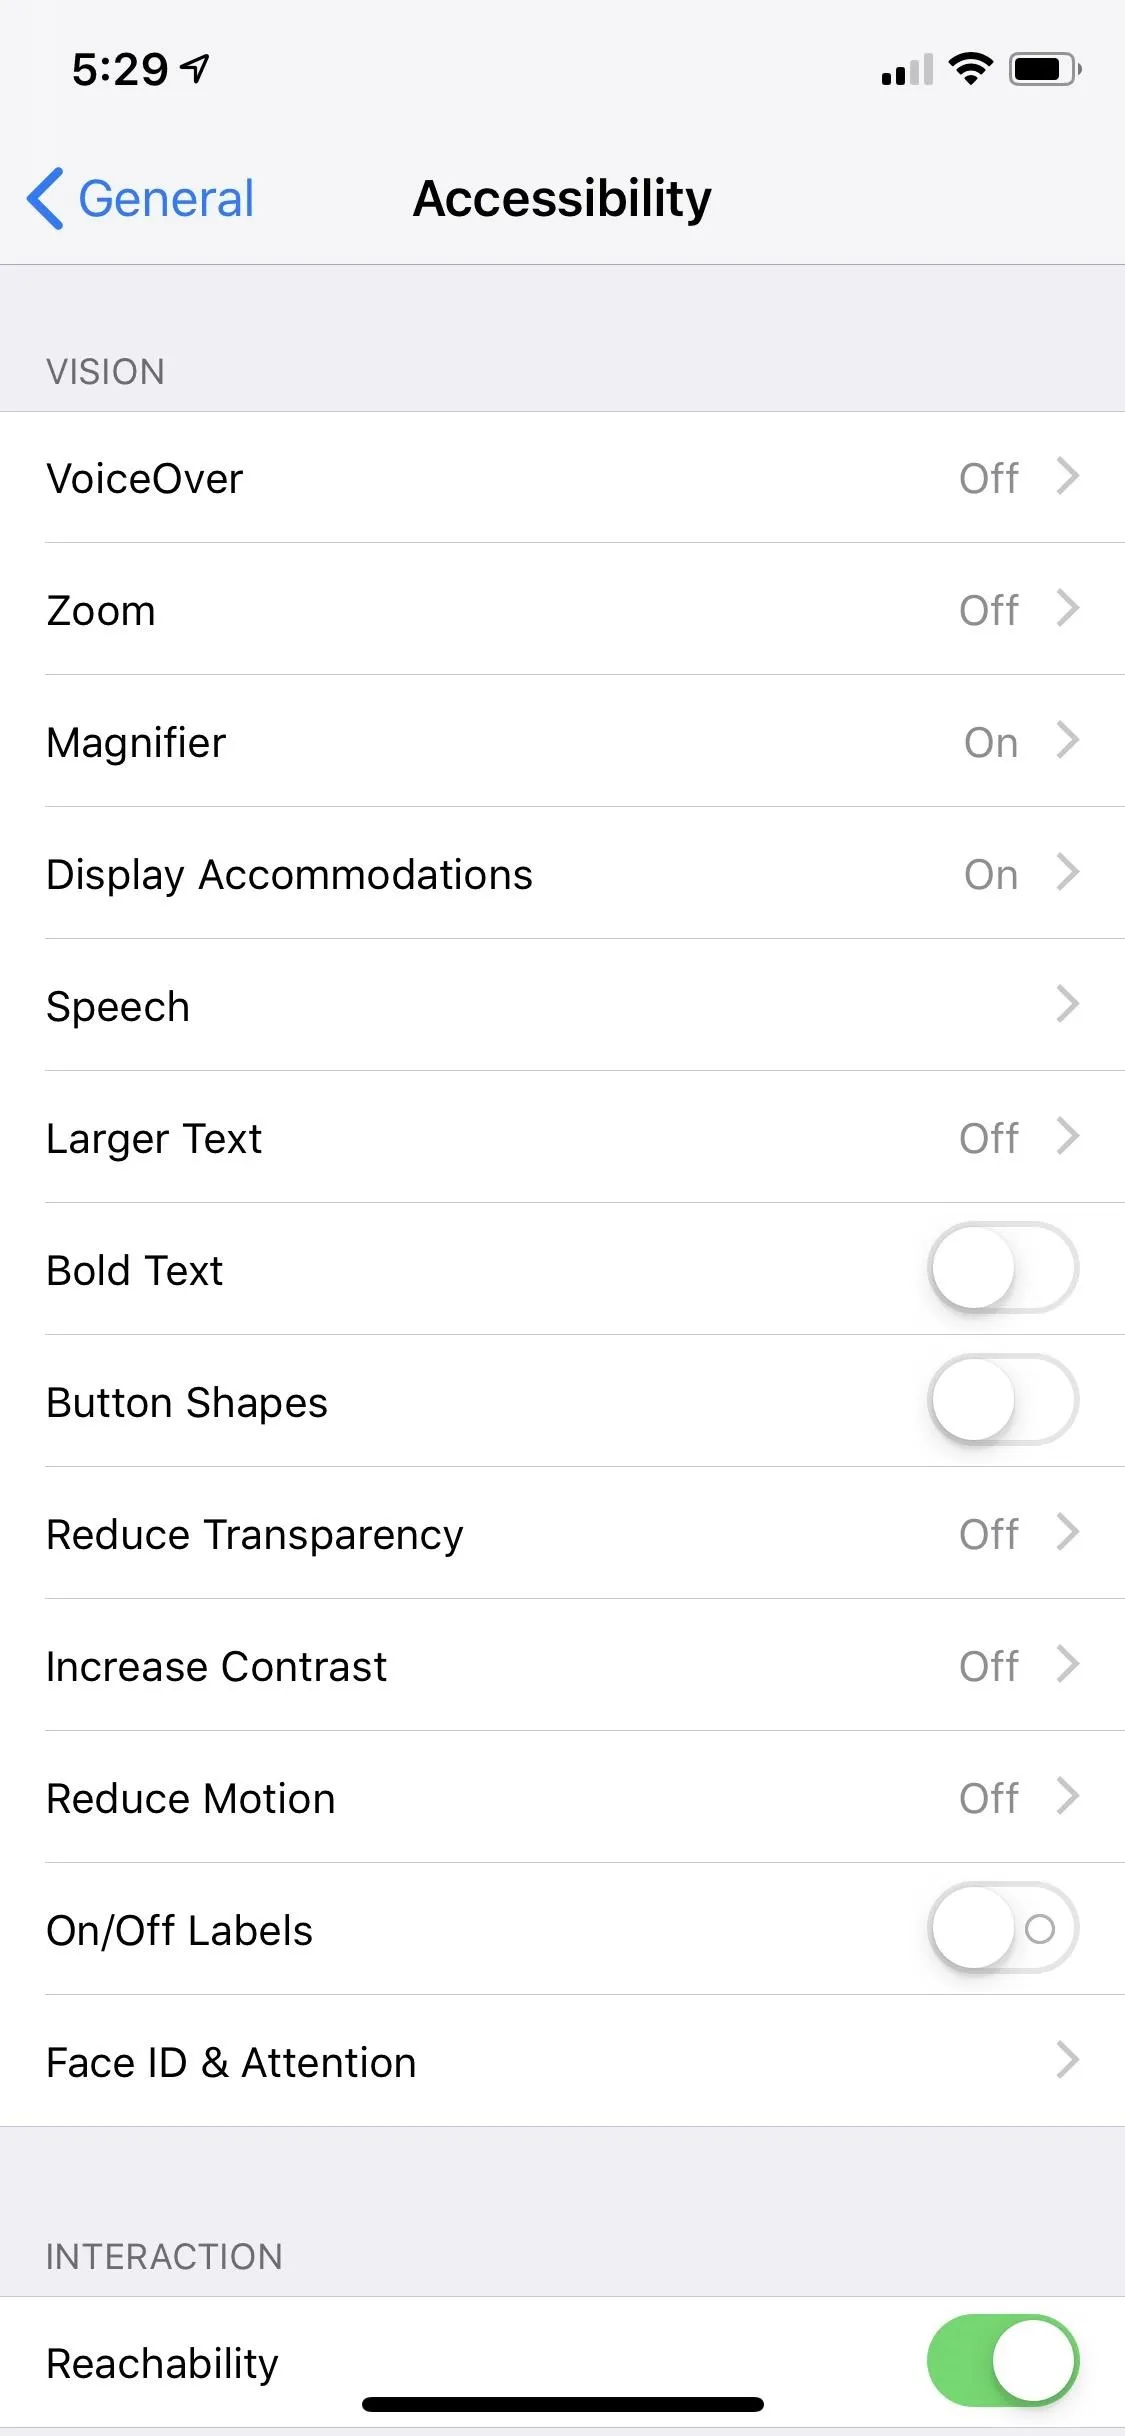
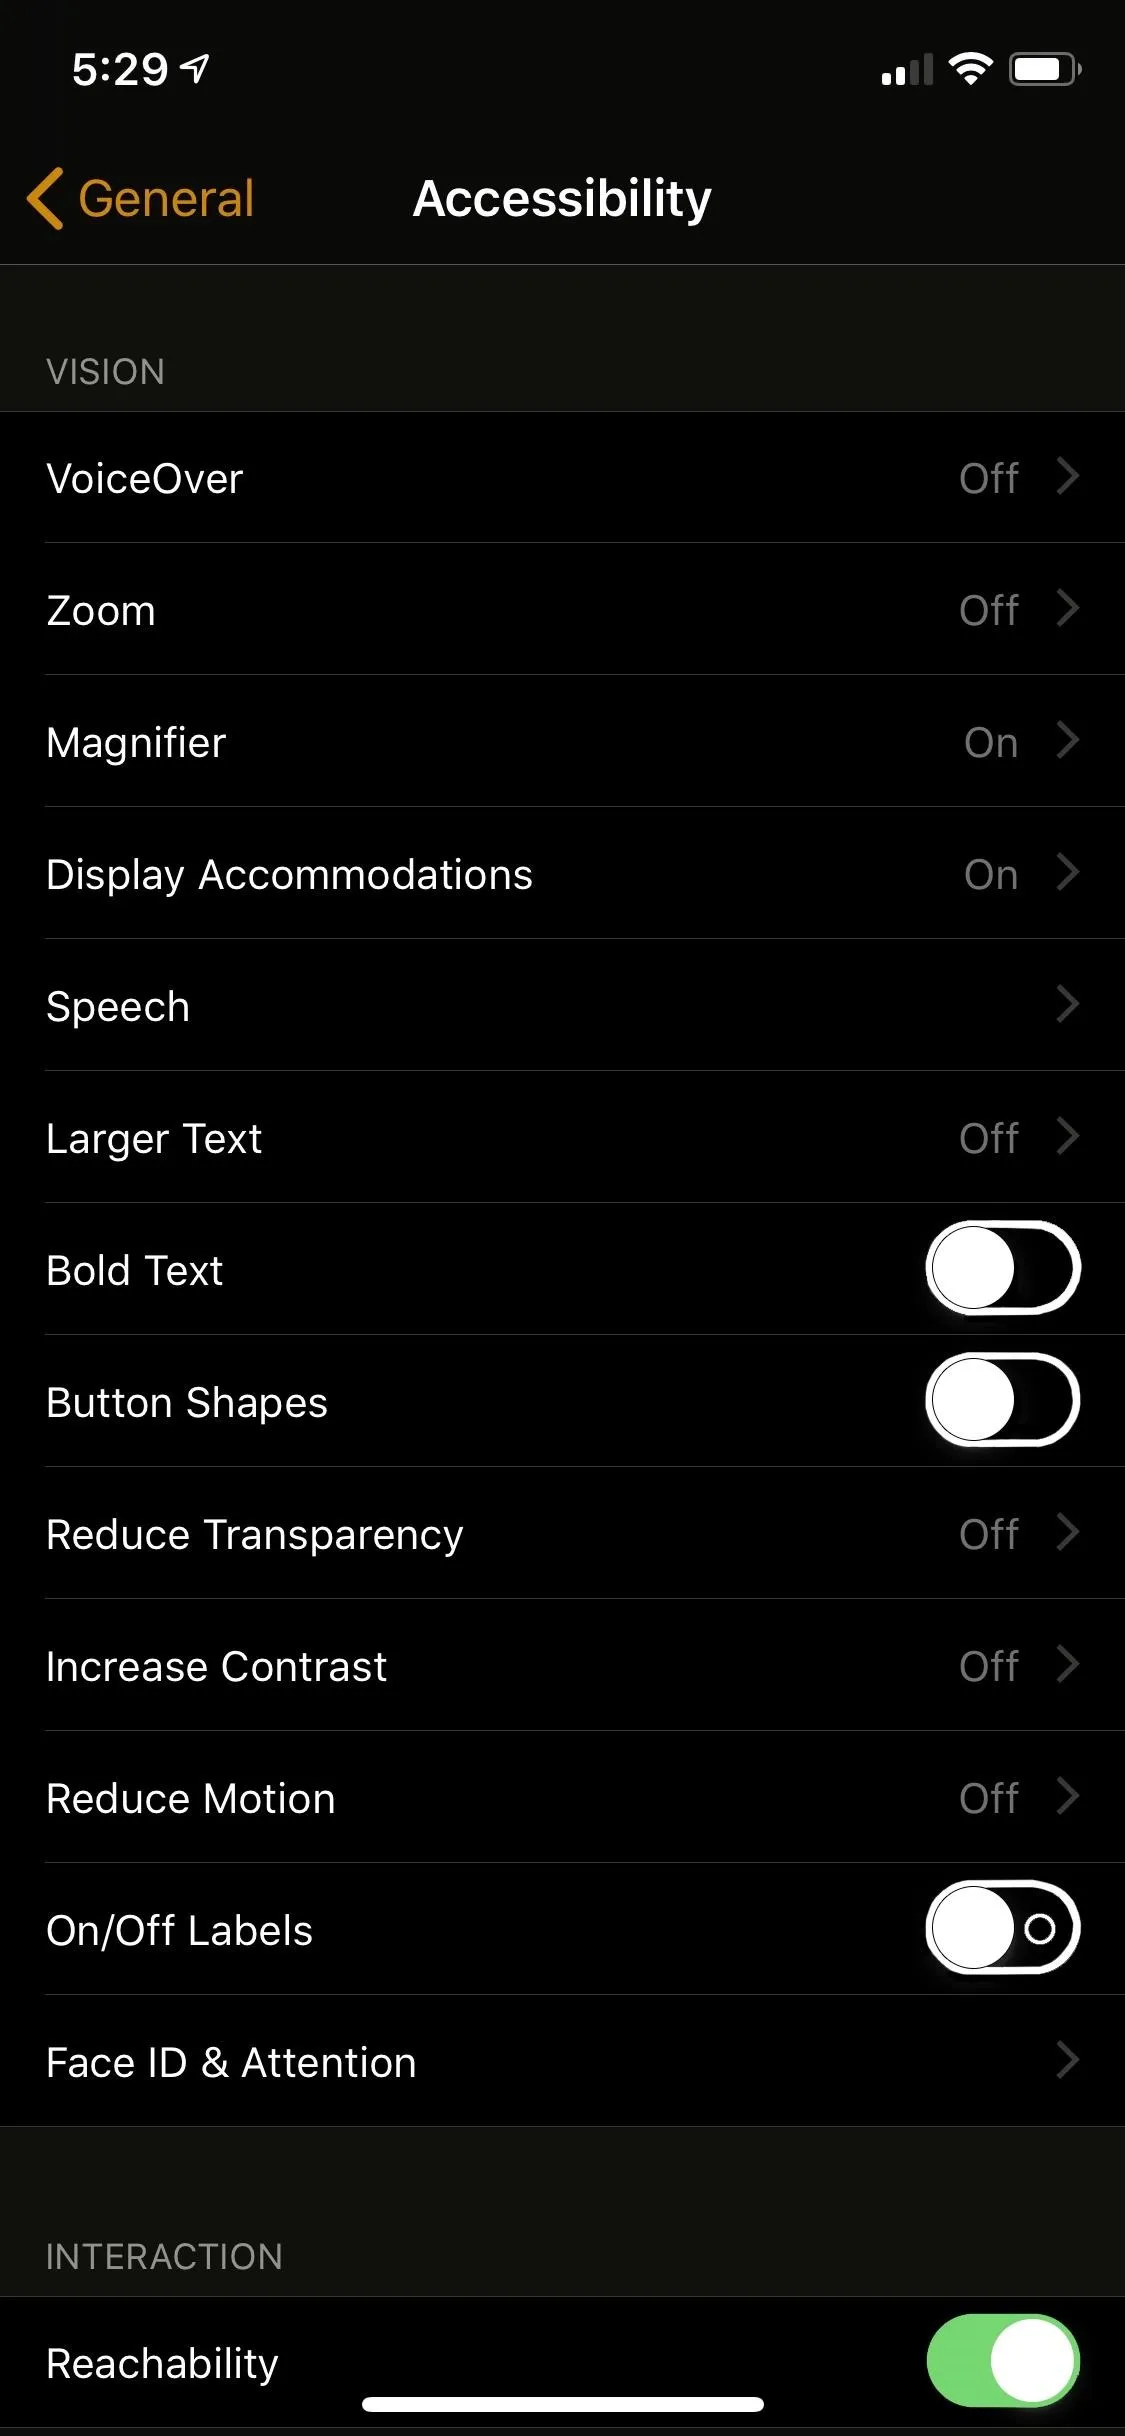
YouTube has a dark mode, while others like Instagram only have one if you're jailbroken. For apps that don't have a built-in dark mode, such as iOS Settings, you can use Apple's "Smart Invert" feature to swap whites for blacks.


5. Use Audio Only for Group FaceTime Calls (Coming Later)
Group FaceTime lets you chat with up to 31 other people at once. While Apple has worked out a great system for keeping 32 faces on-screen at the same time, you don't need to show yours to participate. IOS 12 lets you join a group call with only your voice, even if other users on the call are using video. That way, your camera can stay off, and you can save a little battery while you talk.
6. Disable Dynamic Wallpapers
As cool as some of Apple's "Dynamic Wallpapers" are in iOS, they can really eat up some battery. Unlike the 3D Touch wallpapers, these ones animate all the time in the background, so it's better to avoid using them. You can change the background for your lock screen or home screen from "Wallpapers" in Settings.
7. Disable Unnecessary Notifications
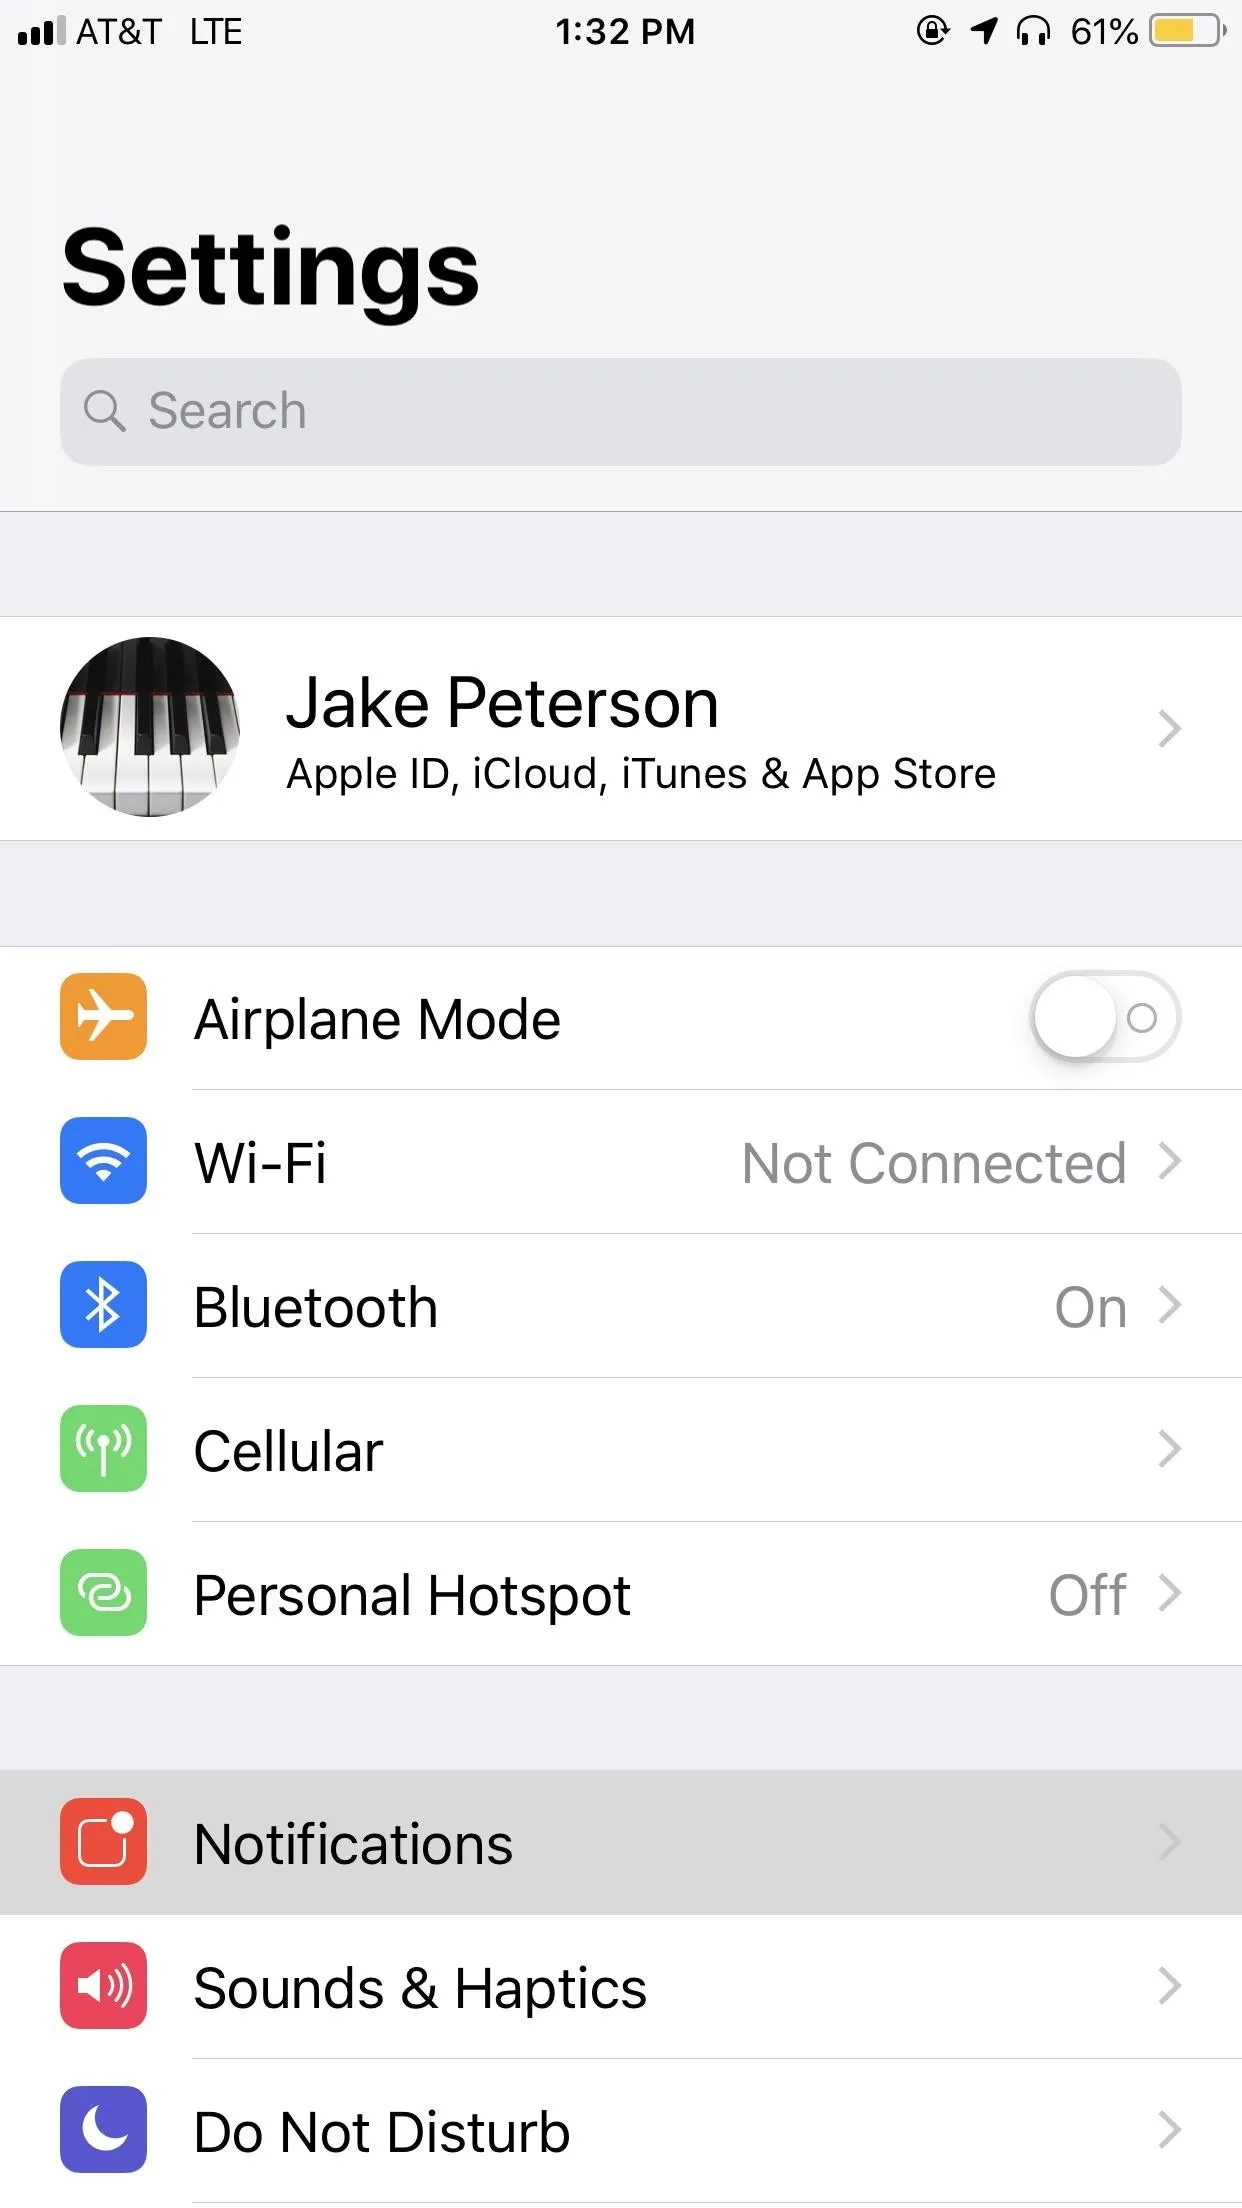
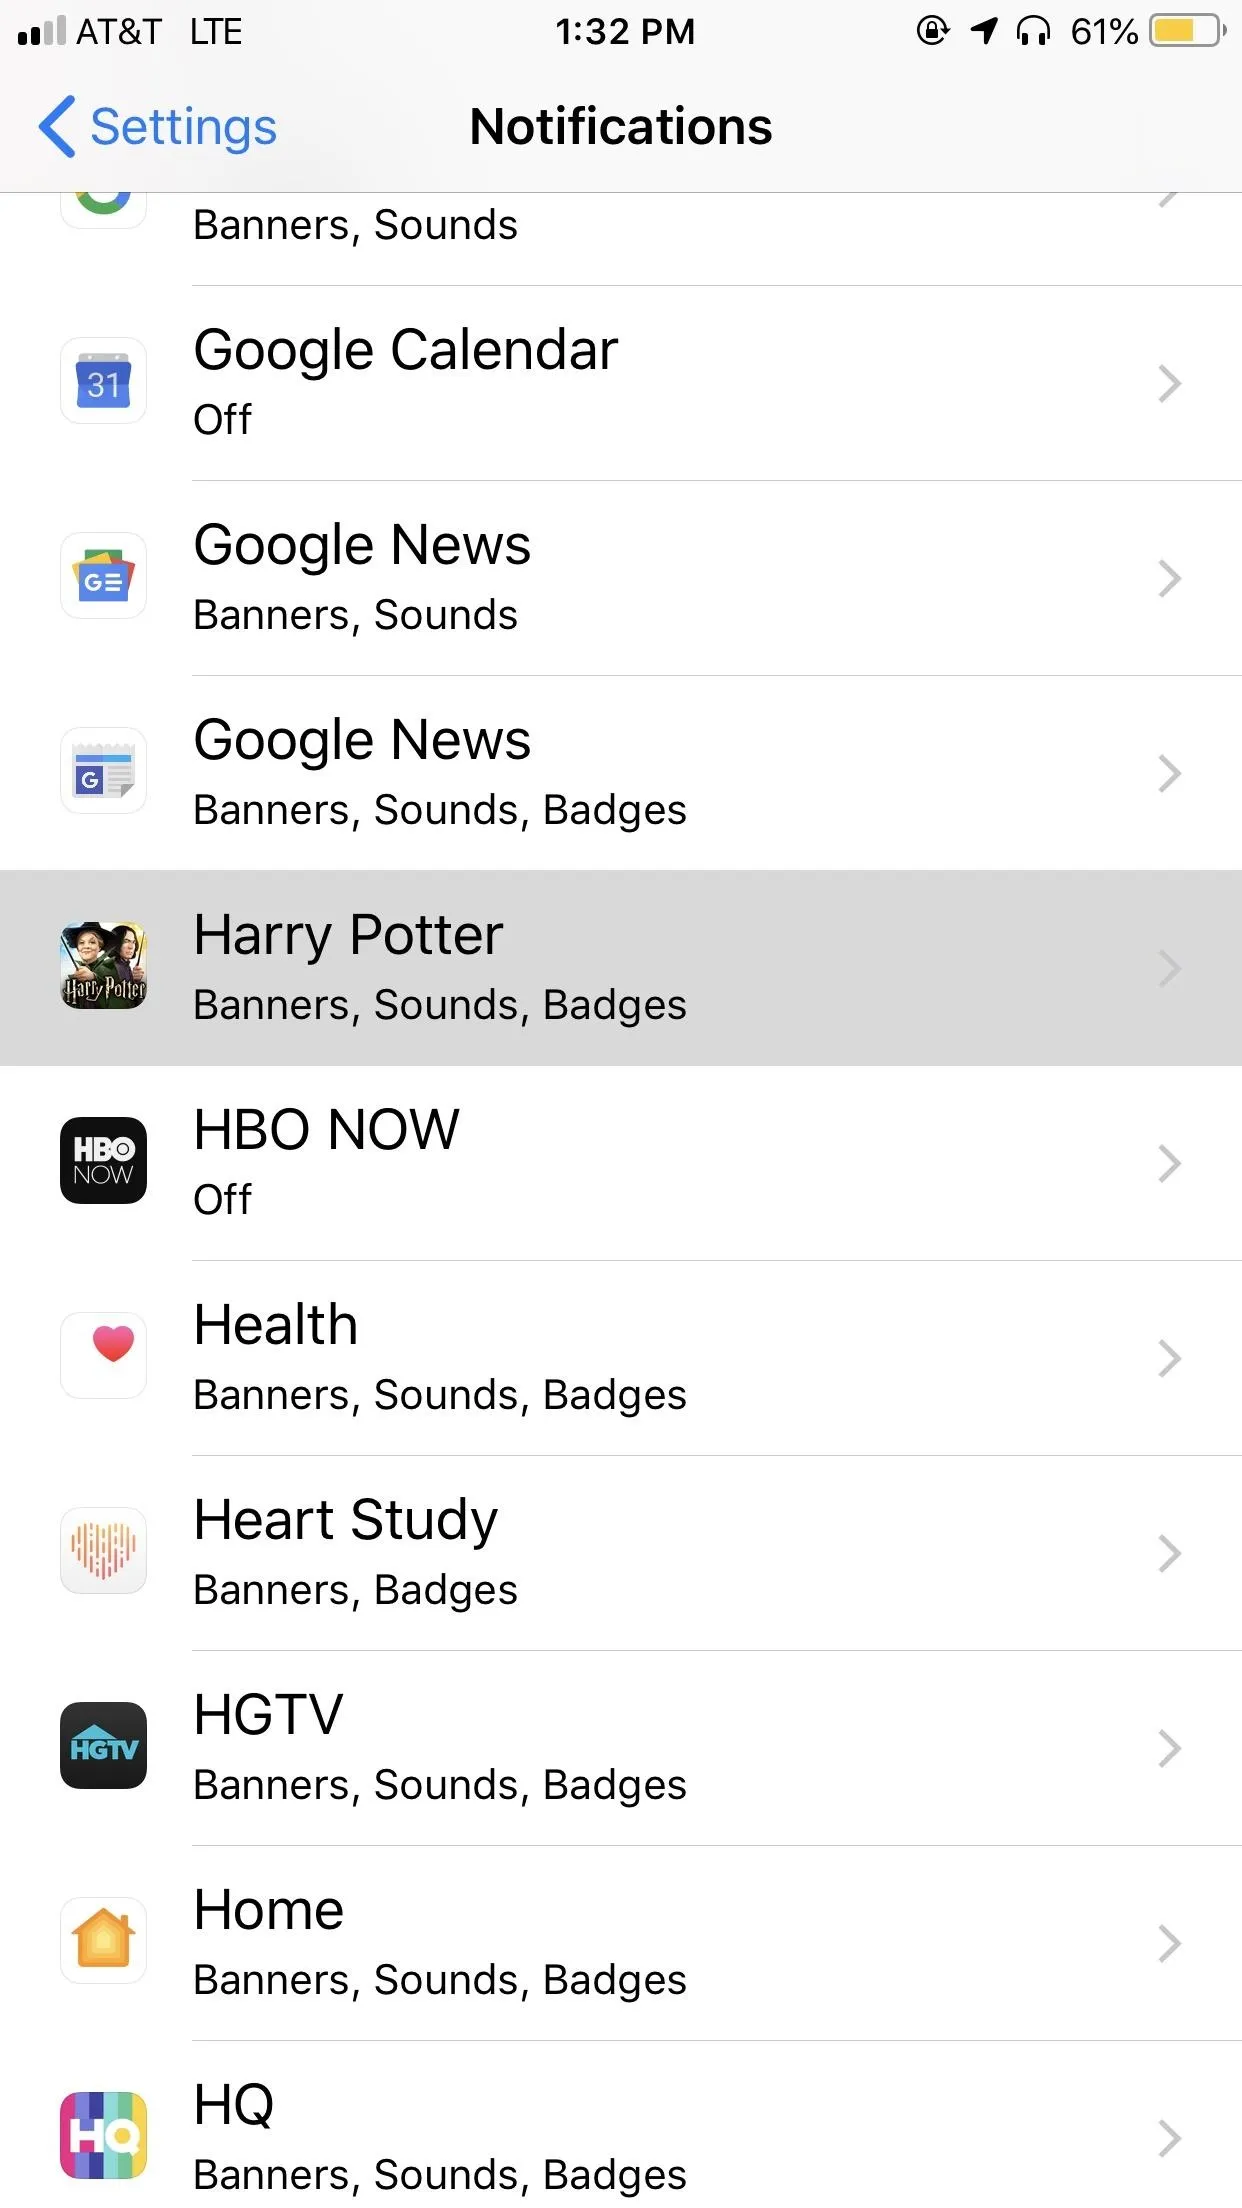
One of iOS 12's most anticipated features is the fine-tuned notification system. That being said, unnecessary notifications only serve to annoy you and to use up your iPhone's precious battery. If you find yourself receiving notifications you don't want or need, pop the notification with 3D Touch. Then, tap the ellipsis (•••) on the window, select "Turn Off..." then "Turn Off All Notifications."
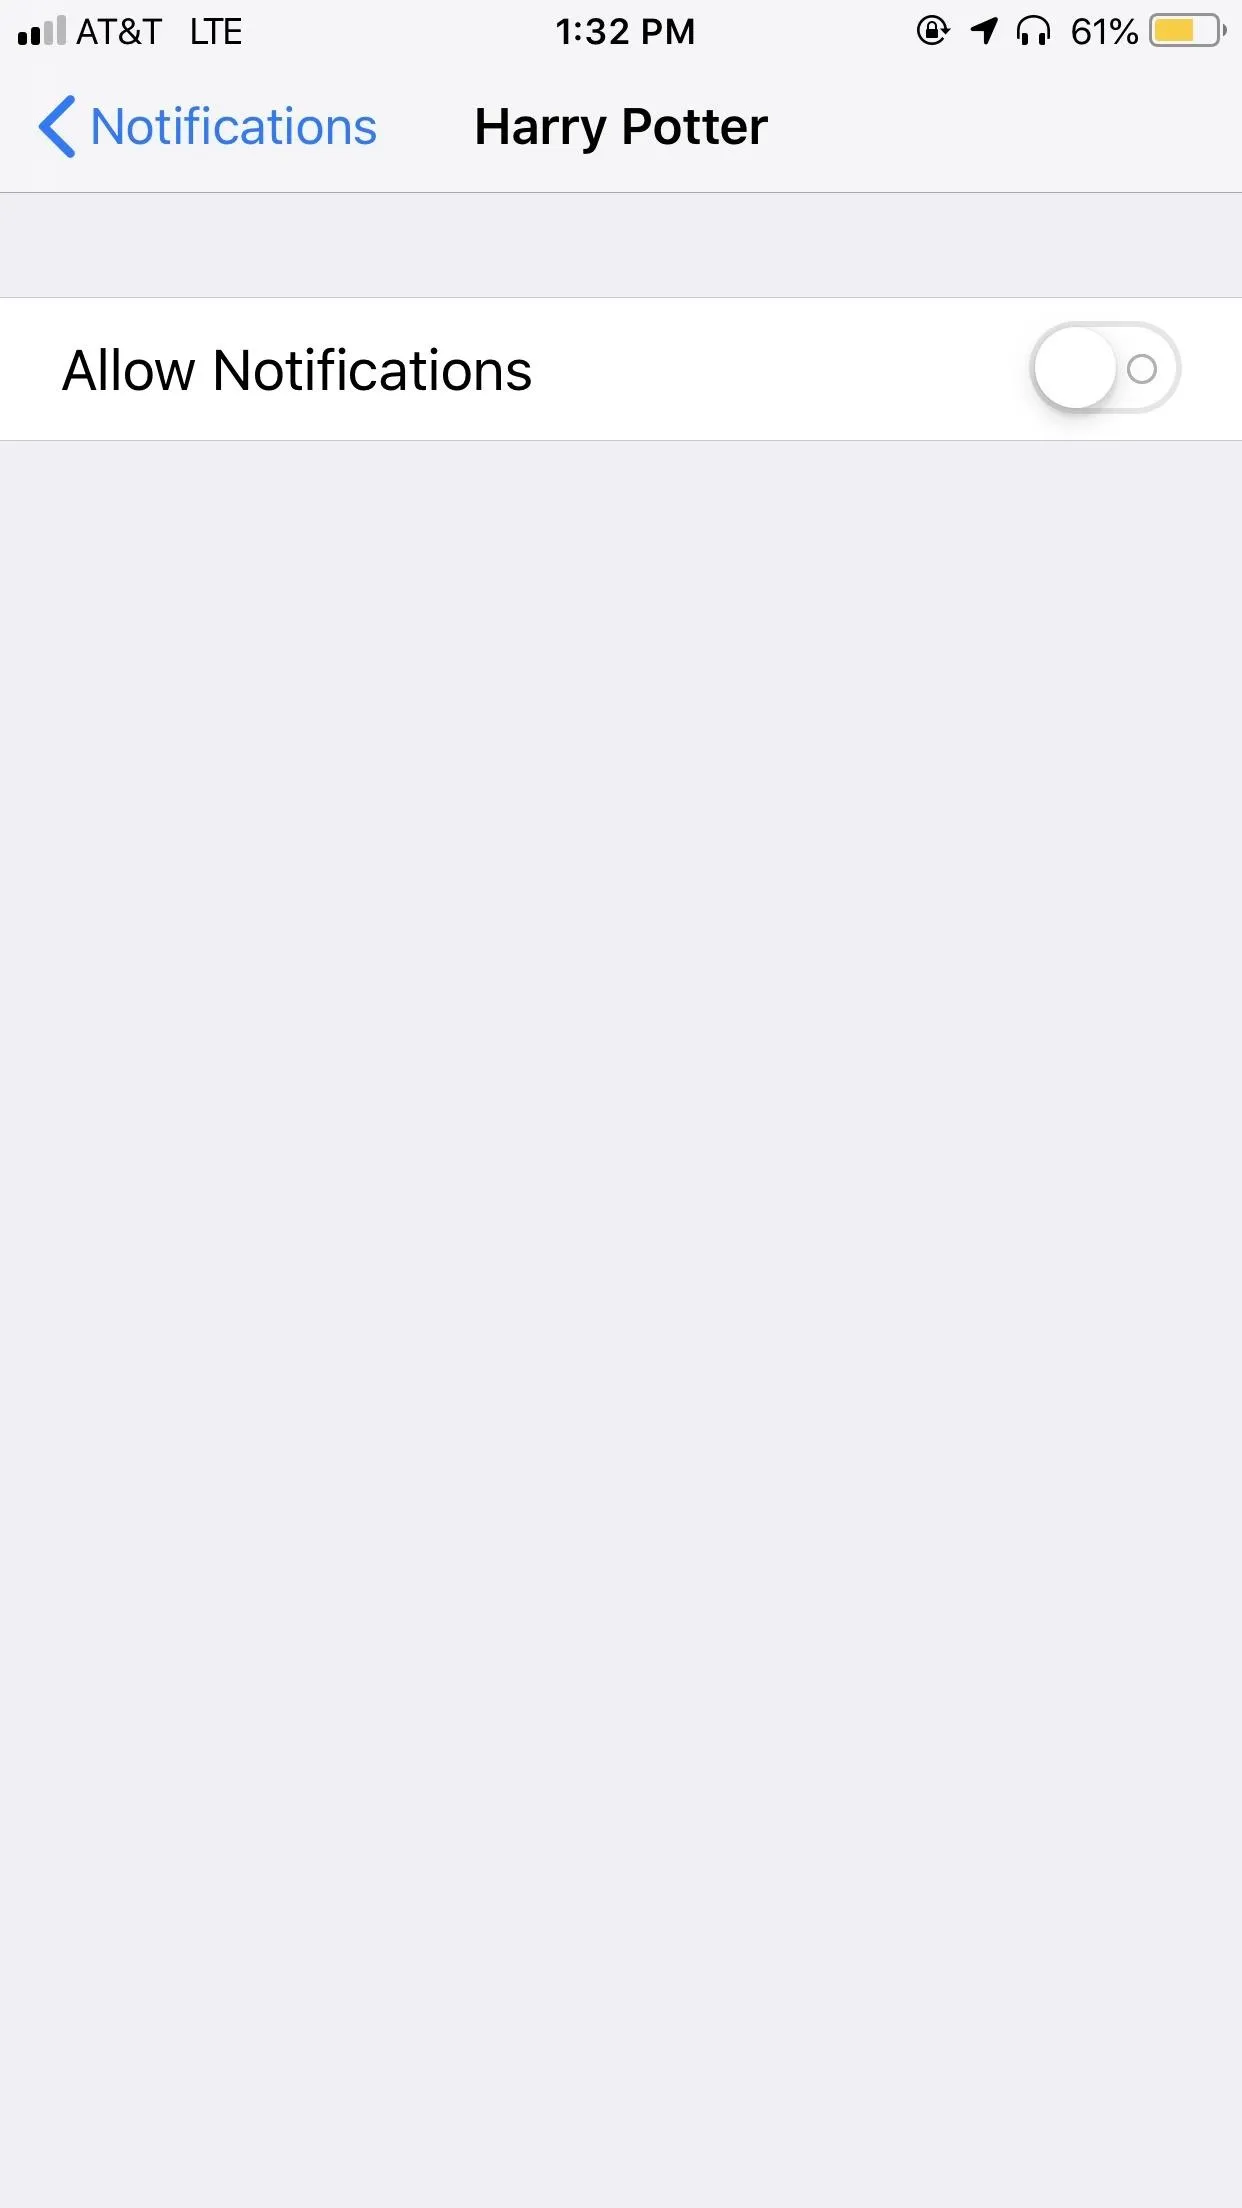
Alternatively, take a dive into your Settings app, tap "Notifications," then select the app in question. Make sure "Allow Notifications" is disabled to block the app from sending you further alerts.


8. Turn Off Siri Suggestions
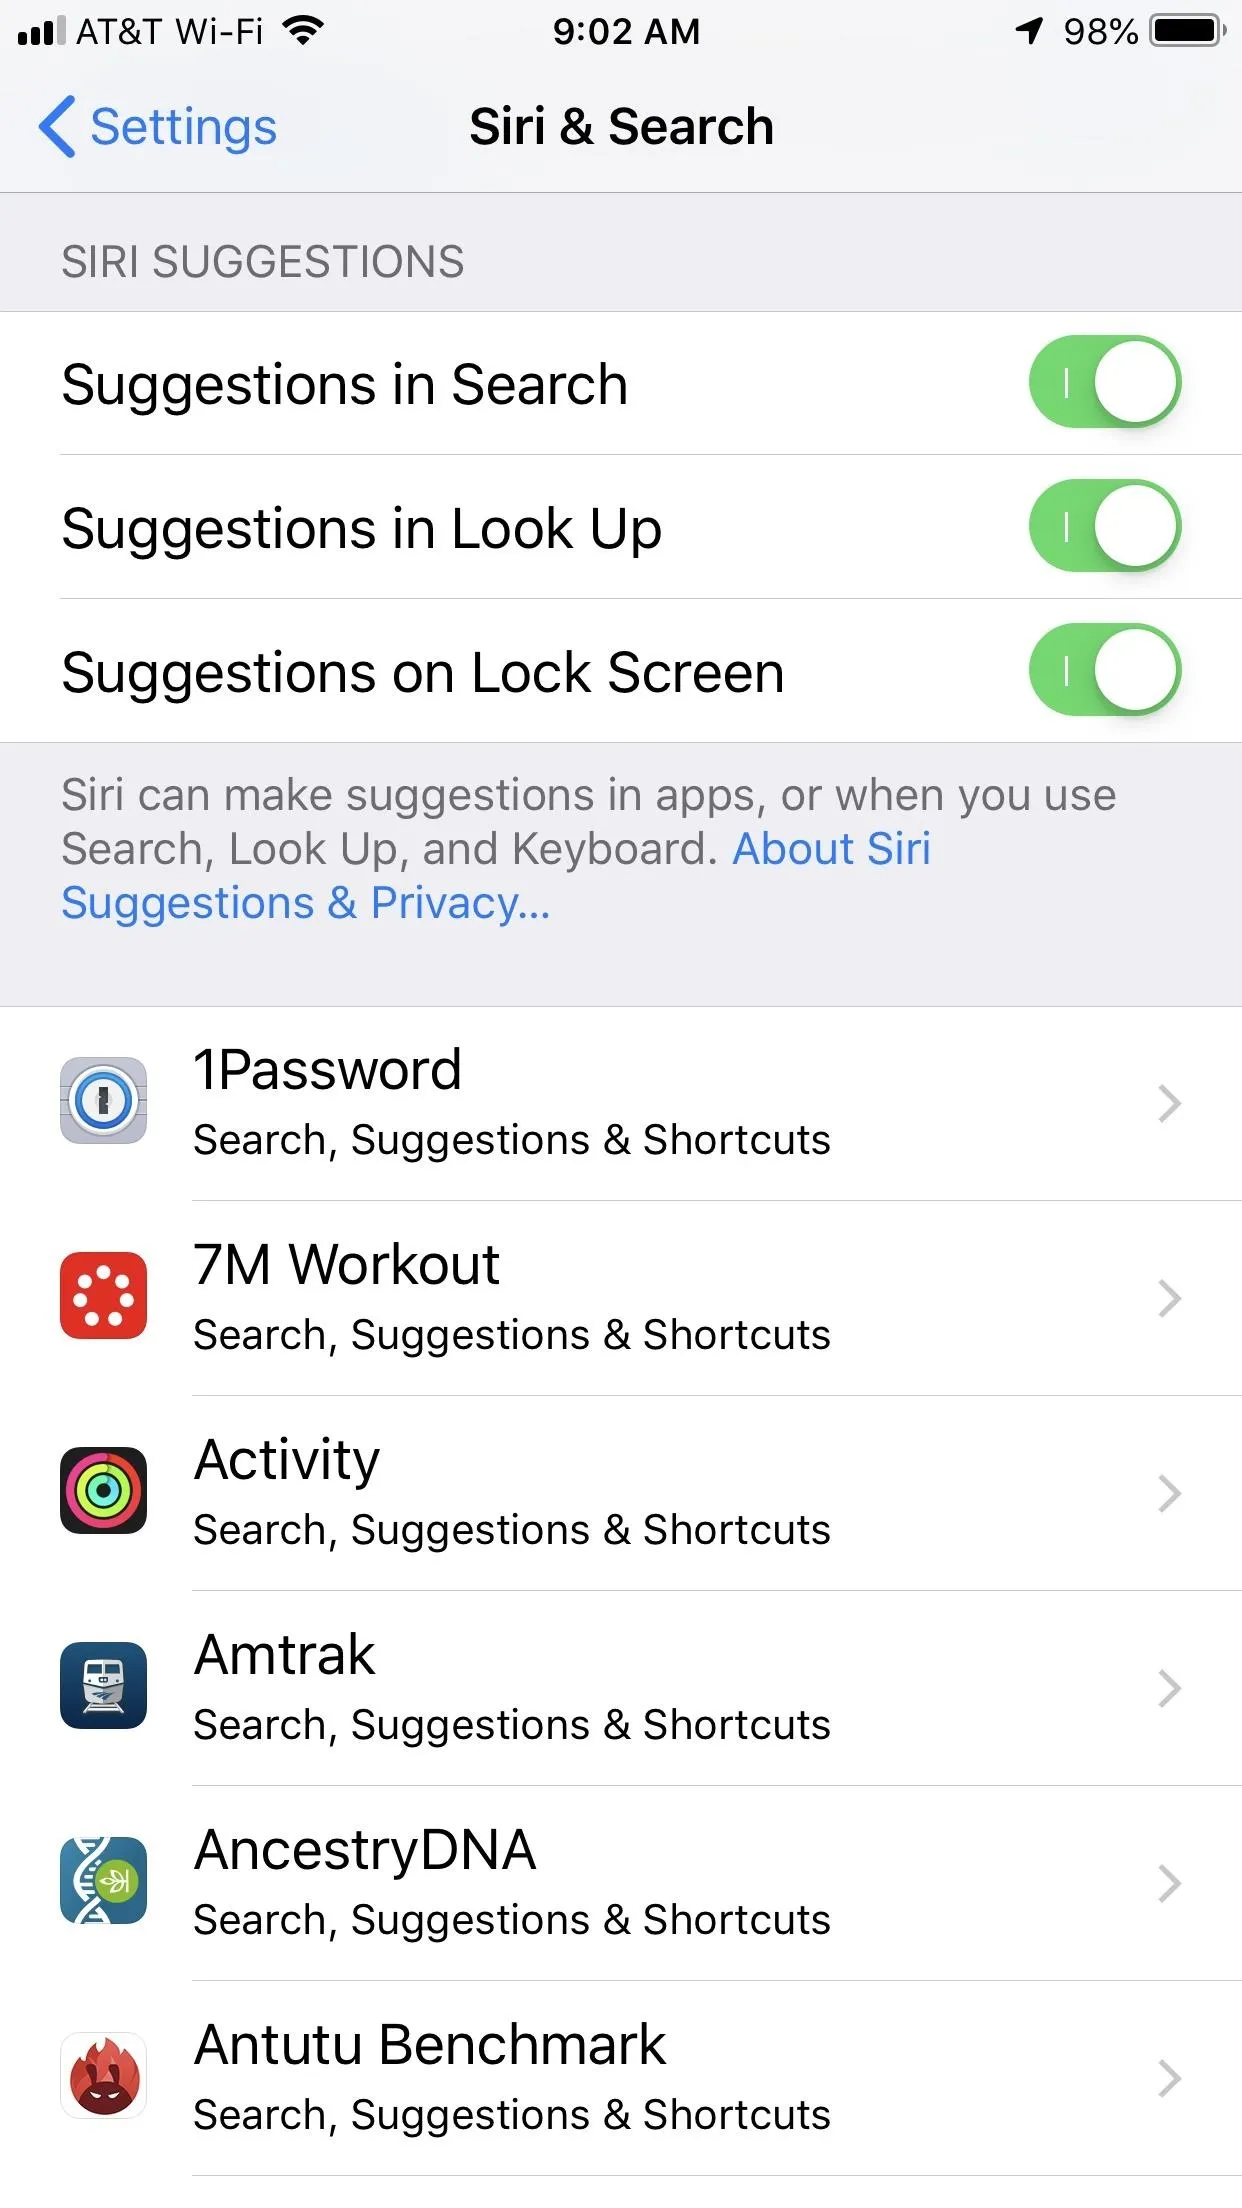
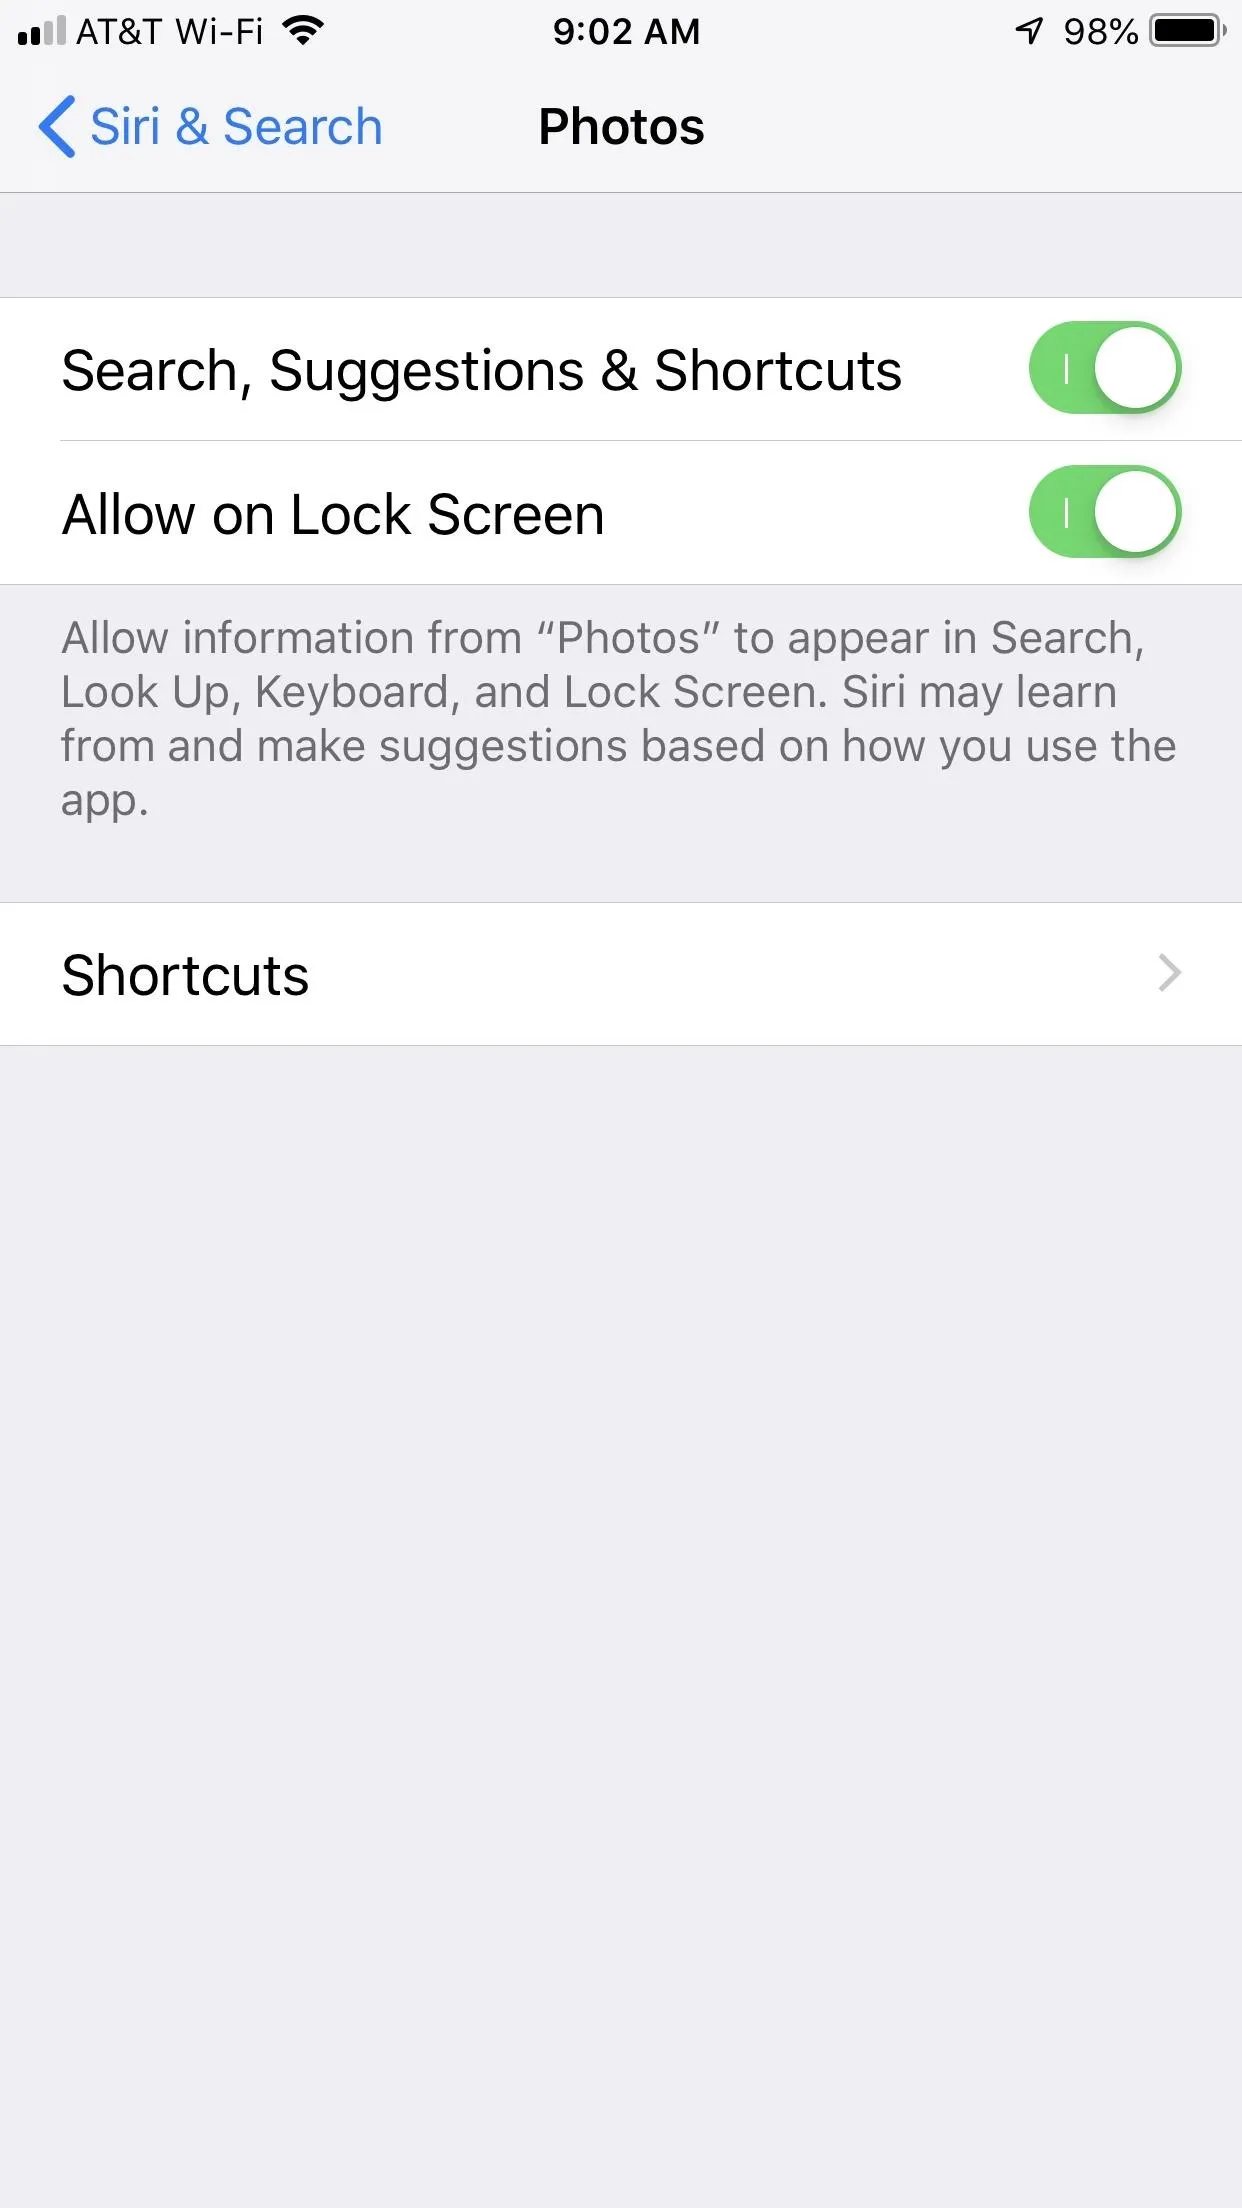
Siri Suggestions have only gotten more useful under iOS 12. That being said, the feature can still use more battery than its worth. If you think the extra battery life is worth losing Suggestions over, you can disable them in Search, Look Up, or on the Lock Screen, as well as for individual apps. Just head to "Siri & Search" in Settings, and decide for yourself what needs to be enabled as well as what doesn't.


9. Avoid Using Animoji & Memoji (iPhone X Only)
While iOS 12's Memojis are a fun take on Animoji introduced with the iPhone X, these animated avatars don't come without cost — it takes extra battery power to render and map either the emojis or personalized Memoji onto your face, especially with the new tongue and wink detection shipping with iOS 12. If you want to make your iPhone's battery last, avoid using Animoji to communicate on-the-go.
10. Disable Background App Refresh
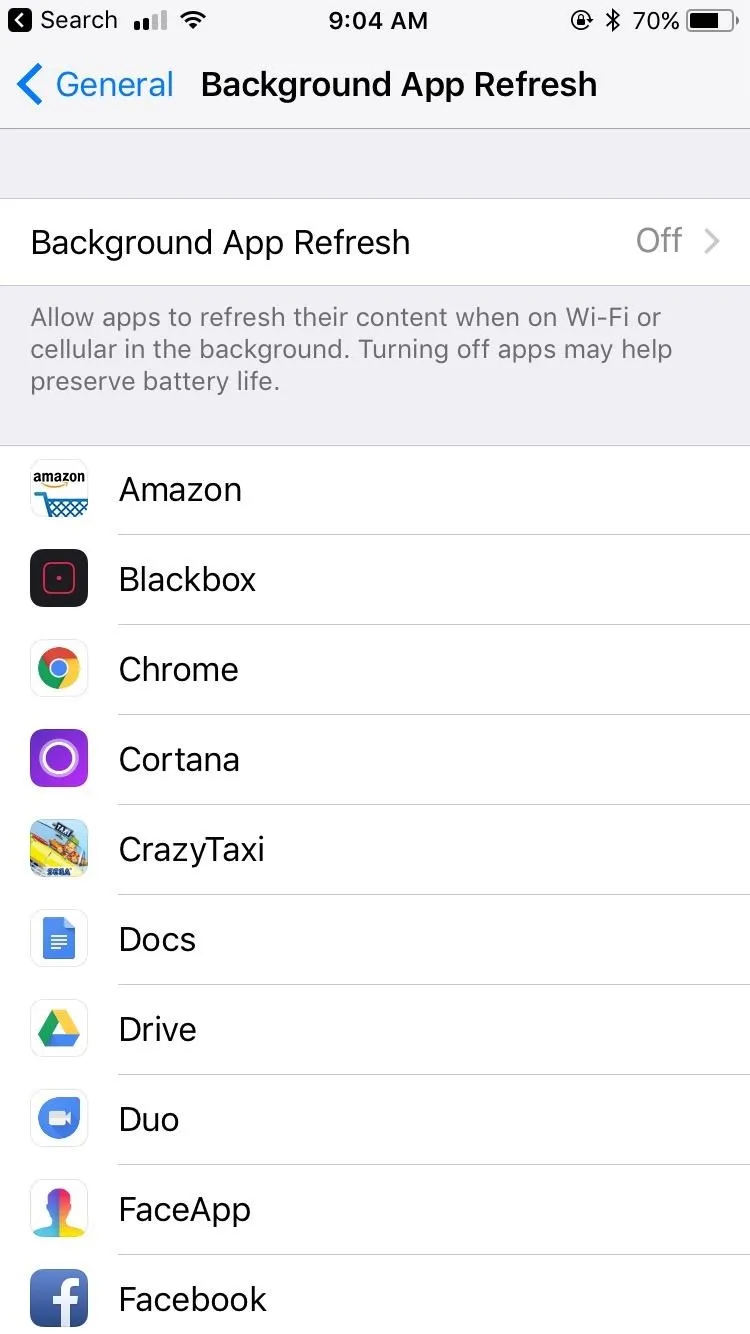
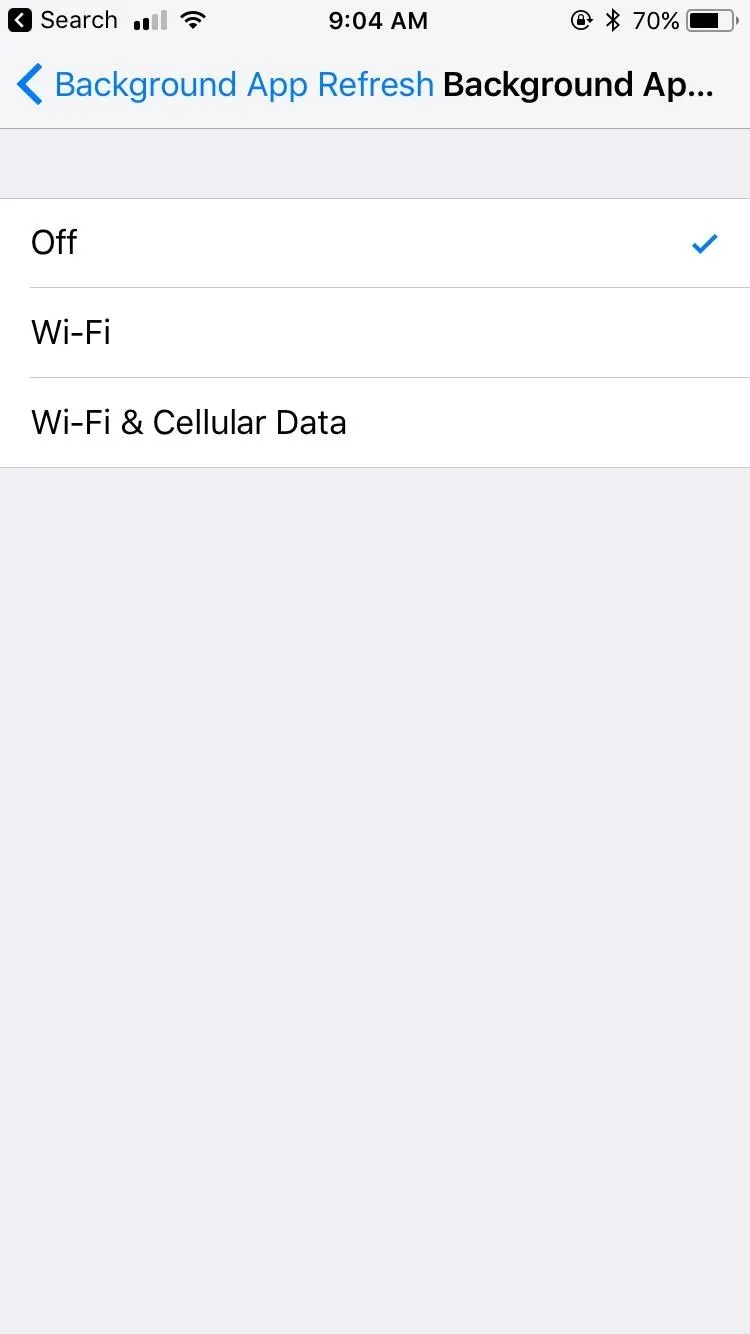
Background app refresh is a great tool to keep your apps up to date and active while you focus on other things. However, background activity is a battery-drainer. While useful, battery-conscious users will want this feature disabled. To shut it off, head over to "General" in Settings, then "Background App Refresh." Tap "Background App Refresh" at the top of the page, and ensure "Off" is selected.


11. Disable Cellular Data While on Wi-Fi
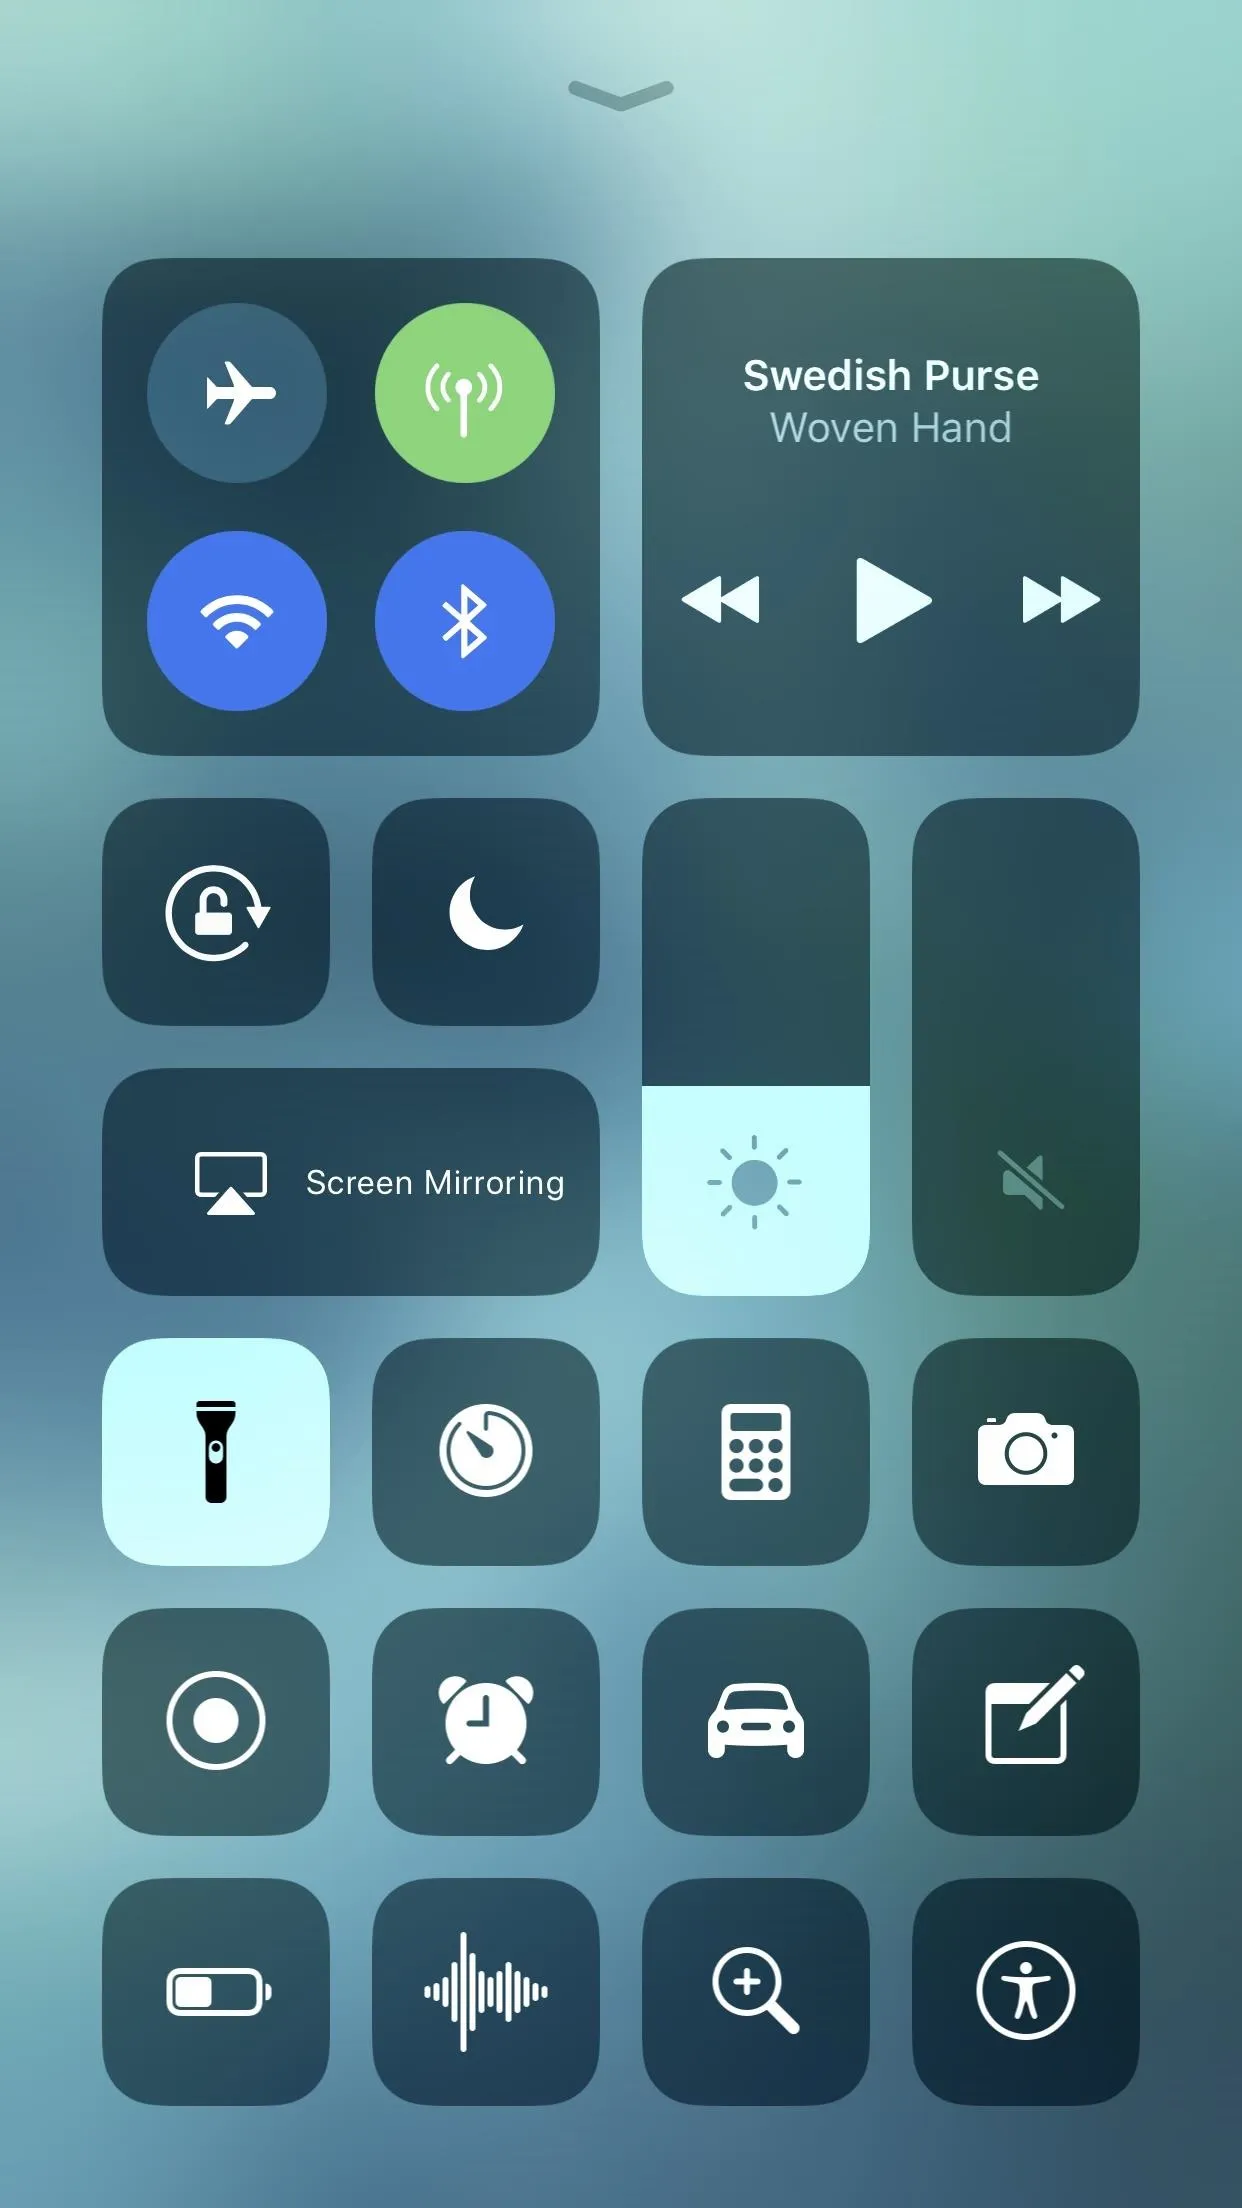
Wi-Fi is how we stay under our monthly cellular data limits. Because you don't need to use cellular data when connected to Wi-Fi, there's really no reason to force your iPhone to waste battery as it constantly searches for a cellular connection. You can quickly disable cellular data via the Control Center, and enable it just as fast when leaving Wi-Fi.
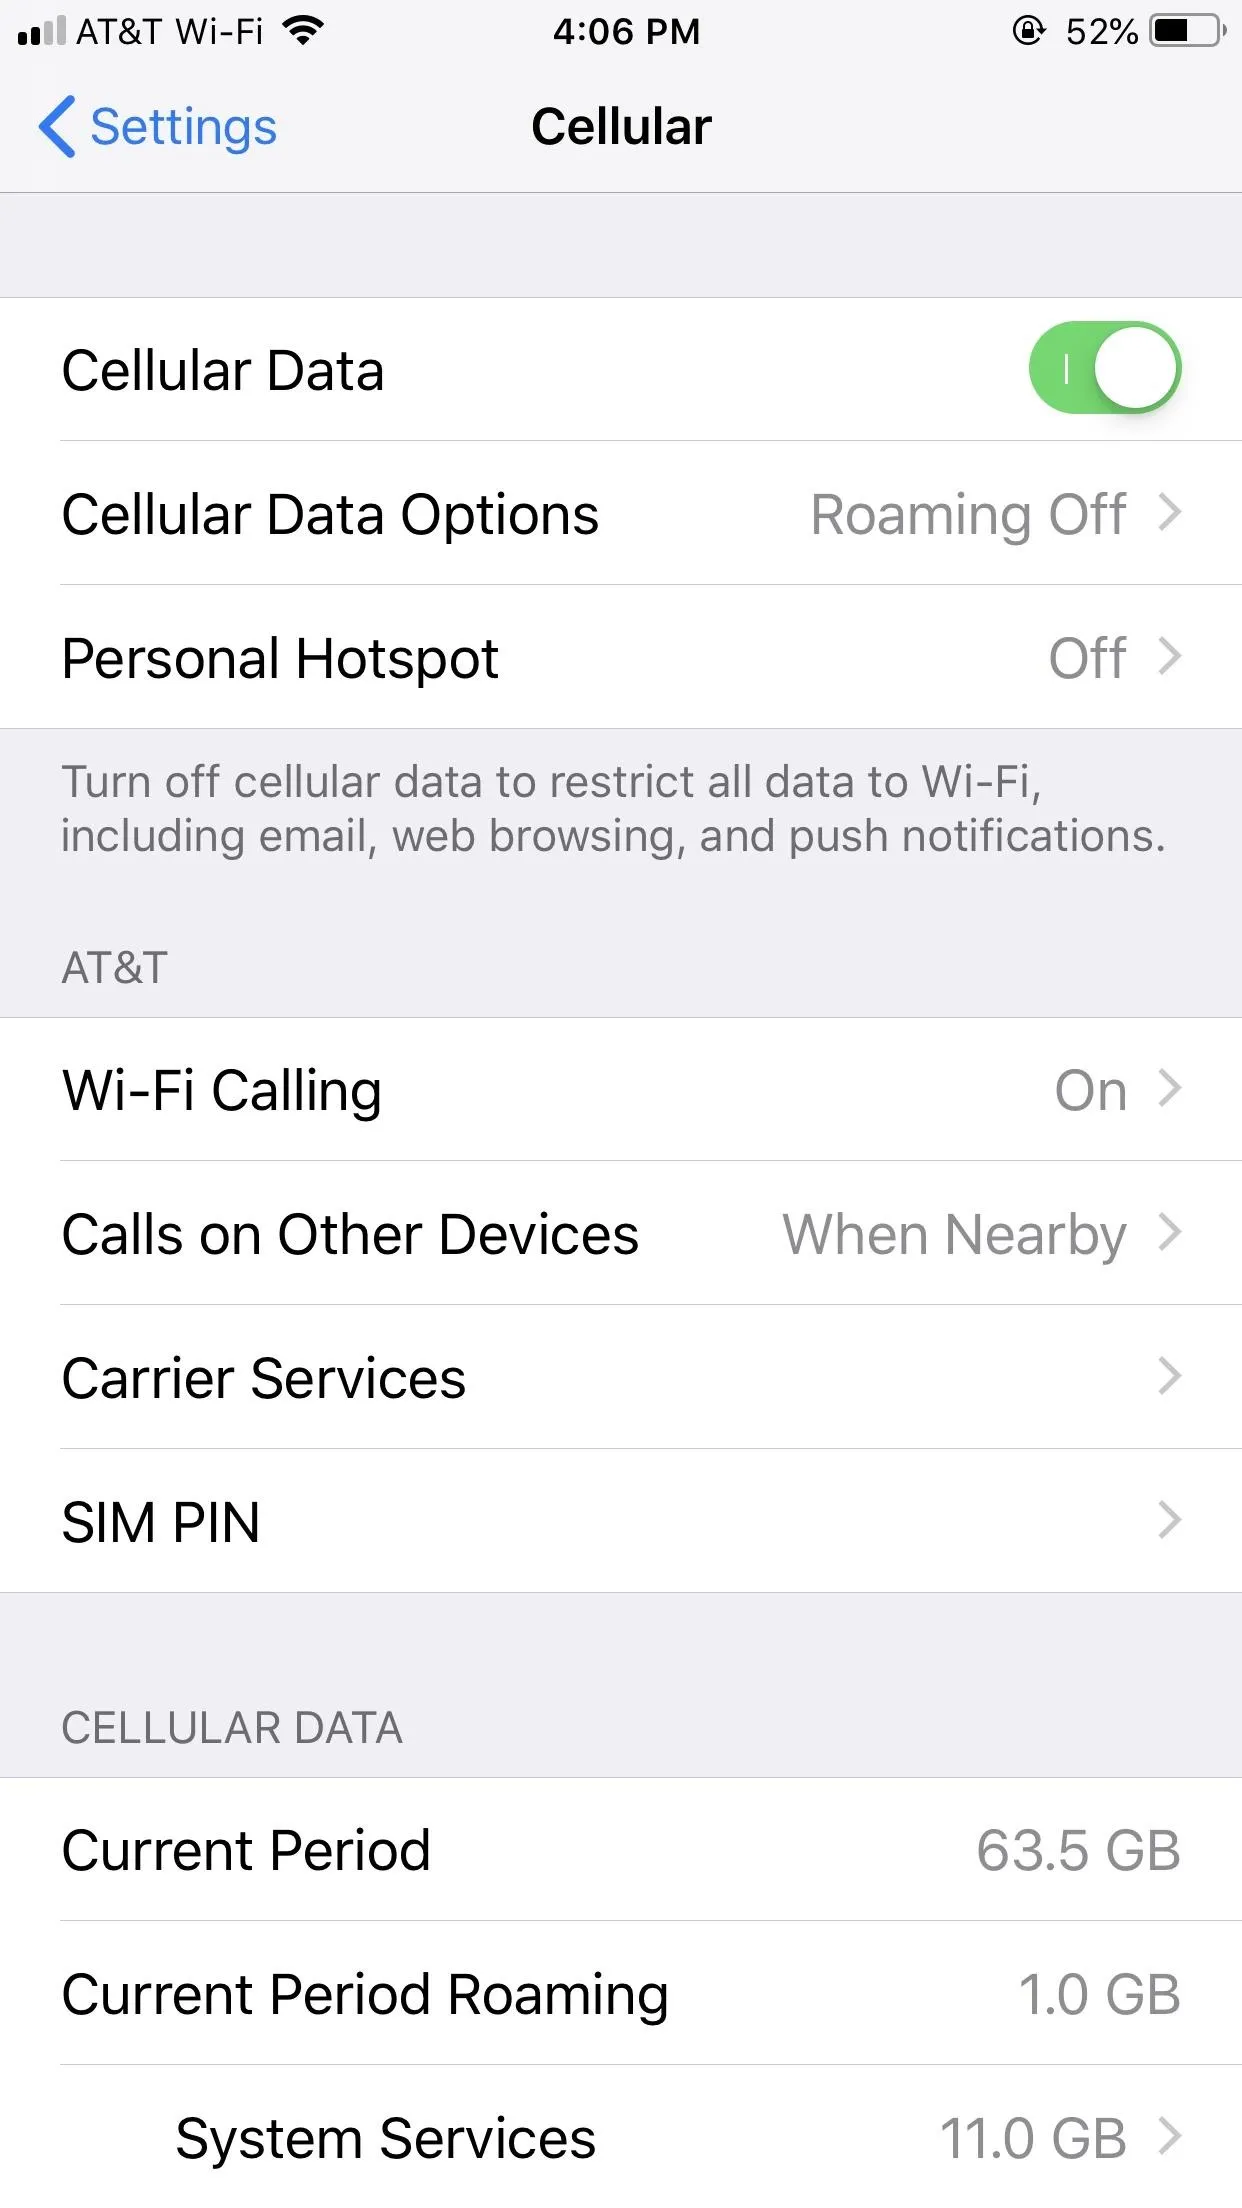
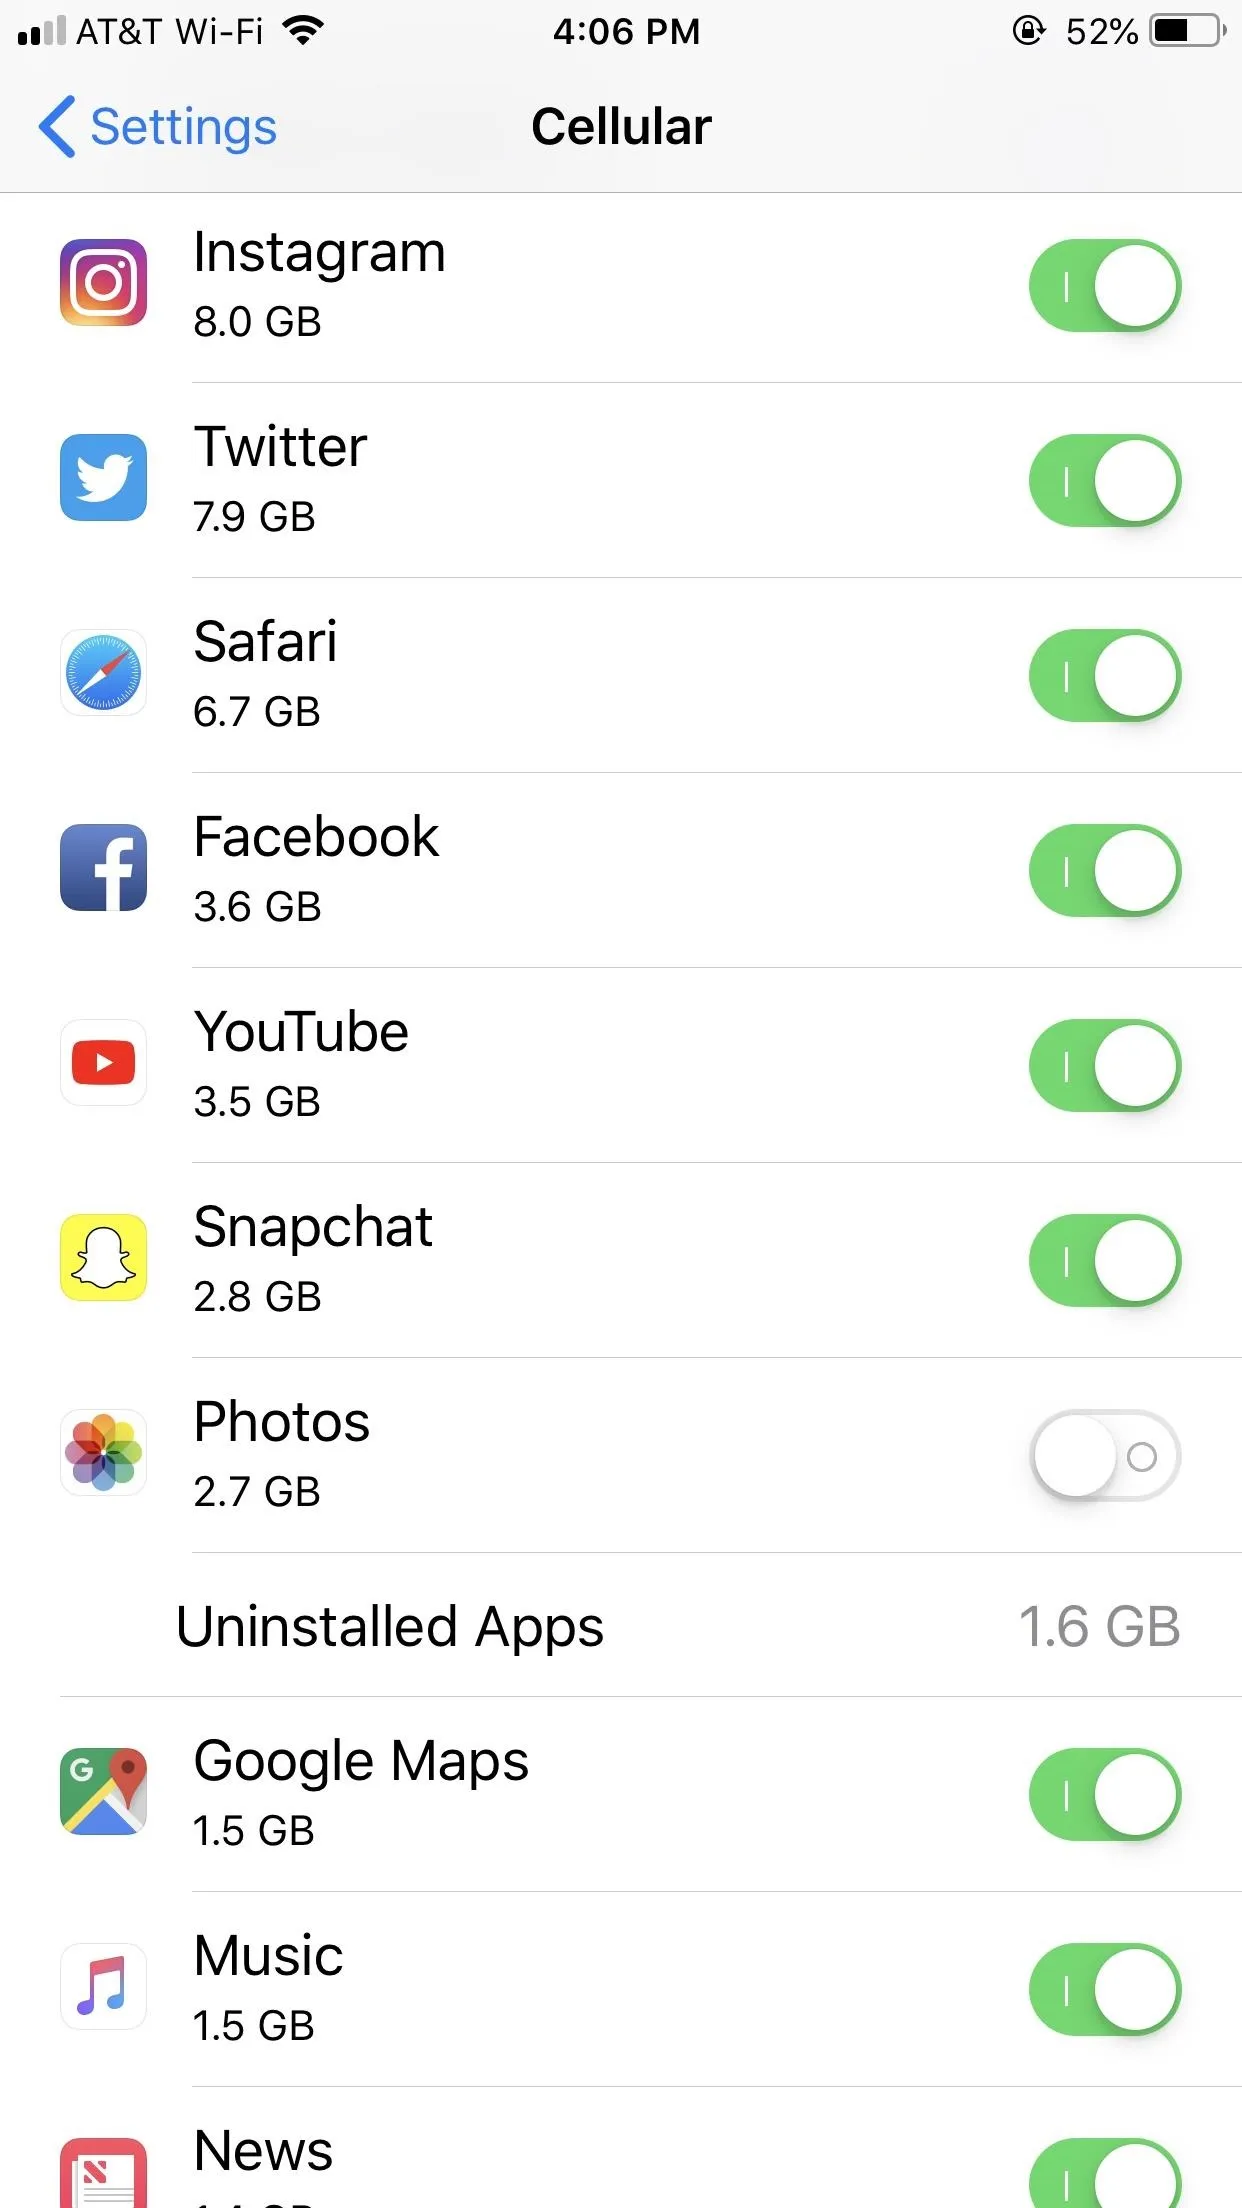
Secondly, you can disable cellular data via the Settings app. Go to "Cellular," then ensure "Cellular Data" is disabled. Additionally, you can disable cellular data for specific apps, if you find you'd like one or two apps connected to cellular anyway.


12. Disable Wi-Fi, Bluetooth & AirDrop
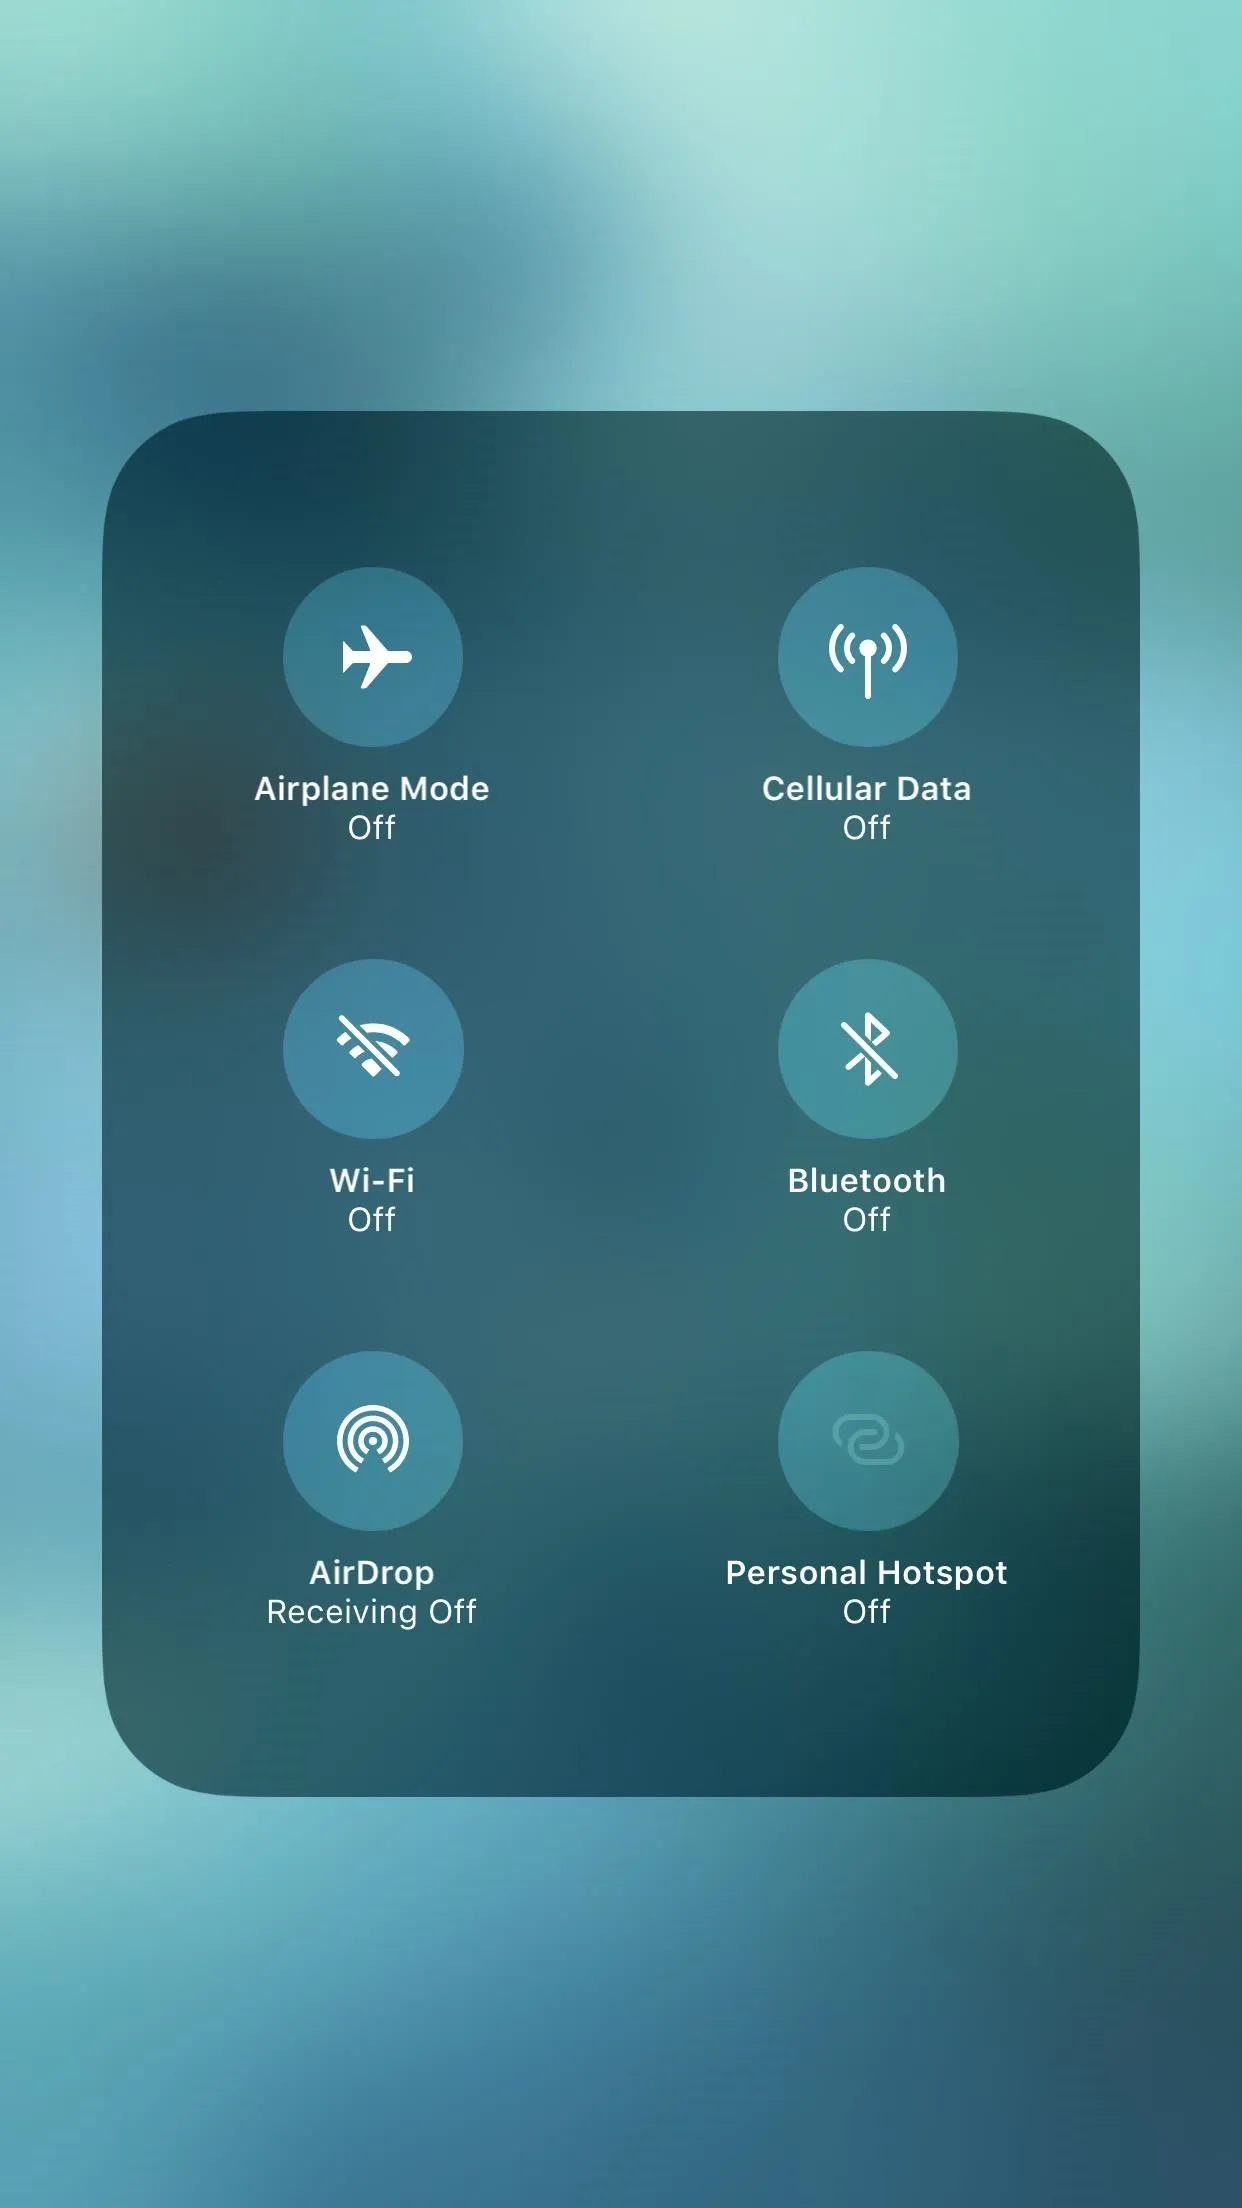
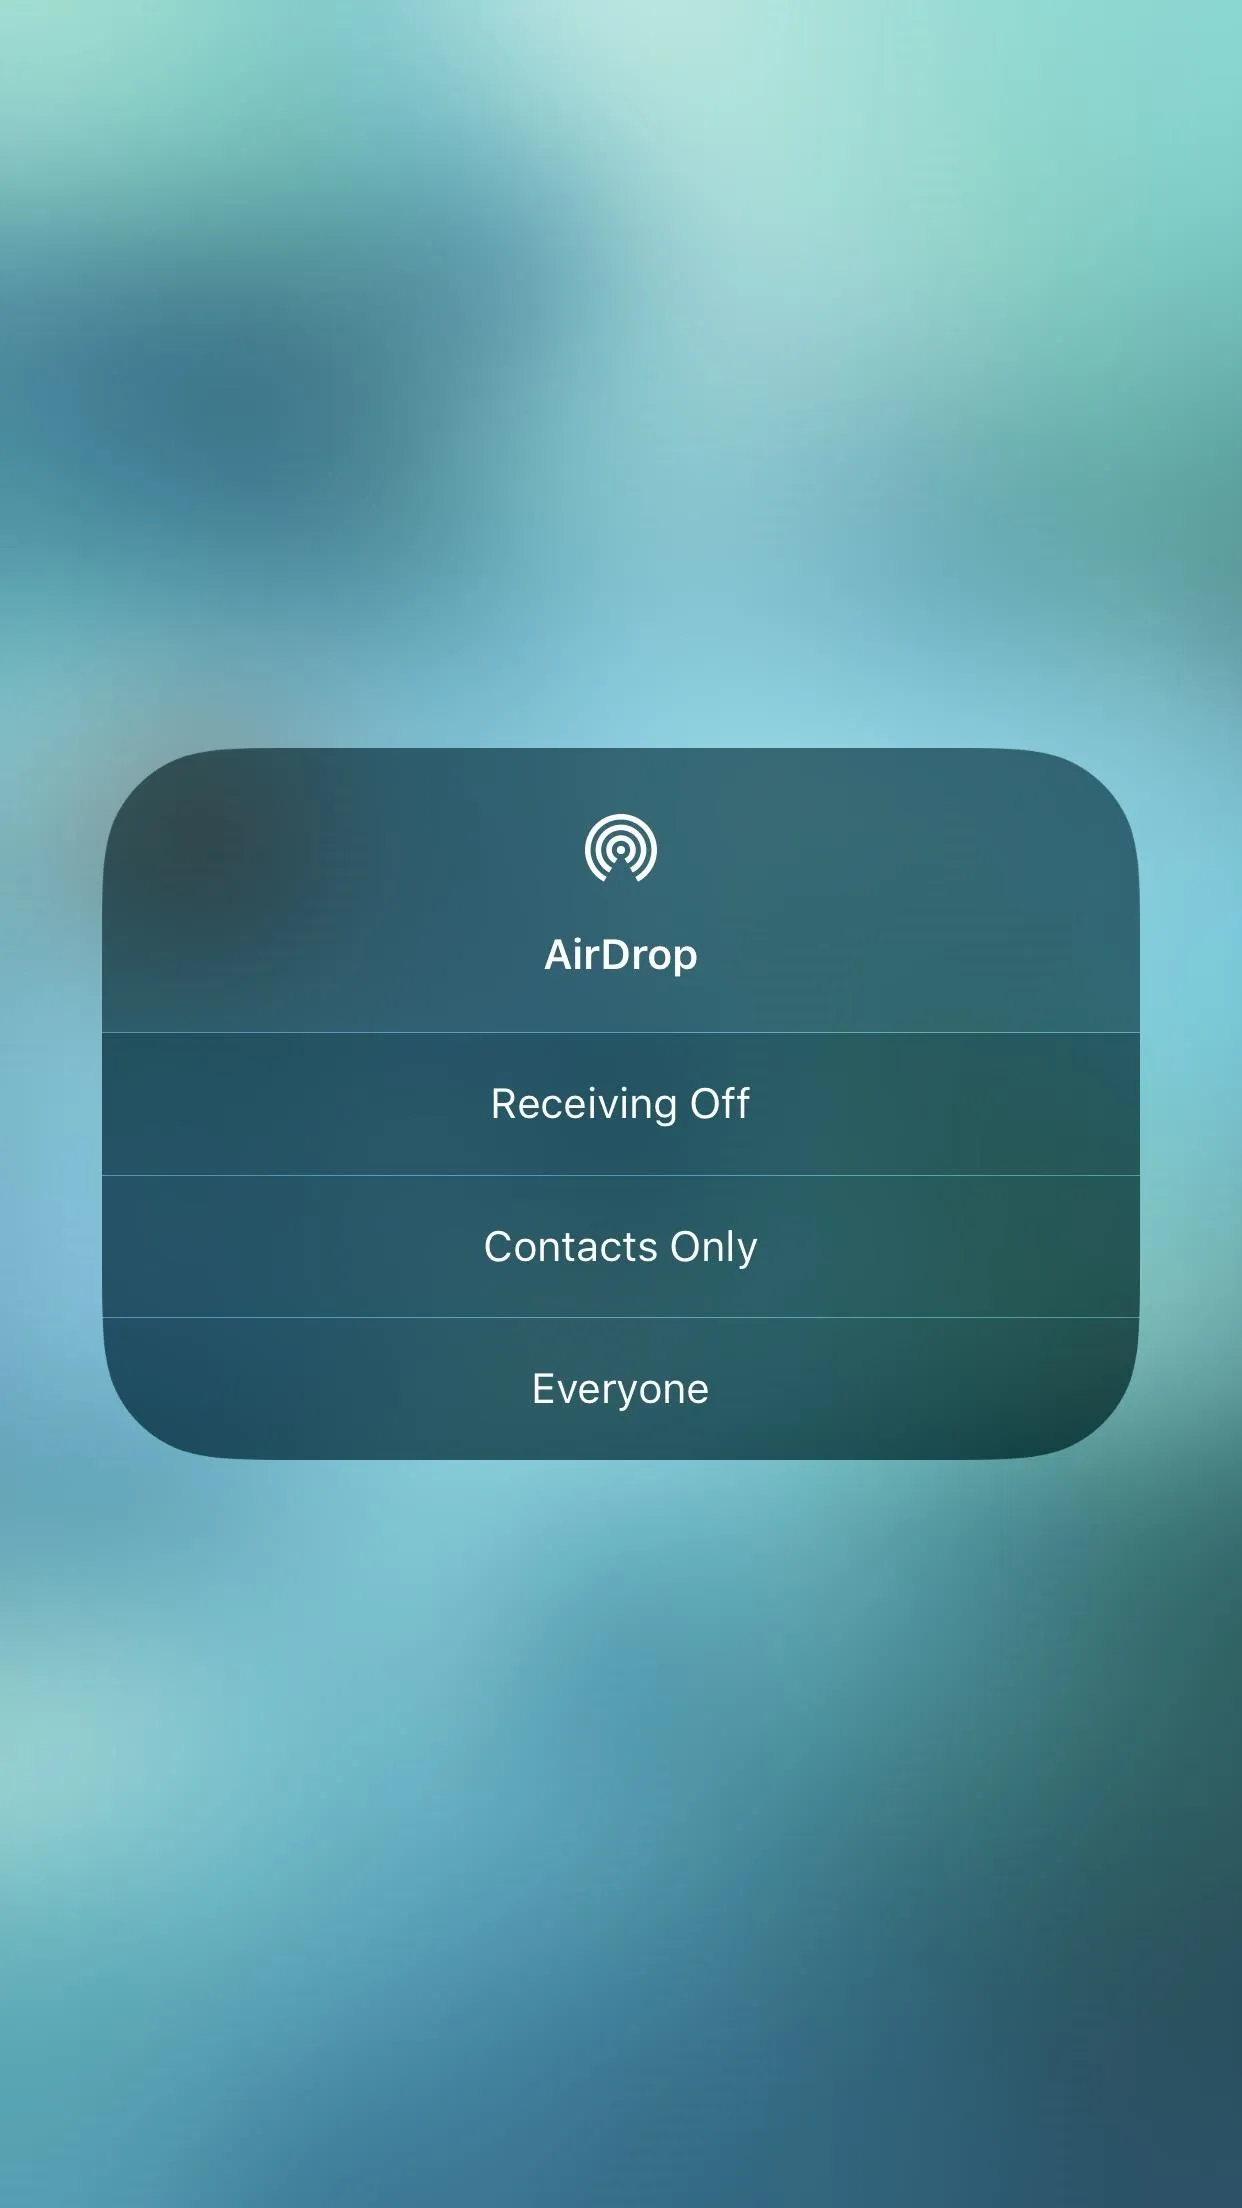
If you depend on Wi-Fi, wear an Apple Watch, and need to share files to a coworker via AirDrop, you'll need all three of these connections enabled on your iPhone to keep your life moving. However, if one, two, or three of these do not apply to you at any given time, it's best to disable them, as your iPhone uses battery life searching for a point of connection for each.
Disabling each connection type is simple; For Wi-Fi and Bluetooth, just jump into the Settings, tap "Bluetooth" or "Wi-Fi," and disable the appropriate feature or features. AirDrop can be quickly disabled from Control Center; Swipe up from the bottom of the display, open the connectivity pane, then tap "AirDrop." When prompted, tap "Receiving Off to disconnect. Tapping either the Bluetooth or Wi-Fi icons here will not disable those items, however.


13. Set Your Flashlight to the Lowest Brightness
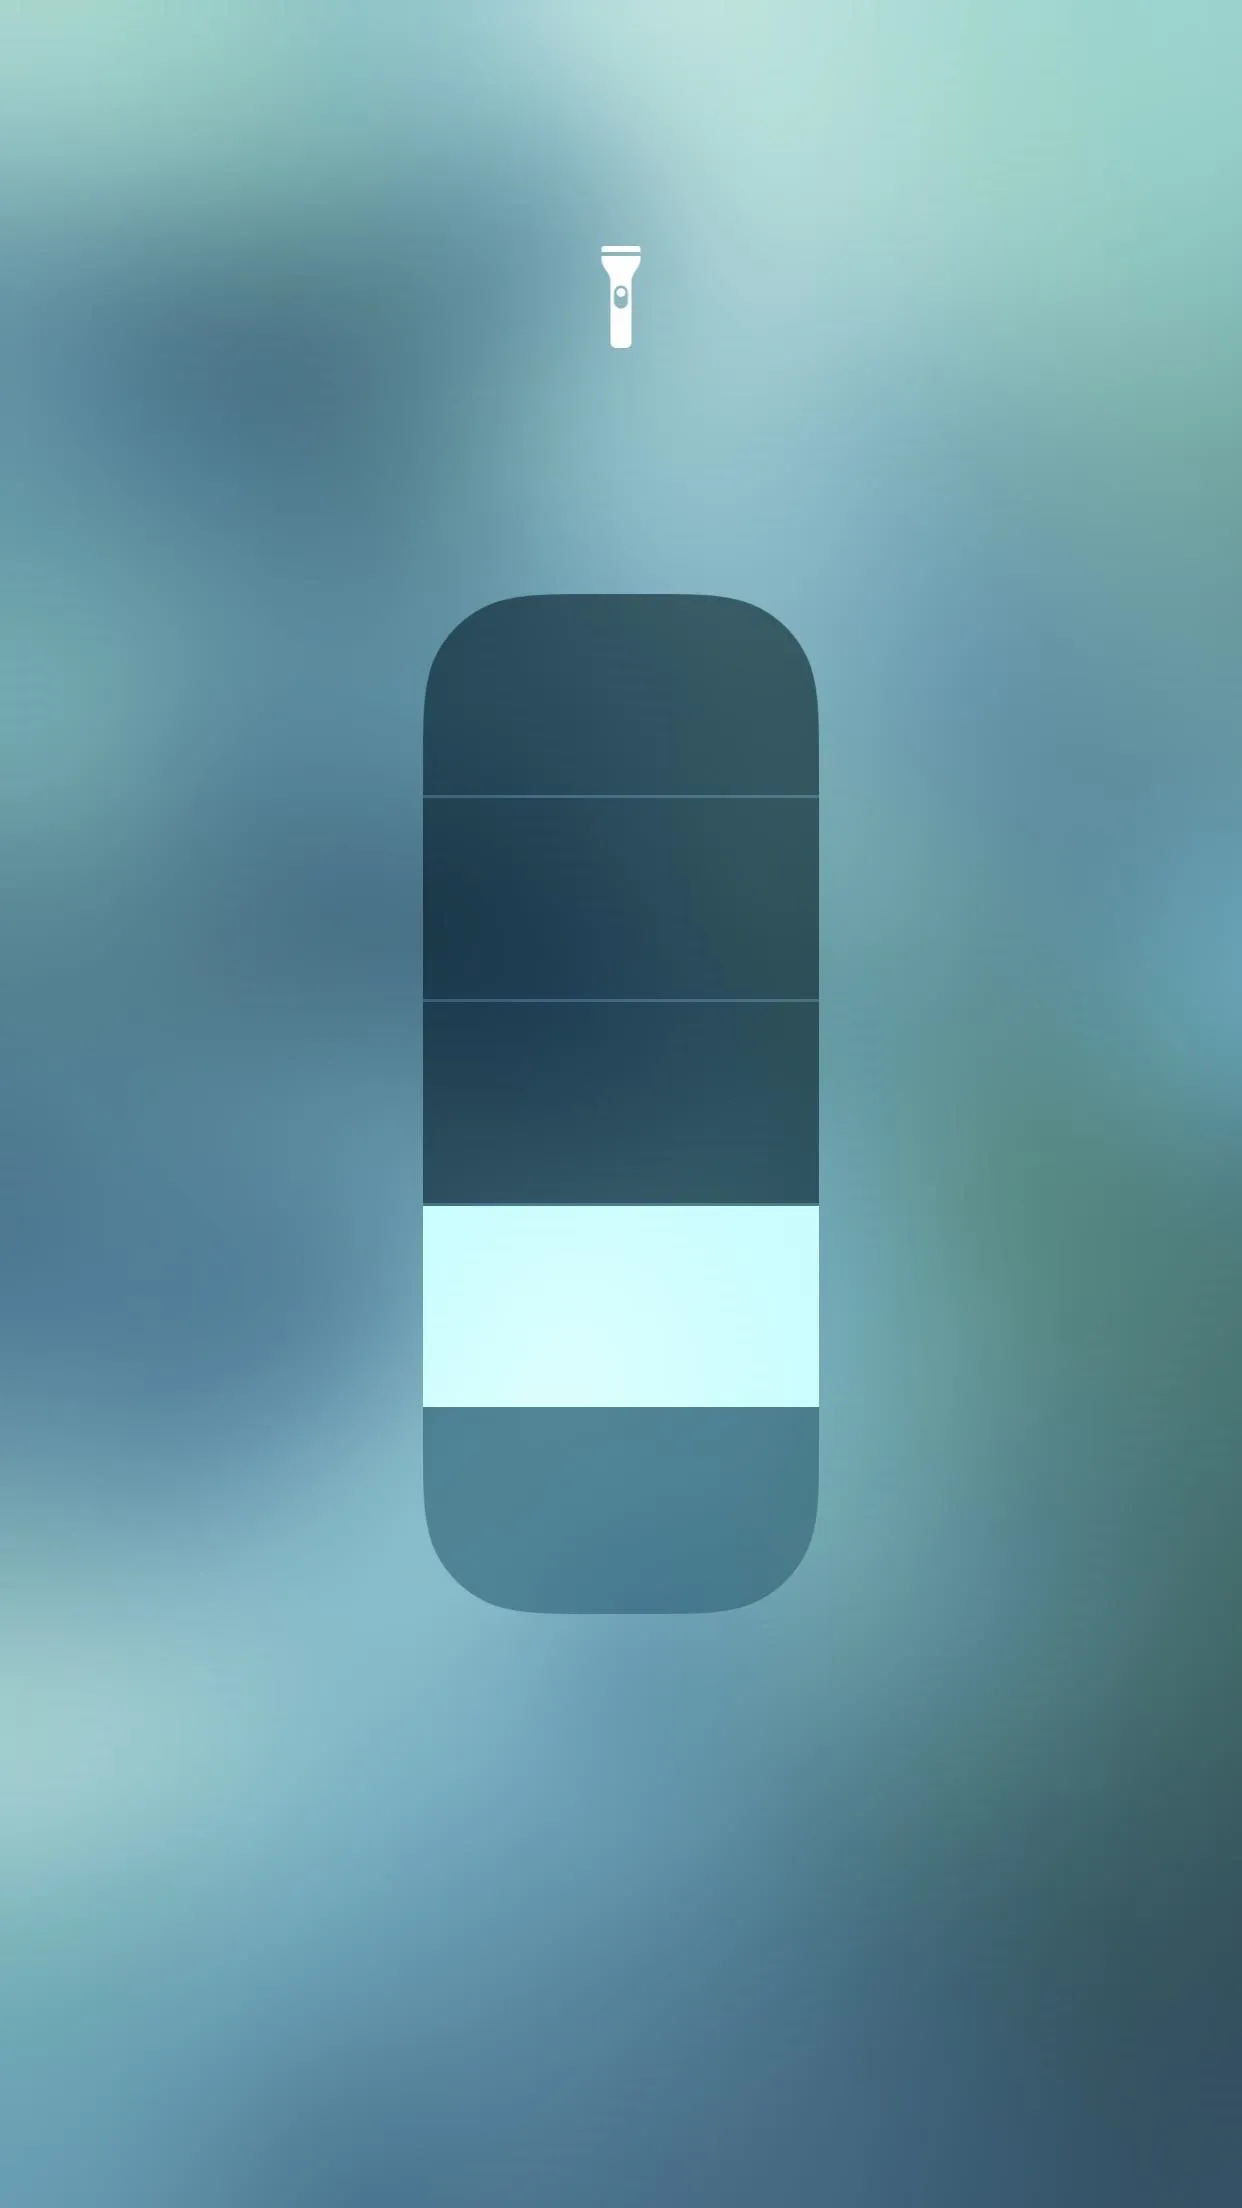
If you're like me, you probably rely on your iPhone's flashlight quite often. While it's tempting to keep the flashlight set to the brightest setting, it can be unnecessary in many situations since the lowest brightness gets the job done and saves battery.
Just open Control Center and 3D Touch or long-press on the flashlight button. Select the lowest brightness setting, and iOS 12 will remember your choice the next time you turn on the flashlight.


14. Enable Wi-Fi Assist
Wi-Fi assist helps you avoid subtle battery drain in areas of weak Wi-Fi connection. If the Wi-Fi is too slow for a proper connection, the iPhone automatically switches to a cellular connection, speeding up your internet use but also relieving pressure on the battery. You won't be able to take advantage of this is cellular data is disabled, however, so keep that in mind when choosing your battery-saving techniques.
To make sure Wi-Fi assist is enabled, open Settings, tap "Cellular," then scroll all the way to the bottom of the page to find the "Wi-Fi Assist" slider. Make sure it's on.

15. Disable Widgets
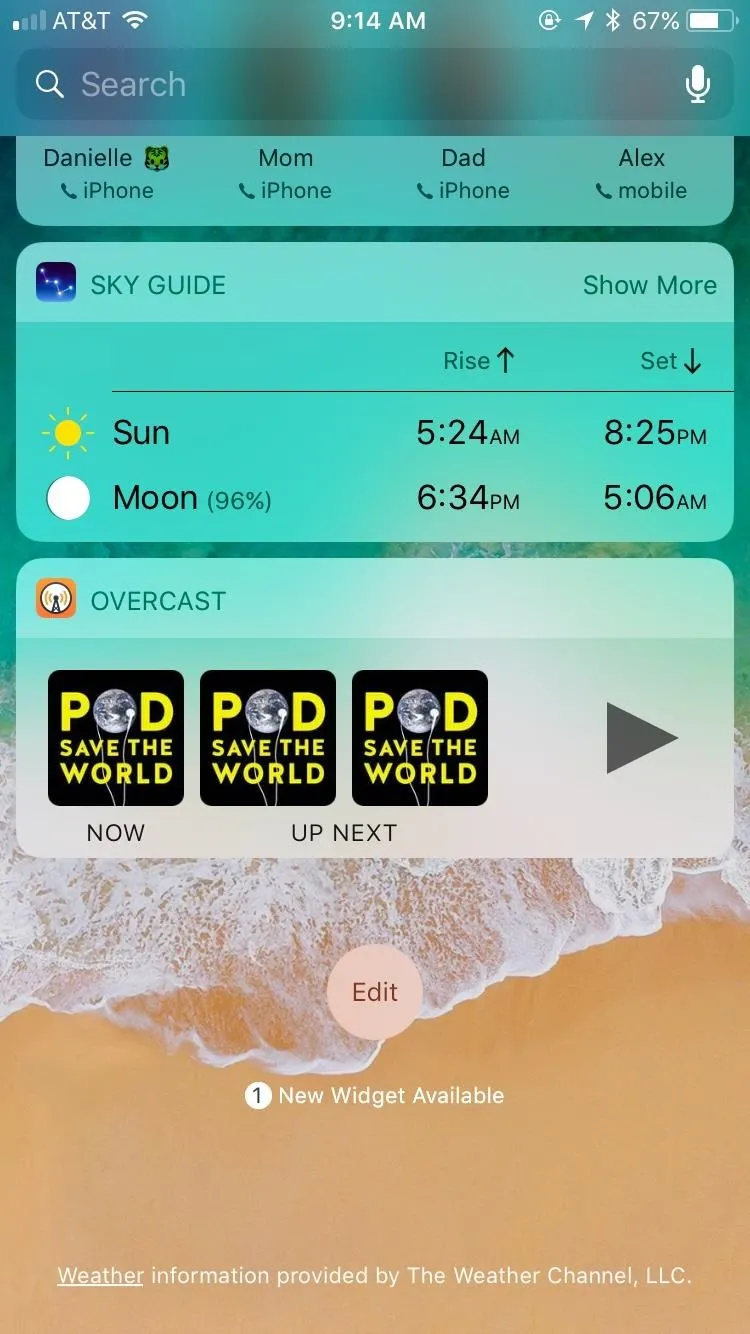
If you take advantage of the convenience of widgets in iOS, this one might be a tough tip to hear. However, widgets can cause battery drain, especially those which use location services, such as Maps or Weather.
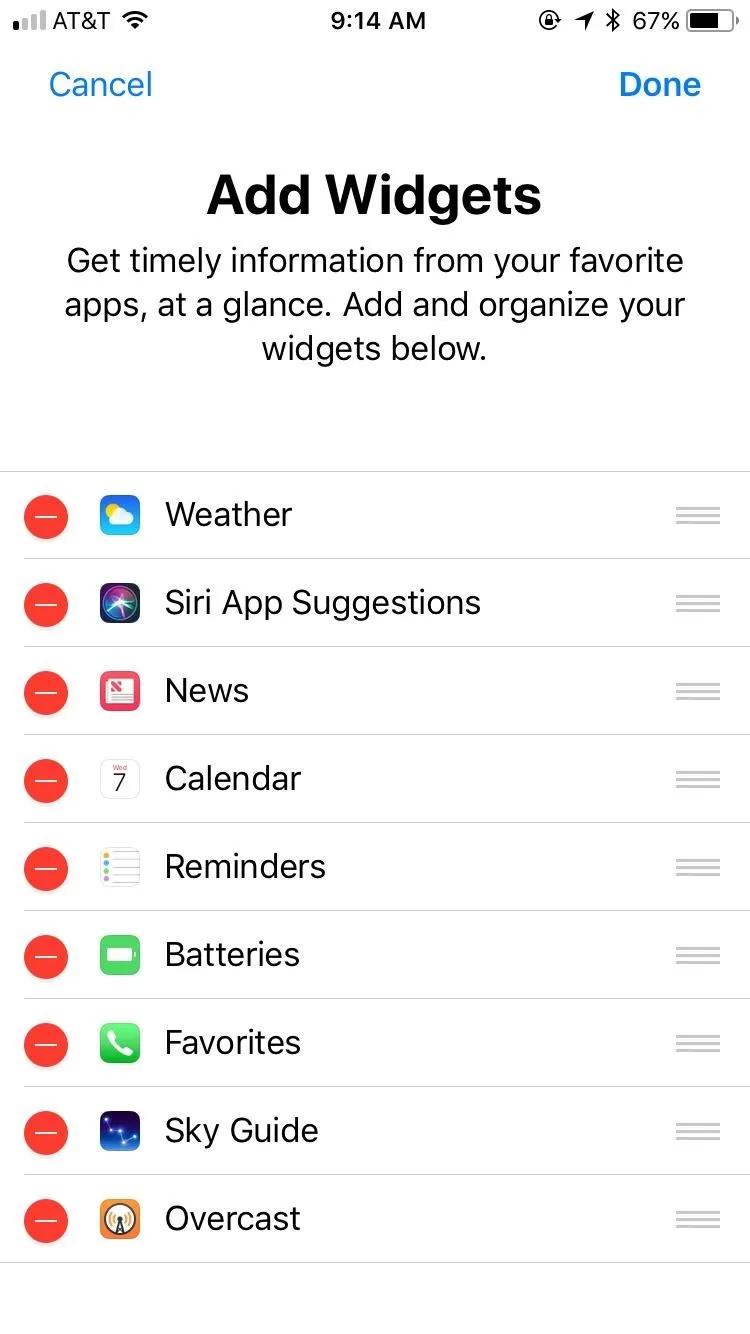
To disable widgets, swipe right on the Today View to enter the widget window. Scroll to the bottom of the page, tap "Edit," then tap the red minus next to any Widget you'd like to remove. The good news? Restoring any of these widgets is as easy as scrolling to the bottom of this page and tapping the green plus next to the widget in question.


16. Turn on Low Power Mode
Who doesn't love Low Power Mode? The feature disables a suite of features that add stress on your iPhone's battery, some of which you can't disable yourself. While iOS only prompts you to enable the setting once your iPhone's battery reaches 20 percent (and then ten percent), you can manually enable it at any time to give your battery a boost.
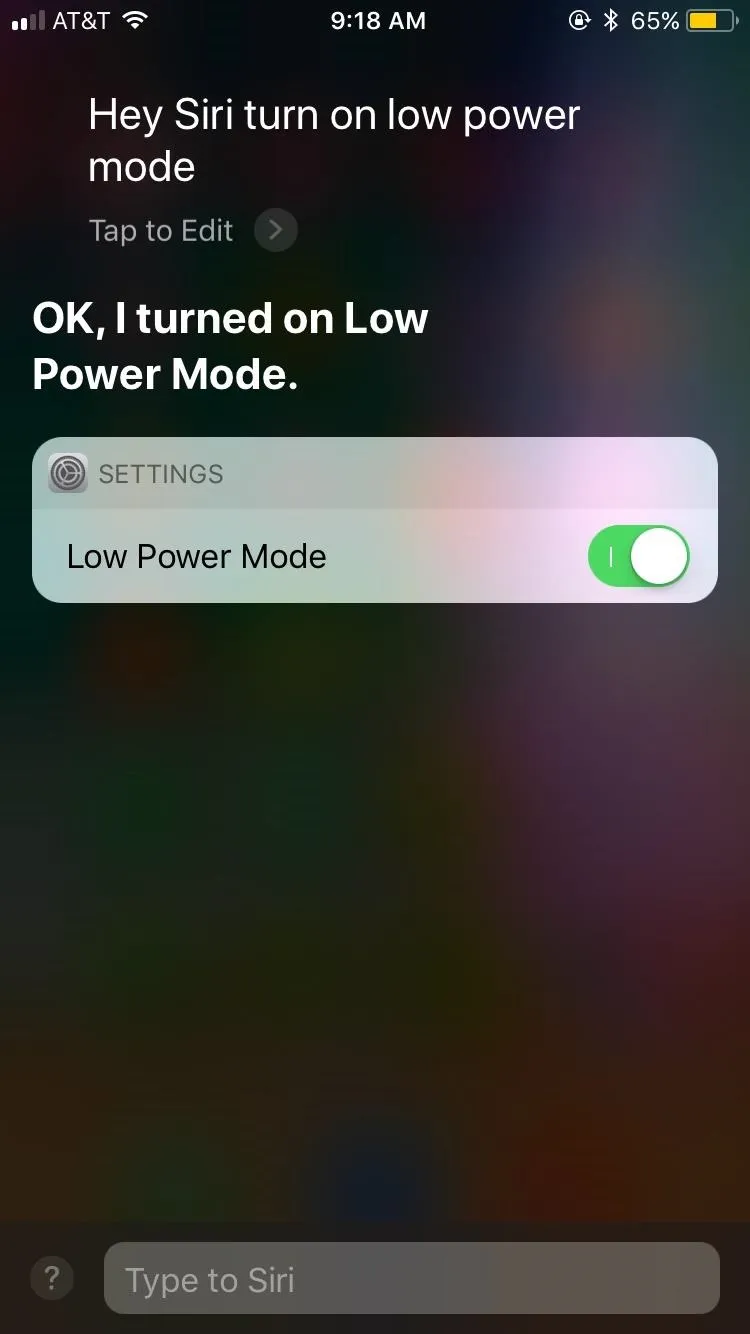
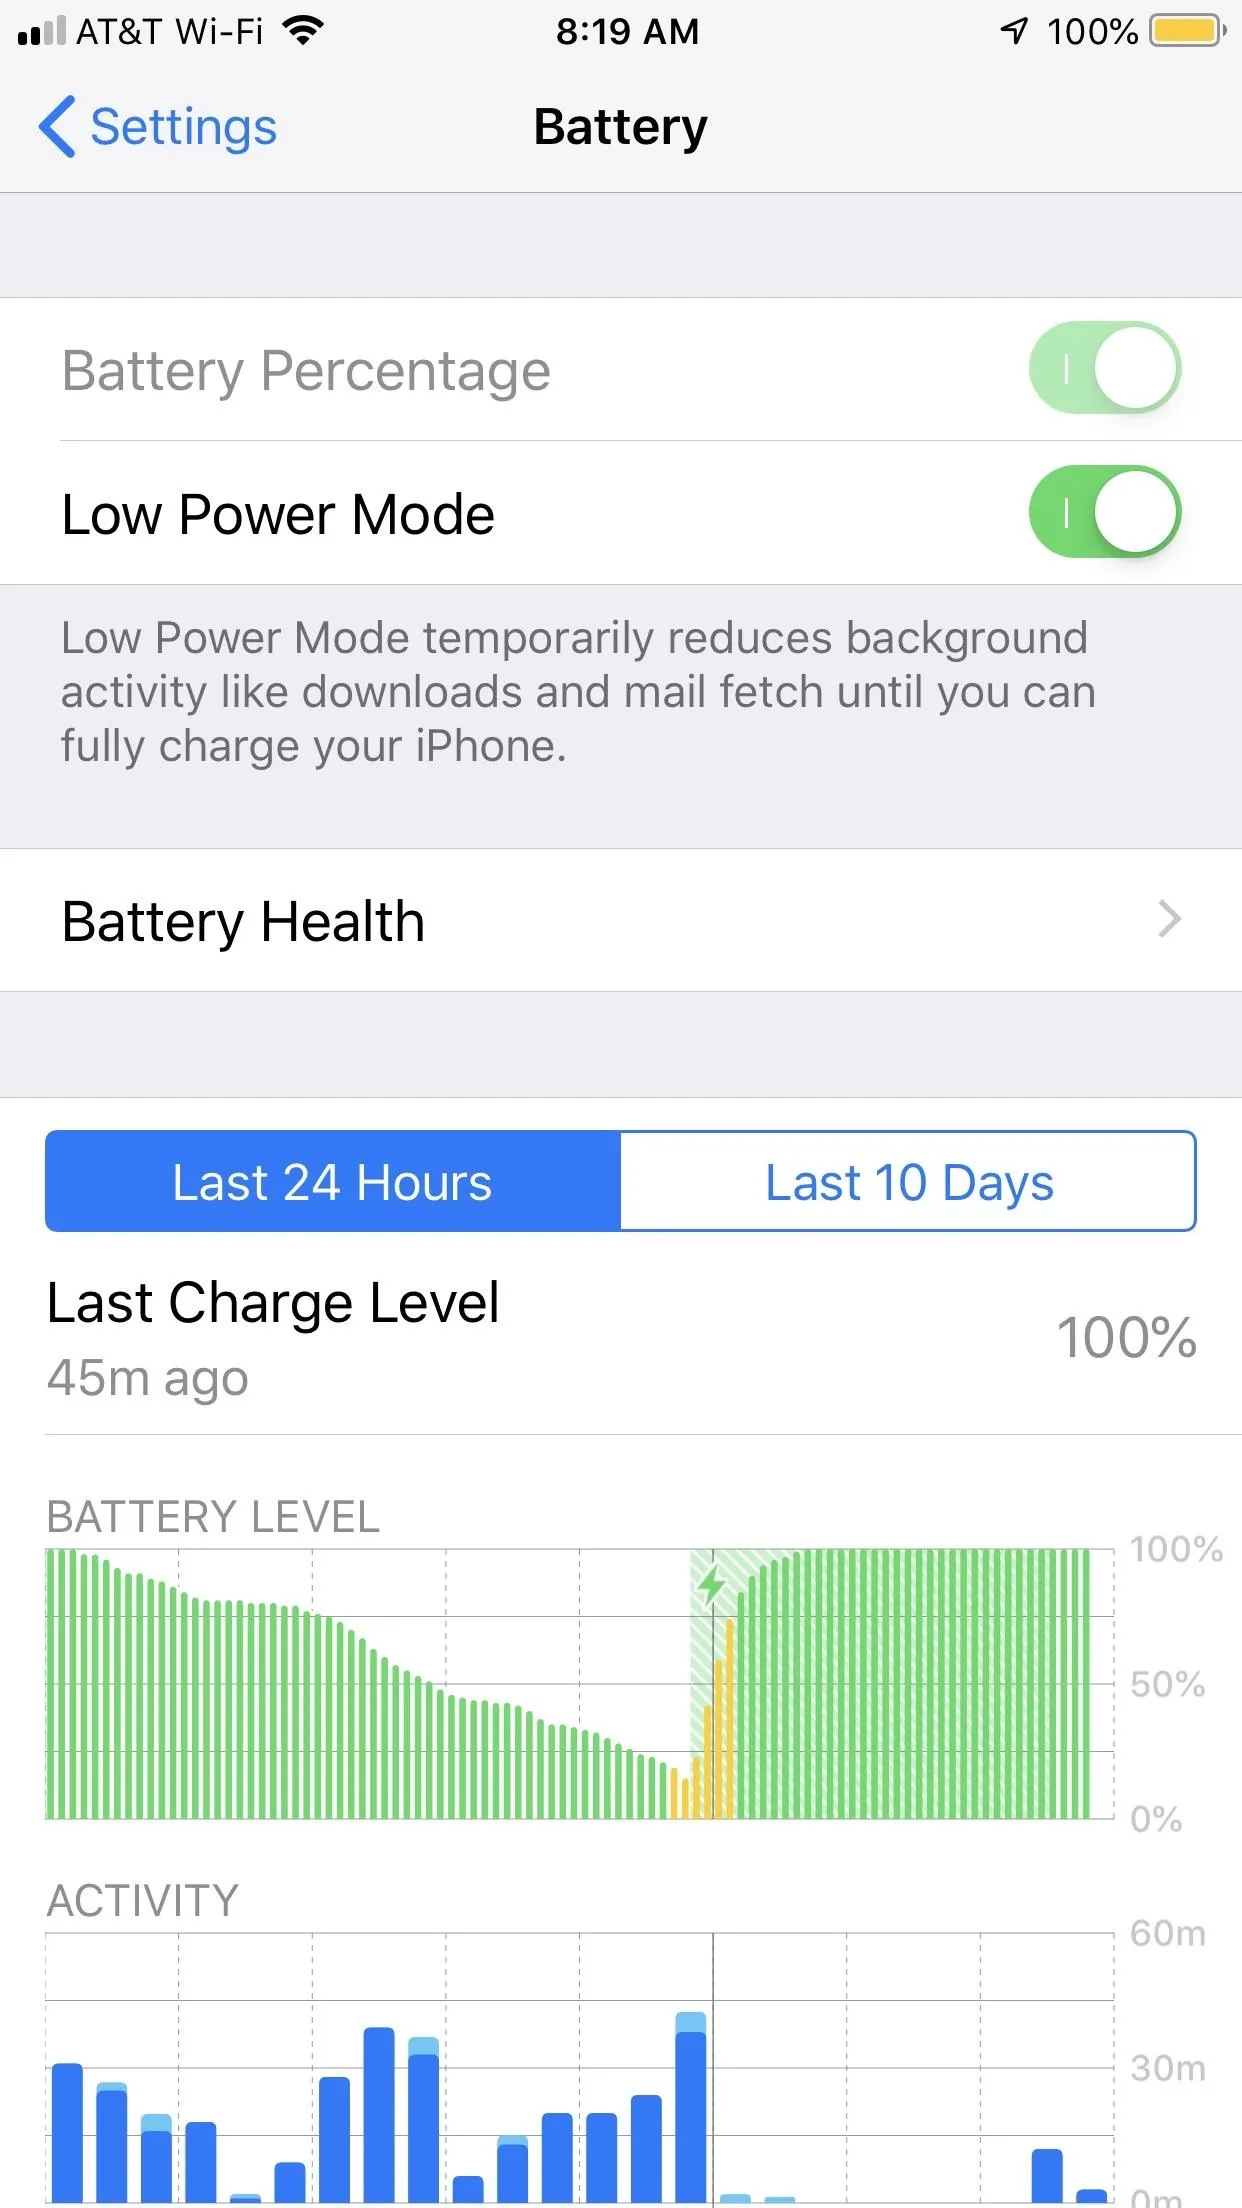
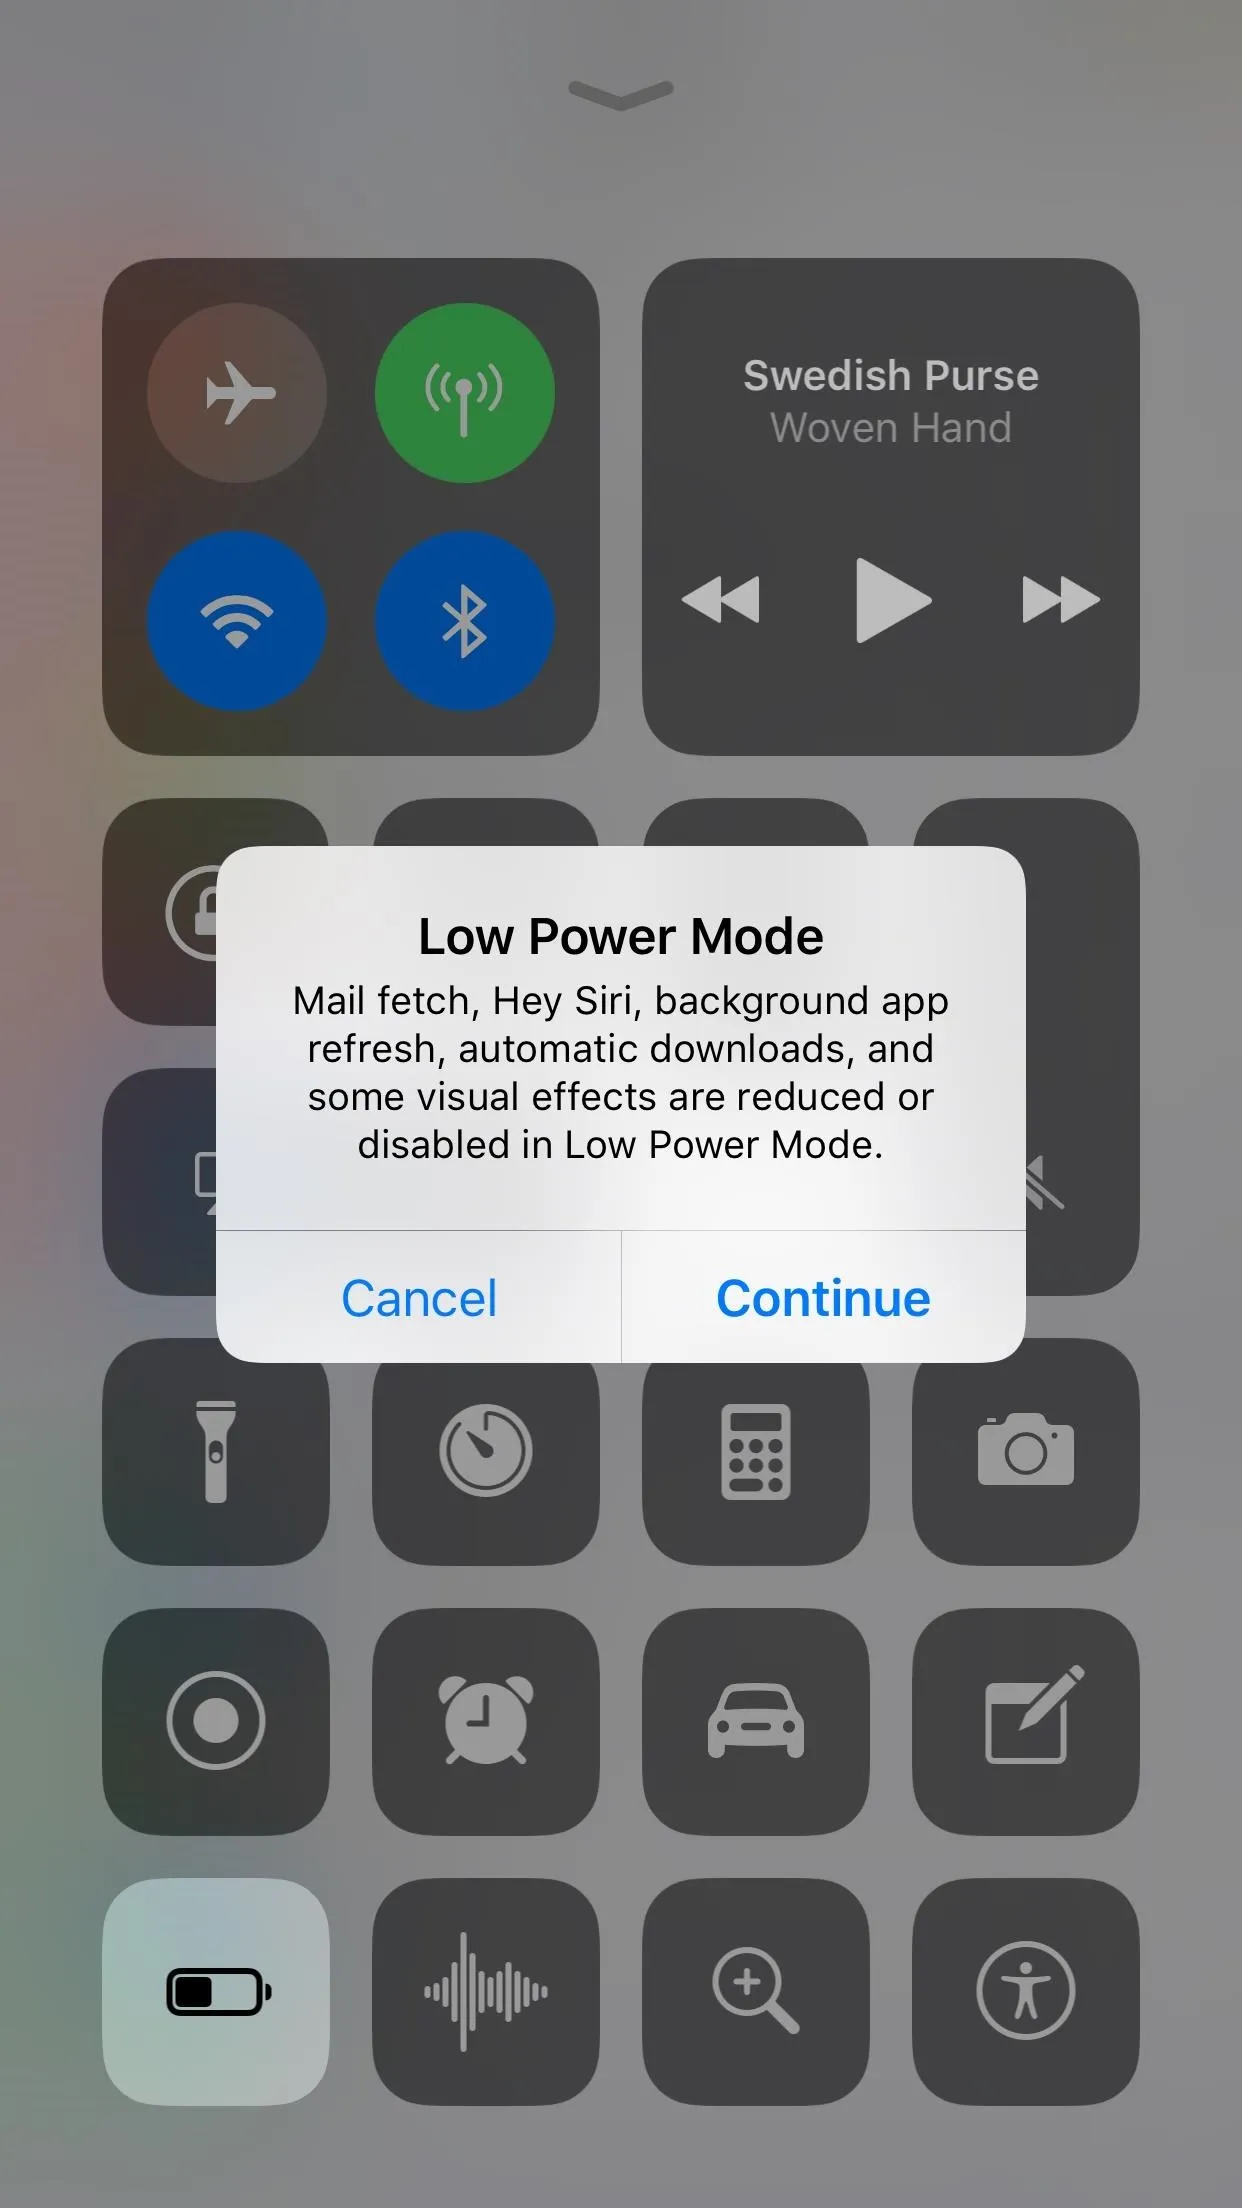
Enabling Low Power Mode is as easy as saying "Hey, Siri — enable Low Power Mode." You can also type the request to Siri, or long-press the Home or Side button and ask the assistant that way. Alternatively, you can jump into the "Battery" section of the Settings app or use the button in the Control Center to enable "Low Power Mode" yourself.


17. Keep Your iPhone Face-Down
There are two kinds of people in this world — those that place their iPhones face down on a table and those that place them face up. If you belong to the former, you now have evidence to your method's superiority.
When face down, your iPhone's display won't activate on its own when receiving notifications. You'll still hear alerts, but the display won't turn on, saving battery life without having to think about it. If you crave visual notifications, you could enable LED alerts, but the battery trade-off might not be worth it.
18. Disable 'Hey Siri'
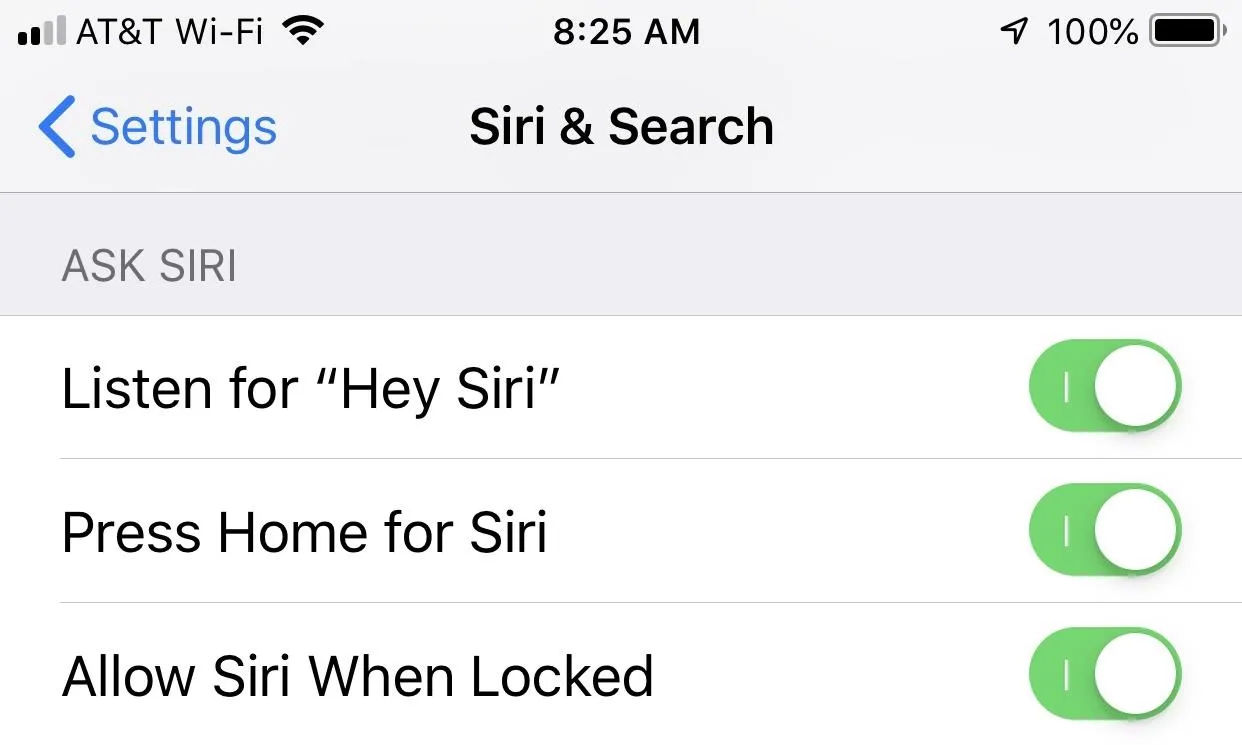
We love "Hey Siri" since the feature comes in handy for more than one tip on this list. That being said, it requires your iPhone to be on guard at all times, listening for your voice commands 24/7. That kind of surveillance doesn't come for free and will take a toll on your iPhone's daily battery life. To quickly disable "Hey Siri," go to "Siri & Search" in Settings, then disable "Listen for 'Hey Siri'."
19. Turn Off Auto-Playing Videos in Apps
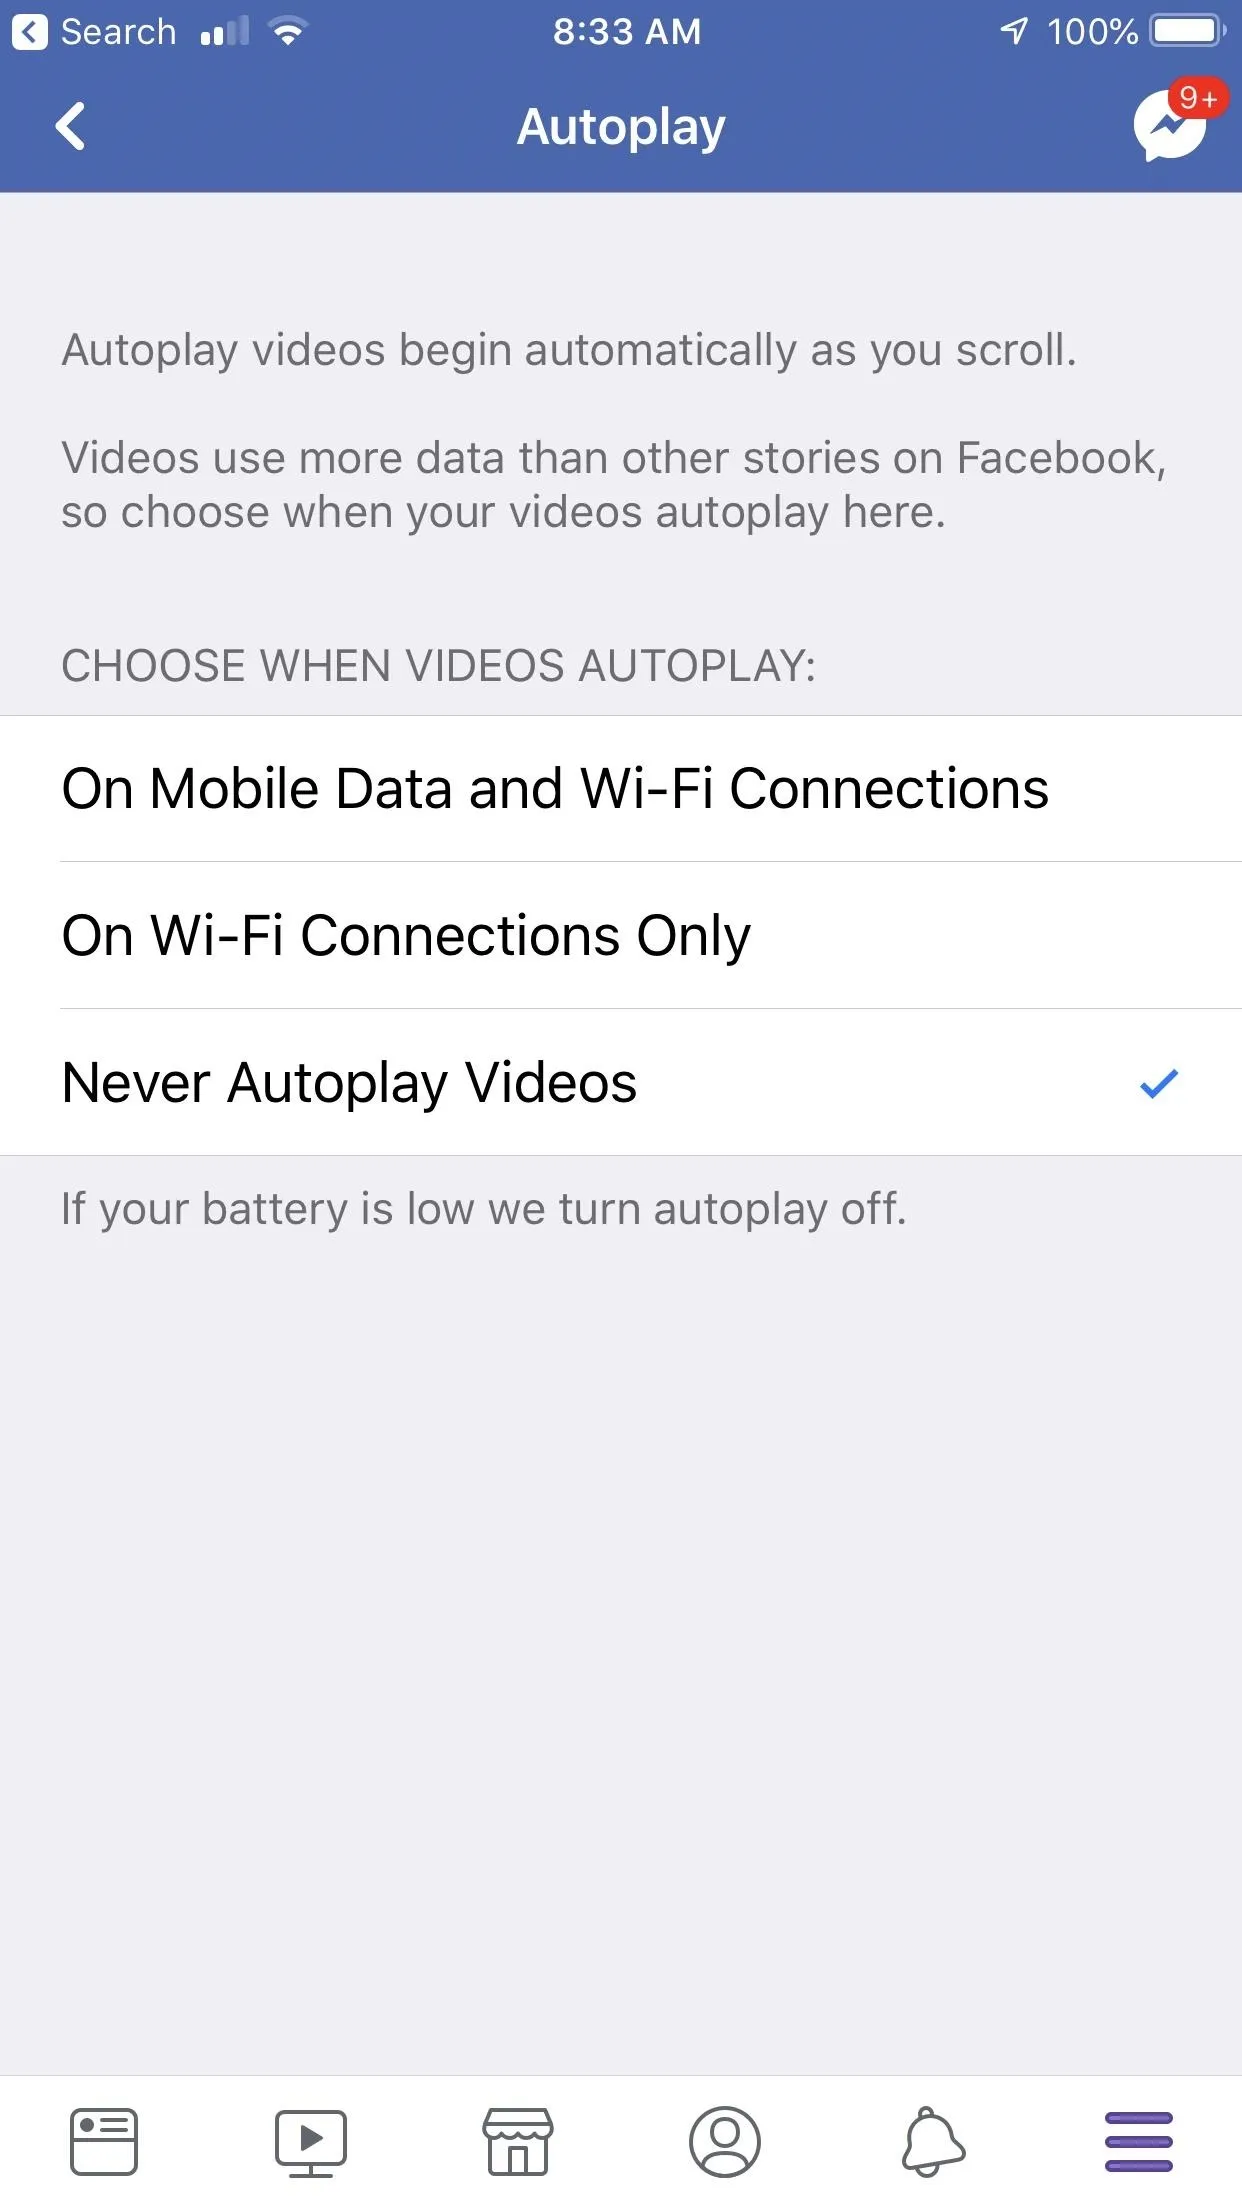
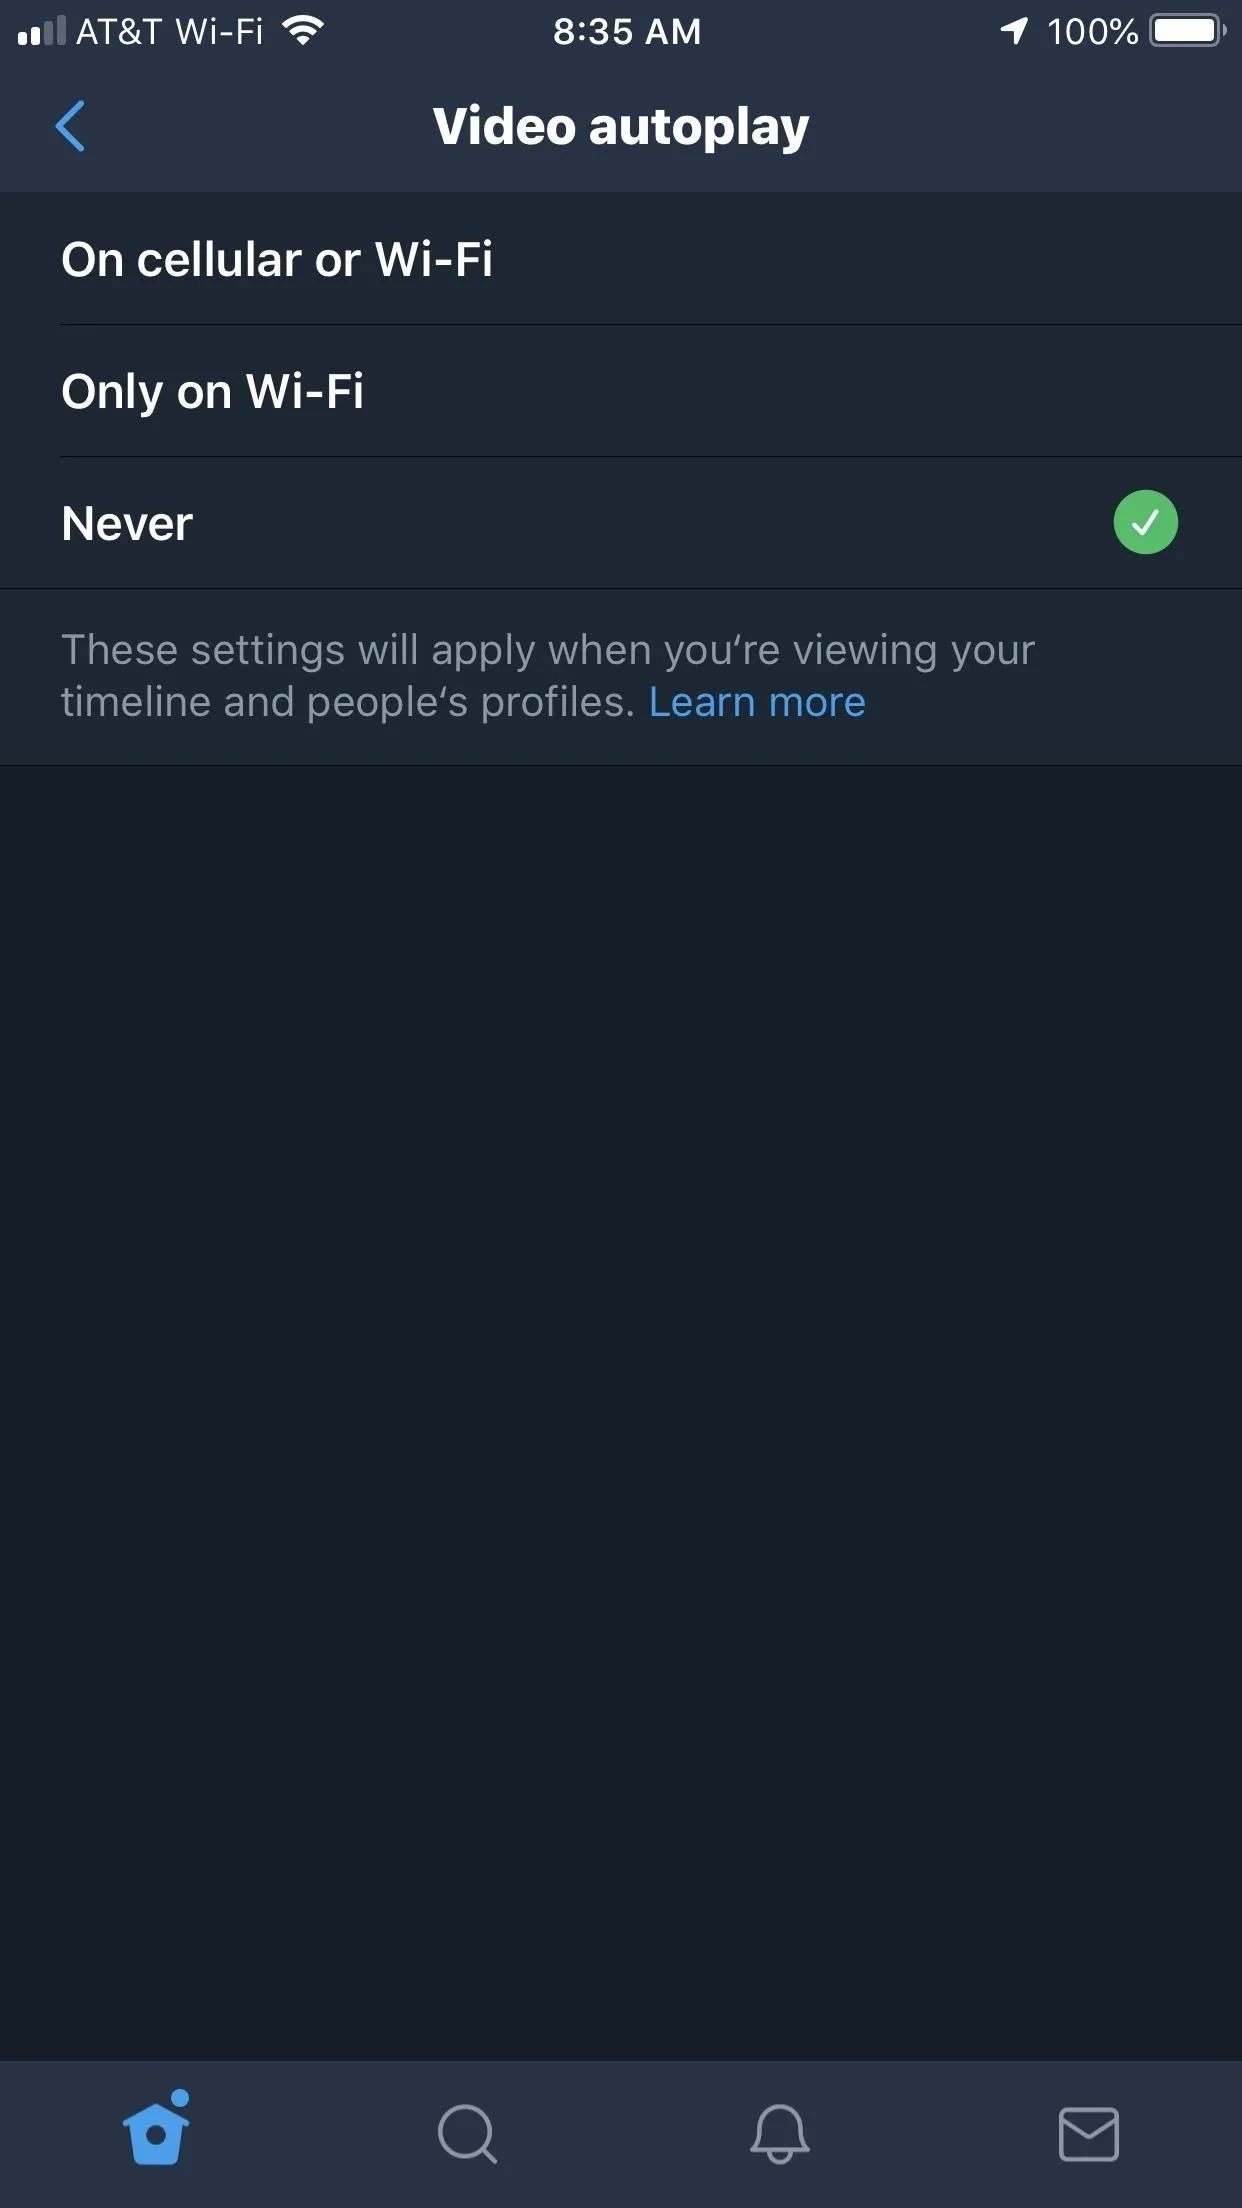
Auto-playing videos in apps like Facebook and Twitter can be convenient, but let's face it — if you want to watch a video, it's not a big deal to just tap the play button. In most cases, this feature is just a weight on your battery. Consider disabling the feature in apps that use it.
While the setting won't be found in the same place in all apps, here are two examples to get you started:
- To disable auto-playing videos in Facebook, tap the hamburger menu in the bottom right, tap "Settings & Privacy" at the bottom of the list, then tap "Settings." Select "Videos and Photos" towards the bottom of the page, then tap "Autoplay." Select "Never Autoplay Videos," and you'll be all set.
- In Twitter, tap your profile icon, then tap "Settings and privacy." Select "Data usage," then in "Video autoplay," tap "Never."


20. Enable Reduce Motion
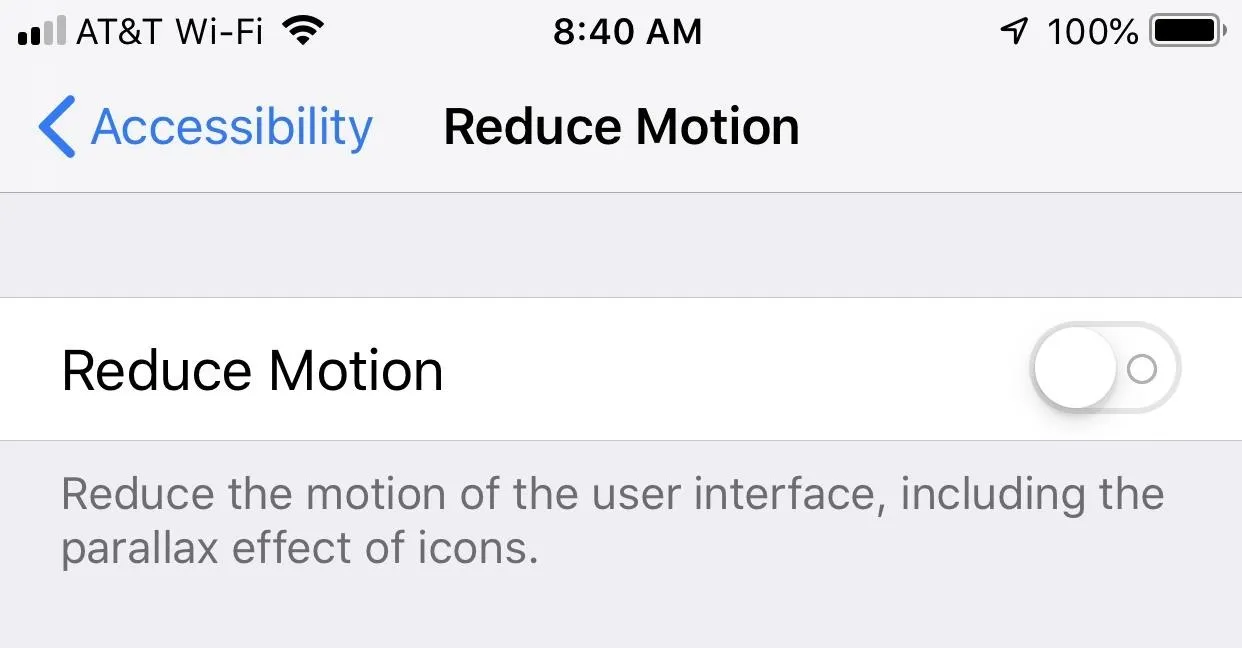
Part of iOS' charm is in its subtle visual effects, like animations when launching apps, and the parallax effects seen on the home screen. However, all of these motions have a negative effect on your battery life. To disable them, head to "General" in Settings, tap "Accessibility," then "Reduce Motion." Enable it.
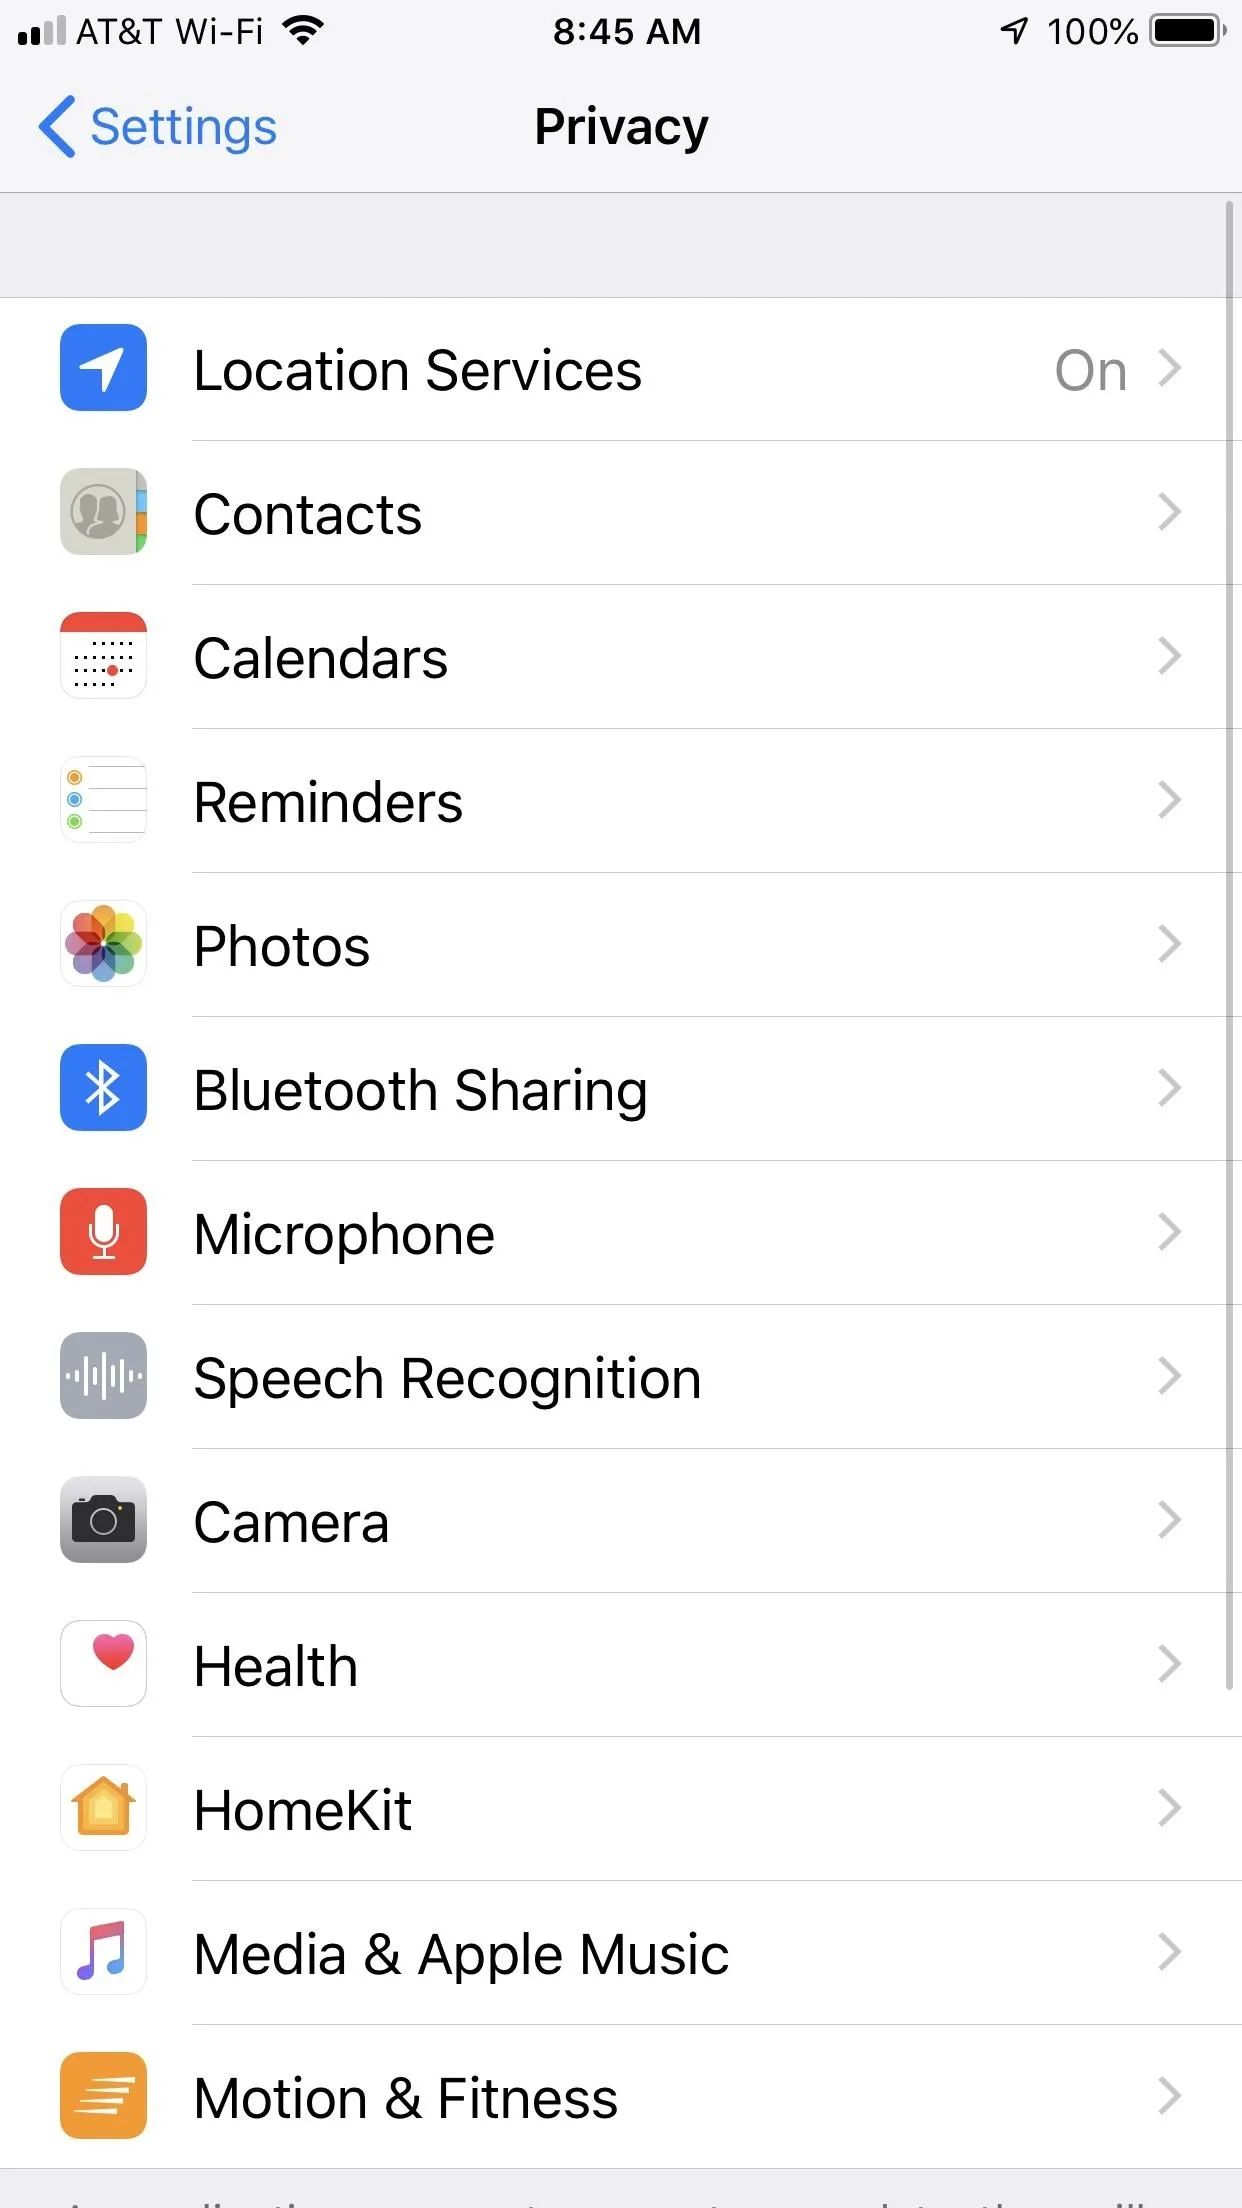
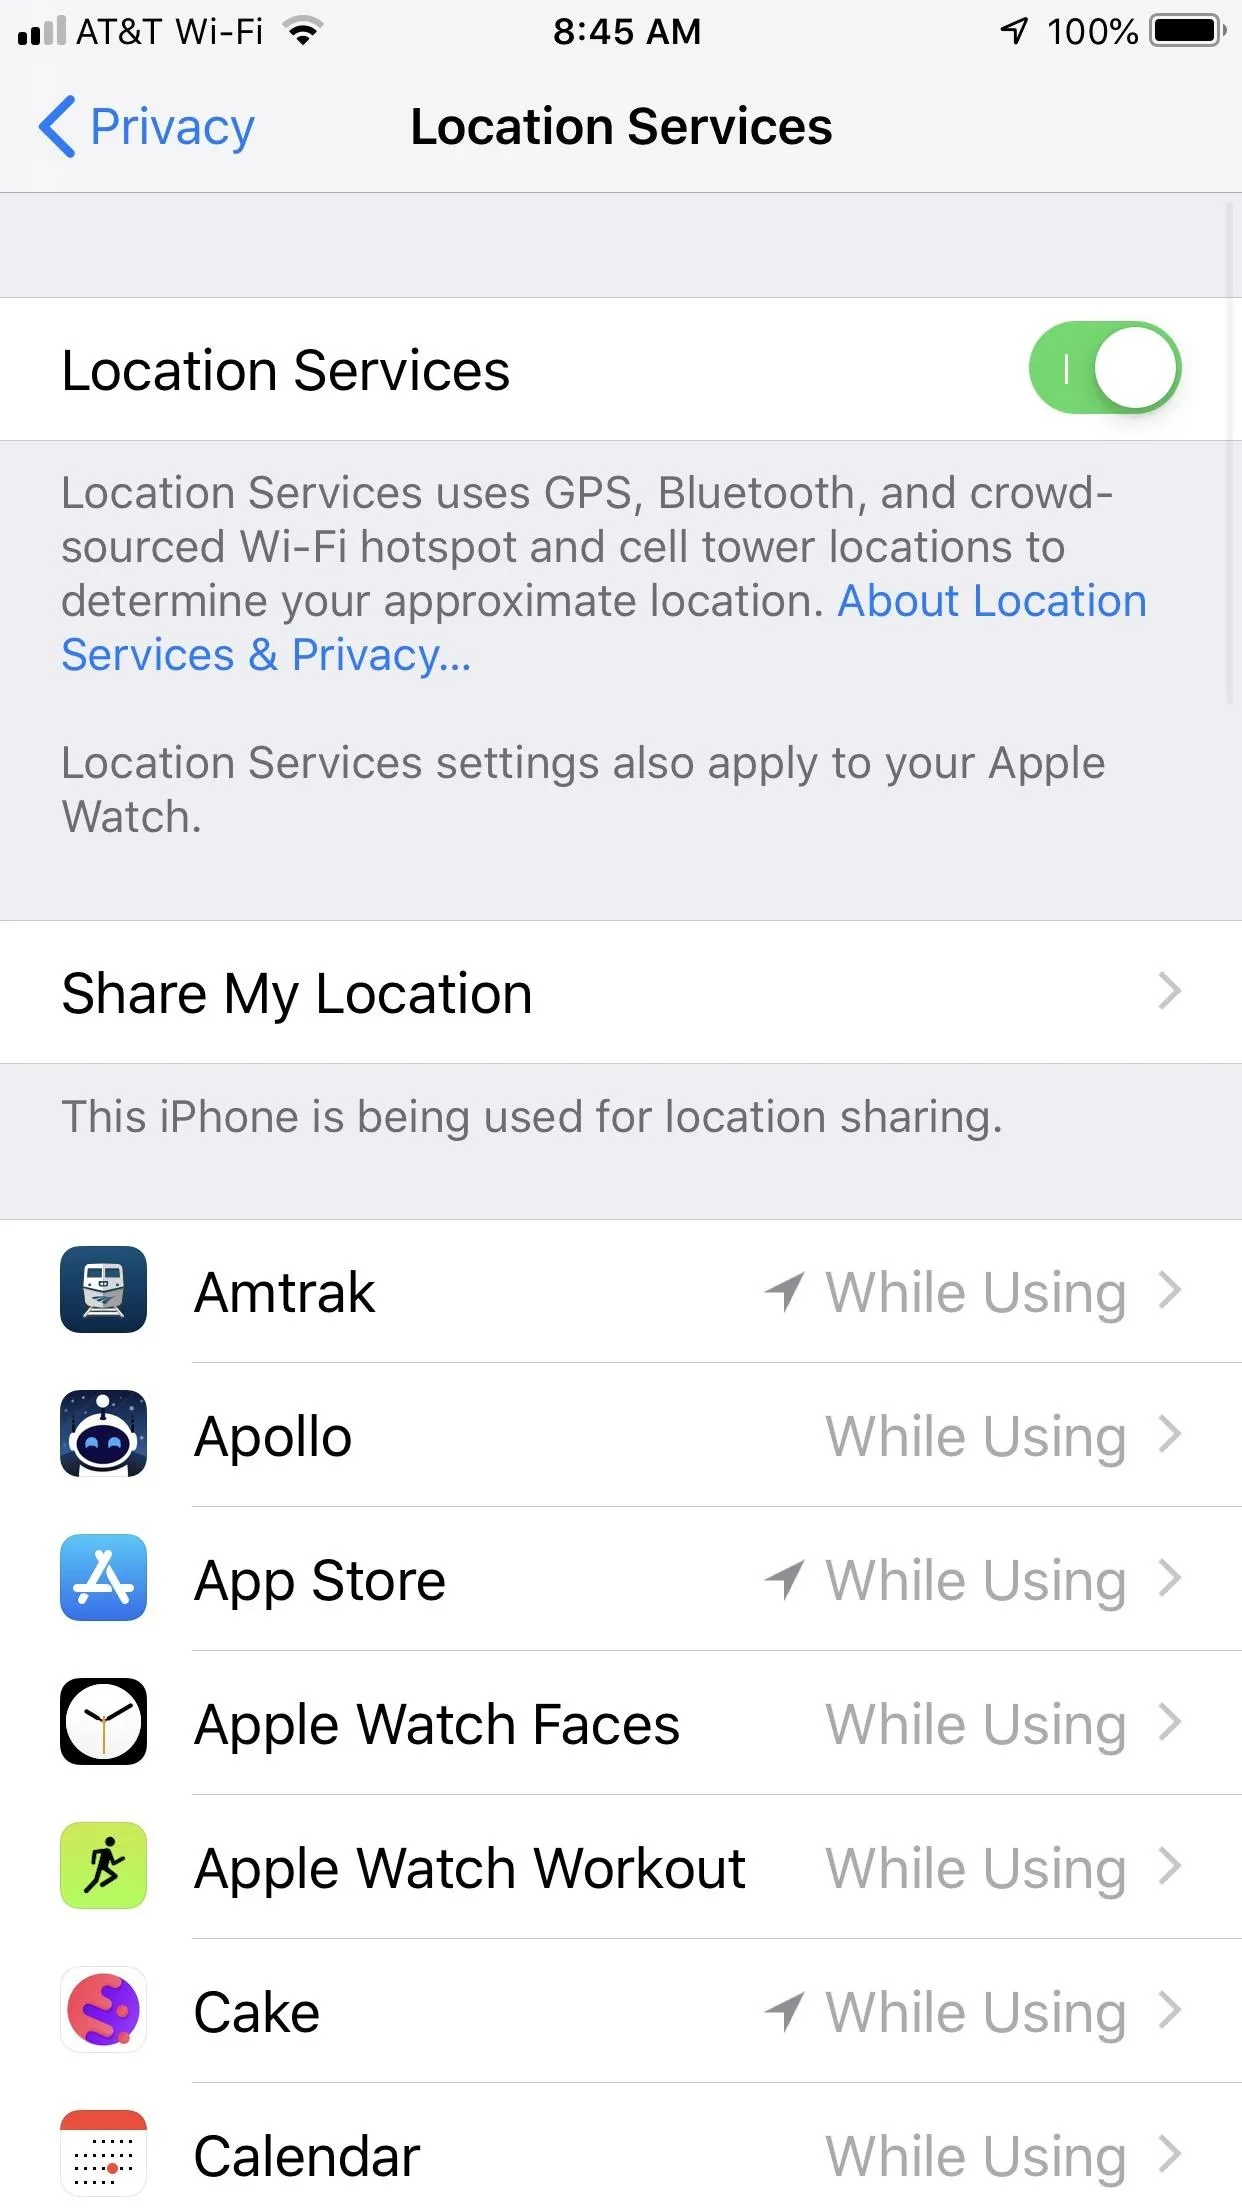
21. Enable Location Services Only for Some Apps
Location services are some of the worst culprits when it comes to battery drain. The problem? They're pretty much necessary to use a modern smartphone. Unless you don't mind total disconnection, some location services will need to remain enabled. The good news is you can be smart about which apps you give location permissions to, as well as when those apps have access to your location.
In "Location Services" found in the "Privacy" menu in Settings, you'll find all the apps on your phone that request access to your location. You can blanket-disable all at the top of the display, but again, this will most likely be impractical. You're better off going through apps one by one and deciding for yourself. For each, choose from "Never," "While Using the App," or "Always" depending on how you feel you need the app you use your location.


22. Turn Off Auto-Brightness
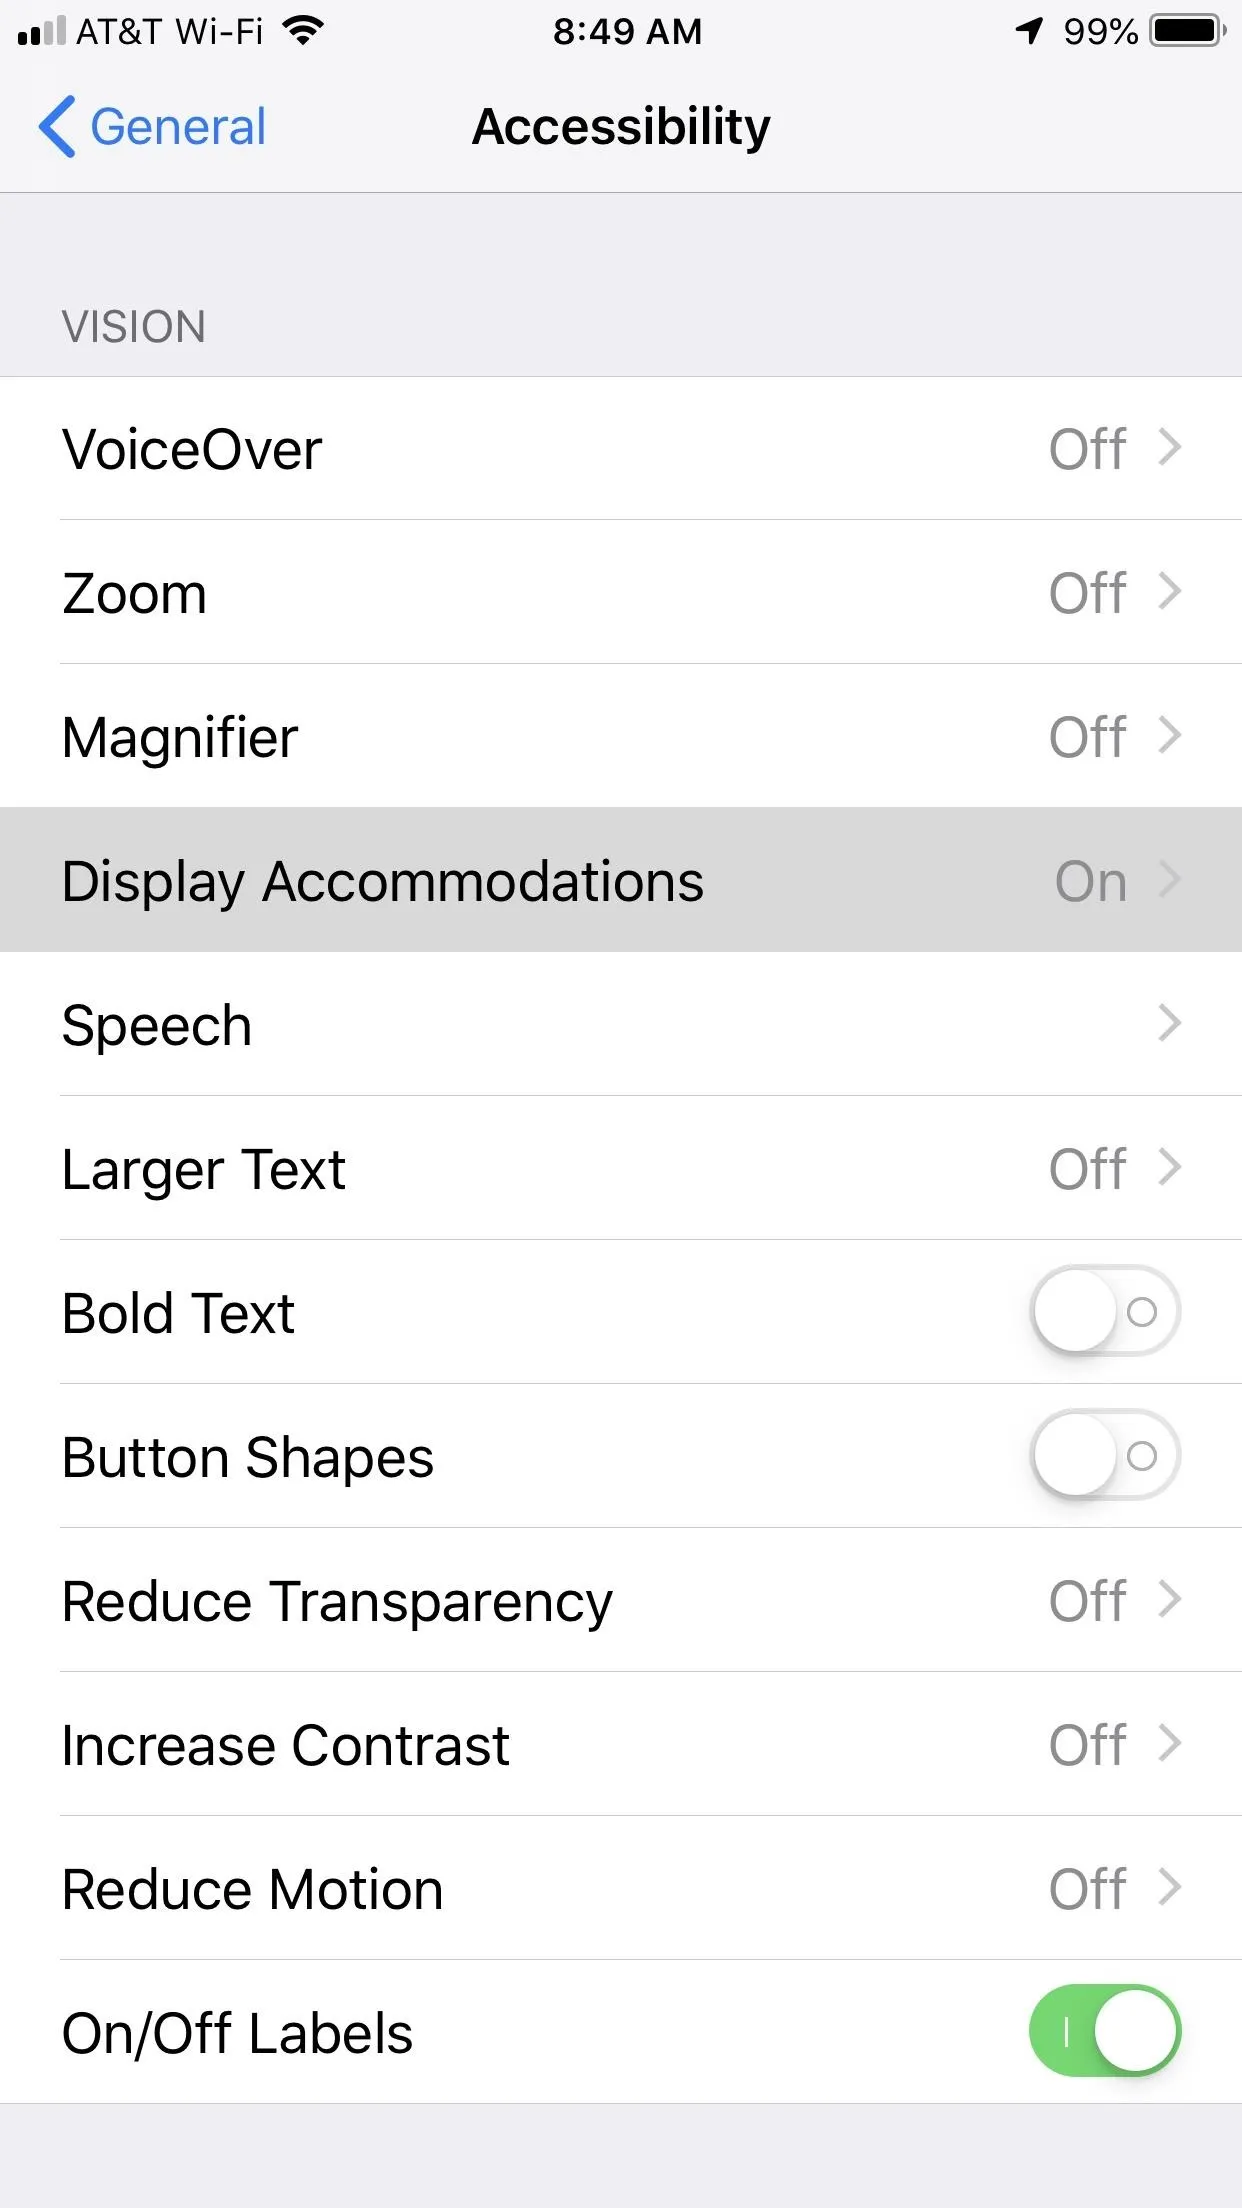
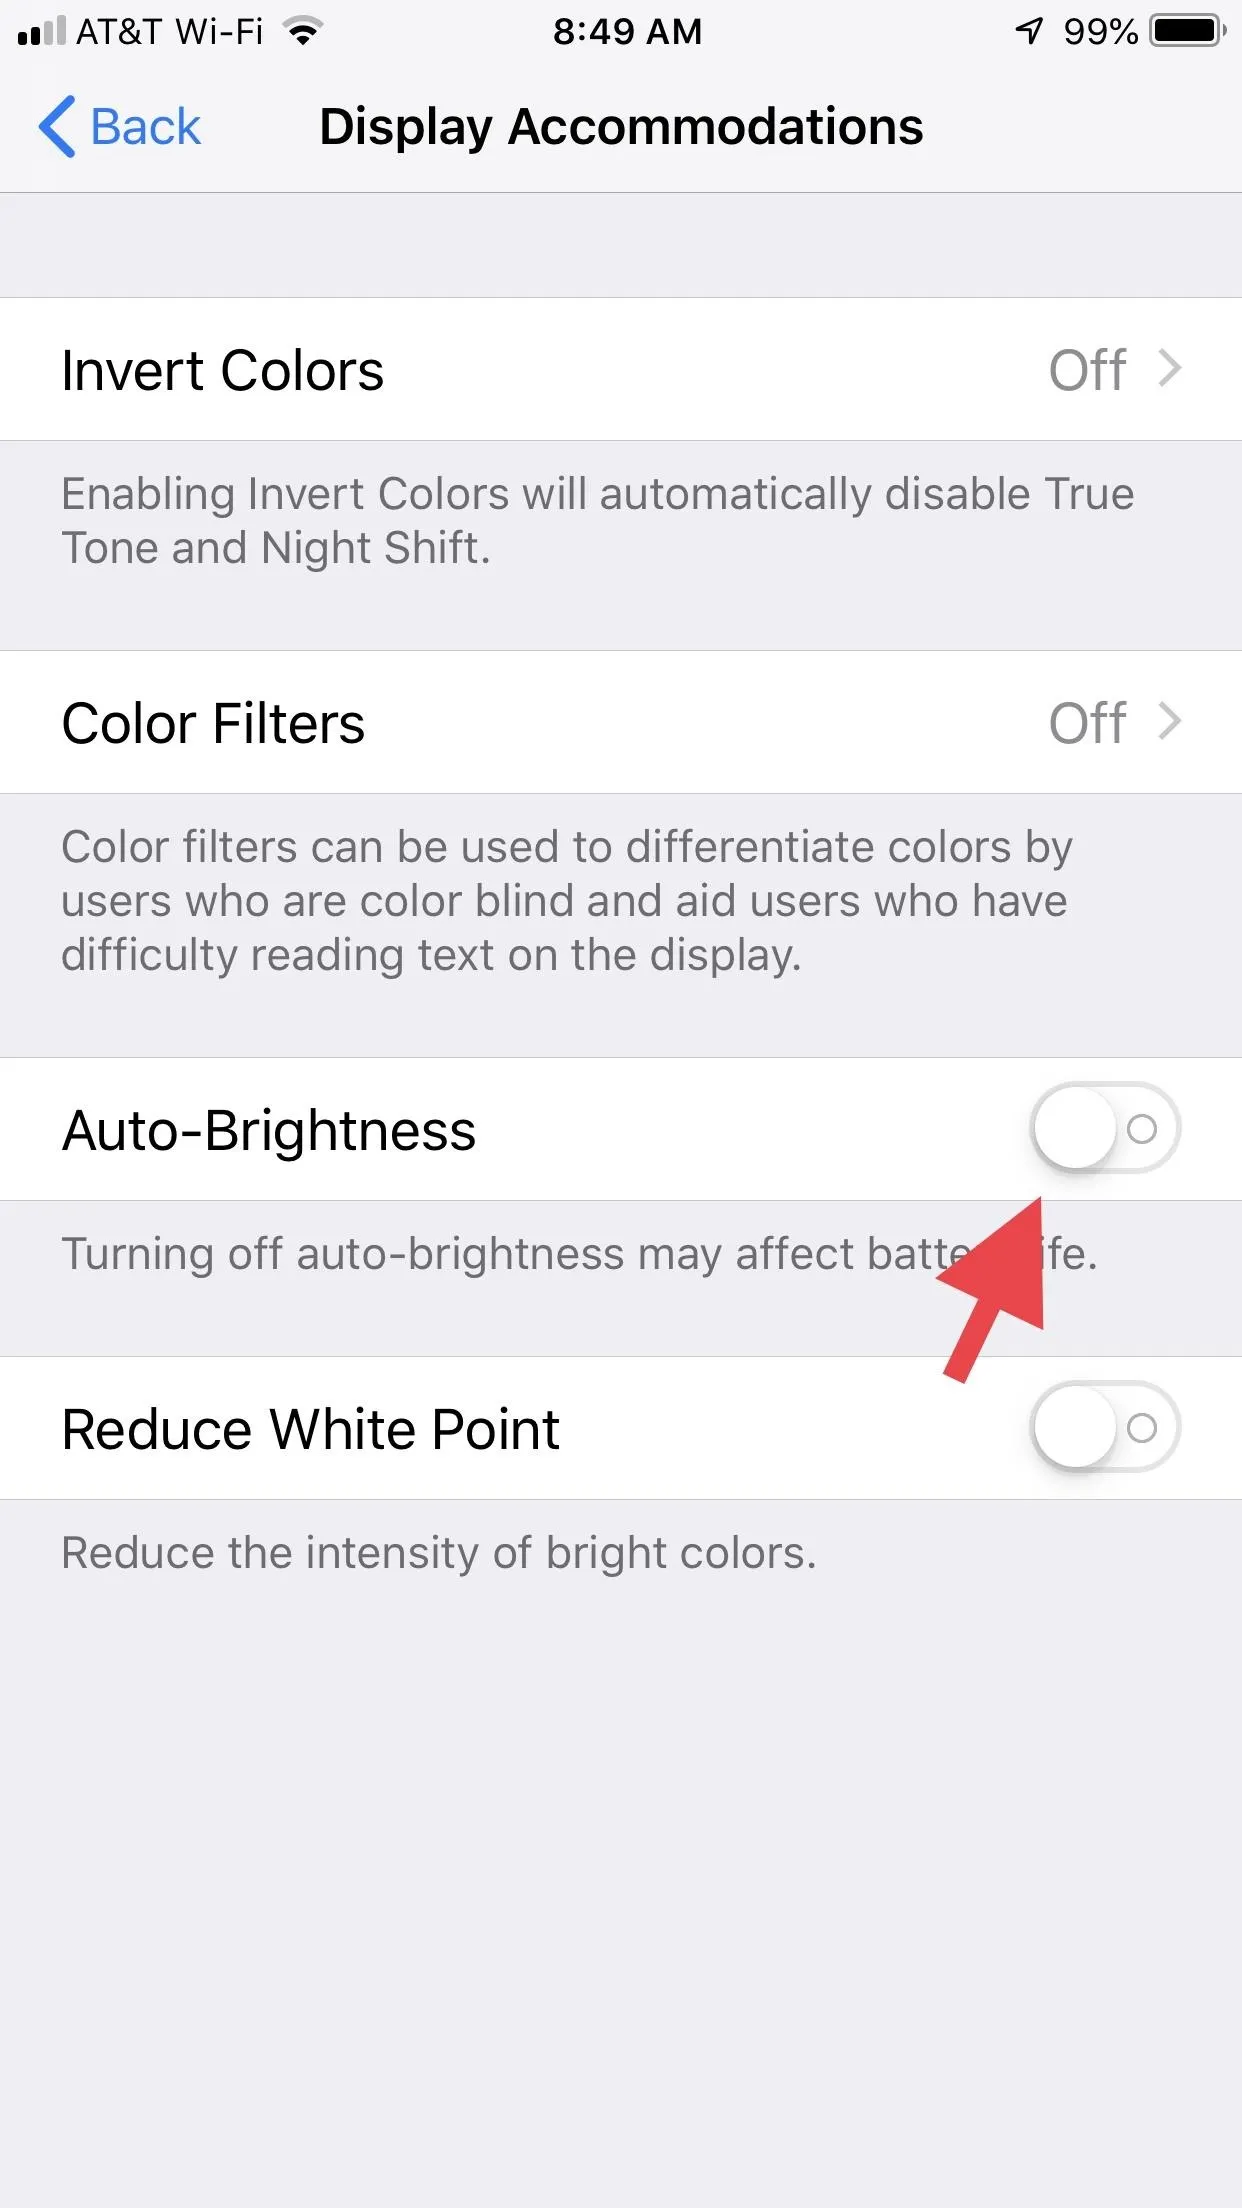
Auto-Brightness in iOS can help make sure the iPhone display is always legible based on the ambient surroundings. If it's dark, the screen brightness will be reduced to prevent eye strain. Likewise, if it's sunny out, it'll max out so you can actually see the screen. However, if you're anywhere in between dark and bright locations, Auto-Brightness will work too hard and will provide clumsy results anyway.
In truth, the setting just wastes battery life when compared to manually controlling it. Head over to "Accessibility" in the "General" settings, tap "Display Accommodations," then disable Auto-Brightness.


23. Turn Off 'Raise to Wake'
This iOS feature is convenient, but requires extra battery life to keep your iPhone's sensors active at all times. To disable it, head over to "Display & Brightness" in Settings, then make sure the toggle next to "Raise to Wake" is turned off.

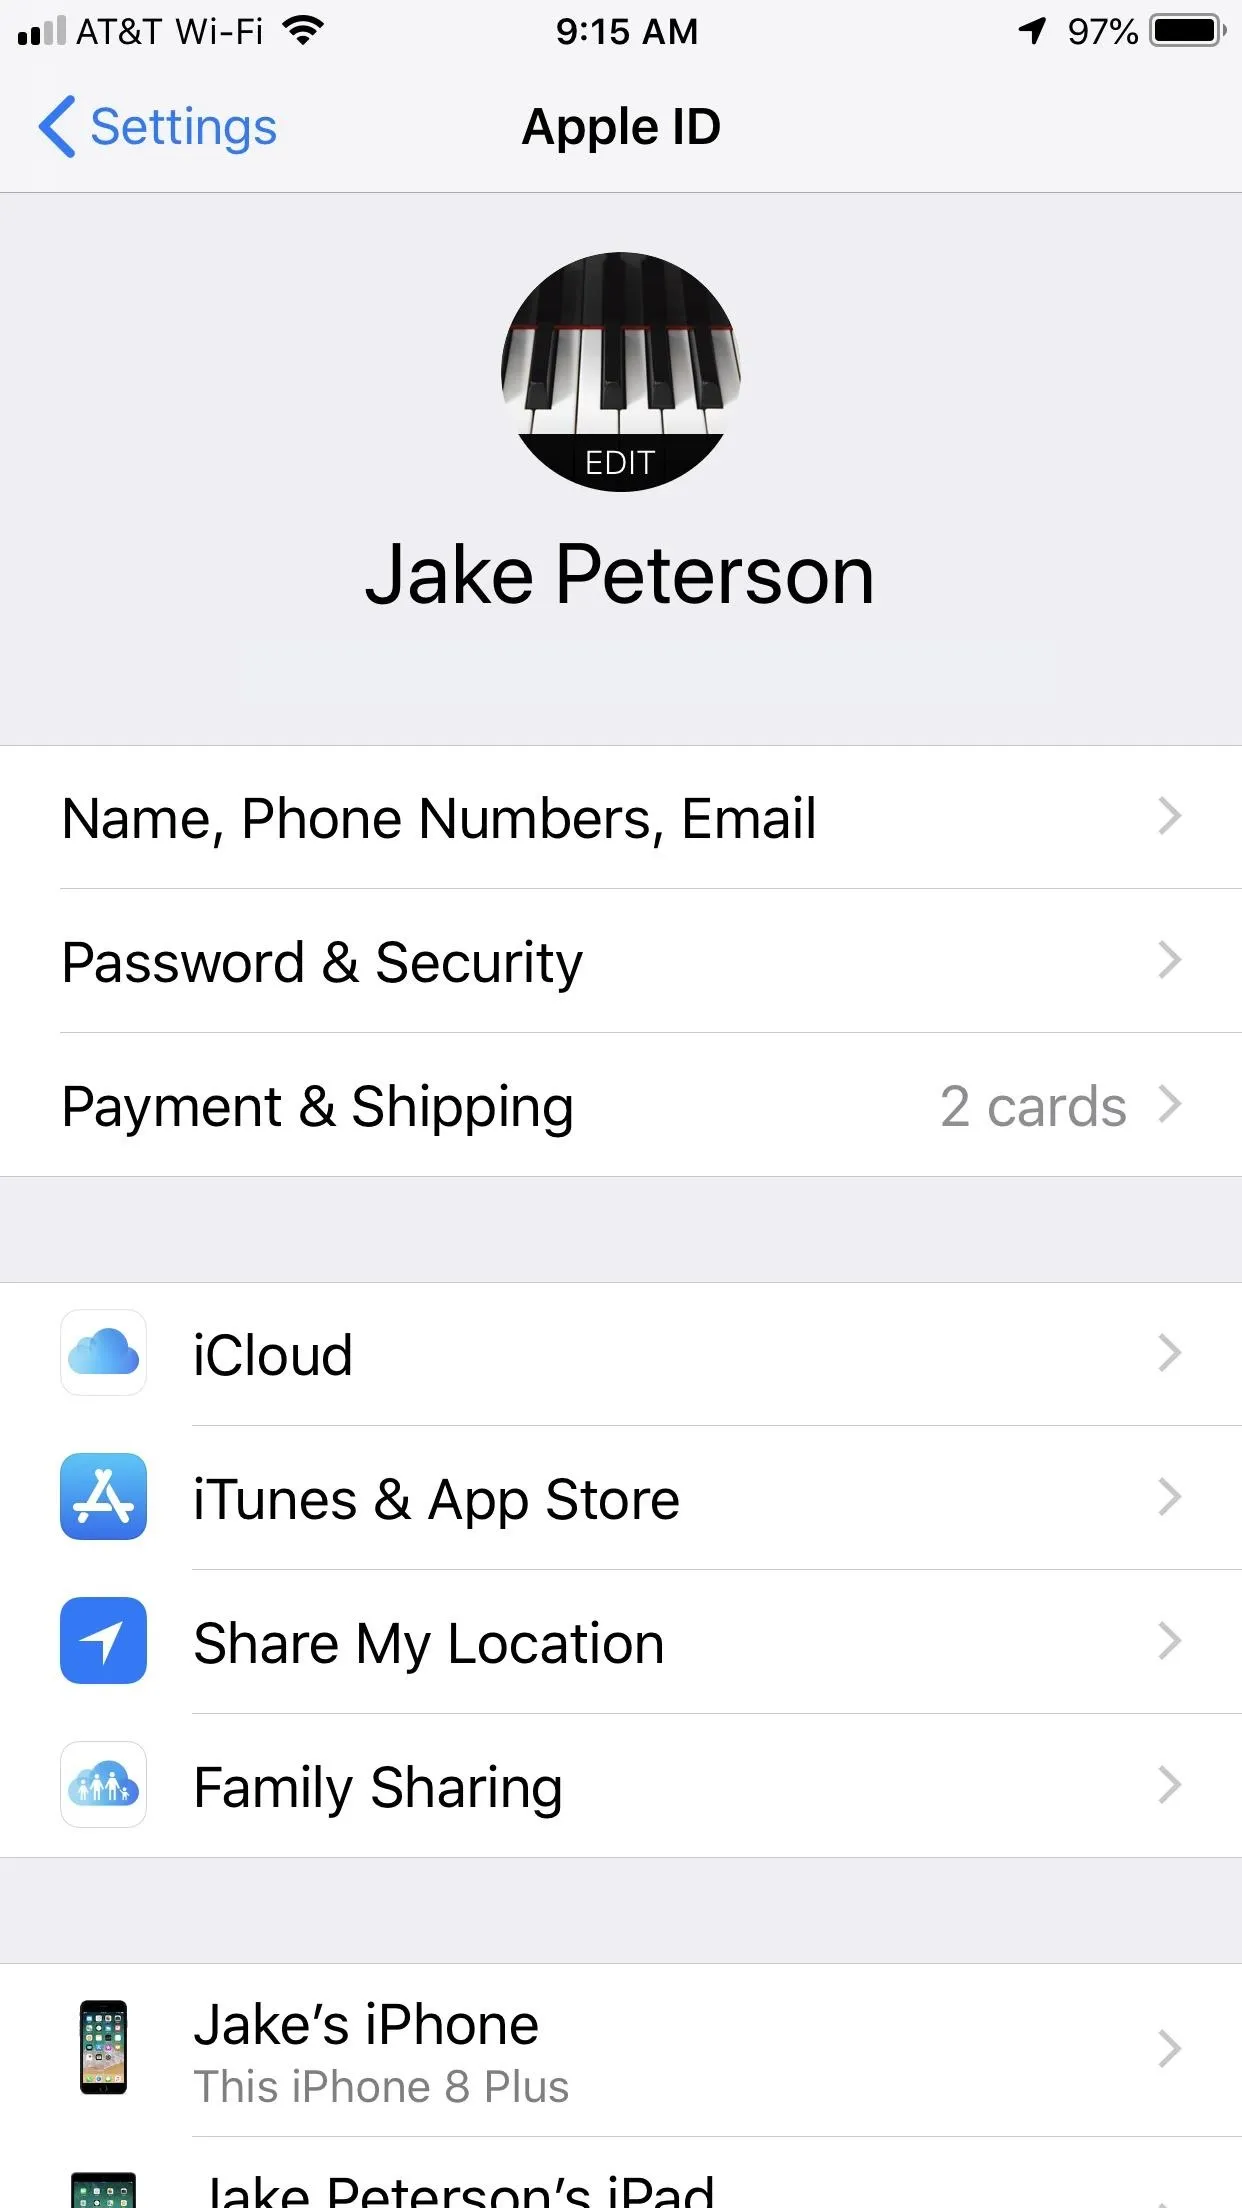
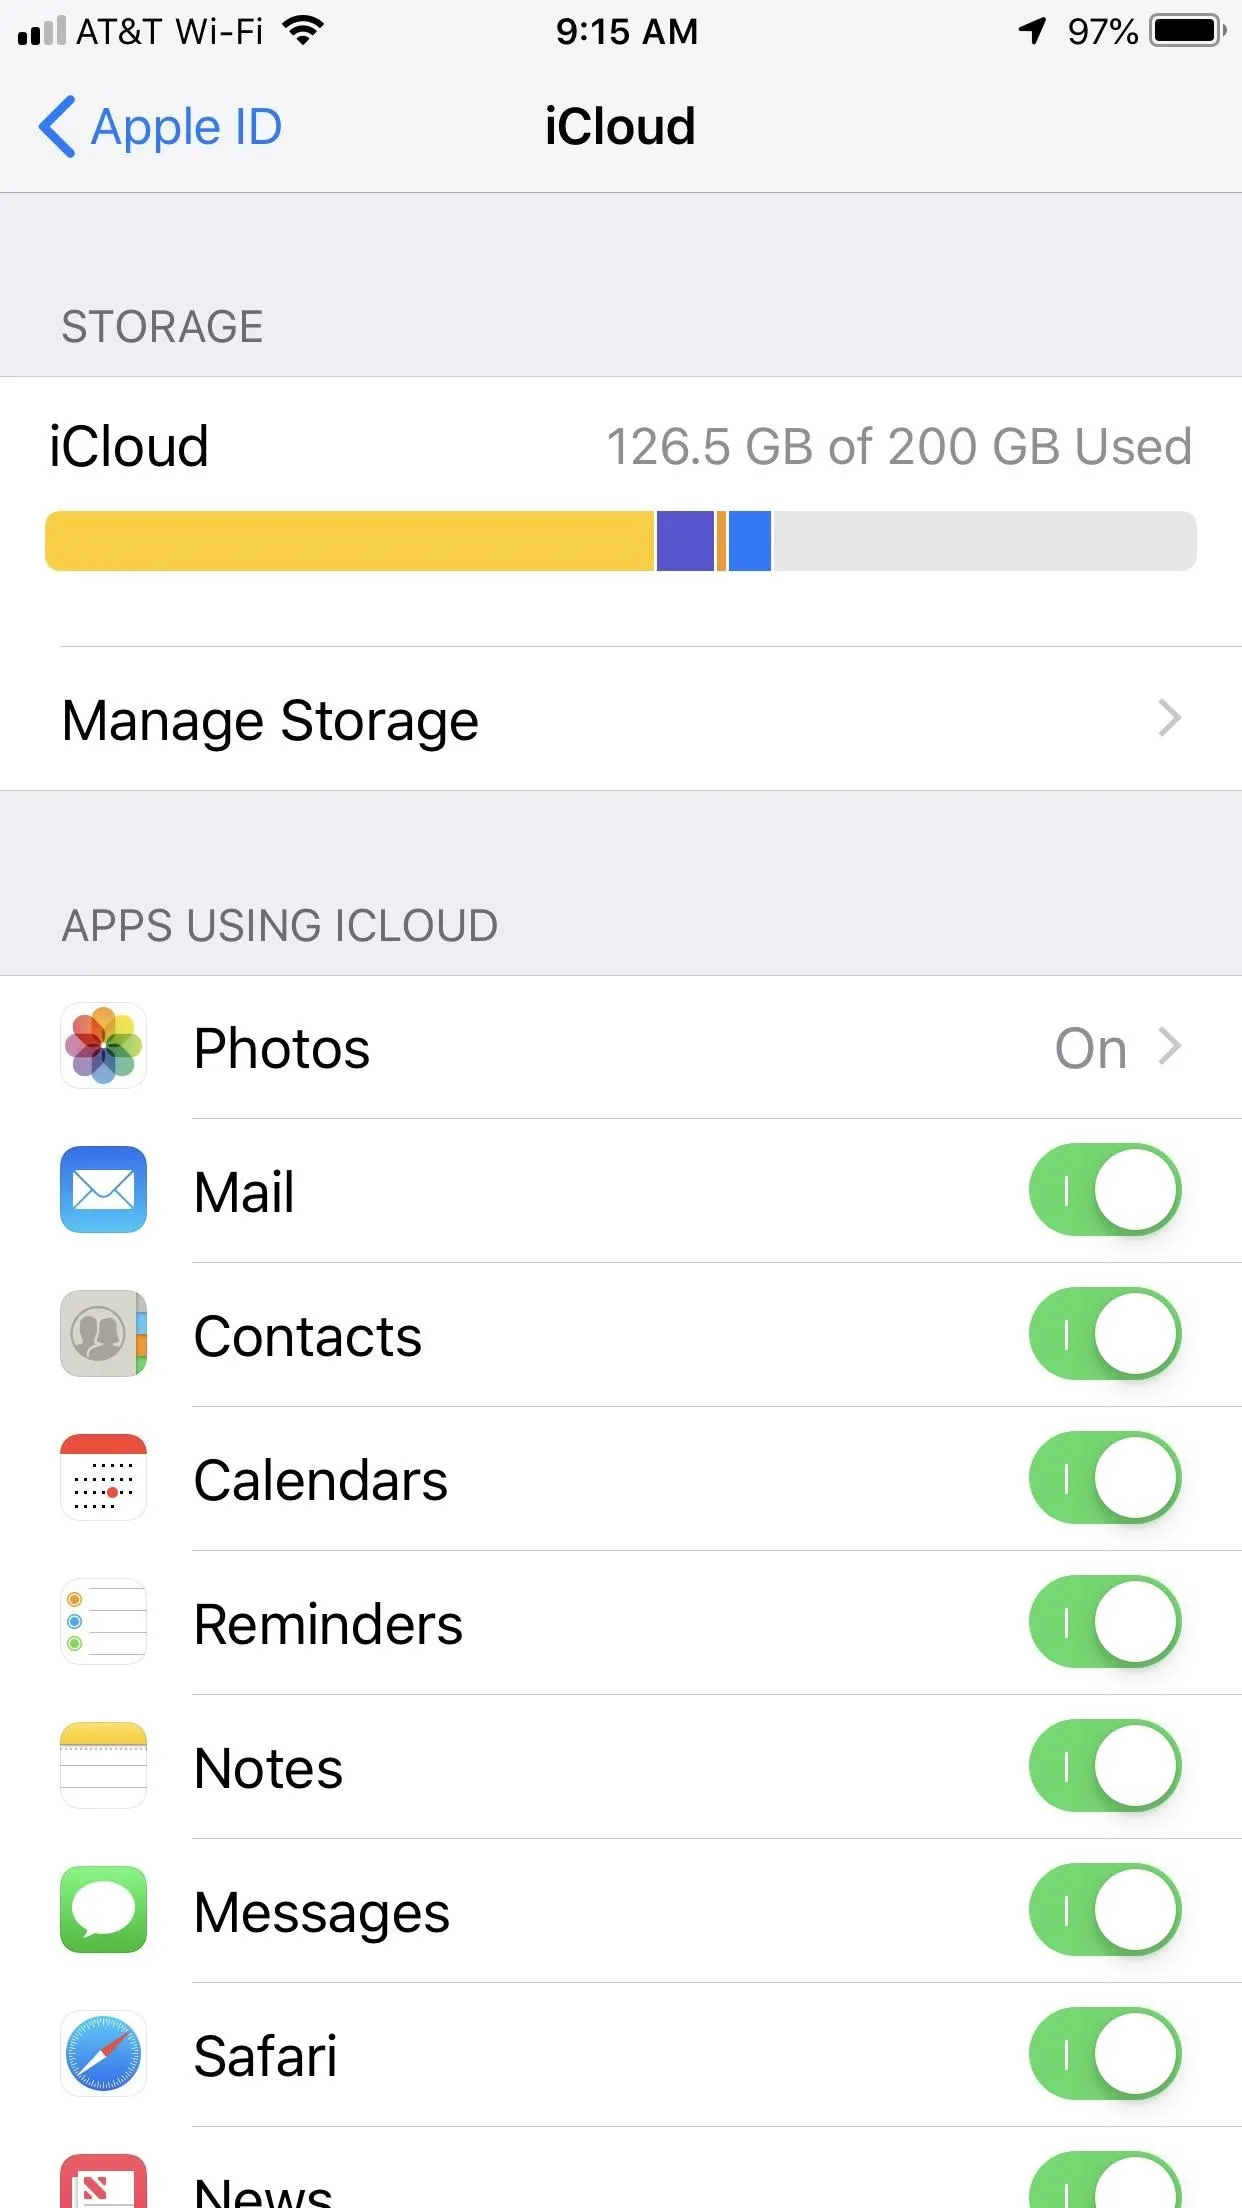
24. Disable iCloud When Possible
ICloud is a great tool, especially for users with more than one iOS device. However, if your iPhone is your only iCloud-enabled tool, you might not care about connecting iCloud to certain apps and services. If that's the case, disabling iCloud for those services can save some battery, as your iPhone isn't constantly attempting to upload data to the cloud.


25. Fetch Data Less Frequently (Or Not at All)
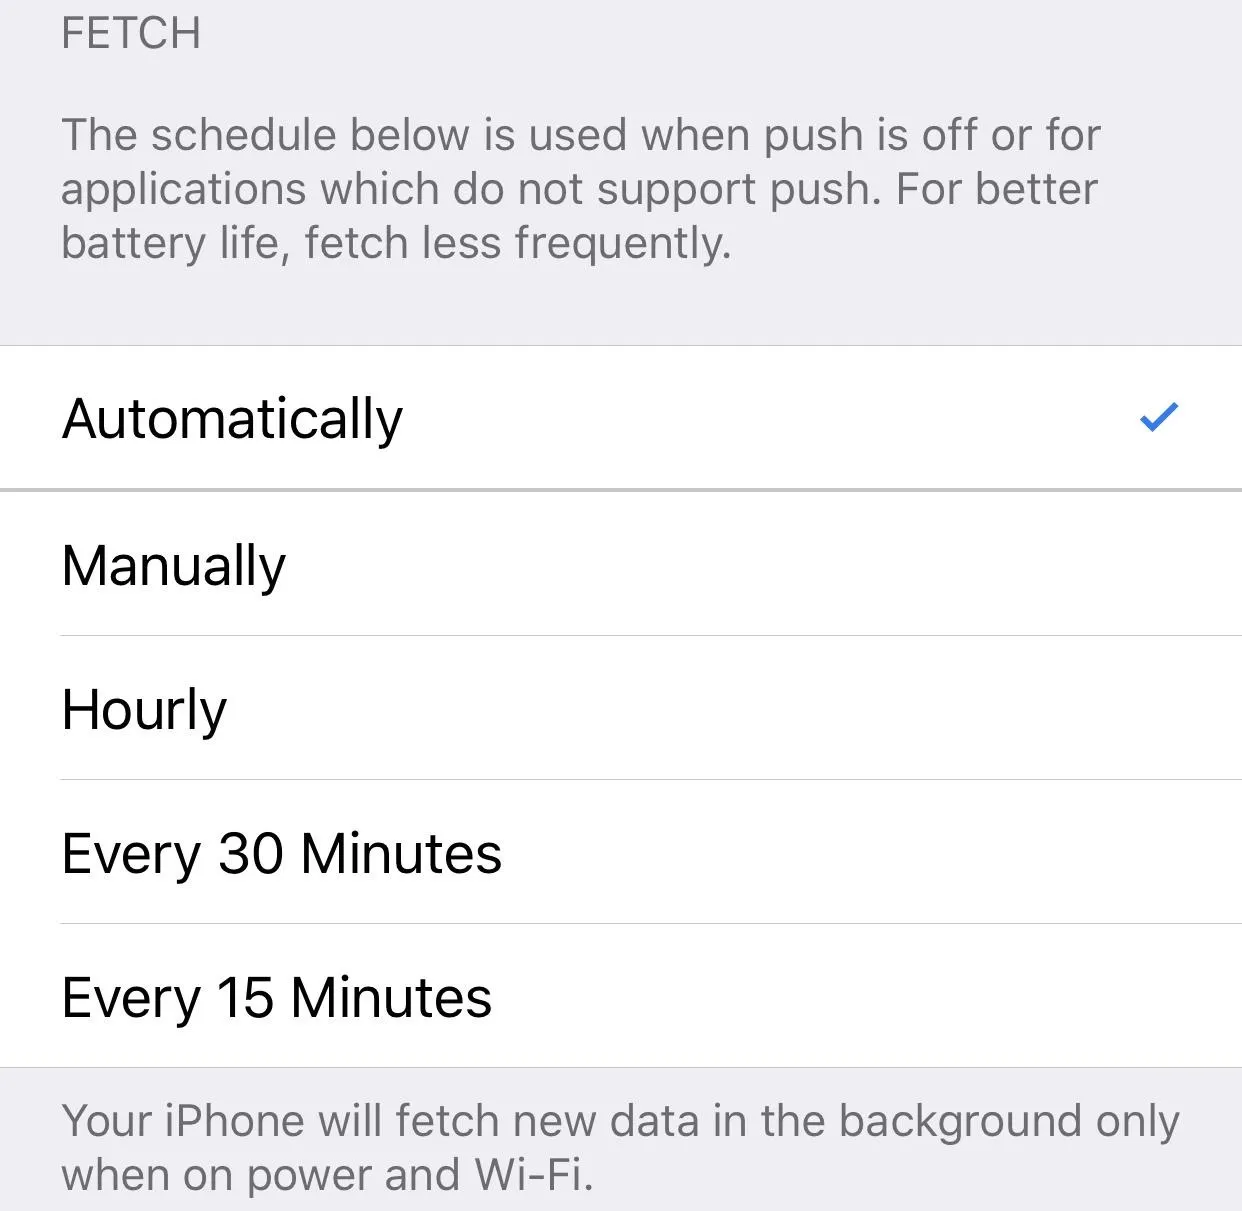
If your iPhone is set to "Fetch" email data more frequently, that's more battery drain for you. If you don't mind receiving email alerts less frequently, head to "Passwords & Accounts" in Settings, tap "Fetch New Data," then select the least frequent timeframe you can. For maximum battery-saving, choose "Manually" so you'll only receive email data when you check for it.
26. Don't Send Data to Apple
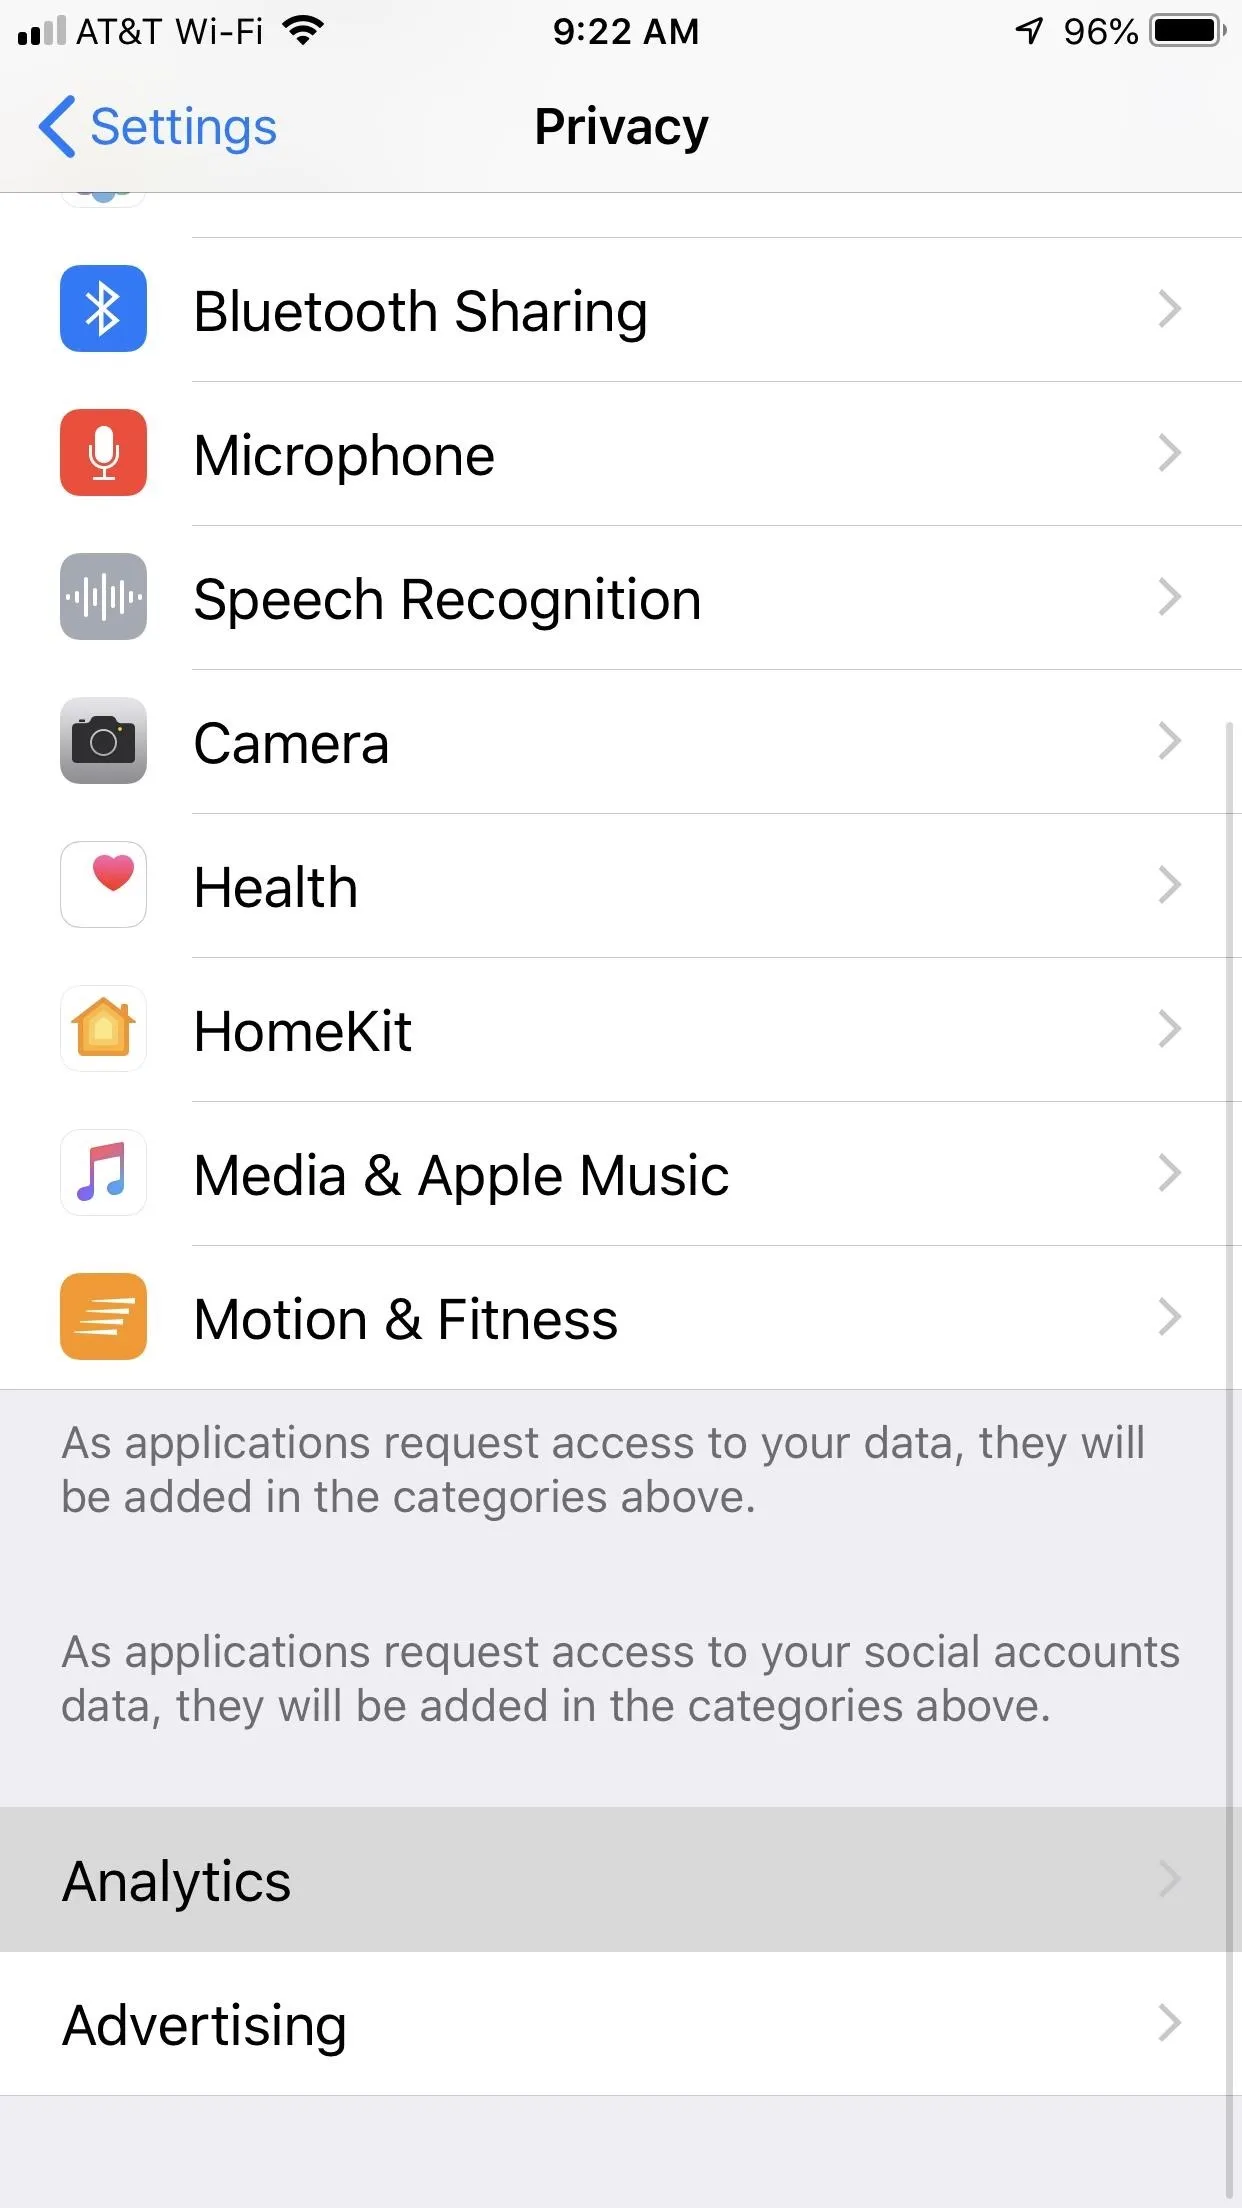
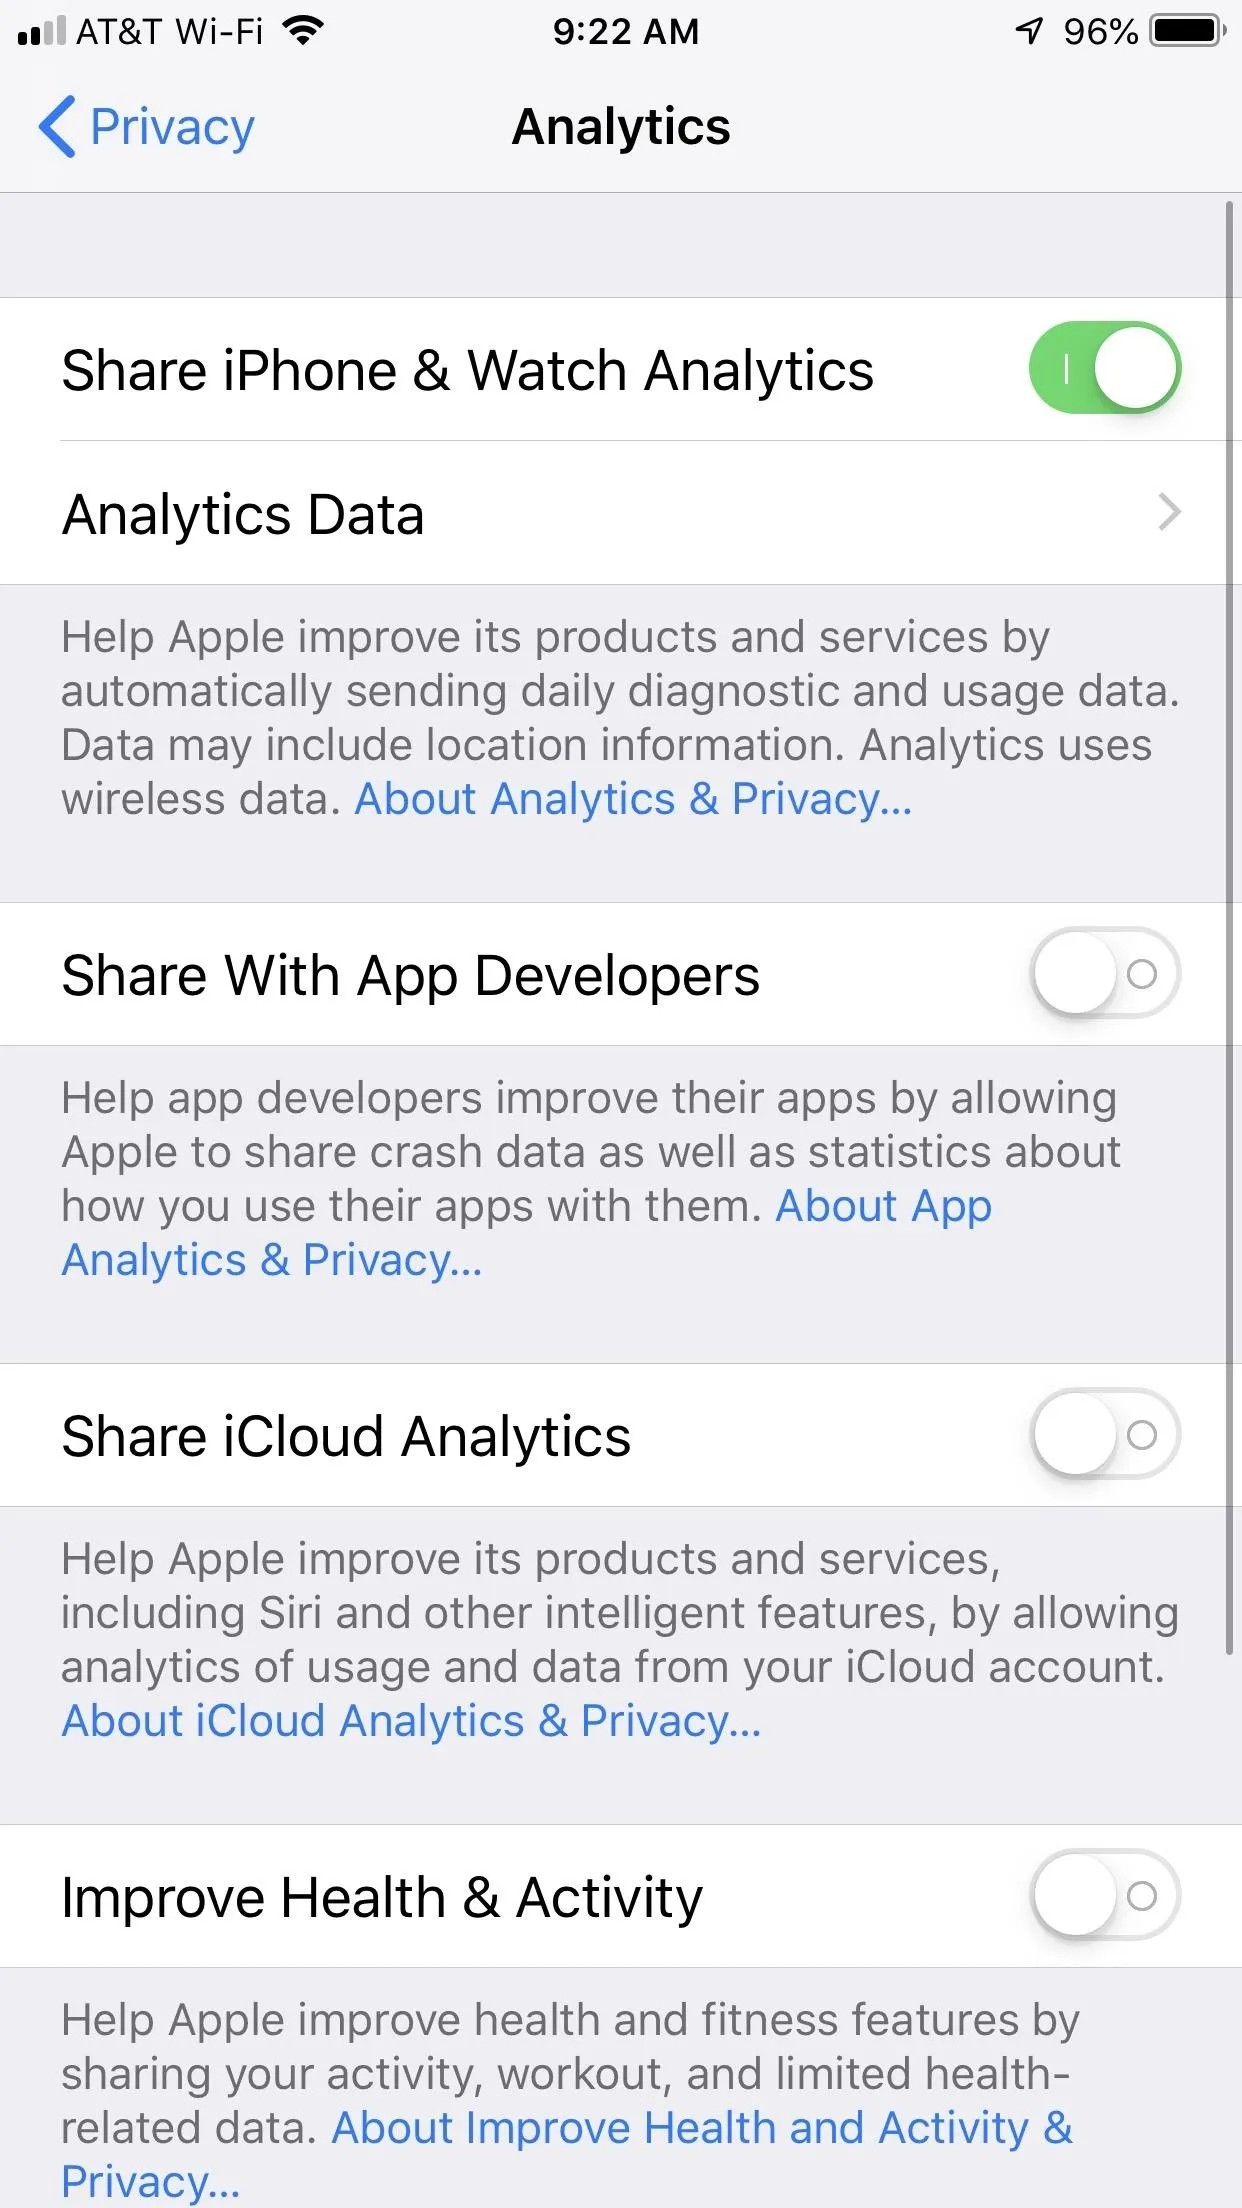
Sending data to Apple is helpful to the company for developing future iterations of iOS. However, all that communications unbeknownst to you can use up your battery. To give both your battery and your privacy a break, open "Privacy" in Settings, tap "Analytics," then turn off "Share iPhone Analytics." Apple Watch owners will see this setting as "Share iPhone & Watch Analytics."


27. Disable Significant Locations
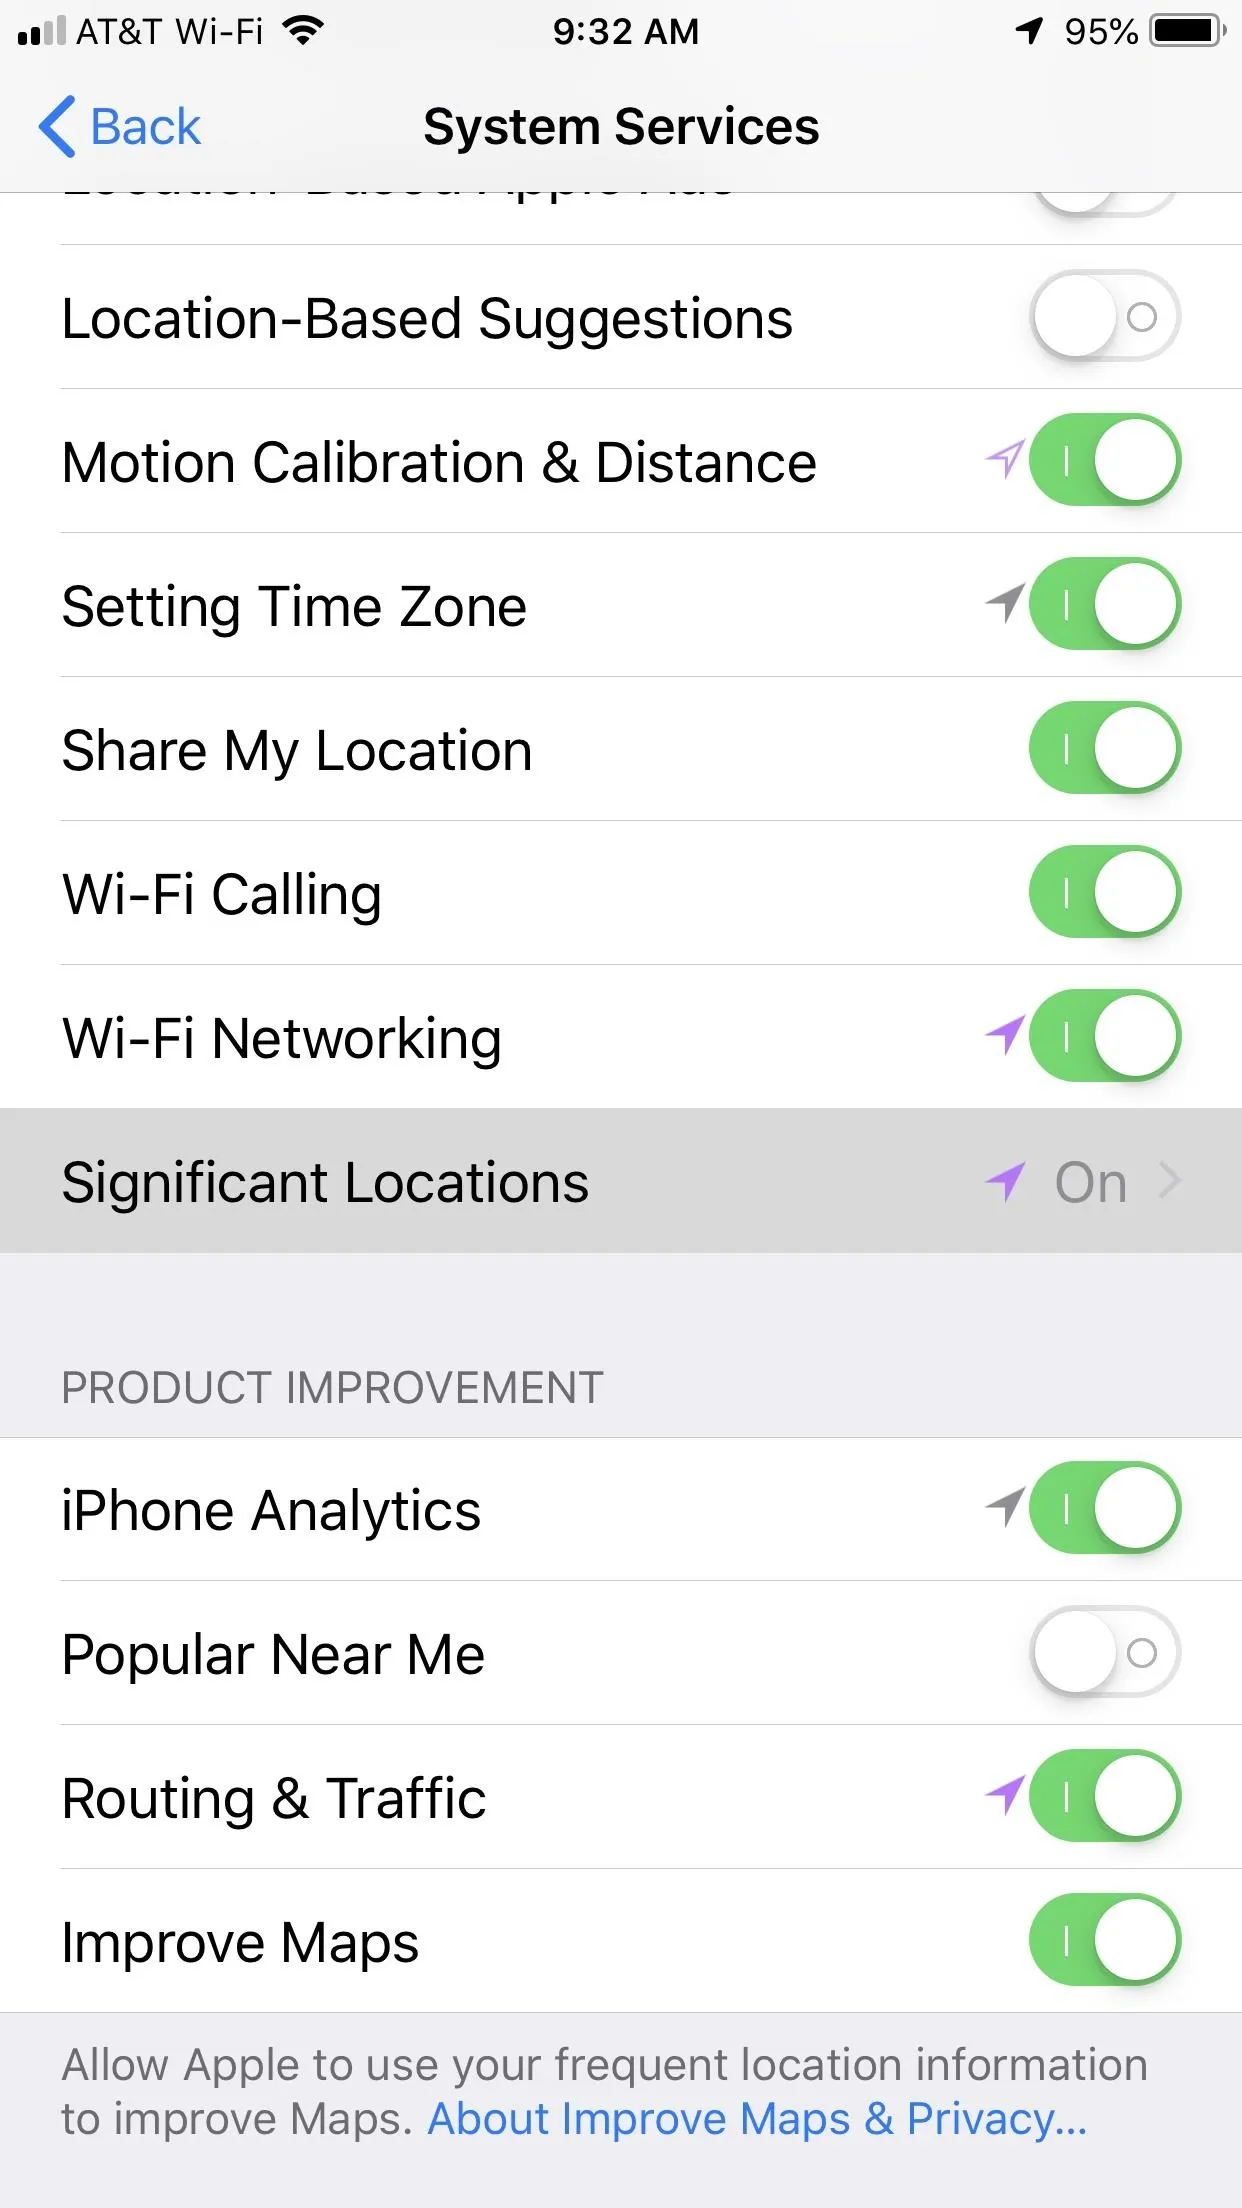
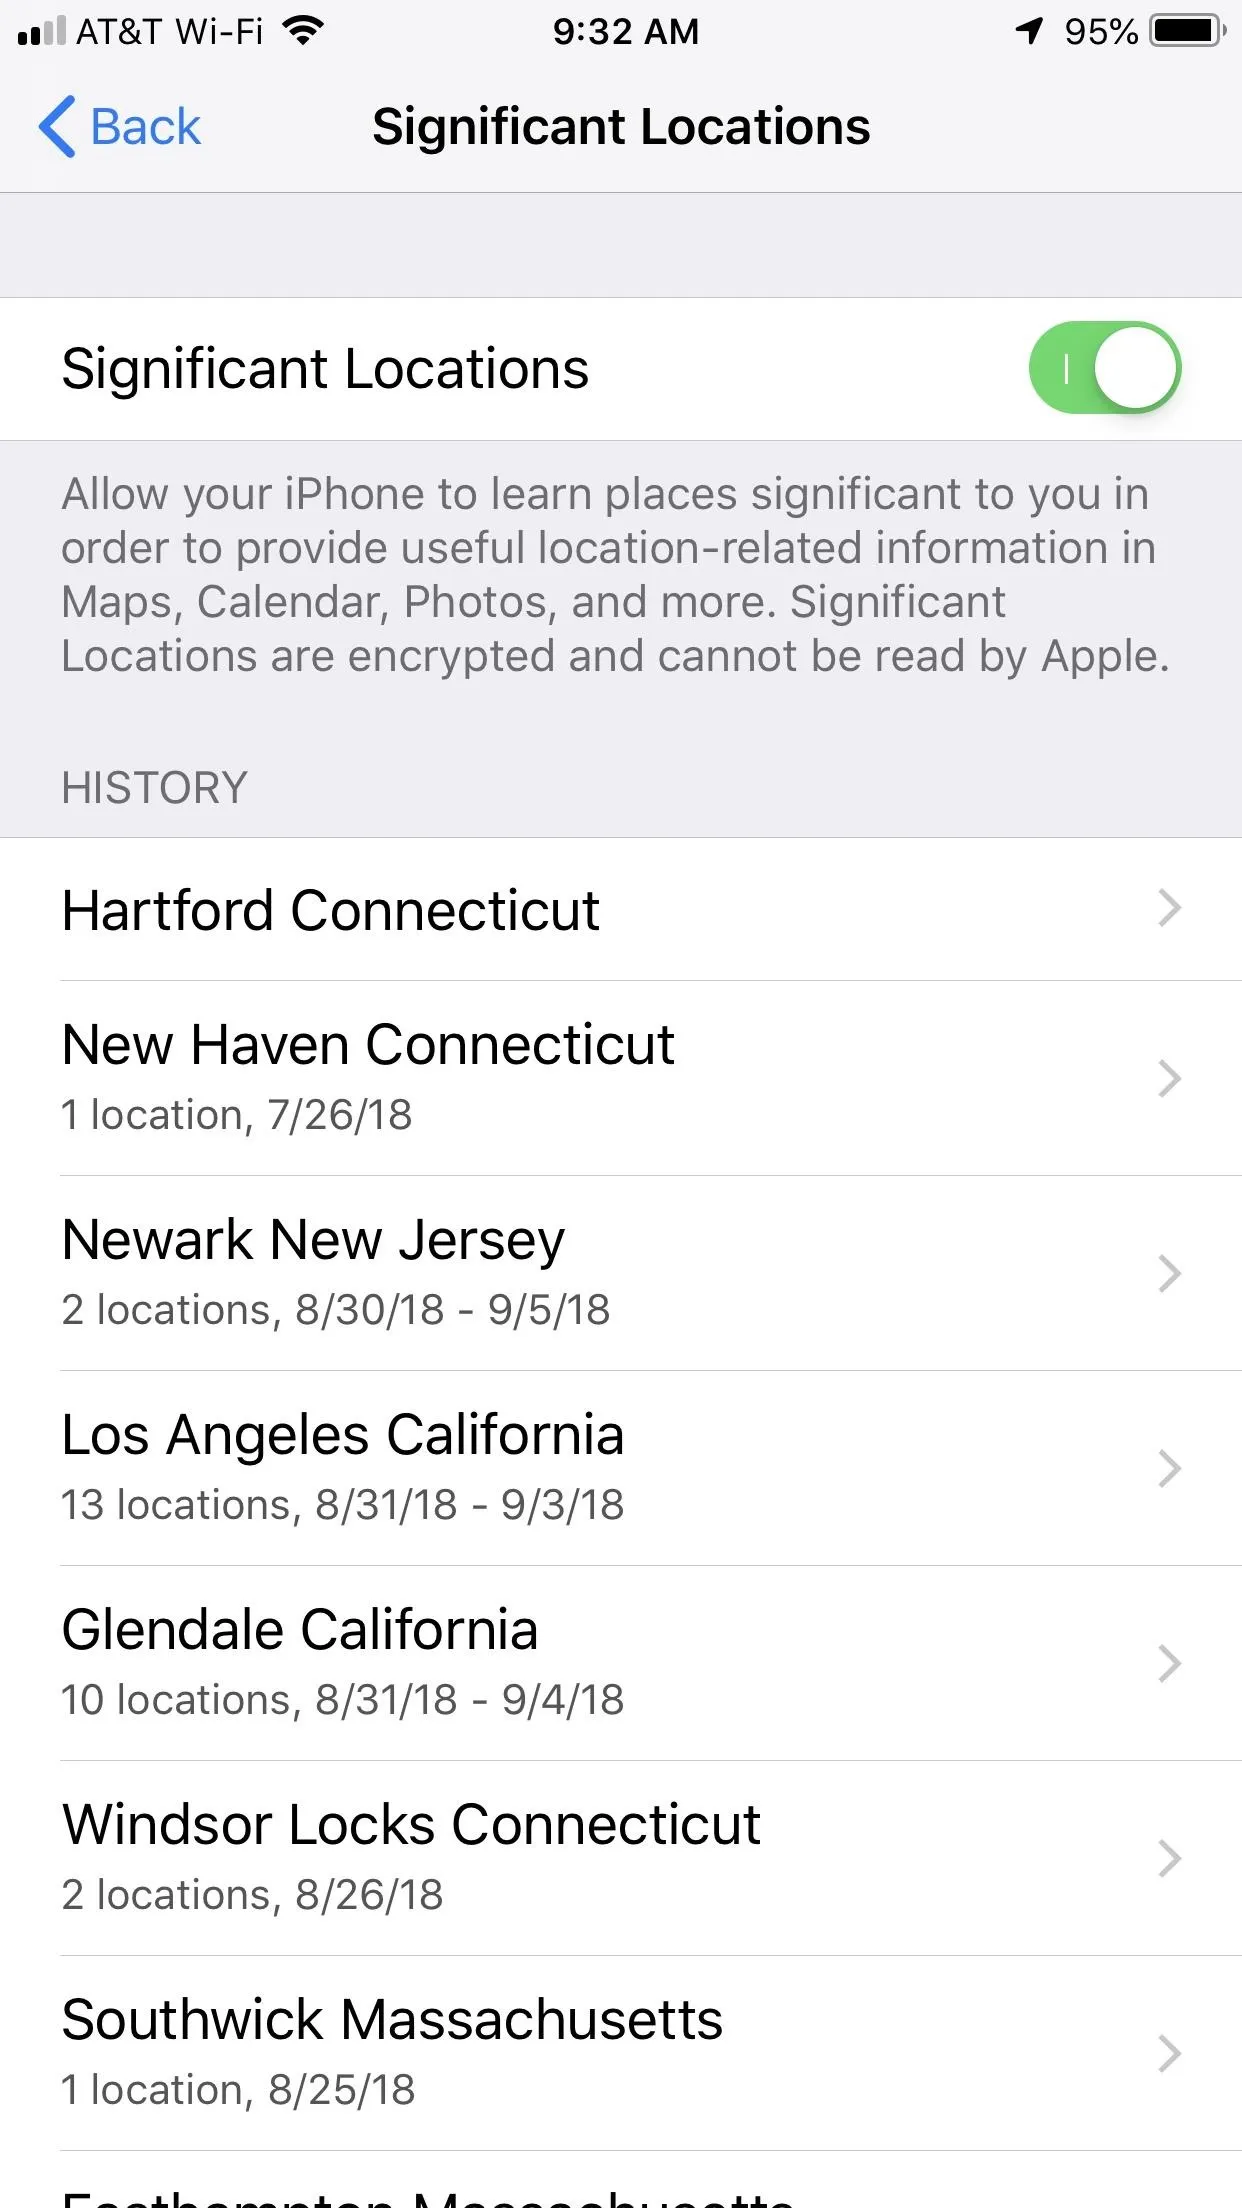
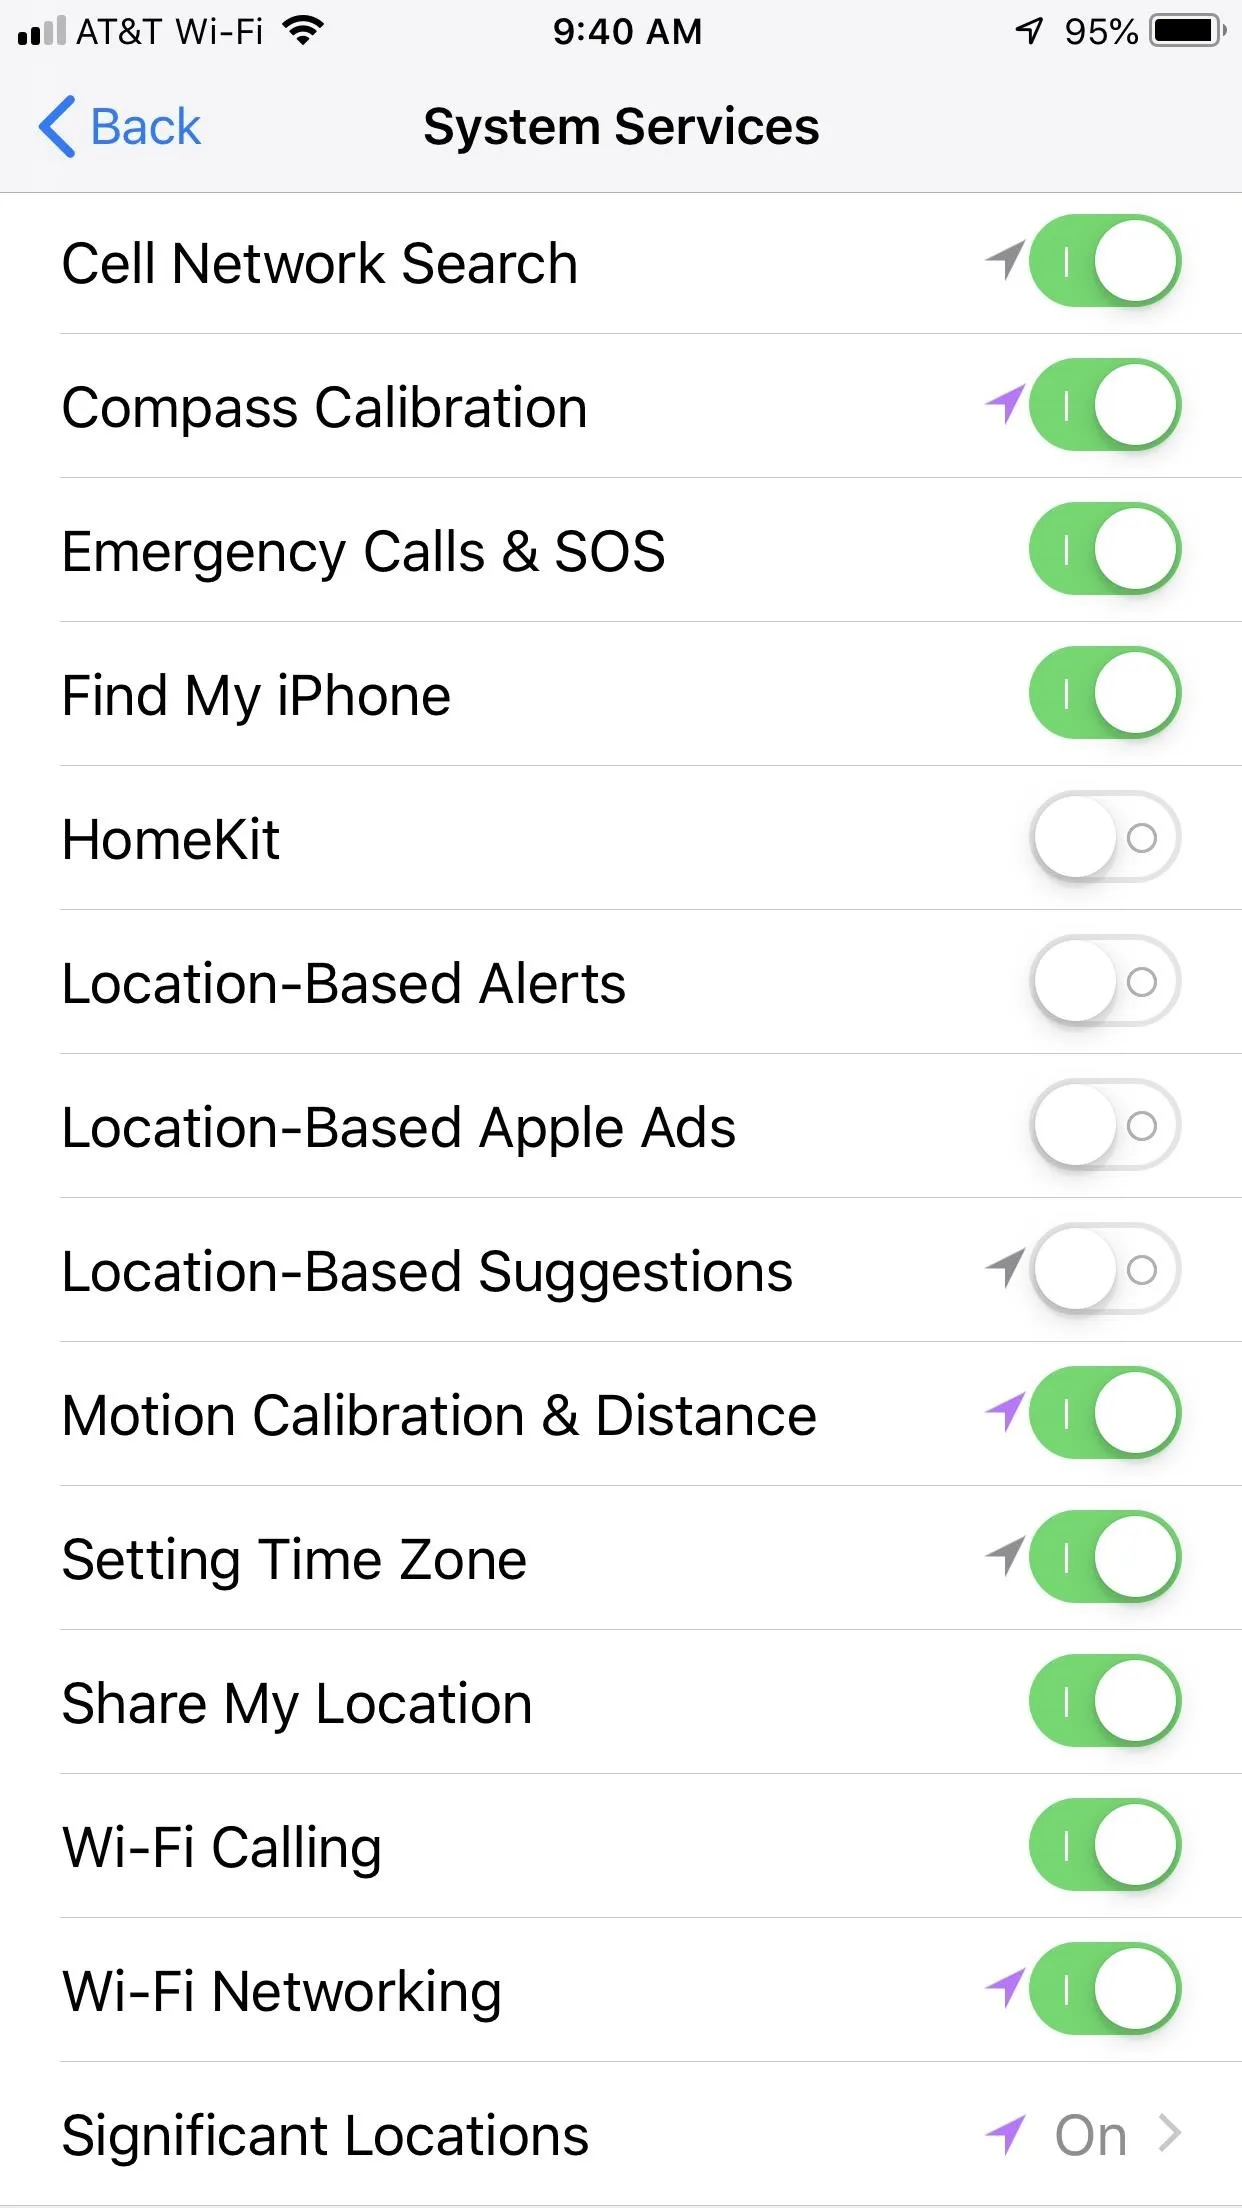
Previously called "Frequent Locations," Significant Locations records the places you visit most to provide better location services in certain apps. Disabling this setting eliminates battery-draining location recording you probably didn't even know was going on in the first place. Just head to "Locations Services" in your "Privacy" settings, tap "System Services," then "Significant Locations." Authenticate yourself, then disable the feature.


28. Disable Suggested Apps for Lock Screen & App Switcher
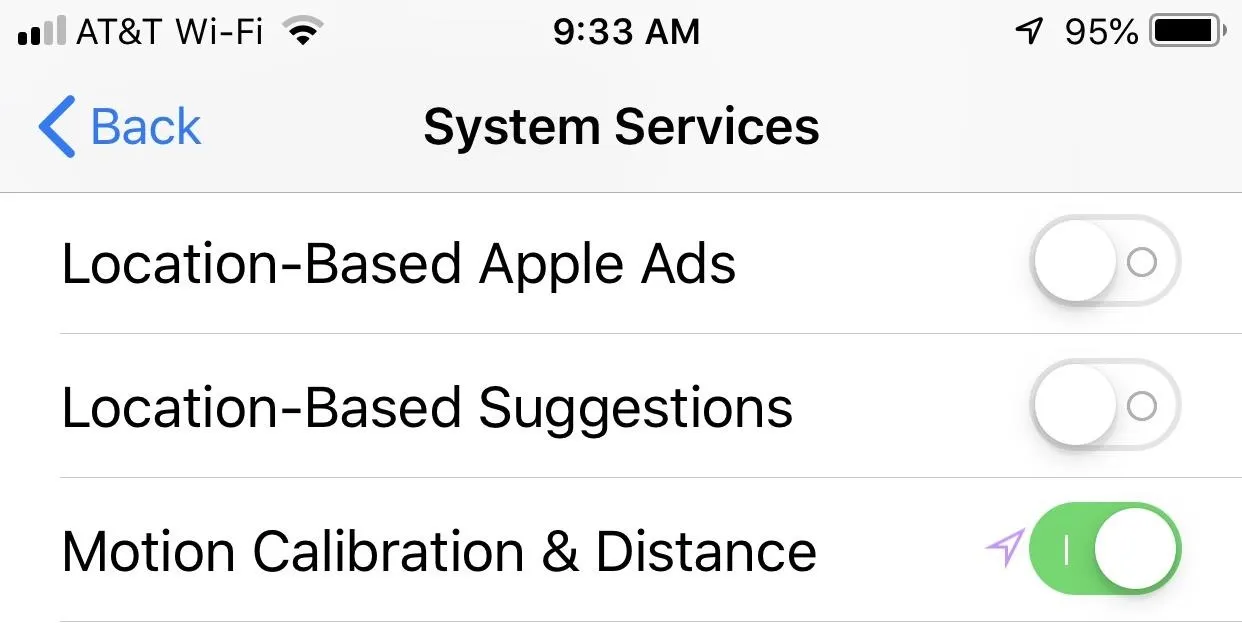
Do you often see an app icon in the bottom right of the lock screen or below your app windows when accessing the app switcher? Those are iOS Suggested Apps, which try to help you out by "guessing" what app would serve you best based on your location. If that doesn't concern you, and you'd rather save the battery life, head to"Location Services" in your "Privacy" settings, tap "System Services" again, then disable "Location-Based Suggestions."
29. Turn Off Most (If Not All) These Location Settings
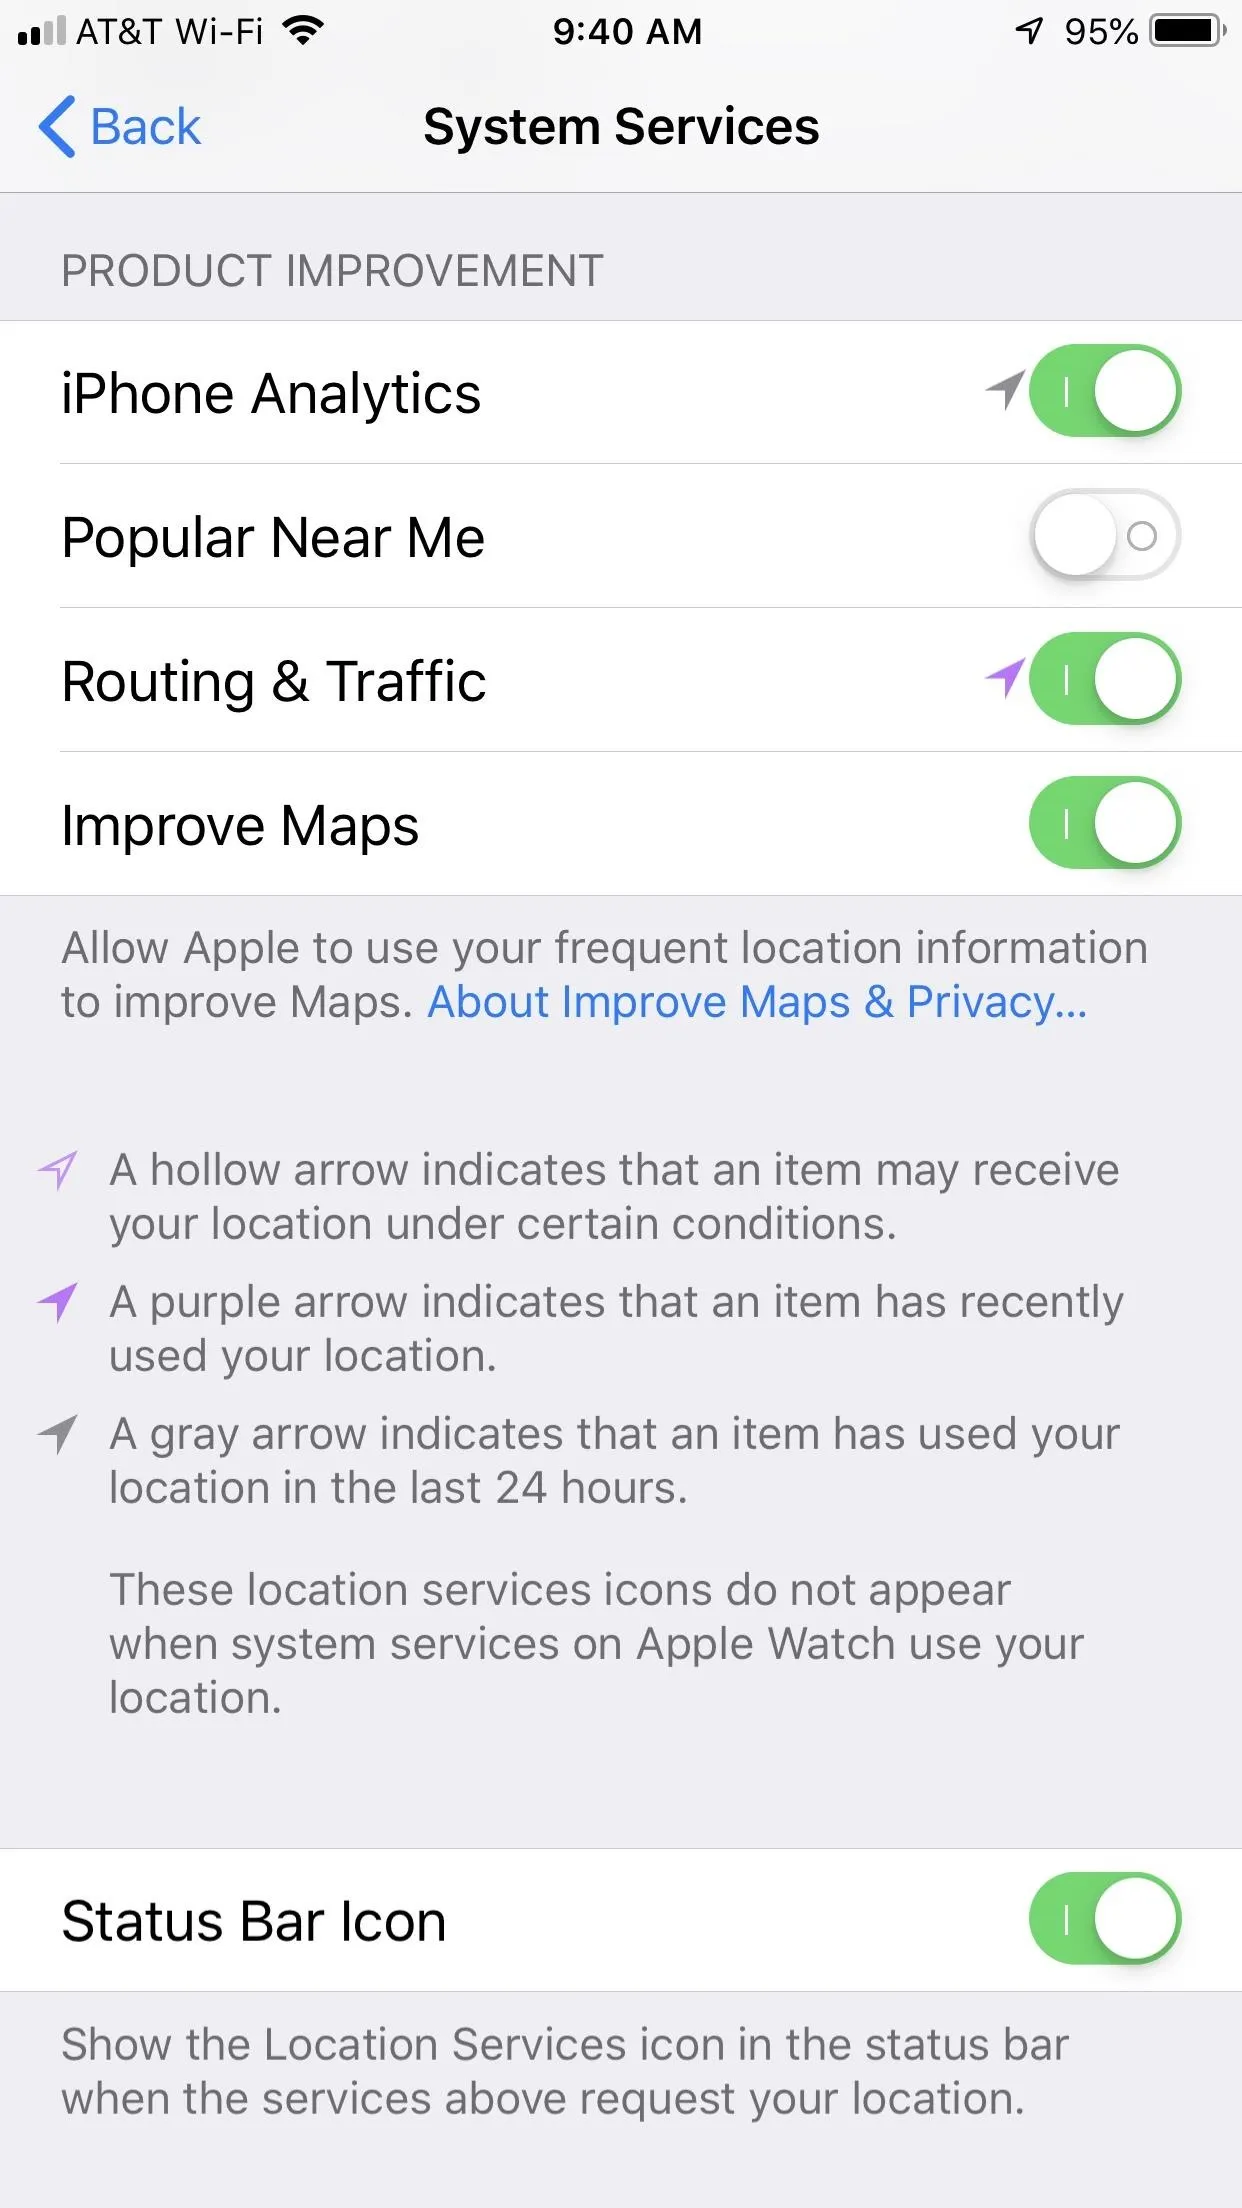
As you can see from the "System Services" page, there are a number of services that use your location data, draining your iPhone on a daily basis. You most likely can do without many of these settings, so turn them off. To get you started, try disabling "Emergency SOS," "Location-Based Alerts," "Location-Based Apple Ads," "Share My Location," "iPhone Analytics," "Popular Near Me," and maybe even "Improve Maps."


30. Turn on 'Limit Ad Tracking'
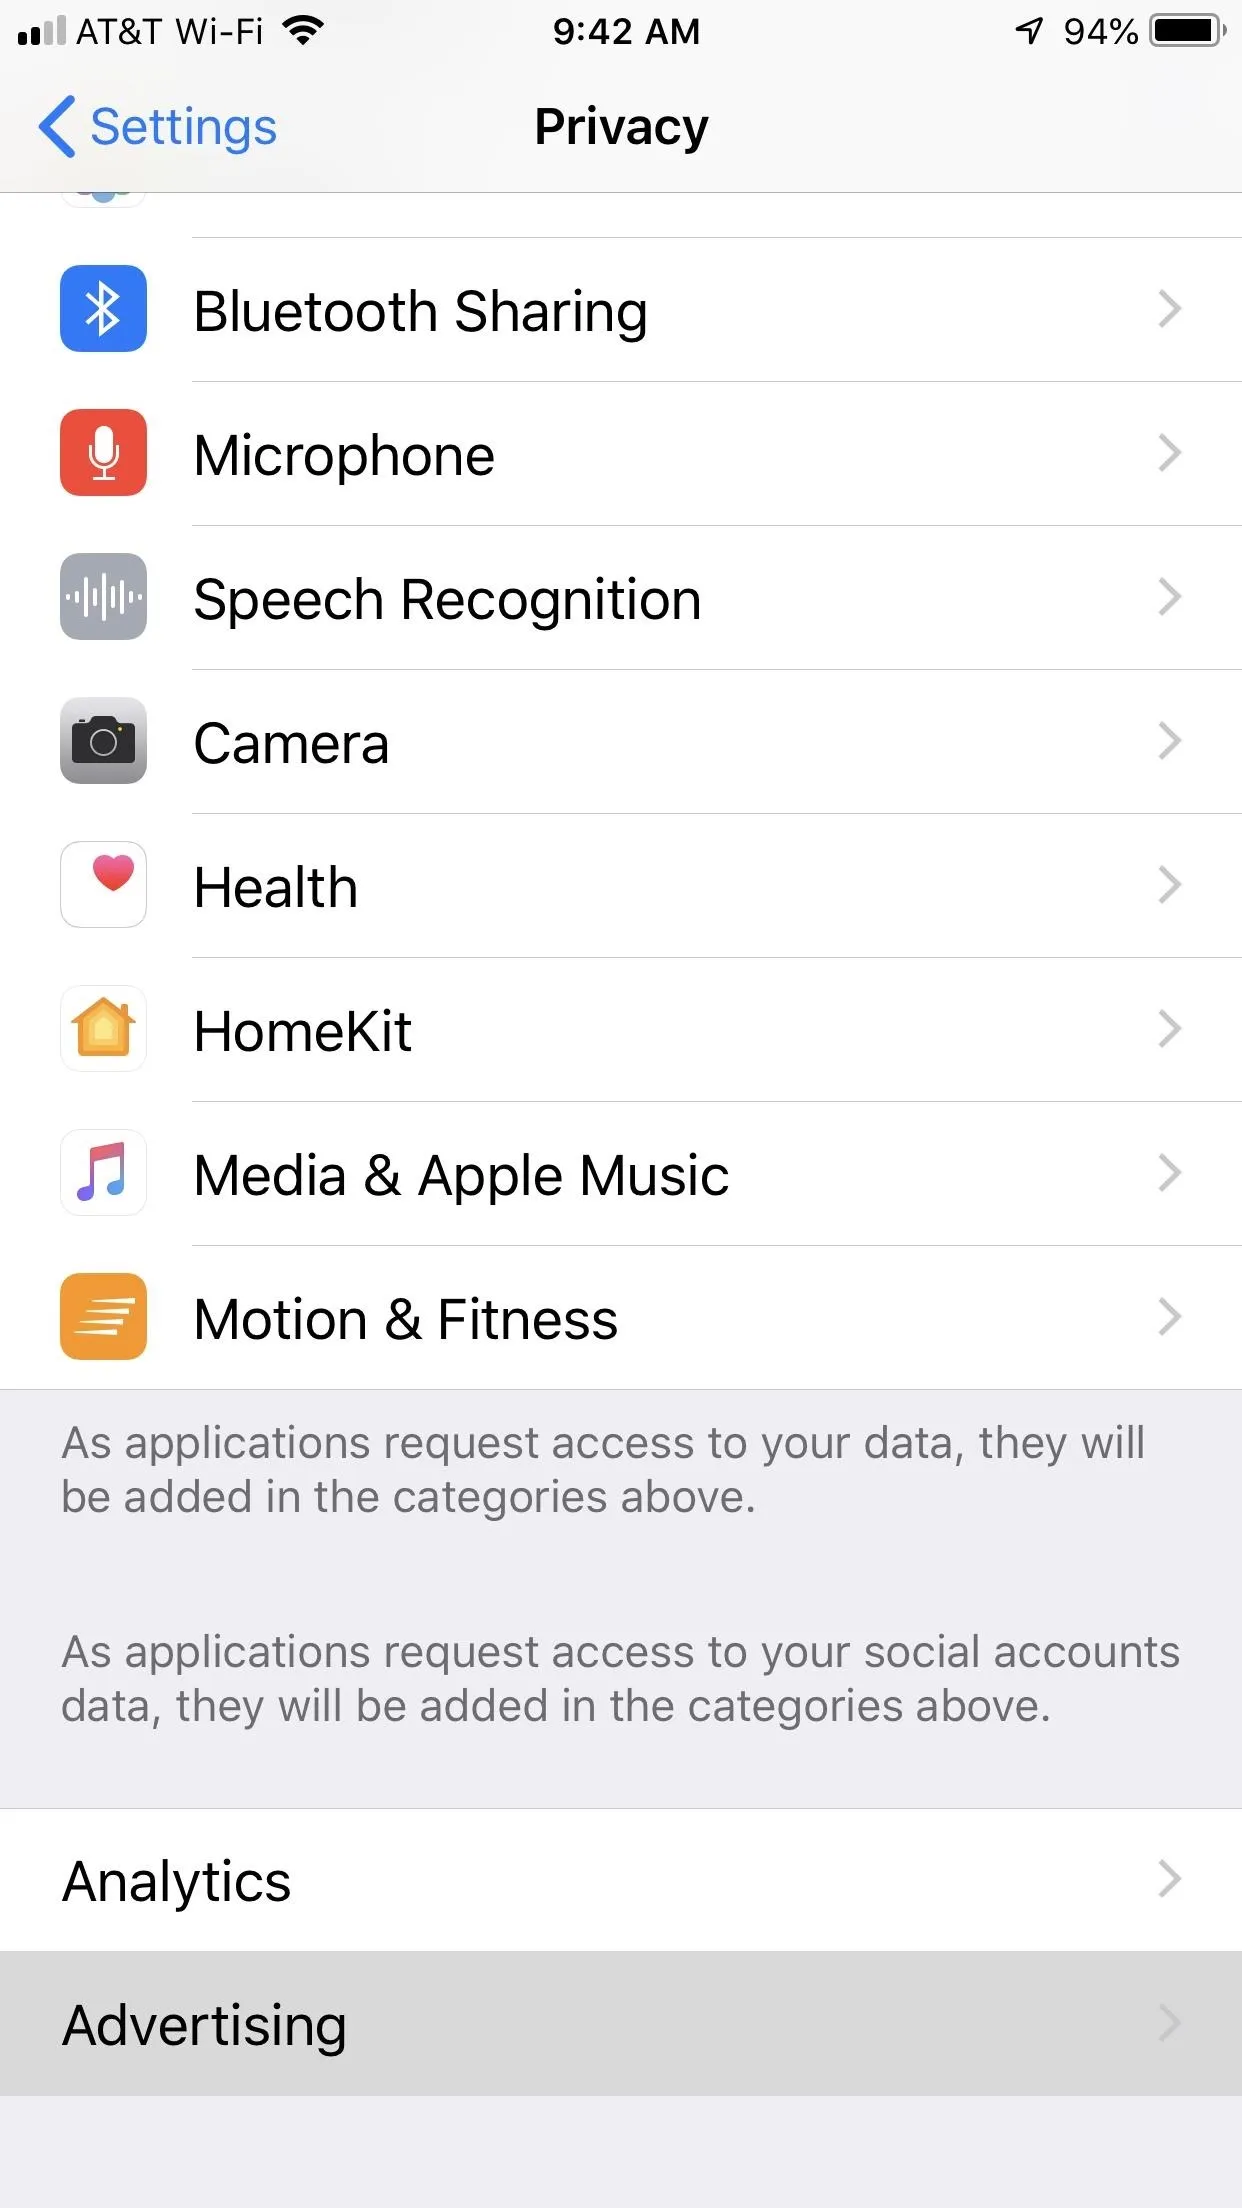
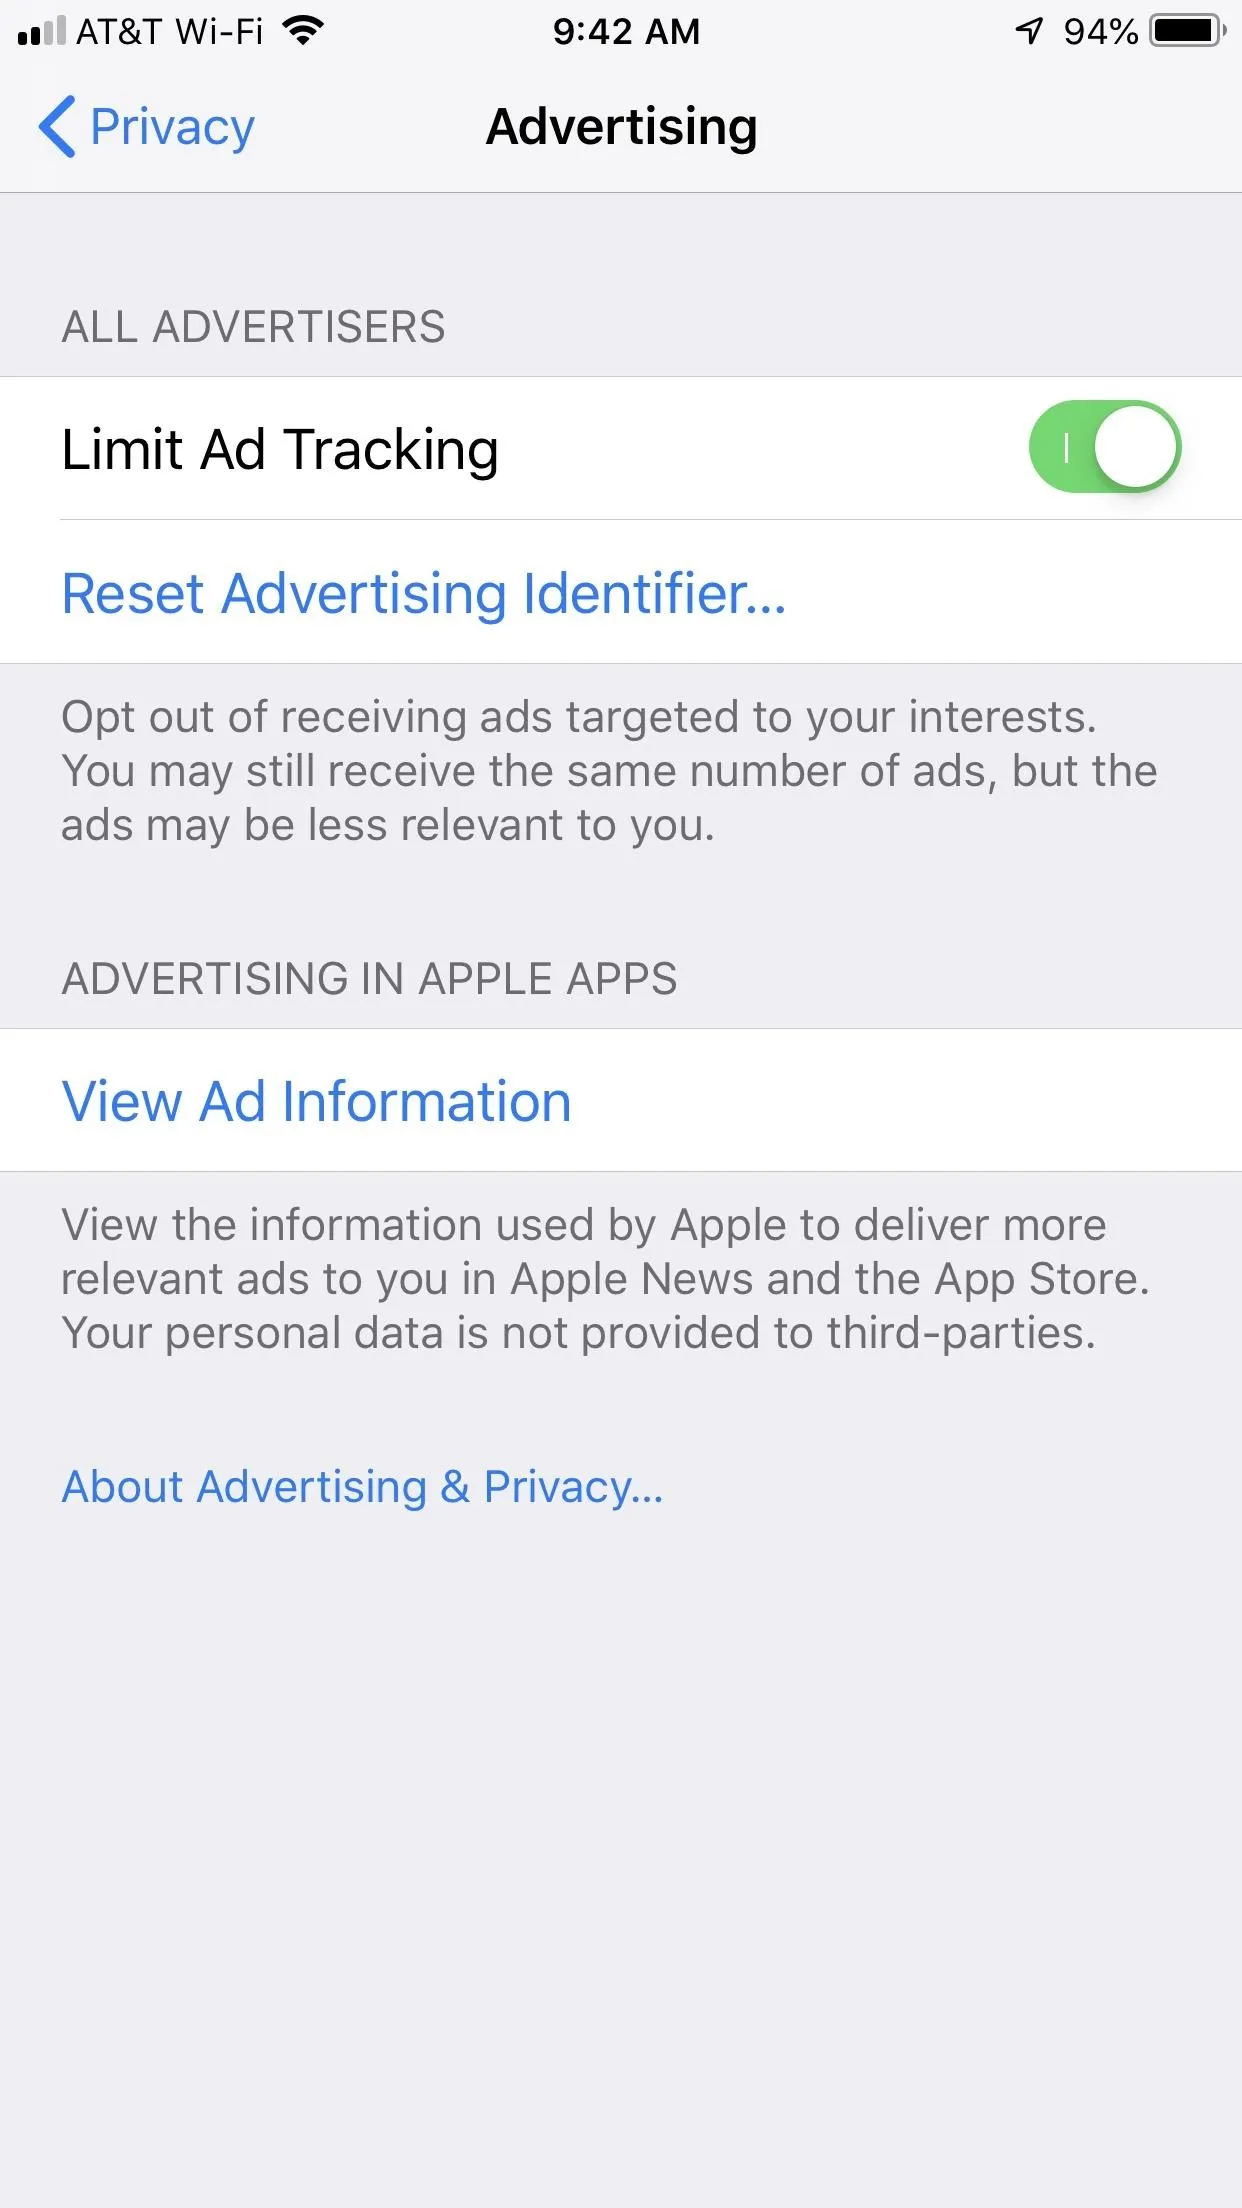
Why not try enabling a setting for a change? "Limit Ad Tracking" blocks location-based ad trackers as much as possible, saving you battery life. Head over to "Advertising" in your "Privacy" settings, then enable "Limit Ad Tracking."


31. Turn Off Fitness Tracking
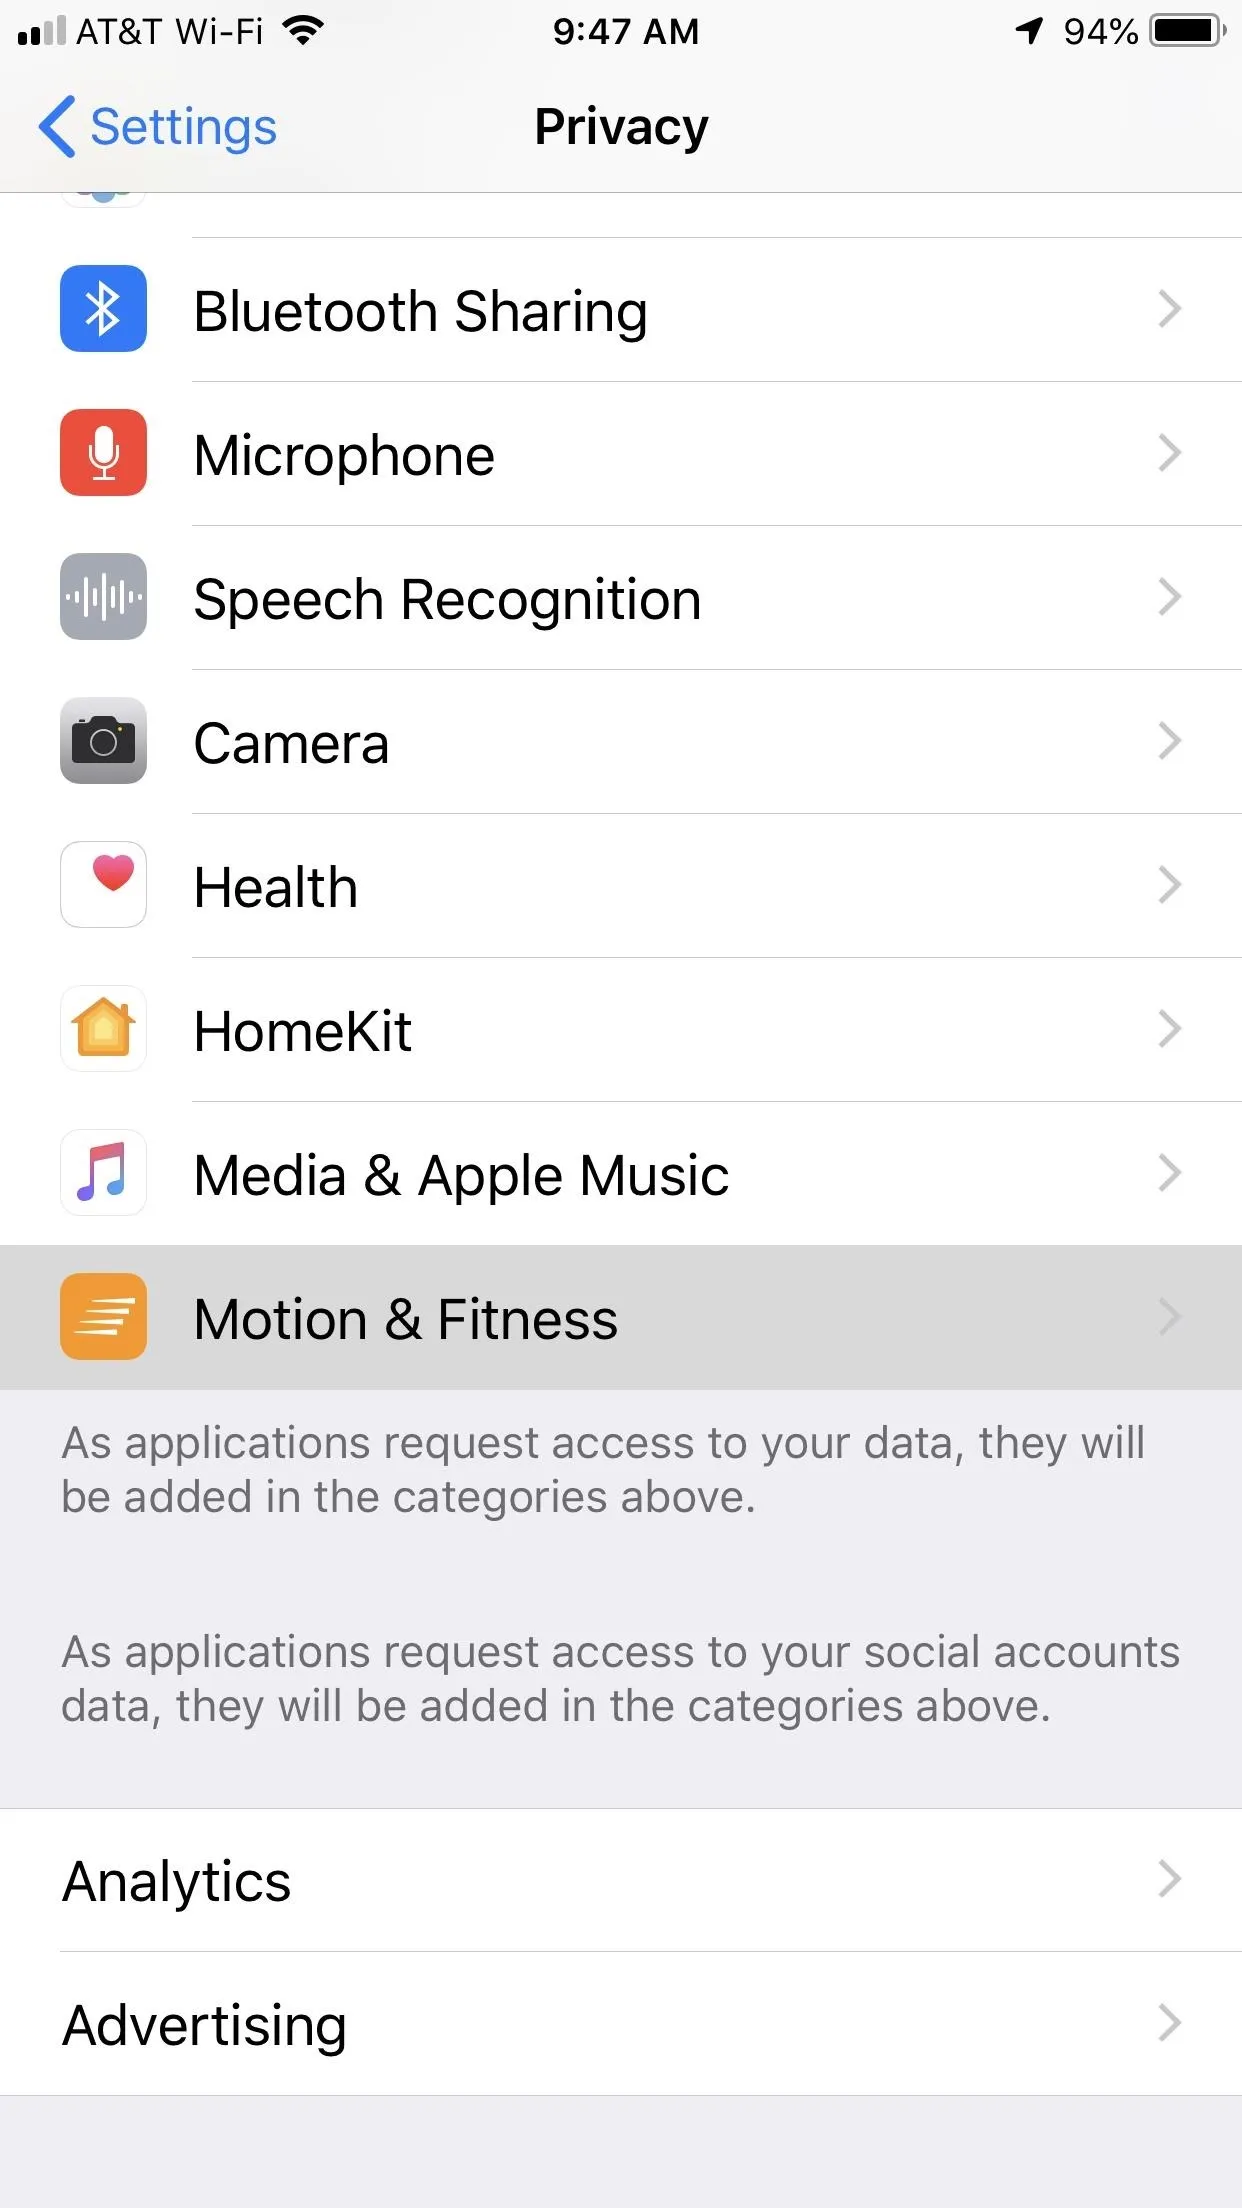
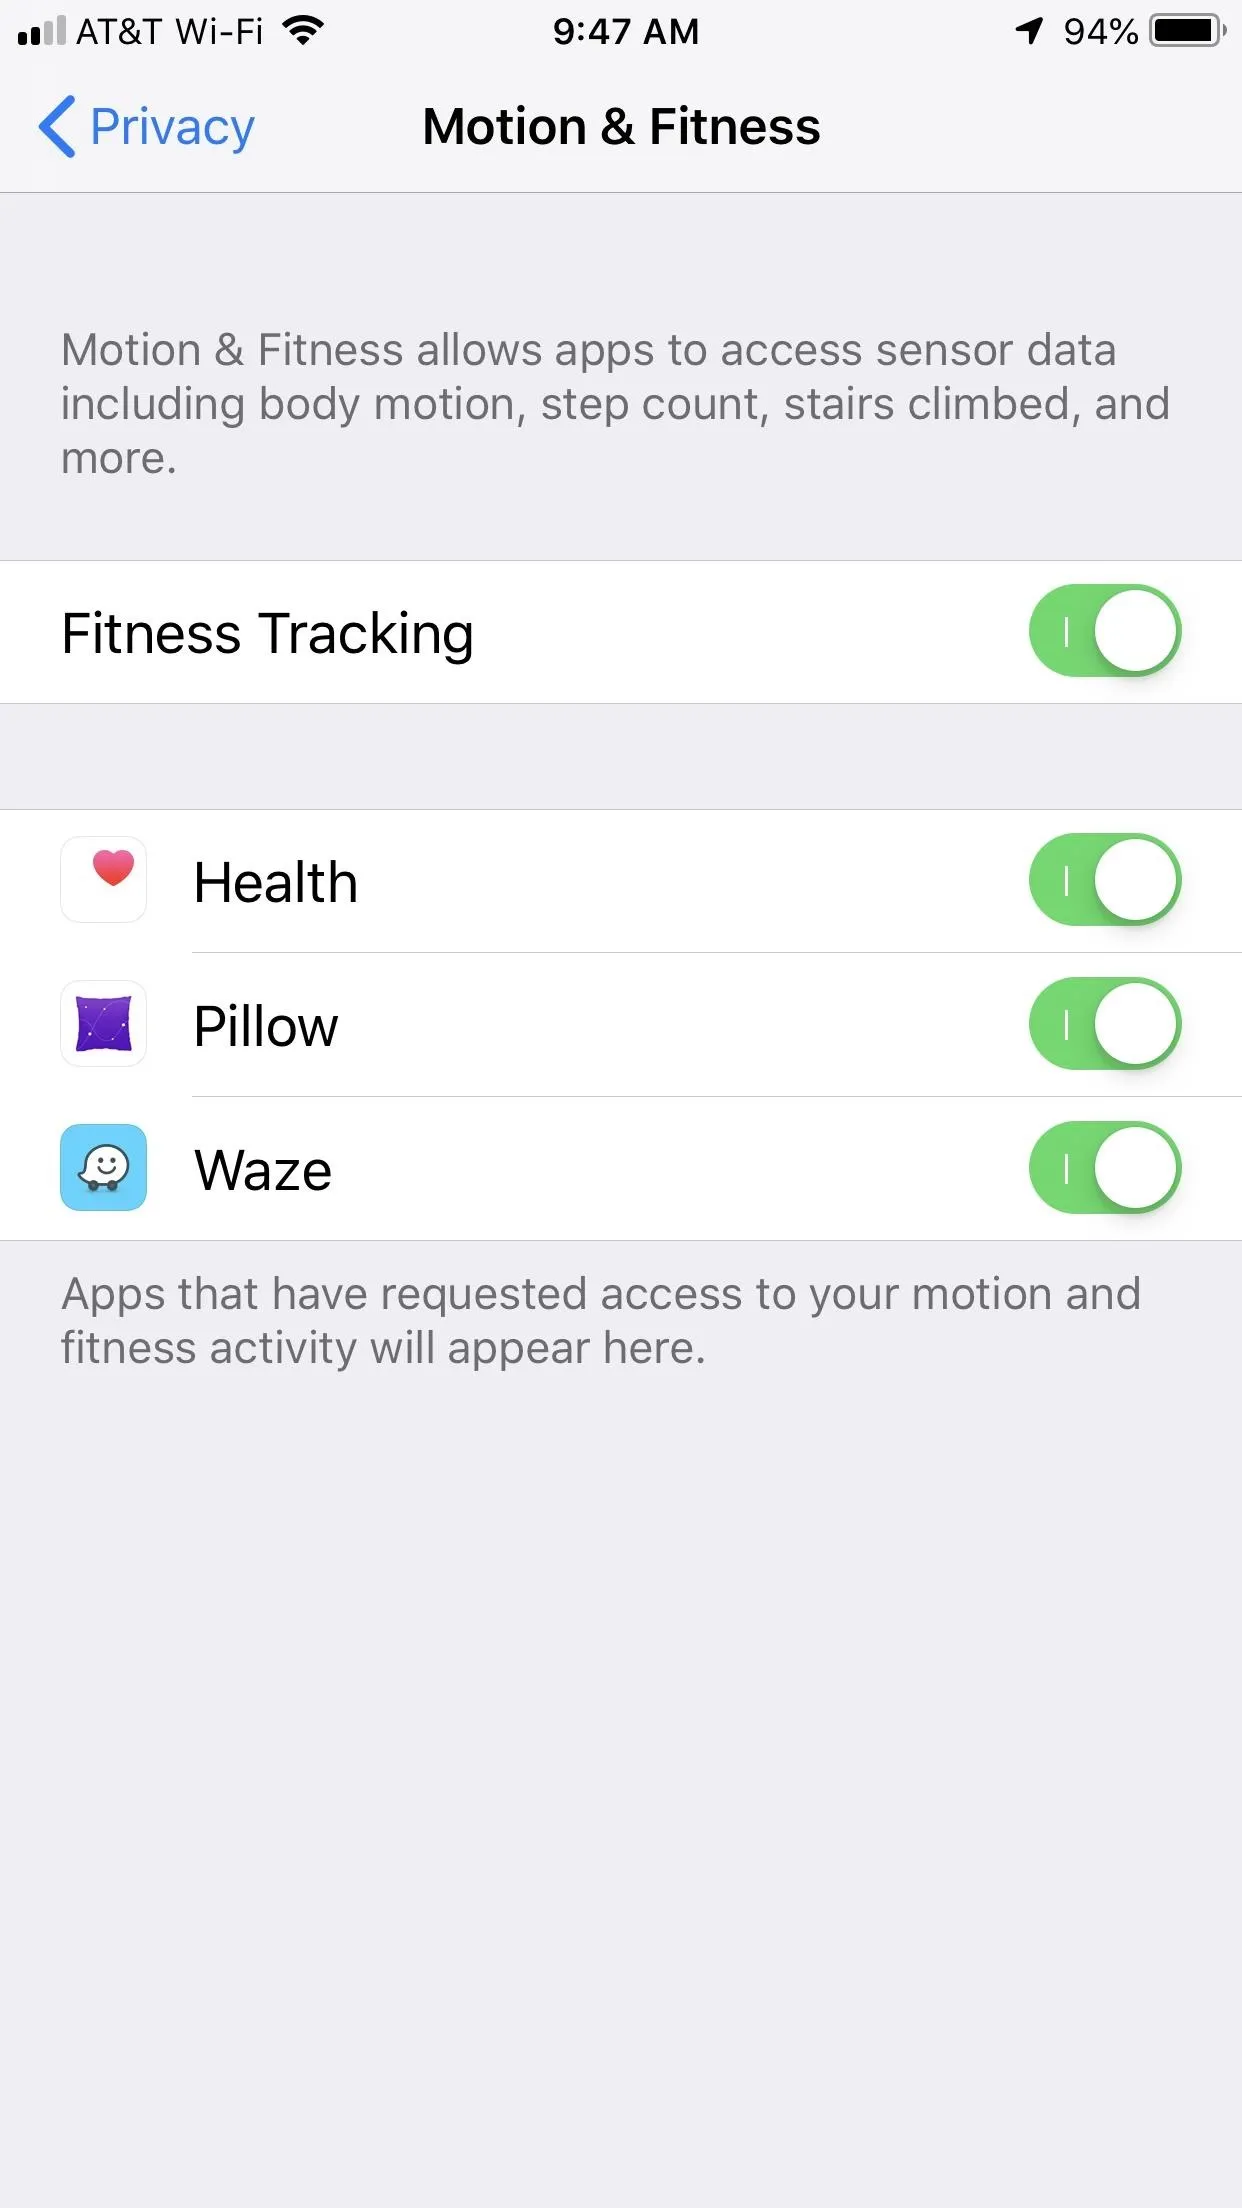
Fitness Tracking uses your iPhone to track your movement throughout the day. While useful, the setting uses battery you might not need. If you have a Fitbit or another fitness tracker, you won't need the additional data from your iPhone. To disable Fitness Tracking, head to "Motion & Fitness" in your "Privacy" settings, then simply deactivate "Fitness Tracking."


32. Turn Off Handoff
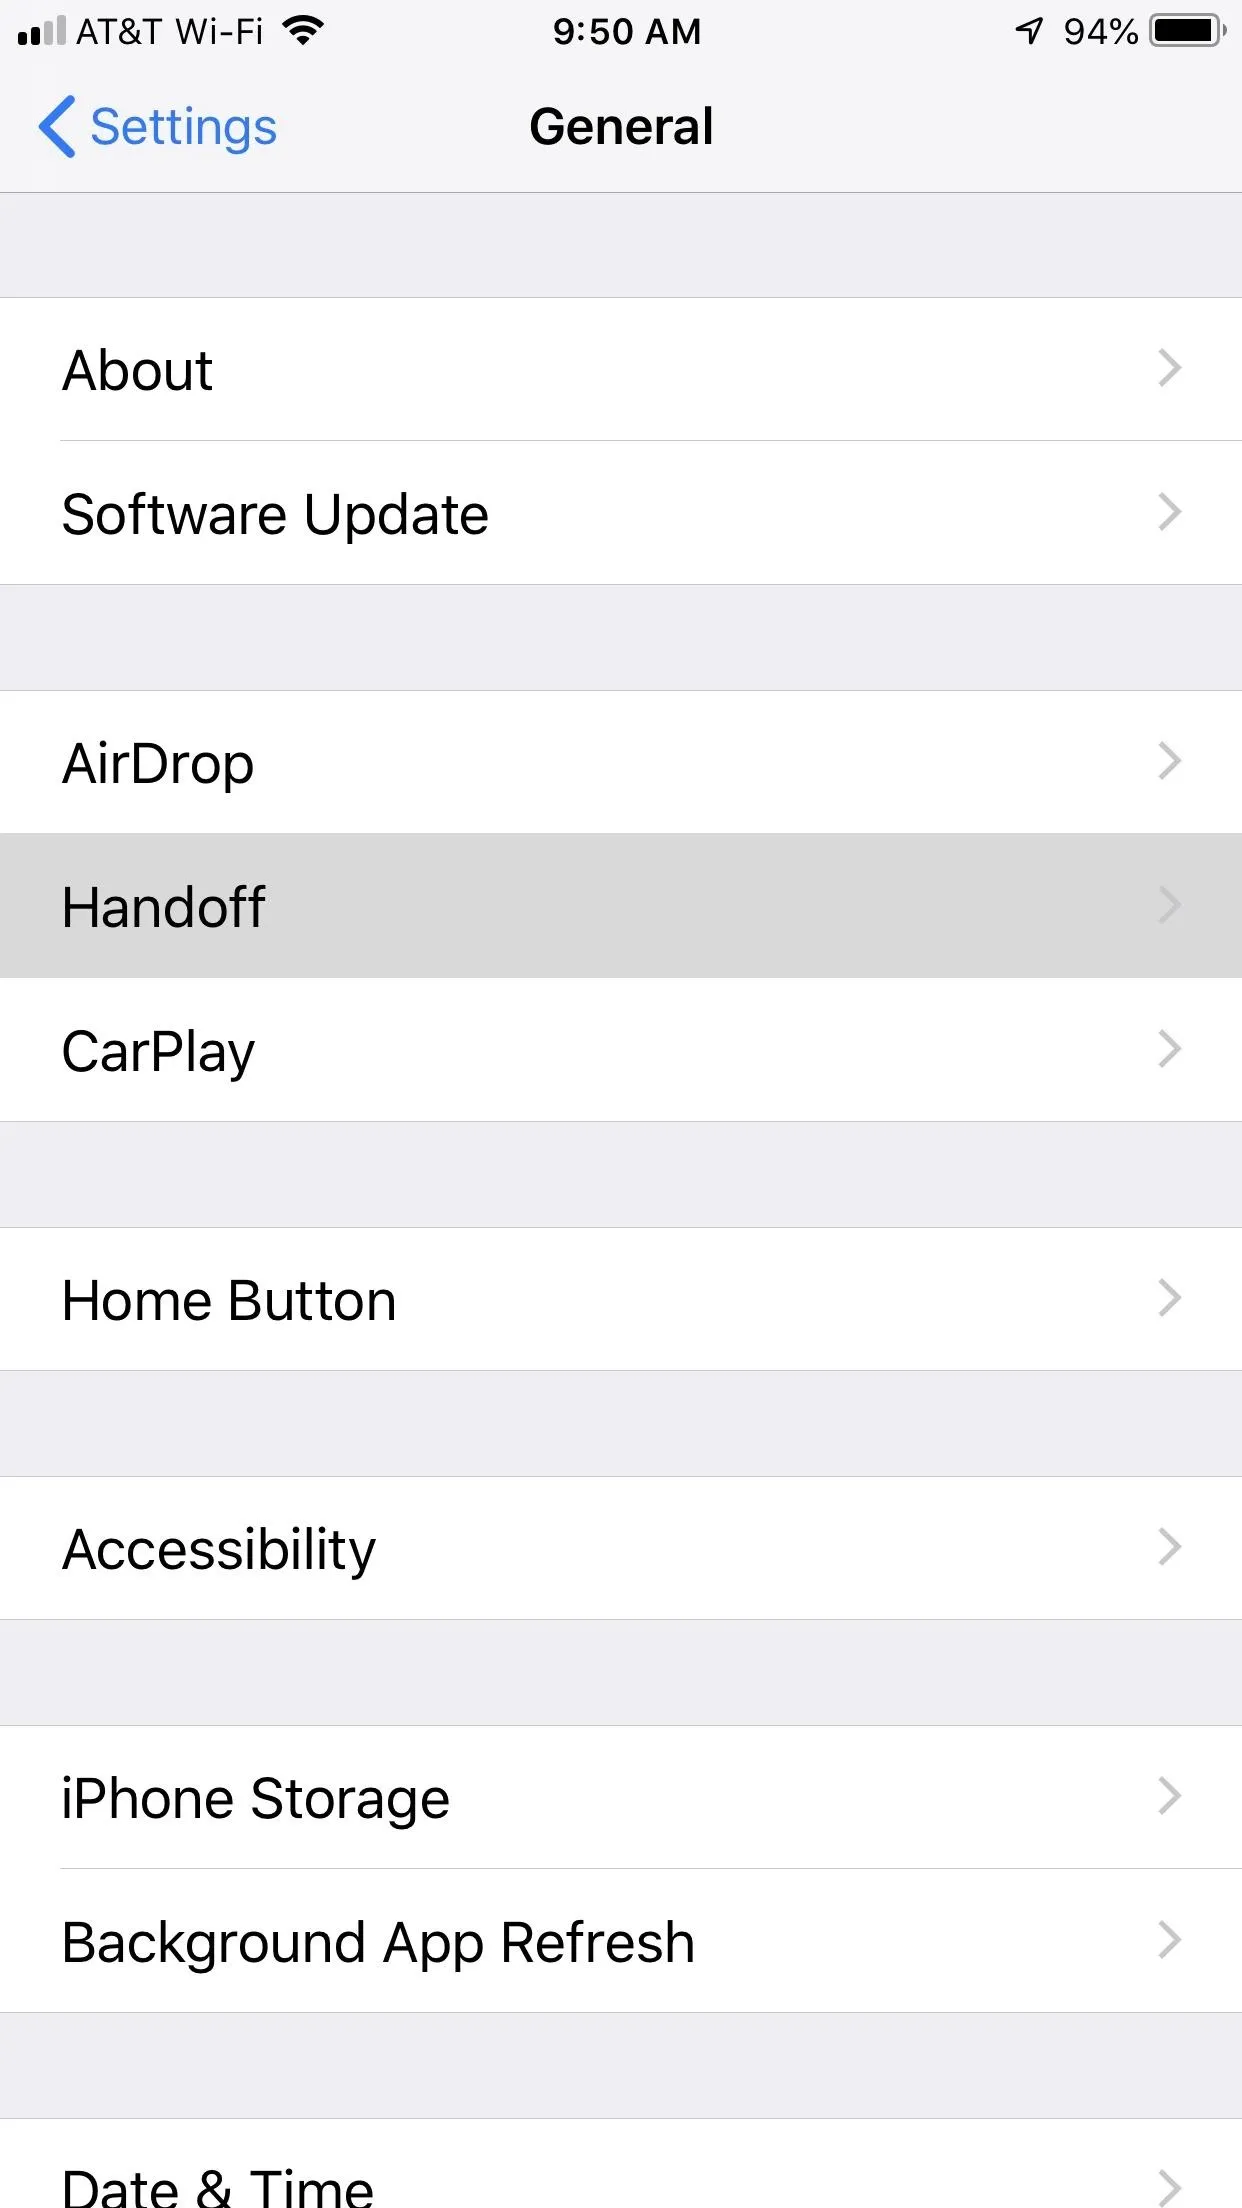
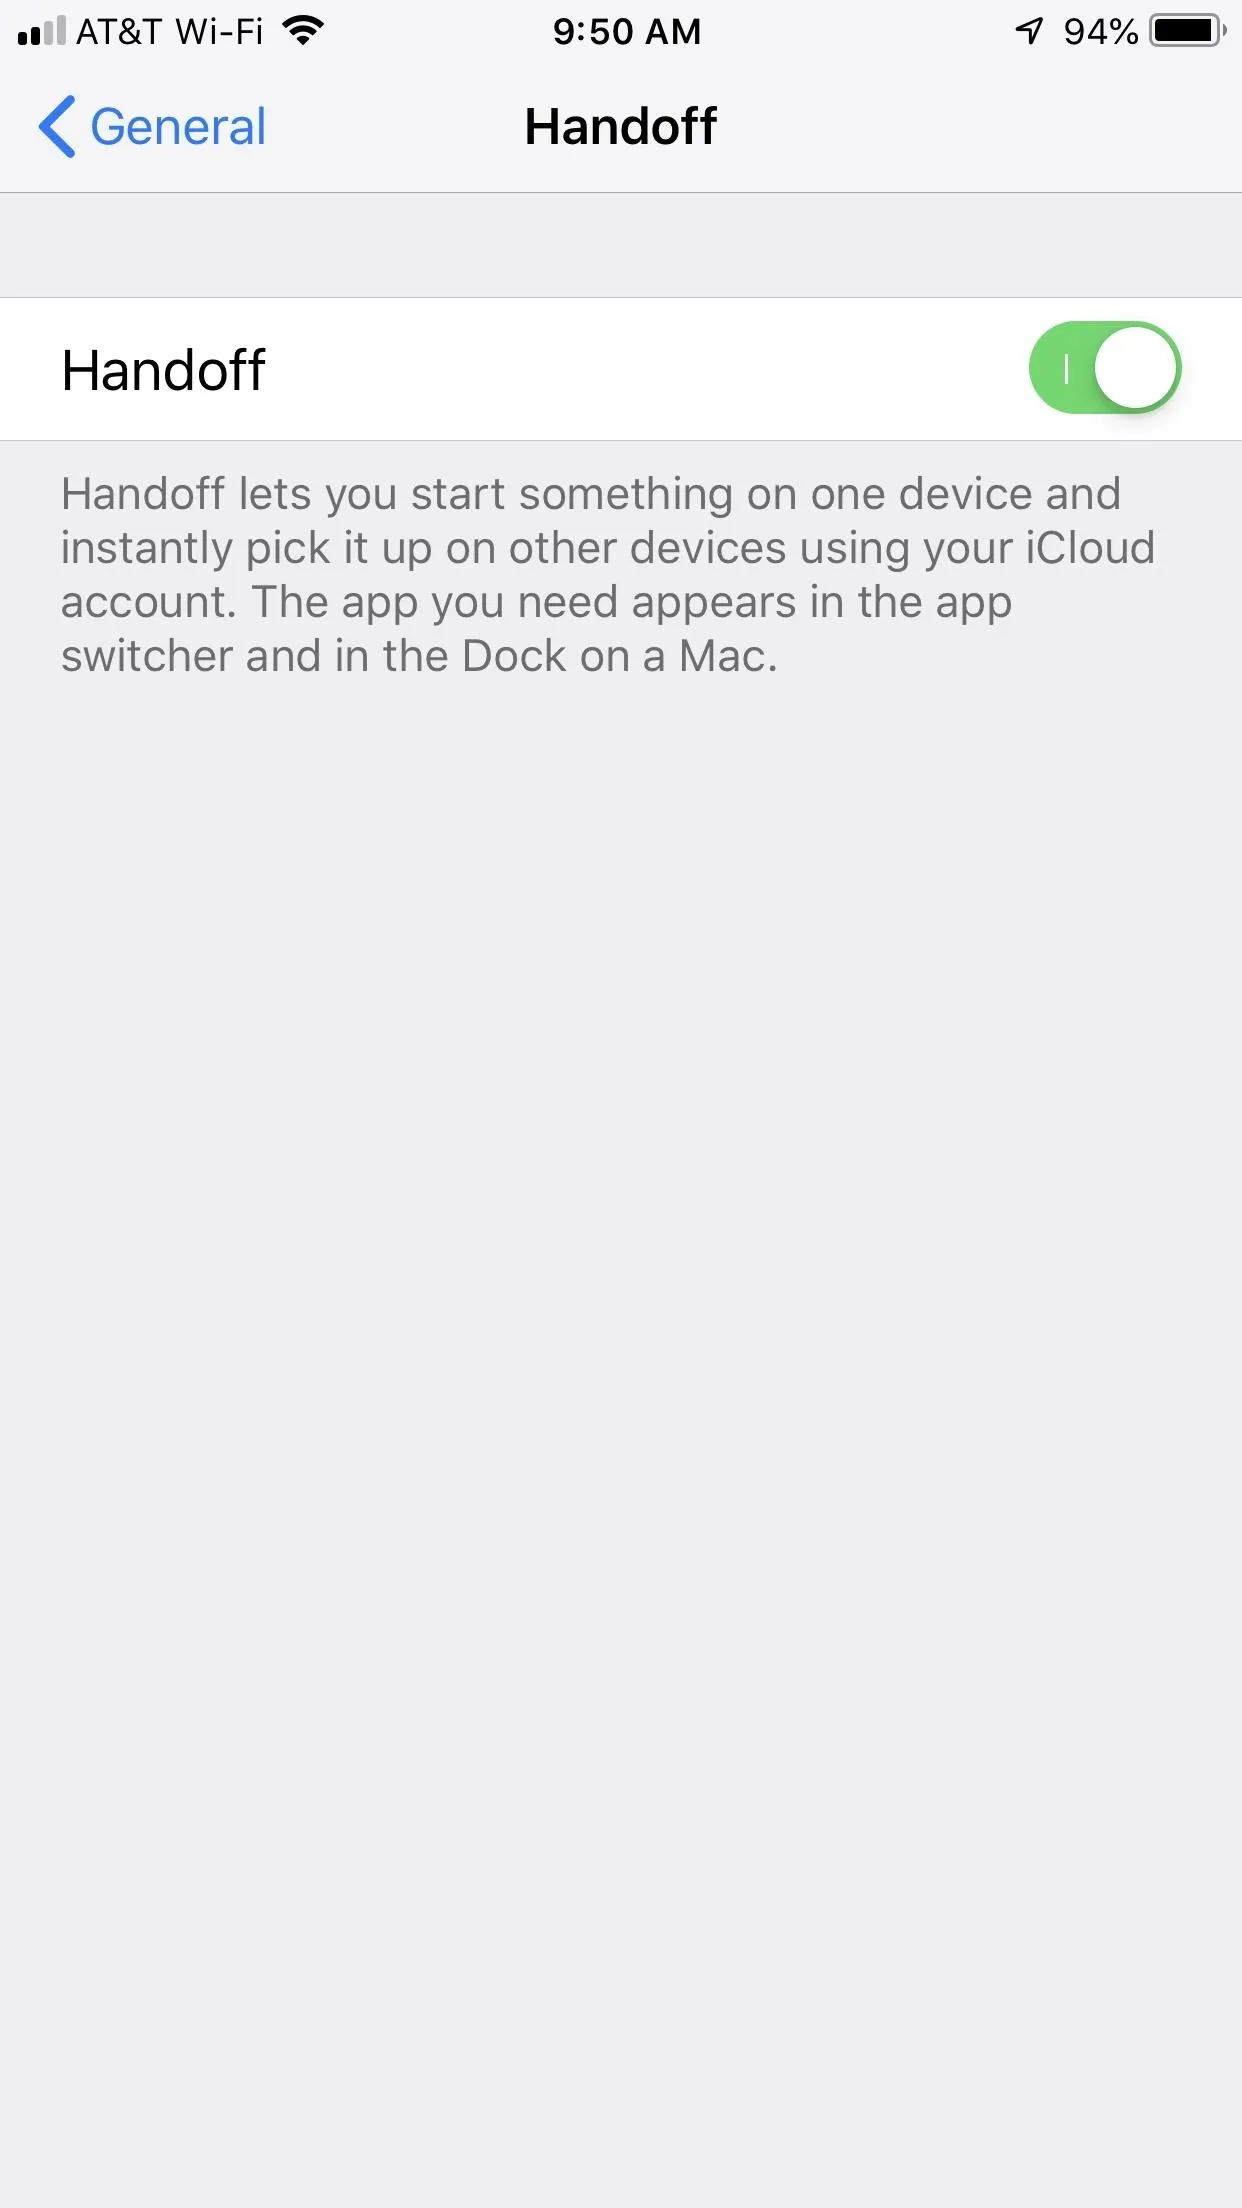
Handoff is great when using the same app between iOS devices or Macs. If you only have an iPhone or you don't work across devices, this feature won't be of use to you, but it could still hurt your daily battery life. Turn it off from your "General" settings.


33. Disable Certain App Store Settings
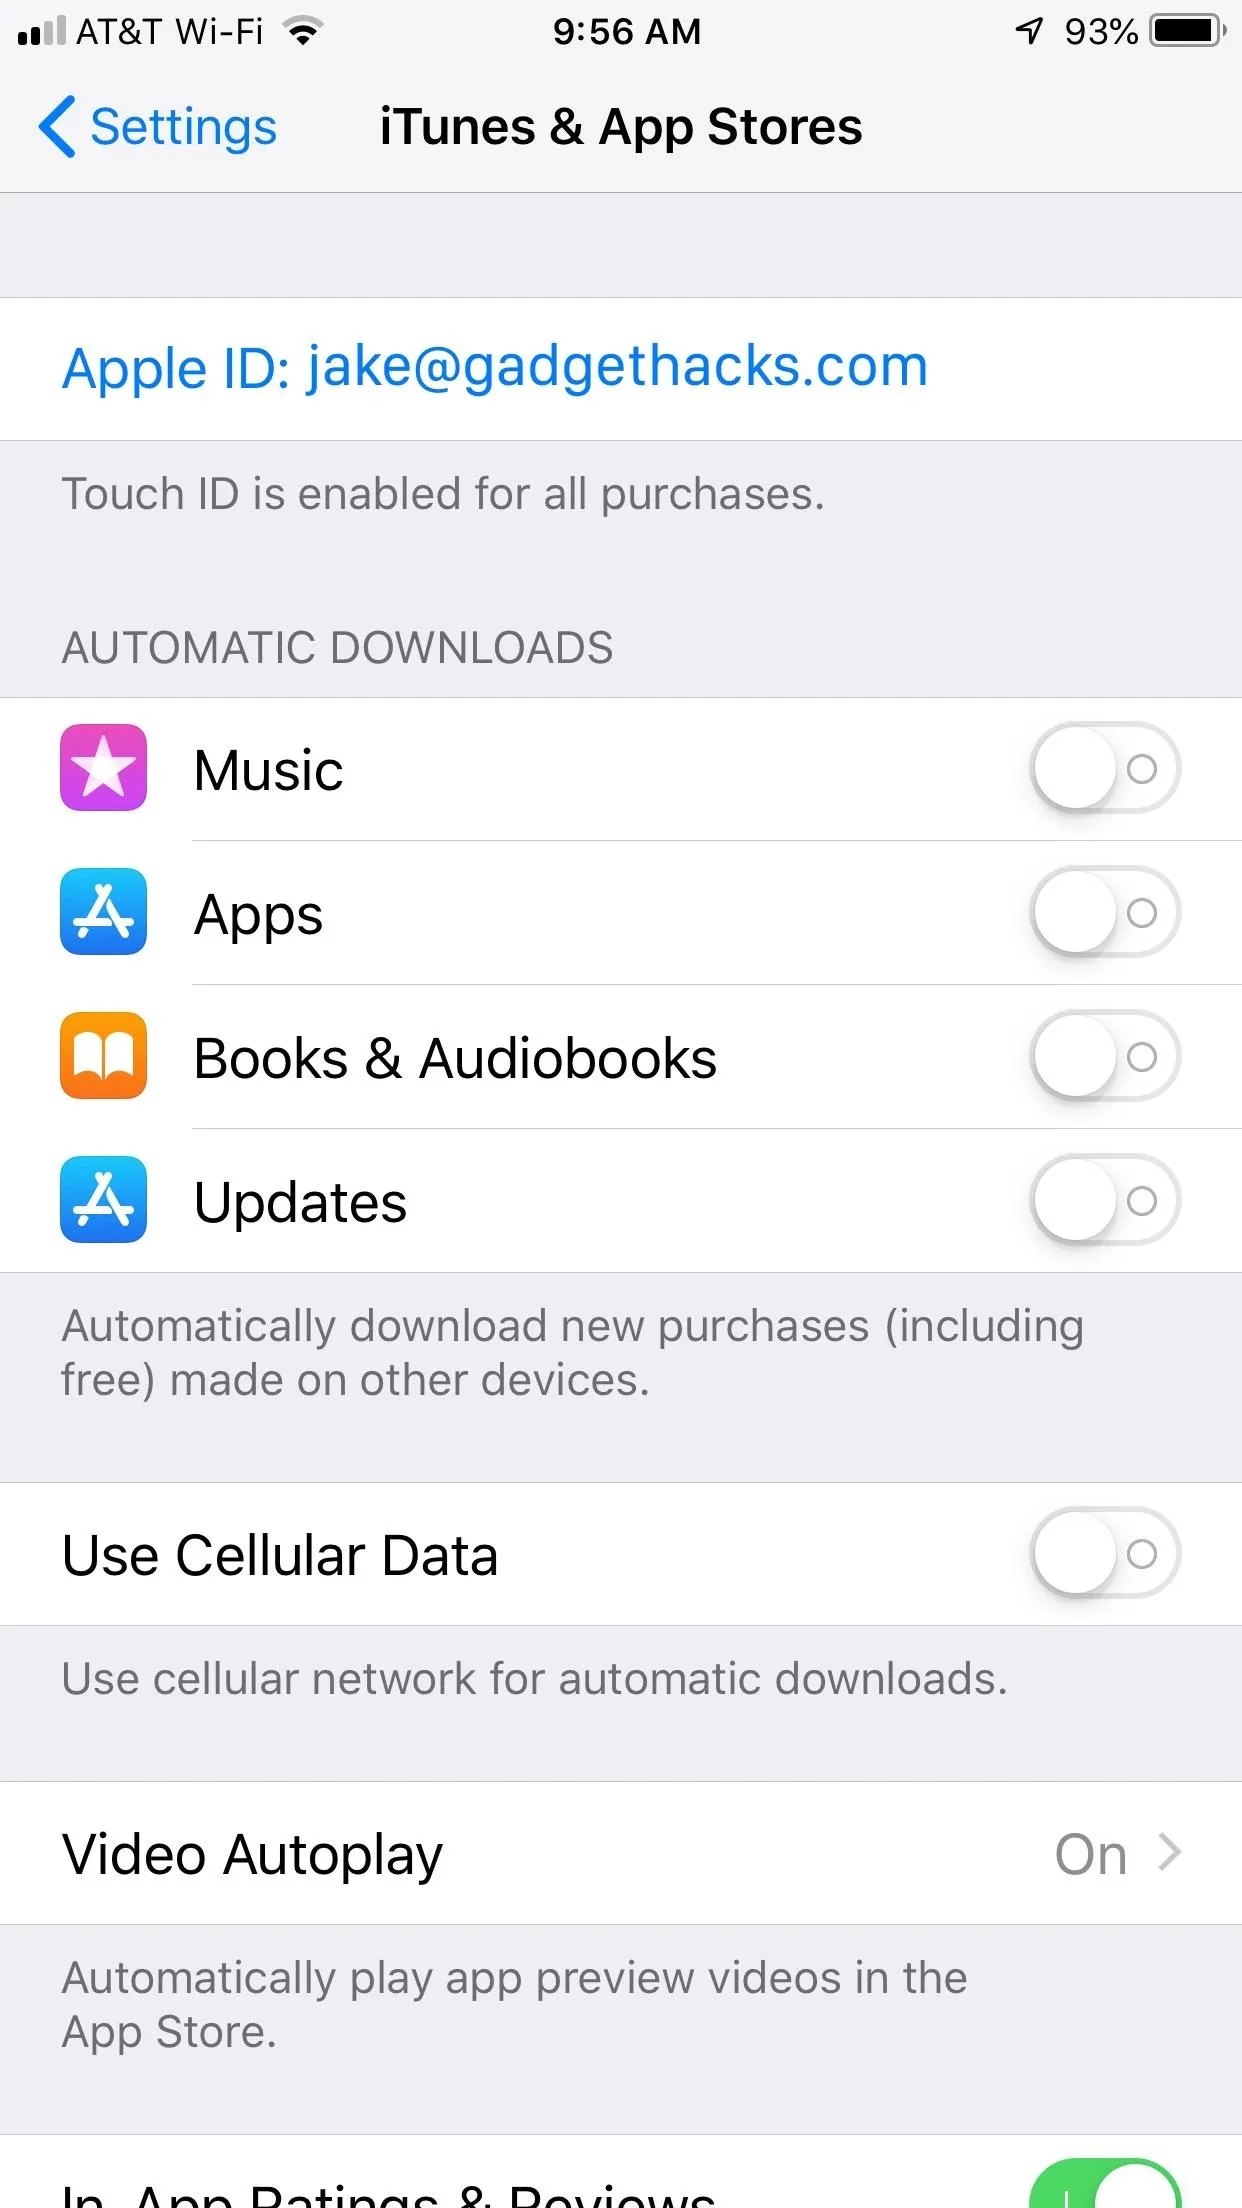
If you download an app on another iOS device, it can be useful to have that app appear on your iPhone without thinking about it. However, when you're low on battery life, that feature might do more harm than good. If you feel it's worth manually downloading your shared apps, you'll be able to save a little battery life.
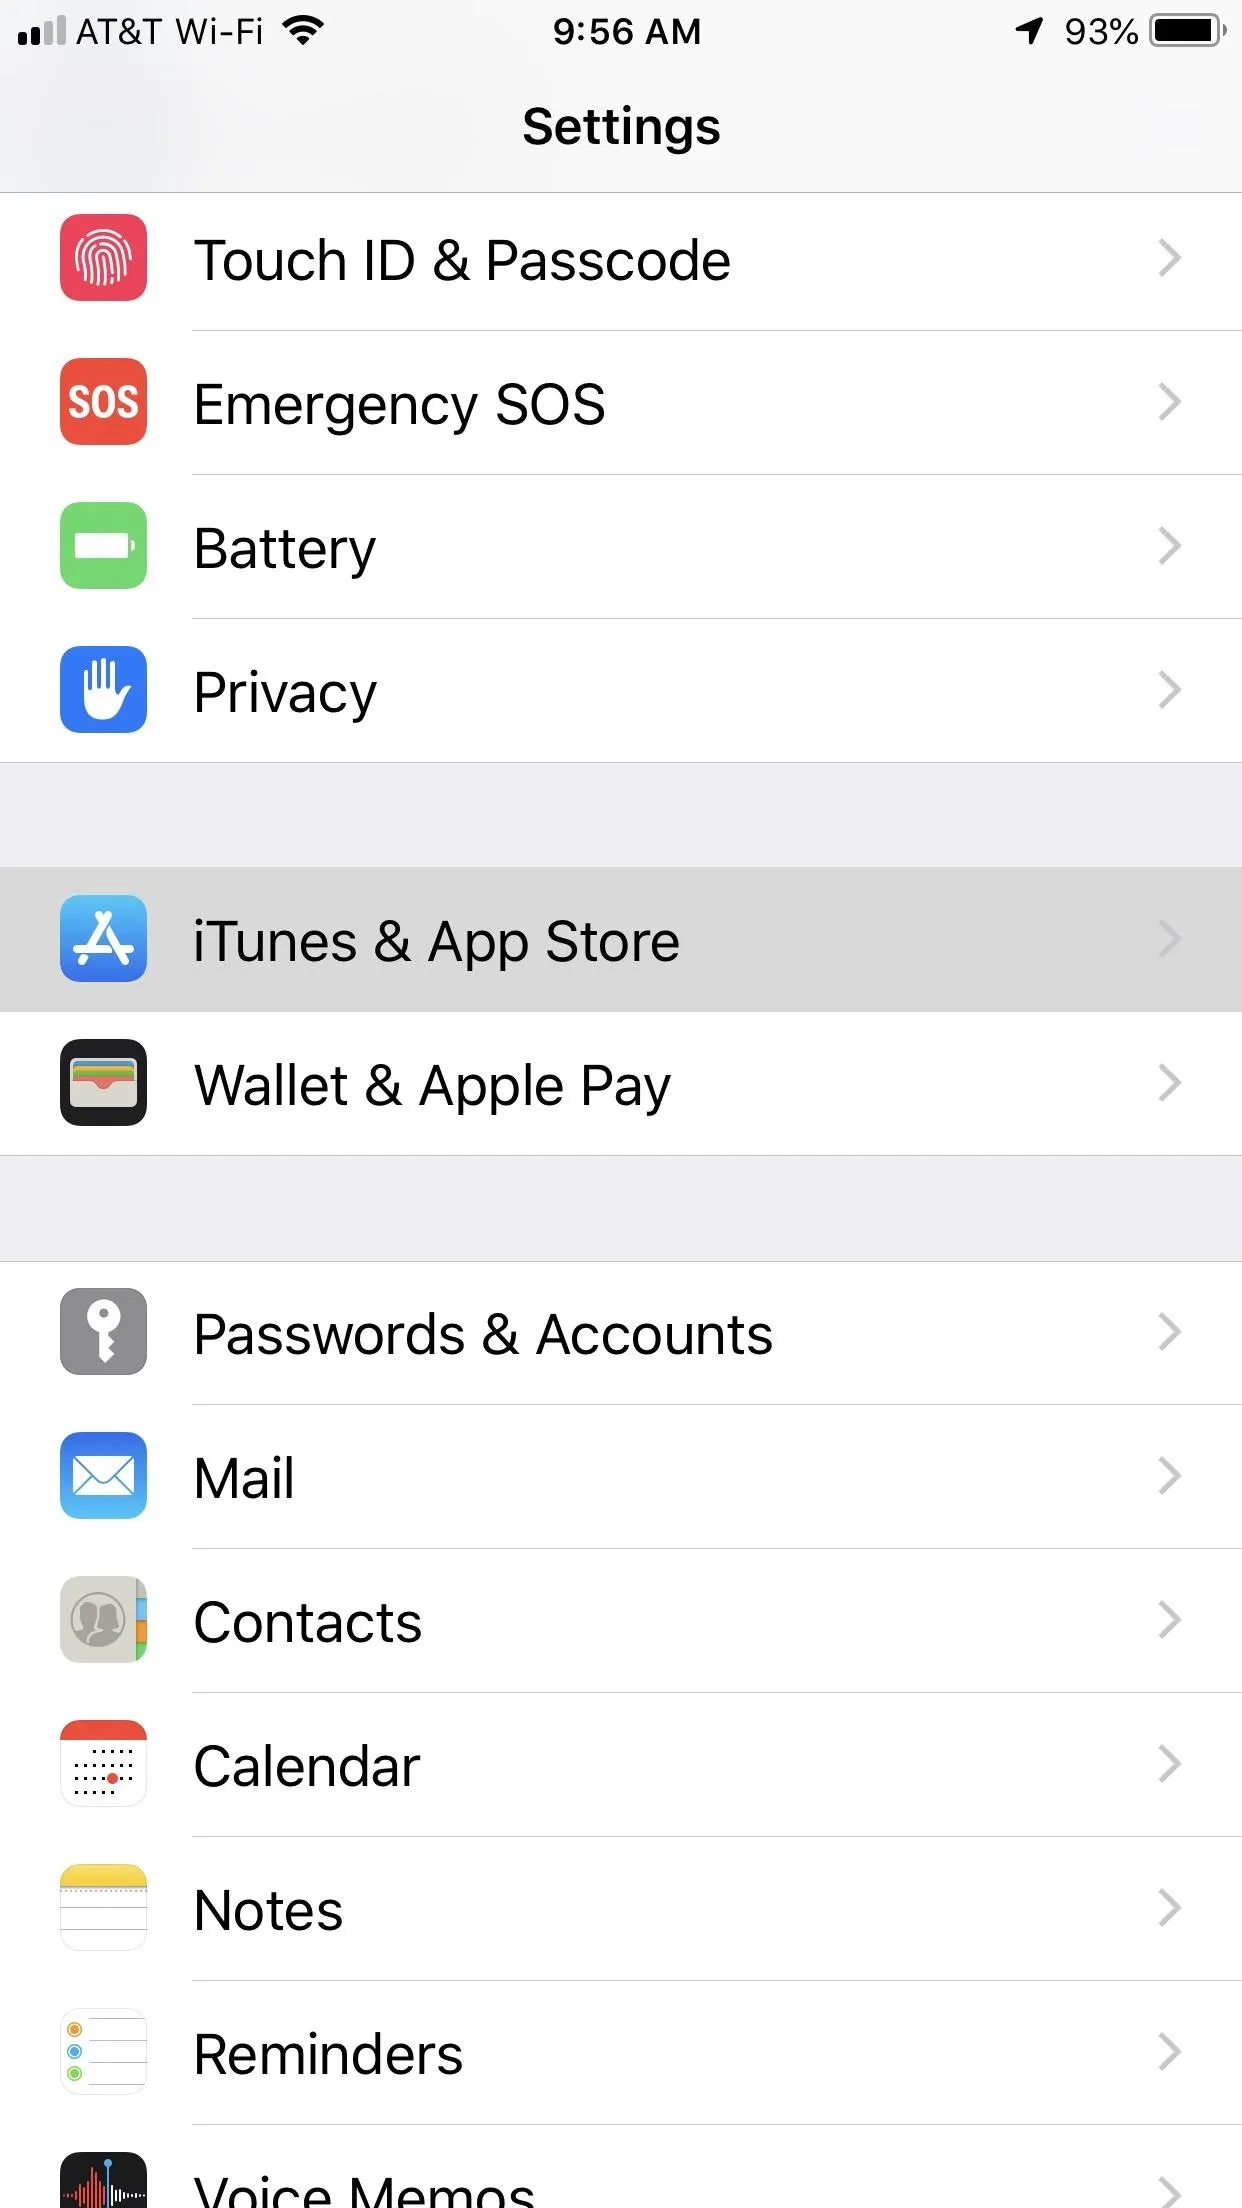
Go to "iTunes & App Stores" in Settings, then disable "Apps." You might want to turn off "Updates" as well, especially if you have a lot of apps on your iPhone, and "Use Cellular Data" if you decide to keep "Music" and "Books & Audiobooks" on since Wi-Fi will use less power.


34. Remove Network Extenders or Signal Boosters
If you have crappy reception at home or in your office, you may have purchased a network extender or a signal booster to get some better coverage for calls and data. Well, as much as they things can help with your cellular reception, they can really drain the battery in your iPhone. We recommended avoiding these products unless you're plugged in and charging at the same time.
35. Try a Charging Case Out
If the above tips haven't helped out much, you go the other route and look at third-party options such as battery boosters. For those of you who don't mind bulky cases, you can get an iPhone case with a built-in battery that charges your iPhone while you're out and about. When you go to charge your iPhone next, you'll also charge the battery pack case. If you don't want the extra bulk, you can just carry around small battery pack for emergency charges.
- Follow Gadget Hacks on Facebook, Twitter, YouTube, and Flipboard
- Sign up for Gadget Hacks' daily newsletter or weekly Android and iOS updates
- Follow WonderHowTo on Facebook, Twitter, Pinterest, and Flipboard
Cover image and screenshots by Jake Peterson/Gadget Hacks (unless otherwise noted)


Comments
Be the first, drop a comment!