


If you want to try out one of Apple's beta programs on your iPhone — whether that's by becoming a developer, joining the public beta, or using an IPSW of an available beta update — there's always a possibility that you'll want to go back to the stable iOS version you were using before. Likewise, if you updated to the latest stable release but liked how iOS worked on the previous version.
To downgrade immediately from a beta, you'll want to have an archived backup of your last stable iOS version handy to restore to. To downgrade immediately from the latest stable iOS update on your iPhone, you'll want to have an archived backup of the previous iOS version you were on.
Whatever the case, having an archived backup of the last iOS version means you can restore to that once you jump back to that iOS version. But it's only helpful if Apple's still signing the iOS version that you want to downgrade to since restore images are completely useless after they are dropped from Apple's lineup.
When You Want to Leave an iOS Beta or New Release
The easy way to dump an iOS beta from your iPhone is to wait it out. If you installed an iOS beta profile from the Apple Beta Software Program or Apple Developer Program, you can just remove that profile and wait until Apple issues a new stable iOS update, which should show up in "Software Update."
However, that method is flawed since you'll have to wait for a stable update that's later than the current version you have. That means staying on the beta until Apple pushes the stable version of the beta update you're currently using. You'll most likely want to downgrade immediately, so that doesn't make sense.
If you want to downgrade from the beta right away — or downgrade from the latest stable release before Apple stops signing the previous stable version — you'll need to use a restore image, which is in IPSW format.
The restore image method works no matter how you installed the software you don't want anymore. You find the correct IPSW file for the specific iPhone model you have and the stable iOS version you want, then use recovery mode in iTunes or Finder to install it on your iPhone. After that, you can restore using an archive backup.
Why an Archived Backup Is Important
The only way to downgrade and return all of your data to the iPhone is to use an archived backup. When you use iCloud Backup, it backs up your system daily when it can, but only some data — and iCloud backups can't be archived. So if you're on the beta or the latest stable update, it's continually backing up the beta or newest stable version. You won't be able to use that to restore all your data after downgrading since it likely has newer features that aren't supported.
To get a complete backup, you need to use iTunes or Finder. But just backing up with iTunes or Finder isn't good enough.
Whenever you created a backup, there's a good chance that you might connect your iPhone to your computer and unintentionally update it in the background to whatever iOS version you want to ditch. If you're restoring with an IPSW, it can happen right after connecting to the computer to install it. By default, only one backup per device is stored on your computer, so your iPhone's gets written over with each backup. So after a downgrade, you won't be able to use that backup to restore your data.
An archived backup is set aside as a separate backup, independent of your normal backup. That way, if you downgrade from an iOS beta or the latest stable release to an older stable version, you can use the archived backup to restore your data as long as it's a backup of a signed iOS stable version that's older than the software you're downgrading from.
When You Should Archive a Backup
The ideal time to create an archived backup is right before you install beta software or a new iOS update. That way, it contains all of your files and data up to that point, and this is the point you'll return to after restoring.
If you use iCloud to store images and other files, anything you sync to iCloud during a beta period will still show up after you restore to a previous iOS version. However, if you keep everything on your iPhone, some content, like photos and videos, will not be recoverable, so you'll want to save those somewhere before downgrading.
Archiving a Backup on macOS Catalina & Later
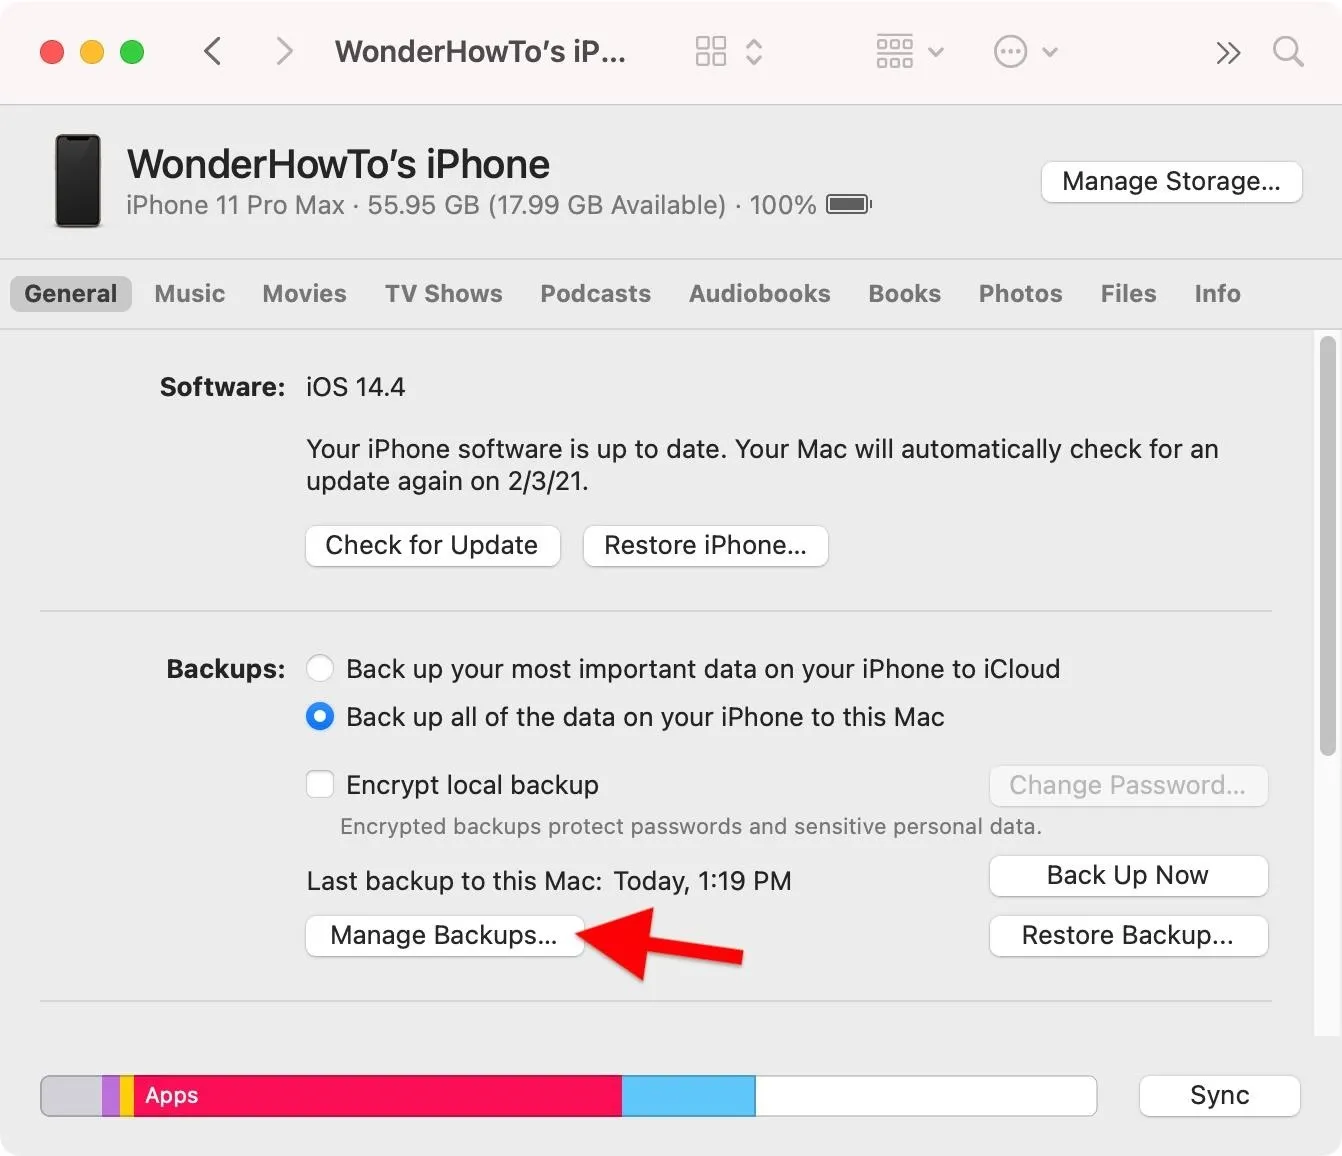
After backing up your iPhone to your Mac as you normally would (see how to back up if you need help with that) — whether it's an encrypted or unencrypted local backup — make sure your iPhone is plugged in and visible in Finder. On the General page, click "Manage Backups..." to see all backups stored on your computer.
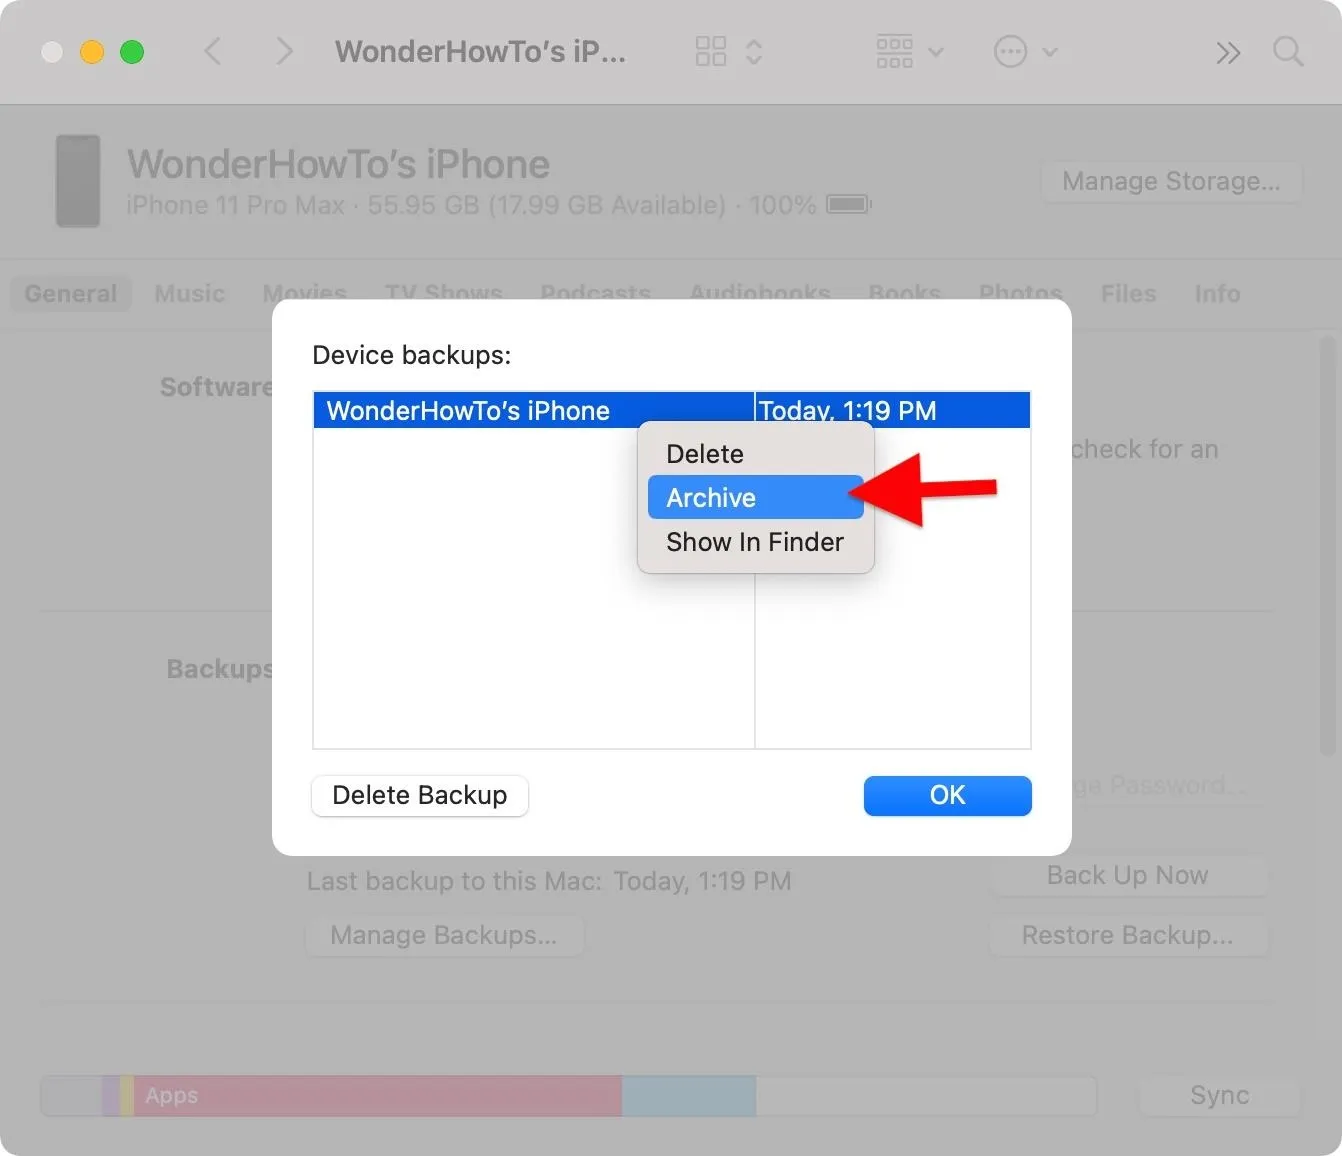
Find the backup you want, right-click on it, and choose "Archive." Next to the device name, there should now be a date listed to indicate it's been archived at that time. Newer backups will be made to a new file, which will also show up in this menu.
When it comes time to restore your data with iTunes after downgrading, you should be able to select your archived backup just like you would select a regular backup.
Archiving a Backup on macOS Mojave & Earlier
After backing up your iPhone to your Mac as you normally would (see how to back up if you need help with that) — whether it's an encrypted or unencrypted local backup — make sure your iPhone is plugged in and visible in iTunes.
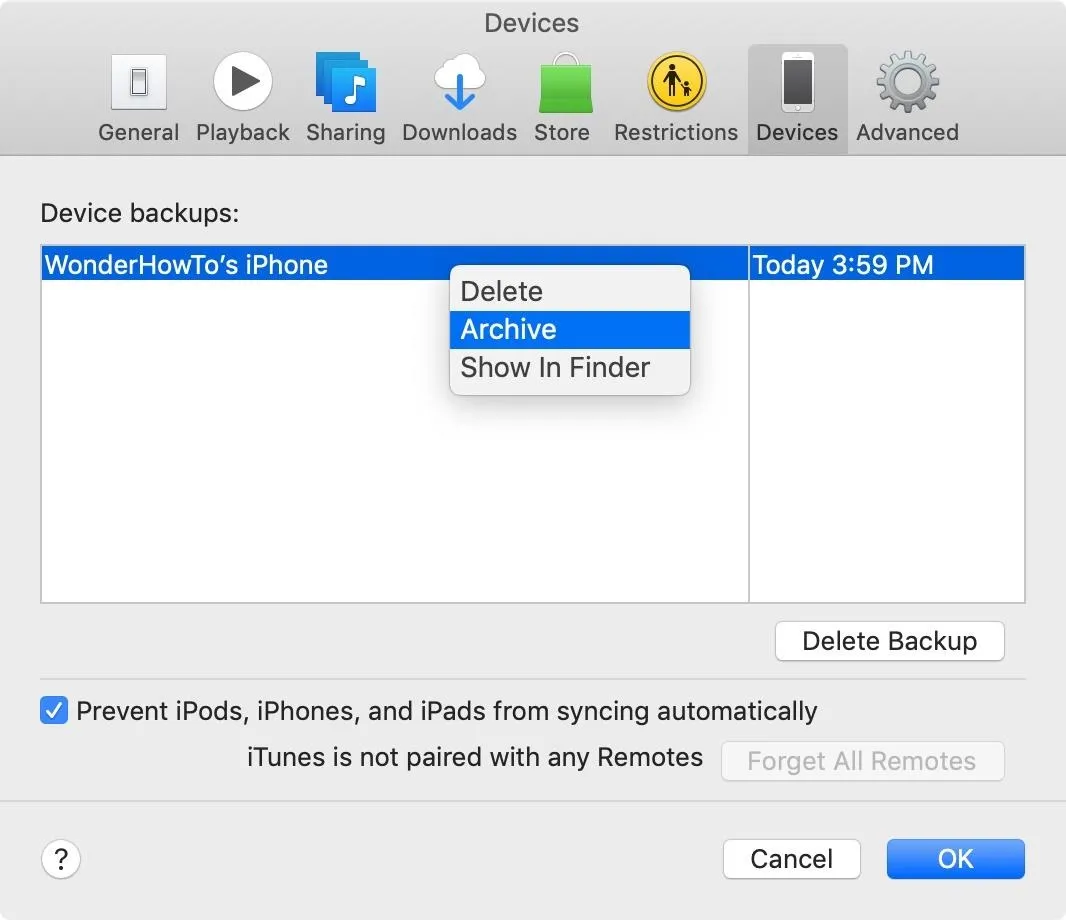
Now, click "iTunes" in the menu bar, then "Preferences," and choose the "Devices" tab. Find the backup you want, right-click on it, and choose "Archive." A lock and date should appear next to the backup to indicate it's archived. Newer backups will be made to a new file, which will also show up in this menu.
When it comes time to restore your data with iTunes after downgrading, you should be able to select your archived backup just like you would select a regular backup.
- More Info: How to Restore Your iPhone to a Backup or Factory Settings Using iTunes on macOS or Windows
Archiving a Backup on Windows
For some reason, Apple did not include the easy "Archive" feature for iTunes in Windows, so to archive a backup, you'll have to find the backup file and move it or change its names. After backing up your iPhone with iTunes on your PC (see how to back up if you need help with that), close iTunes. Now, if you're using Windows 10, navigate to:
C:\User\[yourusername]\Apple\MobileSync\BackupIf you're using an older version of Windows, try:
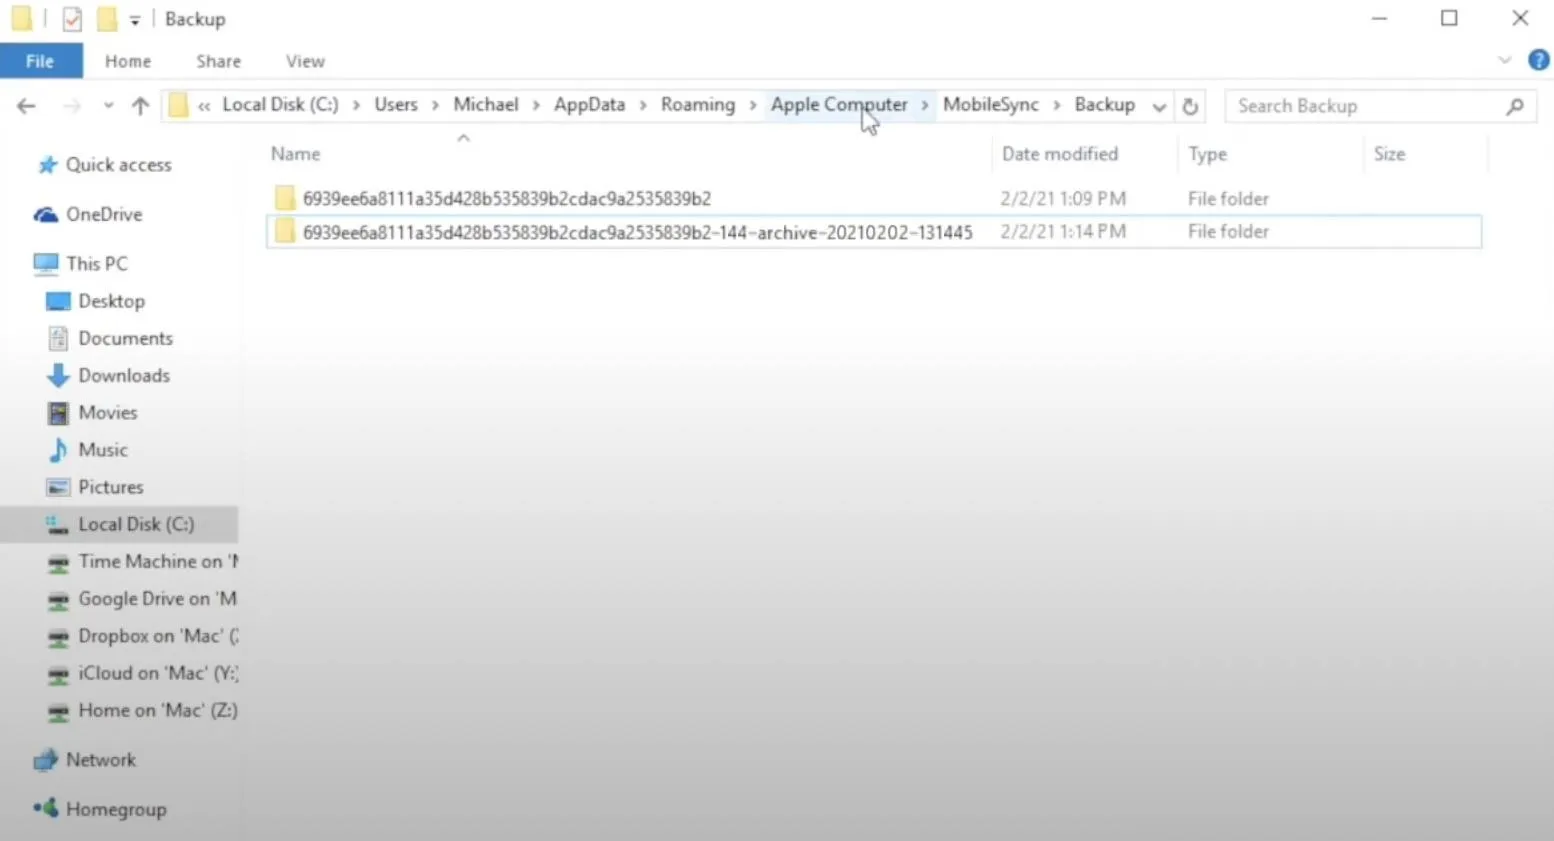
C:\Users\[yourusername]\AppData\Roaming\Apple Computer\MobileSync\BackupNext, find the correct update folder. While the filenames are completely random, if you just backed up your iPhone, you'll be able to identify the correct folder by its last modified date. Select it, copy it, then paste the copy as another folder in "Backup." You can rename the copied version to identify it easier later. We suggest appending it with -xxx-archive-yyyymmdd-hhmmss, where "xxx" is the iOS version, so you know exactly when the file was created and which iOS version it is.
The next time you update your iPhone with iTunes, it will overwrite data in the original folder, so you're iOS beta will now be using that. Your archived backup is tucked neatly away for a rainy day. You can go to "Edit," click "Preferences," then "Devices" to see your backups list. The original and archived backup will have the same name, but you should be able to tell the difference by the date when it comes time to restore your data after downgrading.
Cover photo and screenshots by Justin Meyers/Gadget Hacks


Comments
Be the first, drop a comment!