


If you have a modern iPhone, you have an excellent video recorder at your disposal. Every iPhone since the 6S has the ability to shoot in 4K resolution, and each new iteration has brought new capabilities to the table. But even the best mobile shooter can use a little extra help. That's where these video recording apps come into play, to ensure the footage you capture is as good as can be.
What do third-party video recording apps do? They hand all of your iPhone's camera controls over to you, not just the few that can be accessed for the native Camera app on iOS. Third-party apps can unleash your camera's full potential, giving you manual control over focus, ISO, shutter speed, bitrate, and more. But it goes beyond that. These apps also add additional tools iOS doesn't, tools that professional videographers use in their work every day.
- Don't Miss: How to Enable 4K Recording on Your iPhone
The five apps below vary between features and pricing. No one app is going to work for everyone. That's why we broke down every important note into a comprehensive chart below. Take a look at where each app stands on the chart, then take a look at the breakdown for each app, and use both to decide which one works best for your projects, whether social media videos, home movies, short films, or features.
Jump to a Section
- Comparison Chart
- Chart Key
- App 1: Filmic Pro
- App 2: ProCam 6
- App 3: ProCamera.
- App 4: Moment - Pro Camera
- App 5: ProMovie Recorder
- Summary
Comparison Chart
Key Comparison Points
General
- Price for Paid Version: All of the apps on this list, whether or not they have a free version, have a paid version as well. Prices range from $2.99 to $14.99.
- Free Version Available: Does the app have a free version? Only two of the apps on this list do.
- Free Trial: If there's a paid pro version, is there a free trial period to test it out? Only one app on this list does.
- In-App Purchases: Some apps include their paid versions as "in-app purchases," while others include additional features on top of the initial payment for the app itself.
- Watermark: If there's a free version, a watermark on saved video is the first thing to worry about, so you're better off paying to remove it because watermarks will do you no good, period.
- Editing Tools: The apps in our list are primarily for filming content, but some of them also include editing tools, so you don't have to jump to another app to put together your shots. While no replacement for a full video editor, these tools can be helpful for quick trimming, color correction, and so on.
- Frequently Updated: If the app is updated frequently in the App Store, that's a good sign that it's worth the investment. Most of these apps are, with only one that dropped the ball.
Camera Settings
- Create Presets: Consistency is the key if you're shooting multiple shots and takes for the same scene, so changing the settings to match can be a waste of time. An app that lets you save your current shooting settings as presets means quick-and-easy access to matching shots.
- Control Shutter Speed: Shutter speed is how quickly the shutter opens and closes when shooting each frame of a movie. Typically, you want your shutter speed to be the inverse of your frame rate (e.g., 24 fps should have a shutter speed of 1/48, 30 fps should see 1/60, etc.).
- Control ISO: ISO can be used to control the brightness of your video electronically. The brighter you go, the more video noise you see, so keep that in mind before using the setting.
- Control Exposure: With all video recording apps, you can control exposure — usually referred to as EV (exposure value) — which lets you raise or lower the ISO and shutter speed in unison. Use this if you want to make adjustments to the overall exposure without needing to fiddle with ISO and shutter speed independently.
- Flicker Options: If you're shooting in the US, 60 Hz what you'll want to use since that's what the US power grid users. When you're in other countries where the power grid uses 50 Hz, then you'll want to shoot with that option. Otherwise, if you shoot lights on a 50 Hz power grid at 60 Hz, you'll get some light flickering on the screen.
- Set Automated Focus: Automated controls, sometimes referred to as pull-to-point, let you set a beginning and end point for a tool, in this case, focus, so you don't need to touch the controls as you concentrate on shooting.
- Set Automated Zoom: Just like with automated focus, some apps let you set beginning and end points for the zoom, which will automate during recording so that you don't have to worry about fiddling around with zooming while shooting.
- Set Automated ISO: As you could probably guess, this setting is just like the automated focus and zoom settings, where you can pull-to-point the ISO controls automatically during recording.
- Set Automated Shutter Speed: Following in the footsteps of automated focus, zoom, and ISO, this control will let you set automatic beginning and ending points for the shutter speed during filming.
- Aspect Ratio Guide: An aspect ratio guide overlays black bars on your viewfinder (i.e., the screen), to help you frame the shot outside the traditional 16:9 rectangle your phone loves, so you can shoot in aspect ratios such as 2:39:1, 17:9, and 4:3. Each app offers different options, while some have zero.
- Crop to Aspect Ratio: Does the app allow you to crop the video to your selected aspect ratio guide automatically? Usually, this means you will still see the full frame beneath the aspect ratio guide, but it will crop the final output accordingly.
- Video-Only Mode: Smartphone audio can be terrible. If you use other means of recording audio, not including external mics connected to your iPhone, you might want to use this mode to record without audio.
- Start/Stop Recording with Volume Buttons: When you're in the default Camera app with the video option open, you can click a volume button on the side to start and stop recording, which is handy if you're holding the iPhone a certain way where it's hard to reach the record button. This is also a handy option for third-party apps to adopt. If the app lets you do this, it will also let you start and stop recording with the volume buttons on wired headphones that are connected.
- Video Timer: A video timer delays recording for a set amount of time after you tap the record button. This can be especially helpful if you need to film yourself and don't want an extended amount of footage to run while you get into position. More useless footage means more storage space eaten up.
- Prevent Accidental Start/Stops: On an iPhone, the touchscreen is pretty sensitive, so it's easy to tap the record or stop button accidentally. Imagine filming a big scene that turned out perfect just to realize it stopped recording midway through. That's why this particular setting is so useful, as it requires you to tap-and-hold on the record button for an extended period before starting or stopping recording.
- Anamorphic Mode: Most major Hollywood movies shoot with anamorphic lenses, where a widescreen image is expanded to fill the whole film frame. When editing or projected with a special lens, the film returns to the widescreen ratio. This happens so that you have higher quality footage overall. If you just shot widescreen without an anamorphic lens, the film frame would have black bars on the top and bottom, and the actual images would only take up a portion of the frame, resulting in lower quality overall. The same concept applies to iPhone videos. With an anamorphic lens attached and anamorphic mode turned on, you'll be able to see your shooting aspect ratio as it should be, but the footage is squeezed to fit the iPhone's sensor. Without the proper lens, it will record video in a distorted way, so keep that in mind.
- De-Squeeze Output: If the app supports anamorphic shooting, does it also support de-squeezing the video upon saving to your iPhone's storage? This means that, once de-squeezed, your video will look like a traditional video file, without any stretching or manipulation. Apps that don't offer this option will require you to de-squeeze the footage using a different app to make it usable.
- Flip/Rotate: Some apps let you flip or rotate the video on the display natively. This translation is essential when using certain DSLR lenses with your iPhone. When used with a DSLR, these lenses flip the image to work with the innards of the DSLR so that it appears and records properly. When using these lenses with your iPhone, the image will appear upside-down. Flipping the video ahead of time in-app will fix this issue.
- Level (Tilt Indicator): A tilt indicator is a tool that appears on-screen to help you keep your shot level and balanced. As you unconsciously tilt the camera off-axis, this tool will let you know you're unbalanced and will help guide you back to a perfectly level orientation.
- Overlay Guides: Overlay guides, like tilt indicators, help you keep your shot framed just right. Guides can range from simple lines to help you frame subjects following the standard "rule of thirds," while others offer dense grids for professional framing.
- Enable/Disable EIS: New iPhones ship with some form of EIS, or electronic image stabilization, which uses software to attempt to correct shaky videos. Some apps let you disable this option, which is useful when using a gimbal or other external stabilizer. No apps will let you disable OIS, or optical image stabilization, on the iPhone, which would also be nice when using a handheld gimbal or stabilizer.
- Take Photo in Video Mode: The stock app on your iPhone lets you take a still image while recording a video. This is useful when you're prepping shots beforehand to get a feel for the maneuvers necessary while also being able to share shots of what it will look like to the director. It's also good for promotional purposes, to get a quick snapshot during filming, so you don't have to do any additional shots just for still images. If an app features this, you can expect it to work the same as your iPhone's native Camera app. When shooting in 4K resolution, still images will be about 8 MP. The quality will be less if shooting in lower resolutions.
- Time-Lapse: Sped up footage over a day is created using time-lapse photography, where you can shoot one image per second or one image every 5 minutes. Playing back the images together results in the events being sped up, indicating that time has passed in a very visual manner. Some apps offer the same controls as the native Camera app, while others go above and beyond.
- Choose Which Lens to Use: Your iPhone has up to two rear camera lenses, depending on your model. Does the app allow you to choose which lens to shoot with at any time? This is particularly useful when using external lenses since you can only mount one lens to one lens, and that'd be the lens you'll want to select.
- Automatic Lens Switching: Like the native Camera app, does the app switch lenses when zoomed depending on light levels? This can be a positive, but it's usually seen as a drawback, as it takes away manual control of your lenses and can change the look of your video midway through shooting. However, we rarely see this happening, so it's not a huge issue to combat.
- Hide Interface When Recording: When you're actually shooting footage, you probably already have all the settings you want how you want them, so focusing on what's in front of the camera may be the bigger deal when you hit record. Most of the apps on this list give you some option, whether manual or automatic, to hide elements on the screen you won't need when filming.
- Integrated Accessories: While all apps should support accessories, such as gimbals and lenses, some have integrated support in-app, allowing these devices to take control of the app, or vice versa. This support is for these devices in mind, so there's full compatibility.
- Remote Control App: If you're also in front of the camera, or if you're placing the video camera in a shot where it's hard to navigate and operate the controls, a remote control comes in handy. It's possible that all of these apps could start and stop recording using a cheap Bluetooth remote, but only one app on this list has a feature-packed remote that lets you control practically everything from another iOS device.
Resolution Presets & Frame Rates
- 4K Max: This is a unique resolution setting to ProCam 6, which takes high-res photos and stitches them together in superior 4K resolution. How the effect works is up for debate. Since it's taking images, the frames per second is limited to just 24, 25, or 30.
- 4K: This refers to the best quality the iPhone can shoot at by default — ultra high-definition — which is 4032 x 2268 pixels. The iPhone caps out 4K recordings at 60 fps, and there's nothing the apps on this list can do about that. The frame rate maxes out at 60 fps for this resolution.
- 3K: This isn't a very oft-used term, but Filmic Pro calls it that so we'll make it easy and stick to it. It's usually 3100 x 1800 pixels, or 1800p, but another app is similar at 3264 x 1836. The frame rate maxes out at 60 fps for this resolution.
- 2K: Just like 3K, 2K isn't used very often to describe this level or resolution for recording video. Filmic Pro uses it to describe 2560 x 1440, or 1440p, though, that's more like 2.5K if you want to get technical. Another app is closer to 2K at 2048 x 1152 pixels, which should only be used when you intend to crop down to a typical format. The frame rate maxes out at 60 fps for this resolution.
- 1080p: This is your standard full HD resolution used these days, and 1920 x 1080 pixels, and is used by pretty much everyone for videos being display on phones and TVs, whether it's a social media video or television show. The frame rate can go anywhere from 24 to 240 fps.
- 720p: This is the start of high-definition at 1280 x 720 pixels, and it's supported on most devices. But if you're going to shoot in HD, you might as well go with 1080p. The frame rate can go anywhere from 24 to 240 fps.
- 540p: Just a step about 480p, this resolution setting is 960 x 540 pixels, and was common 7–10 years ago. It was the start of the 16:9 phase in mobile phones and elsewhere. The frame rate can vary from 24 to 60 fps.
- 480p: This is standard resolution, or SD, at 640 x 480 pixels. Unlike most of the above settings, this uses a 4:3 aspect ratio, not a 16:9 one. Think old-style televisions sets, and you know what SD is. When shooting in 480p, you only get 24, 25, and 30 fps options with the apps in this list.
- Non-Standard Frame Rates: For apps that have non-standard frame rates, it means that you can select something beyond the common ones such as 24, 25, 30, 48, 50, 60, 96, 100, 120, 192, 200, and 240 fps.
- Playback Rate Options: Some apps give you a playback frame rate, which is the rate at which the footage is played, not what it was shot in. Ideally, the rates will be the same, but you could also go out of sync of a specific effect you want to achieve. Only one app on this list gives you frame rate options for playback.
Live Analytics
- Zebra Stripes: Zebra stripes appear on areas of the image that are over or underexposed, helping guide how you expose your shot. Lighting may need to be adjusted to get the correct exposure.
- Image Clipping: Image clipping is similar to zebra stripes, but clipping highlights areas of the image that are so over or underexposed that no data can be fixed later in post.
- Focus Peaking: Focus peaking highlights the areas of the shot that are in focus, guiding your ability to keep the image sharp in the places you want it to be.
- False Colors: If zebra stripes aren't good enough for you, false colors give you a complete profile of your image exposure levels. Filmic Pro, for example, highlights properly exposed areas as green, while denoting over and underexposed areas as blue and red, respectively.
- Histograms: A histogram is an on-screen chart that shows an image's light levels. The left-most side of the chart is underexposure, and the right-most side of the chart is overexposure, with the rest of the spectrum falling throughout the chart.
Temperature, Color & Tone Settings
- Gamma Curves: Gamma curves offer you video footage primed for color editing. Log and flat profiles look washed out at first glance, but they take in much more information from the camera sensor, giving you much more flexibility when color correcting yourself in post.
- Manual White Balance: White balance ensures that colors appear accurately between vastly different lighting conditions. If you want some serious control, a good pro app will allow you to control the white balance settings by hand.
- Color Temperature: If you don't plan on performing extensive color grading and color correction in post, you can change the color temperature right when you're shooting, if the app will let you. This will allow you to change the look to anywhere between a warm orange to a cool blue.
- Tint Control: This goes hand in hand with color temperature, but instead of letting you adjust from the orange to blue scale, it enables you to control the magenta to green colors.
- UI Color Customization: Some apps allow you customize the user interface, such as tilt indicator lines and menu lines. This can be useful for personalization as well as making lines and text more legible on-screen.
Audio
- Audiometer: An audiometer is a visual tracker for the audio levels in your video. Too quiet, and you won't be able to hear the recording. Too loud, and you risk distorting the audio beyond repair. To avoid this, you should pay attention to audio clipping.
- Audio Clipping Indicator: This indicator — usually denoted in red — will let you know if your audio clips, i.e., becomes distorted. When it does, you will not be able to repair the distorted audio, so it's good to watch this indicator and make an effort to keep your sound below this threshold.
- Audio Format Options: The stock Camera app records audio in either mono or stereo mode with 32 bits AAC tracks. Some of the apps here use Apple's defaults, but others let you also choose from formats such as PCM and AIFF, which are uncompressed.
- Sample Rates (kHz): A sample rate controls the quality of your video's audio. Standard sample rates for video files are 16, 44.1 and 48 kHz. However, some editing programs will require a specific sample rate, so it always helps to have multiple options. The stock iOS app only lets you use 44.1 kHz stereo or mono.
- Choose Internal Microphone: Depending on your iPhone model, it may have more than a couple of built-in microphones. Newer models come with three, and being able to pick and choose which mic you record audio from makes all the difference depending on where you're subject is at.
Video Formatting
- HEVC Support: HEVC, or H.265, is a highly efficient video codec that will save you significant storage space when shooting. Apple's default Camera app supports it, as do most of the apps in our chart.
- H.264: On the flip side, H.264 is still the standard codec for smartphone videos. You might find HEVC unsupported by specific editing and playback software, so an app that can also shoot in H.264 is welcome.
- Bit Rate: Some apps allow you to adjust the bitrate, which is the number of bits, where 1 bit is equal to 8 bytes, is being transmitted per second. The higher the bitrate, the more data that gets recorded. We know that 4K is higher quality than 1080p, but a higher bitrate 4K video will be better quality than a lower bitrate 4K video. Bitrate is measured in Mbps (megabits per second), the equivalent of 1,000,000 bps (bits per second).
System
- Optimized for iPhone X & Newer: Newer iPhone models with Face ID and the TrueDepth camera on the front means there's a notch that apps have to account for. Plus, newer models have different aspect ratios, so older apps that are not optimized may show black bars on the top and bottom. While none of the apps here have the black bar problem, there are some UI issues that one app has.
- 3D Touch Quick Actions: If you have an iPhone that supports 3D Touch (sorry, this is not for Haptic Touch users), when you force-press on an app's home screen icon, a quick actions menu will pop up. Every app has this by default, but the only option available for every app is "Share." It's up to developers to add more quick actions, such as opening the camera right to a selected preset from the home screen.
- Siri Shortcuts:Siri Shortcuts lets developers hook into Siri to allow you to perform specific actions in the app just by talking. For instance, you can set up a Siri Shortcut with a custom phrase so you can just say something like "Open my camera's settings" to do just that.
- Apple Watch App: If you have an Apple Watch, you might be able to use it as a remote control for the video recording app. Features are usually pretty basic if supported, but it's better than nothing, for sure.
- Geotagging: While you may not care about location data after editing a film or video to be played back on YouTube or a television screen, since the editing process usually wipes all that data away, geotagging location data into shots can help you stay organized with your footage later. Almost all of the apps here will ask you to give them location permissions.
- Control Screen Brightness In-App: Some apps allow you to control the display's brightness in-app, rather than force you to access the Control Center. Changing the screen brightness from the Control Center is pretty hard to do when you're using a video recording app. Doing it from within the app directly will be less frustrating and make it less likely that you might move the camera inadvertently for a shot that was already set up.
- Auto-Save to Camera Roll: All of these apps store your video footage inside its app container on your iPhone, only accessible or exported from the video recording app. However, some apps let you choose to save to your "Camera Roll" album in your Photos app instead.
1. Filmic Pro-Manual Video Camera
Without a doubt, the most notable video recording app for iOS is Filmic Pro, and even professional filmmakers use it. Sean Baker's Tangerine (2015) and Steven Soderbergh's Unsane (2018) and High Flying Bird (2019) were all filmed on iPhone using Filmic Pro, among other films. We live in a crazy time where the iPhone in your pocket can shoot Hollywood-grade content — you just need the right app.
Right off the bat, the first thing to note about Filmic Pro is that it isn't cheap since it's a Hollywood-approved app. Compared to traditional software, Filmic Pro isn't that bad, but at $14.99, it's not only the most expensive app on this list but one of the most expensive apps you've probably thought to buy. Unfortunately, there's no free version nor trial, so you're going to need to fork up the big bucks to gain access to Filmic Pro's professional arsenal.
- App Store Link: FiLMiC Pro-Manual Video Camera ($14.99)
If you have a little extra to spend, Filmic Pro also has a $13.99 in-app purchase called the "Cinematographer Kit," which comes with features like log and gamma curves, but more on that later. Filmic Pro offers no watermark and, thankfully, is frequently updated with new features and bug fixes to keep your shooting up to date.
Filmic Pro also comes with a good selection of editing tools. You can trim clips; downsample clips; adjust for exposure, contrast, white balance, saturation, and tint; bring up the activity view (aka Share sheet); and save to the Filmic Pro folder in your Photos app.
Now, let's dive into the real meat and potatoes. Filmic Pro comes chock-full of features, including manual controls for shutter speed, ISO, and exposure. Plus, there's even a setting that lets you choose between Auto, 50 Hz, or 60 Hz lighting.
You're also able to set an automated focus, zoom, ISO, and shutter speed using its "pull-to-point" sliders, the only app on this list to allow you to do so. For those pull-to-point controls, focus and zoom are connected as are shutter speed and ISO. What that means is that you can only select one from each group if you want to use two automated settings at the same time. For example, you could automate focus and shutter speed, as well as zoom and ISO, but not focus and zoom.
Filmic Pro gives aspect ratio guides to help you frame your shots, eight in total — 16:9, 17:9, 3:2, 1:1, 2.2:1, 2.76:1, 4:3, and 2.39:1. You can choose to use the guides and output to 16:9 so you can crop later in post, or you can crop to your selected aspect ratio right away.
There's also a video-only mode, where you can shoot without any audio tracks, and start and stop recording with the side volume buttons. Any of the features mentioned above, as well as the ones below, can be saved as a preset for quick access at a later time. Otherwise, the next time you open the app, all the settings will be returned to default.
Two missing features here are a video timer and a way to prevent accidental starts and stops. However, Filmic Pro has an anamorphic mode, perfect if you have an anamorphic lens or adapter. Subsequently, the app can de-squeeze that video content in real time. You can also flip your video if using external DSRL lenses. There's no tilt indicator, but you can utilize the rule-of-thirds overlay guide to line up your shot just right, and EIS can be enabled or disabled depending on the situation.
There's no support for taking photos while recording video, but you can shoot time-lapses directly in-app. Filmic Pro lets you control the frame rate here, so you can choose to have a time-lapse image taken every 1, 2, 3, 5, 10, 30, 45, or 60 seconds. You also have free rein over choosing which built-in lens to use. Filmic Pro supports several third-party integrated accessories, such as DJI OSMO Mobile, Zhlyum Smooth 4, Movi Cinema Robot, Moondog Anamorphic lens, and 35 mm adapter. Filmic Pro even makes a full-featured remote control app.
- App Store Link: FiLMiC Remote ($9.99)
Filmic Pro does have options for hiding overlayed elements on the display while you're recording. You can block what's in front of your camera from appearing on the viewfinder, which is handy if you connect to external monitors that you view instead. Beyond that, you can enable a feature called "Tap To Hide Interface" which does exactly what it sounds like — with it enabled, you can tap on the screen to hide and unhide elements. There is also an option to hide the focus and exposure reticles when you tap to hide the rest of the interface. And you can choose to hide the zoom rocker, as well.
For those who want to see all the video data possible while filming, Filmic Pro is the way to go. The app is the only one to offer zebra stripes, image clipping, and false colors, and is one of two apps in this list to offer focus peaking and histograms. Filmic Pro even takes the histogram cake by offering three modes: luminosity, which measures light levels in the shot; composite/RGB, which measures color in the frame; and waveform, which shows detailed information about the exposure of your shot.
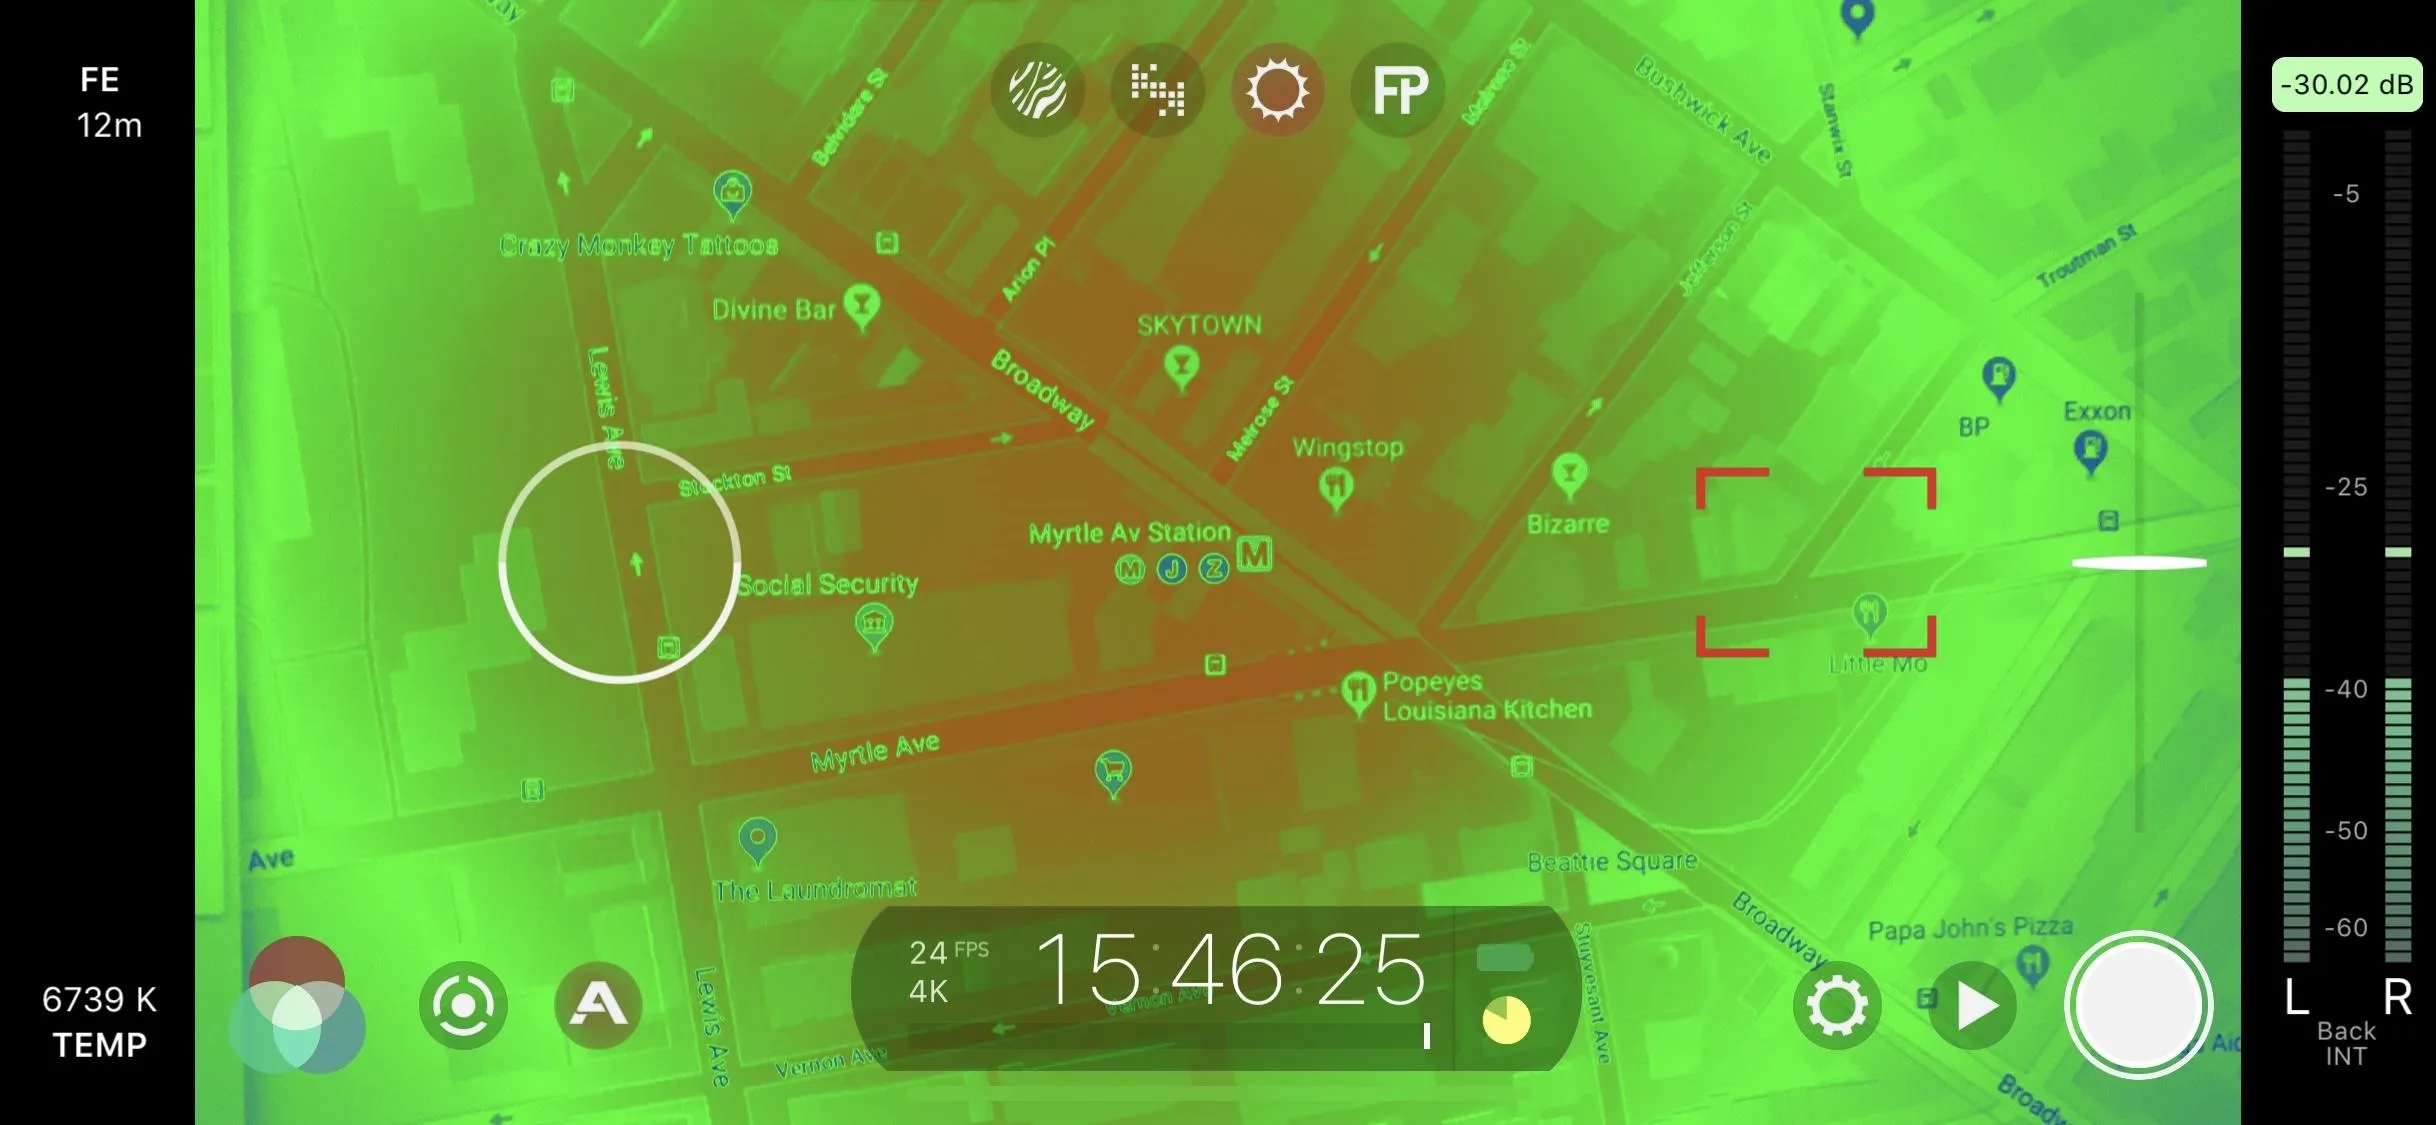
False Colors in action.
If you ended up spending money on the Cinematographer Kit, you get access to gamma curves, which allow you to shoot in different color profiles, a helpful feature when manually color editing your footage later. Filmic Pro includes natural, dynamic, flat, and log profiles, the latter two of which are used often in professional settings with traditional camera setups. If you're looking to color your footage, look into flat and log before shooting.
Of course, Filmic Pro hands you over control of the white balance, temperature color, and tint, in either full manual mode, with auto white balance, using one of four presets, or selecting between two custom presets, and you can lock the white balance in place.
While you can't control Filmic Pro's UI color, you do have access to the best audio controls in the biz. You get an audiometer and audio clipping indicator, as well as the option to shoot with PCM, AIFF, or AAC, with sample rates of 16.0, 44.1, or 48 kHz. You can also choose between the back, front, and bottom mics. Whatever you need from your project, Filmic Pro has your sound covered.
Filmic Pro supports both the new HEVC codec and the traditional H.264, with the former a toggle option in the "Resolution" settings. The app also lets you control the bit rate, with two options, "FiLMiC Quality" and "FiLMiC Extreme," giving you a higher bit rate than Apple's standard.
Whether you have a traditional iPhone display or an iPhone X model, Filmic Pro is optimized for your device. The app features 3D Touch Quick Actions on the home screen for any presets you have enabled, but there is no Siri Shortcut integration (at least, not yet). There's an Apple Watch app, which doubles as a remote control, and Filmic Pro can geotag your footage if you'd like. You can't control screen brightness in-app, but you can save your footage automatically to your "Camera Roll" for easy access.
When it comes to resolution and frame rate, Filmic Pro has presets ranging from 24 fps to 240 fps, depending on whether you're shooting in 540p, 720p, 1080p, 2K, 3K, or 4K resolution. You can see which applies to which in the chart. However, it also has a variable frame rate tool that lets you choose anything from 3 fps to 240 fps, depending on the resolution. Filmic Pro is also the only app on this list that lets you choose a playback frame rate.
When it comes down to it, no app out there can beat Filmic Pro when it comes down to features. Filmic Pro has nearly everything you need to push your iPhone to its cinematic limits. However, it is expensive, especially if you get the Cinematographer Kit, when compared to some of the other options on this list. If you're looking to save some money on your video recording app of choice, you might want to consider one of the apps below.
2. ProCam 6
Compared to FilmicPro's price tag, ProCam 6 really isn't that bad. For $7.99, you get a capable video recording app. However, you'll find it falls behind other names on this list in a handful of categories.
- App Store Link: ProCam 6 ($7.99)
There's no free version of ProCam 6, nor is there a free trial. The app does offer in-app purchases; If you want to shoot in 4K Max resolution, which takes high-res photos and stitches them together in superior 4K resolution, you'll need to pay $4.99, as well as an additional $2.99 for 4K Max time lapses. There are also filters packs available from $0.99 to $1.99, which you can apply during editing.
Luckily, ProCam 6 skips the watermark, but that's a given with no free version. Better yet, the app is frequently updated, so you don't need to worry about new software or iPhone bugs getting in the way.
ProCam 6 also includes a vast selection of editing tools. You can crop, rotate, flip, trim, straighten and correct perspective for videos, as well as adjust brightness, contrast, saturation, exposure, white balance, highlights, shadows, tint, color balance, sharpness, fade, grain, and scratches. There are also free and paid color filters you can apply, as well as vignette, fisheye, tilt-shift, macro, split, kaleidoscope, ripple, striped, hatched, and halftone effects. You can add music, adjust the volume of both the recorded and added audio track, and control the playback speed for audio and video.
When you dive into ProCam 6's camera features, the list is a bit hit or miss. You can control your shutter speed, ISO, and exposure; use one of nine aspect ratio guides (1:1, 4:3, 1.85:1, 1.91:1, 2:1, 2.20:1, 2.35:1, 2.40:1, and 2.45:1); use the side volume buttons to start and stop a recording; use a video timer for up to 60 seconds; and apply tilt indicators and overlay guides (rule of thirds, grid, and the golden spiral phi layout, the last of which has four orientations).
You can also control EIS; take photos in video mode; choose which lenses to use; and shoot time-lapses (with one image every second or every 5 minutes, with 298 more options in between at one-second intervals). Not too shabby, right? It also adjusts the frequency depending on whether you're shooting under 50 or 60 Hz lighting.
However, many features are missing here. You can't create presets; set automated focus, zoom, ISO, or shutter speed; crop to your aspect ratio; shoot in video-only mode; prevent accidental starts and stops; shoot in anamorphic mode (which means no de-squeeze either); flip or rotate the screen; or switch lenses automatically. There are no integrated accessories, nor is there a remote app unless you have an Apple Watch.
Unlike all other apps on this list, ProCam 6 does not let you hide any on-screen elements when filming, so the interface could block some areas of the scene.
Live analytics is also a loss for ProCam 6. There are no options to view zebra stripes, image clipping, focus peaking, false colors, or histograms of any kind. If you're looking for this type of professional information, you'll need to look elsewhere.
ProCam 6 shoots with a standard gamma curve with no option to shoot in others. There are limited white balance controls, where you can only choose auto or select a spot from 2,000 K to 10,000 K and lock your setting, and you can't adjust the temperature color or tint of your video independently. You can, however, customize the UI color, if that's your interest.
ProCam 6 comes with a standard audiometer and audio clipping indicator, but no control over audio format options, sample rates, or internal mics. If you need to shoot in HEVC, you're in luck because the app only shoots in this format. Those of you looking to shoot in H.264 or change the bit rate will need to find another app, though, if you try out the 4K Max in-app purchase, it will up the bit rate to 150 Mbps from 50 Mbps.
ProCam 6 really excels with system functions. The app is optimized for all iPhones, to ensure proper on-screen formatting, and you have access to a "Video" option in 3D Touch, home screen Quick Actions to instantly open in video mode. There are Siri Shortcuts here, an Apple Watch app, and optional geotagging settings. You can control the brightness of the display only while in time-lapse mode, and you can auto-save footage to the "Camera Roll" album.
For resolution, you can shoot in either 480p, 720p, 1080p, or 4K resolution, and the frame rate for each ranges from 24 fps to 240 fps, but not all resolutions support each frame rate. You can see which applies to which in the chart. ProCam 6 does not let you select a frame rate beyond the preset options, nor a playback frame rate.
3. ProCamera.
ProCamera is a similar alternative to ProCam 6. Both apps cost $7.99, with no free version or trial, which in turn means no watermark. Both apps are frequently updated and offer in-app purchases. ProCamera suggests you buy "Private Lightbox," a $0.99 security option that saves your footage in a Touch ID or Face ID-protected folder.
- App Store Link: ProCamera. ($7.99)
The apps continue their similarities in their lack of camera features. With ProCamera, you cannot create presents; set an automated focus, zoom, ISO, or shutter speed; shoot in video-only mode; use anamorphic mode (or de-squeeze anamorphic video); flip or rotate the viewfinder; use integrated accessories; or use a remote control app.
Unlike ProCam 6, in ProCamera, you also cannot use a video timer; control ISO or shutter speed independently; shoot time-lapse videos, or perform any video editing. As for aspect ratio guides, you only get the standard 16:9 ratio, which means there is no cropping to other ratios.
ProCamera, however, lets you control exposure, start and stop recording with the volume buttons, take photos in video mode, control EIS, and pick which lens to use. There's also a tilt indicator you can use, as well as three different overlay guides for the standard grid, rule of thirds, and golden ratio.
When you start recording, ProCamera will automatically hide on-screen elements for distraction-free filming. However, that may be a negative if you want to actually see some data when filming, and there's no way to turn the auto-hide setting off. And there is no setting to prevent accidental starts and stops, which helps avoid accidentally cutting a take short or recording unintended footage.
The app also offers focus peaking, giving you greater control over manual focus. But like ProCam 6, sadly, ProCamera skimps on zebra stripes, image clipping, false colors, and all histograms. But it does adjust the frequency depending on whether you're shooting under 50 or 60 Hz lighting.
ProCamera does beat out ProCam 6 when it comes to temperature, color, and tone settings, as it allows you to control white balance, temperature color, and tint. For white balance, there's the standard auto setting, or you can choose from 2,500 K to 8,500 K and lock it in place, and there's also an option to long-press on a gray card you have in front of the camera to calibrate it. There's no UI color customization, however, nor are there gamma curves other than the standard.
There's an audiometer with audio clipping indicator, but no options for audio formatting, sample rates, or internal mics, nor can you adjust the bit rate of your video. However, you can shoot in either HEVC or H.264, which is always good to see in a professional app.
You'll find the same system functions in ProCamera that you do in ProCam 6. The app is optimized for iPhone X and newer models, with a "Video" option in 3D Touch Quick Actions on the home screen, as well as Siri Shortcuts. There's also an Apple Watch app and optional geotagging, and the ability to save your footage directly to the "Camera Roll" album. What's missing is the ability to control the screen brightness in-app, but to many, that won't be a huge sacrifice.
For resolution, you can shoot in either 480p, 720p, 1080p, or 4K resolution, and the frame rate for each ranges from 24 fps to 240 fps, but not all resolutions support each frame rate. You can see which applies to which in the chart. ProCamera does not let you select a frame rate beyond the preset options, nor a playback frame rate.
4. Moment - Pro Camera
Moment is at its best when using its own professional-level iPhone lenses. Moment produces smartphone cases built to work with its lenses, which in conjunction work seamlessly with the app. More on that later. But that's not all that makes Moment a great video recorder.
Let's talk pricing: Moment used to have a free version, as well as a seven-day trial for the pro version, but as of version 3.9, it's strictly a paid app at $5.99. However, anyone who has the free version installed and updates to 3.9 will automatically get the pro version for free. That's a pretty sweet deal if you have an older version installed already.
- App Store Link: Moment - Pro Camera ($5.99)
If you're coming from the Filmic Pro section above, you might be a bit disappointed with Moment's selection of features, but that's not to say that the app isn't feature-filled.
Moment comes with shutter speed, ISO, and exposure control; a choice between 50 and 60 Hz lighting; an anamorphic mode with the option to de-squeeze to a saved file; an overlay guide for the rule of thirds, square videos, or the golden ratio; EIS control; lens choice; zebra strips, image clipping, and focus peaking; volume button support to start and stop recording; and integrated accessories (Moment's lenses). As for aspect ratio guides, you only get the default 16:9 look, but with the overlay button, you can also get a 1:1 square overlay to guide you.
However, there's a long list of Filmic Pro features not present. There are no custom presets; editing tools; automated focus, zoom, ISO, or shutter speed abilities; options to crop to the aspect ratio; video-only mode; flip or rotate option; tilt indicator; taking photos in video mode; or time-lapse recording. There's also no companion remote control app, and you won't find a video timer, nor will you find a way to prevent accidental start and stops.
While there are no settings for hiding or unhiding elements on the screen during recording, Moment will automatically hide unneeded interface parts when you tap the record button, so you can see your scene in full view.
The missing features don't stop there. You won't find false colors visuals. Moment does include histograms, featuring composite/RGB and waveform options, but it lacks Filmic Pro's luminosity graph. You'll find default, flat, and log gamma curves, as well as manual white balance. As for temperature color, tint, or UI color control, you won't find that with Moment.
Moment gives you an audiometer and, subsequently, an audio clipping indicator. You don't, however, have any control over the audio formats, sample rates, or internal mics. What you do have control over is whether to shoot in HEVC or H.264, and you can choose your favored bit rate, either standard, medium, or high.
You'll find that Moment is perfectly optimized for iPhone X and newer devices so that no content will hide behind your notch. You don't have 3D Touch Quick Actions on the home screen, but Moment does support Siri Shortcuts, an Apple Watch app that can act as a remote control, optional geotagging, and auto-saving to the "Camera Roll" album. There's no option to control brightness in-app but, as you can see, there are plenty of pros to cancel out that con.
For resolution, you can shoot in either 720p, 1080p, or 4K resolution, and the frame rate for each ranges from 24 fps to 240 fps, but not all resolutions support each frame rate. You can see which applies to which in the chart. Moment does not let you select a frame rate beyond the preset options, nor a playback frame rate.
5. ProMovie Recorder
ProMovie Recorder's greatest asset is its price tag. First, it's the only app on this list to offer a free version. Best of all? The features between both the free and the paid version of the app are the same. So why give ProMovie any money? Well, you may be discouraged to see a giant watermark pasted on your videos. The solution? Pay the $2.99 fee to remove the watermark or buy the app right away for $2.99. Why not — even with the paid version, it's the cheapest app on this list.
- App Store Link: ProMovie Recorder (free)
- App Store Link: ProMovie Recorder + ($2.99)
However, there are some immediate drawbacks. ProMovie Recorder doesn't have a free trial, nor is it frequently updated. At the time of this article, ProMovie Recorder hasn't been updated in about 17 months. If you happen to run into any bugs, don't expect the ProMovie team to be patching it for some time, if at all.
While you can't create presets in ProMovie Recorder, you can control shutter speed, ISO, and exposure, and it adjusts the frequency depending on whether you're shooting under 50 or 60 Hz lighting.
Filmic Pro's automated focus, zoom, ISO, and shutter speed features are nowhere in ProMovie Recorder, but you do have access to 12 aspect ratio guides of 1:1, 4:3, 1.37:1, 3:2, 15:9, 16:9, 1.85:1, 2.00:1, 2.20:1, 2.35:1, 2.40:1, and 2.55:1. However, all video will record at 16:9 or 4:3, depending on how you want to shoot, so you'll need to do any cropping outside of the standard 16:9 and 4:3 options yourself in a video editor. There's also no video-only mode, video timer, or editing tools.
In happy news, you can start and stop recording via the side volume buttons via an advanced setting, as well as enable a lock to prevent accidental starts and stops when recording. Also, the app has support for an anamorphic mode, but you can't de-squeeze the video in-app. You can flip or rotate the video feed if needed, and there's both a tilt indicator and rule-of-thirds overlay guide to help you line up your frame. There's even "advanced" EIS in addition to standard EIS, claimed to give you a little extra stability over normal EIS, but we can't tell how much of an impact it has.
There are some nice options for hiding elements on the screen during recording. First, there's a view where the image fills up most of the screen with all the tools and elements overlayed on top of the scene. Second, there's another one that shrinks the scene down into the middle so that the tools and elements will not obstruct the scene view. Third, there's an option called "Full Screen Mode" which fills the scene up like in the first option, but which hides many of the on-screen elements. There's also a toggle in the settings that lets you disable the remaining camera info displayed on the screen, but if you keep this on, there's an "Auto-Hide" setting you can choose at different intervals that will hide everything on the screen except the scene during filming, even the record/stop button.
You can't take photos in video mode, nor can you produce a time-lapse, but you can choose which lens to use, and the app supports automatic lens switching. Unfortunately, there's no integrated accessories, no remote control app, nor any of the live analytics you might like to see, such as zebra stripes, image clipping, focus peaking, false colors, or histograms.
ProMovie Recorder shoots with a standard gamma curve, with no option to change it. You can control white balance by hand from between 2,500 K to 9,000 K, use the auto mode, choose between five presets, or calibrate with a gray card. You can't change the video's temperature color or tint independently, however, but you can alter the UI color customization if you'd like.
The app also comes with some decent audio features. Staple additions like the audiometer and audio clipping indicator are here, but, like Filmic Pro, you can also choose from audio format options (PCM and AAC) and your sample rate (44.1 and 48 kHz). Filmic Pro might have one more option in each category, but it's still nice to see ProMovie Recorder put in the effort here. However, you cannot pick a specific internal mic to record audio with.
ProMovie Recorder does allow you to shoot in either HEVC or H.264, whatever is more appropriate for your workflow, and it lets you select between five bit rates, either 5, 10, 15, 20, or 100 Mbps. Sadly, the app isn't optimized for Face ID devices, meaning the notch blocks options and menus. There are no 3D Touch quick actions on the home screen, Siri Shortcuts, or geotagging here, which feels like ProMovie Recorder spent more time on the "pro movie" features than iOS system functions, which I think most users would prefer anyway.
ProMovie Recorder does have an Apple Watch app, and you can control the brightness in-app, but you don't have the option to auto-save your footage to the Photos app. If you want to get your video off ProMovie Recorder, you'll need to go through its media viewer first.
For resolution, you can shoot in either 720p, 1080p, or 4K resolution, and it also gives you some non-standard 2K and 3K options at 2048 x 1152 and 3264 x 1836, respectively. The frame rate for each ranges from 24 fps to 240 fps, but not all resolutions support each frame rate. You can see which applies to which in the chart. ProMovie Recorder does not let you select a frame rate beyond the preset options, nor a playback frame rate.
In Conclusion
When it comes to professional video recording apps on your iPhone, there's no better choice than Filmic Pro. It offers the most features for controlling your recording, especially if you're someone with a professional background. Automated controls, expanded gamma curves, and so much more add up to an app that can produce a feature film.
However, Filmic Pro is expensive, and if you're someone new to the video game or someone who would rather put that money elsewhere, the other names on this list are capable as well. Moment stands out since you can pair its app with its lenses, but ProMovie Recorder, ProCam 6 and ProCamera all have their place for consumer shooting.
Which app on this list is the best? Filmic Pro. Which app is best for you? That's up to you to decide.
This article was produced during Gadget Hacks' special coverage on smartphone-based video creator tips for filming and editing. Check out the whole Videography series.
- Follow Gadget Hacks on Pinterest, Reddit, Twitter, YouTube, and Flipboard
- Sign up for Gadget Hacks' daily newsletter or weekly Android and iOS updates
- Follow WonderHowTo on Facebook, Twitter, Pinterest, and Flipboard
Cover image and screenshots by Jake Peterson/Gadget Hacks


Comments
Be the first, drop a comment!