


When you need a file on your Mac as soon as possible, you usually have to get your MacBook or hop on your iMac, Mac mini, Mac Pro, or Mac Studio. But that's too much work if you're in bed, lying on the couch, or outside in the fresh air. Why even bother when you can access that file directly on your iPhone or iPad — without moving an inch?
With the latest macOS, iOS, and iPadOS software, you can connect your iPhone or iPad to your Mac on your local network at home, work, school, or wherever it may be. You can preview, open, copy, and share your Mac's files on your iPhone or iPad, edit them, move them from device to device or onto the cloud, and more. Just make sure both devices are connected to the same Wi-Fi network before proceeding.
Enable File Sharing on Your Mac
To share files between your Mac and iPhone or iPad, you need to ensure file sharing is enabled on your Mac, and you can do so from your Mac's system settings. You can open System Settings (macOS Ventura 13 and later) or System Preferences (macOS Monterey 12 and older):
- From the Apple logo in the menu bar.
- From your Applications folder.
- By asking Siri.
- By hitting Command-Space to search for it on Spotlight.
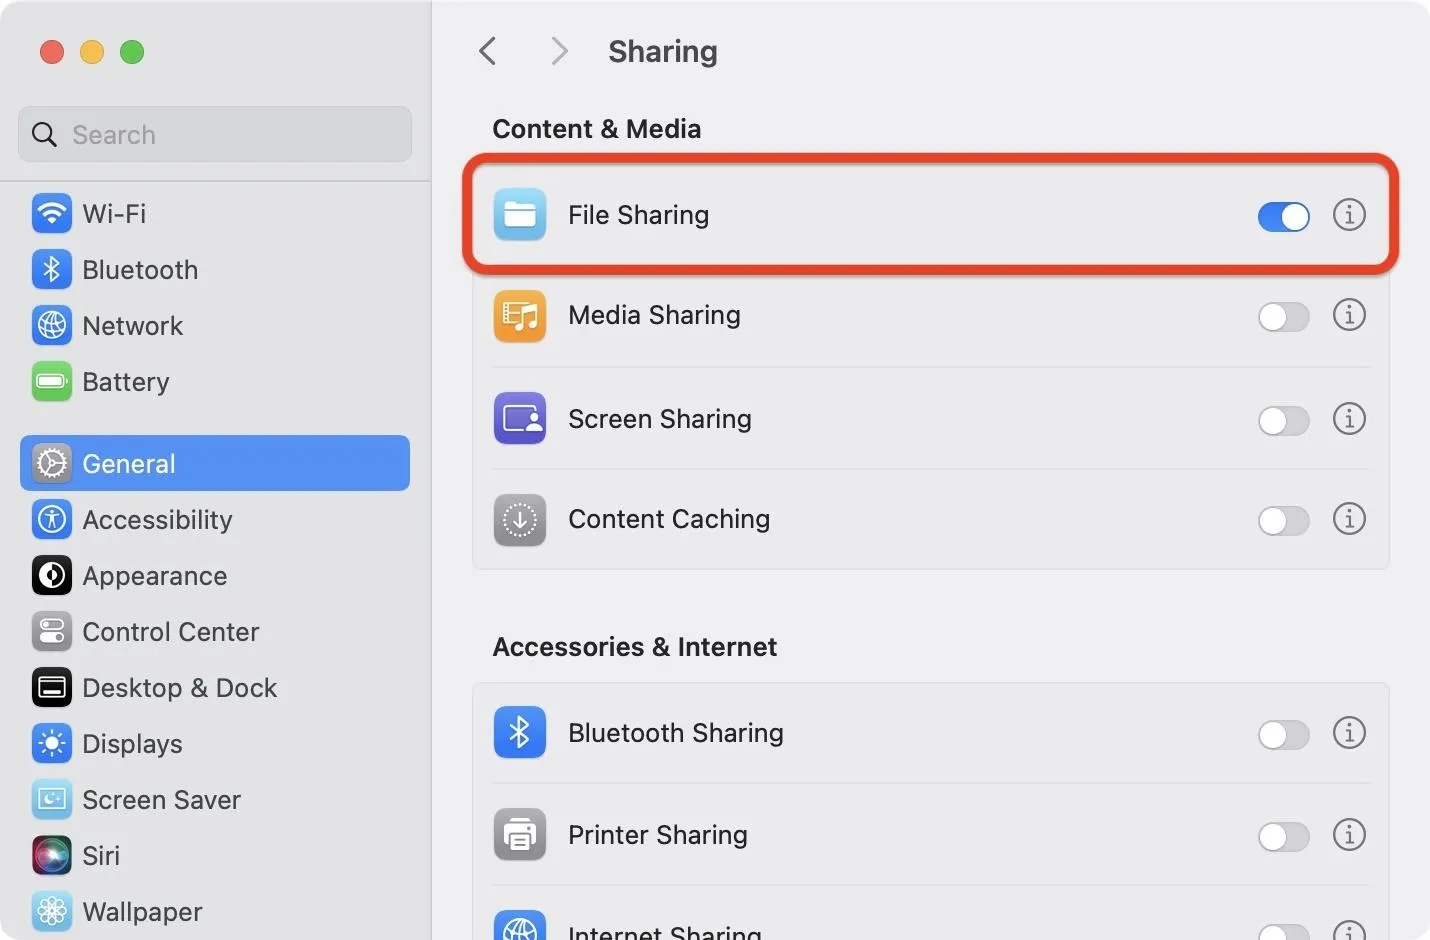
Once there, go to General » Sharing in System Settings or just Sharing in System Preferences. Then, toggle or check the File Sharing option if it's not already. If you're an admin or regular user on your Mac, you don't need to configure any options — you should be all set to log into your Mac's file server on your local network.
- Don't Miss: 18 Siri Commands Every iPhone Owner Should Know
Find Your Mac's Local Hostname
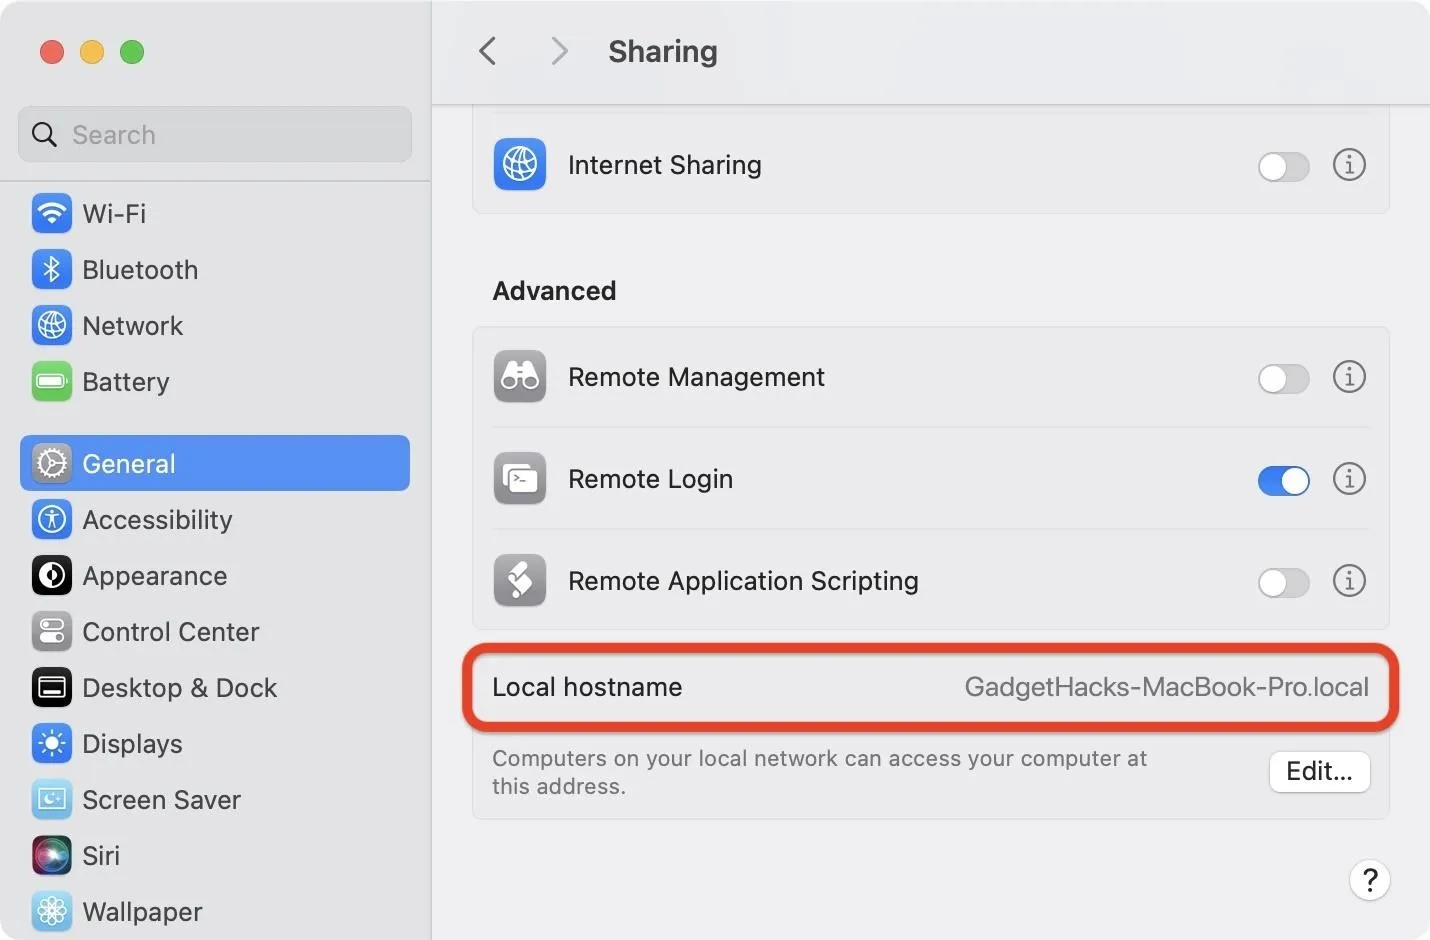
Now that File Sharing is enabled, you must find your Mac's local hostname. Your iPhone or iPad will remember it when you enter it in Step 3, so you should only have to do this once on your Mac. It should be visible from the Sharing menu you were just in (see Step 1), either at the bottom (System Settings) or top (System Preferences). It will end in .local. For example:
- GadgetHacks-MacBook-Pro.local
This can also be found with the "hostname" Terminal command.
Last login: Tue Jul 16 14:43:04 on ttys001
gadgethacks@GadgetHacks-MacBook-Pro ~ % hostname
GadgetHacks-MacBook-Pro.local
You can add smb:// in front, but it's unnecessary. SMB stands for Server Message Block protocol, the client-server network sharing protocol Apple uses.
- smb://GadgetHacks-MacBook-Pro.local
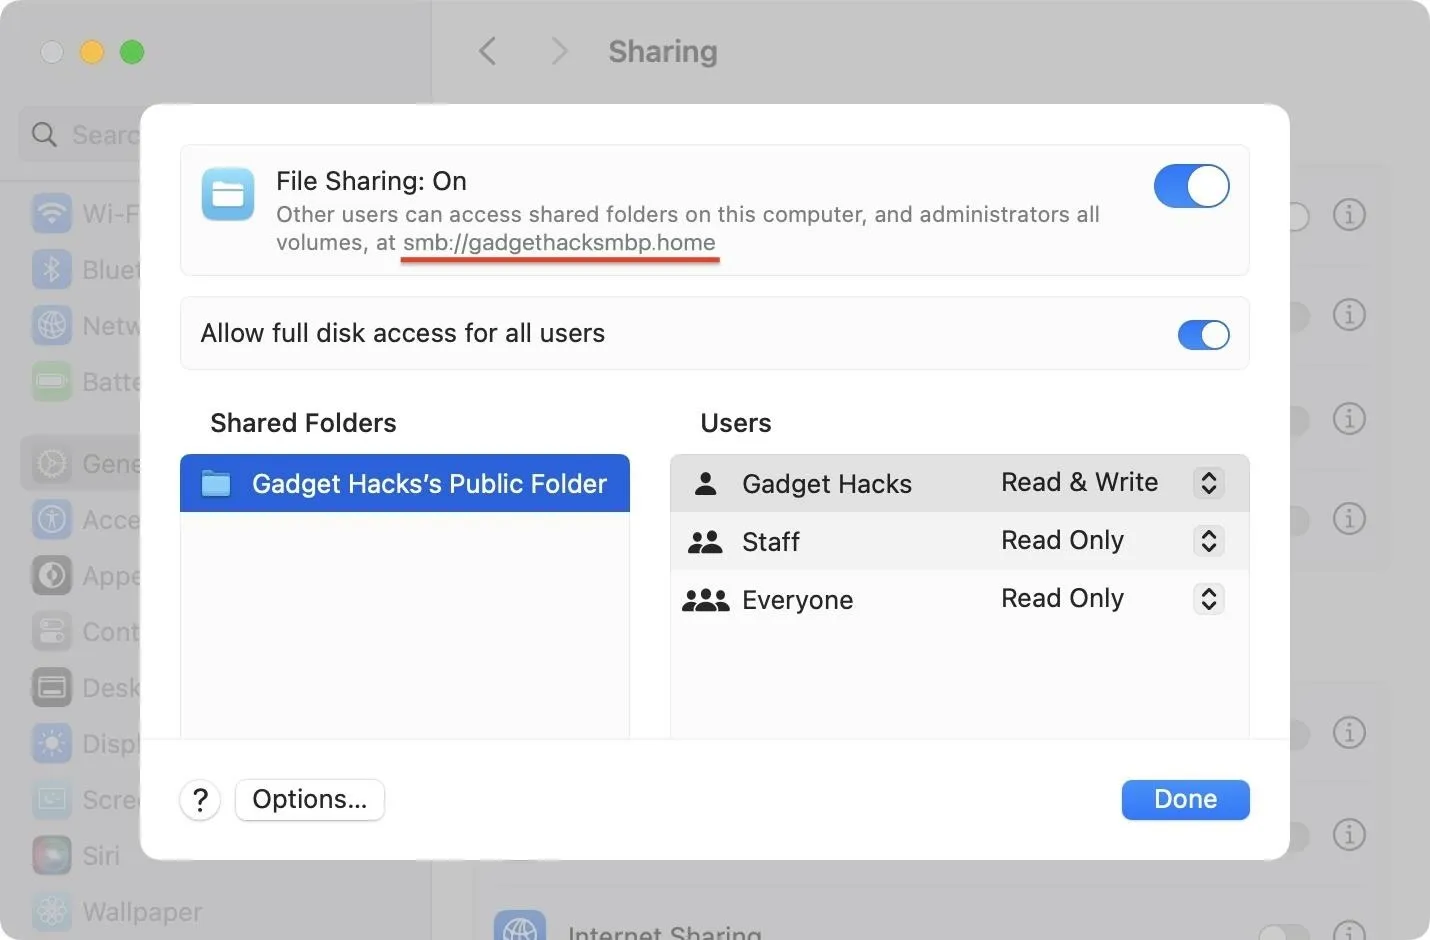
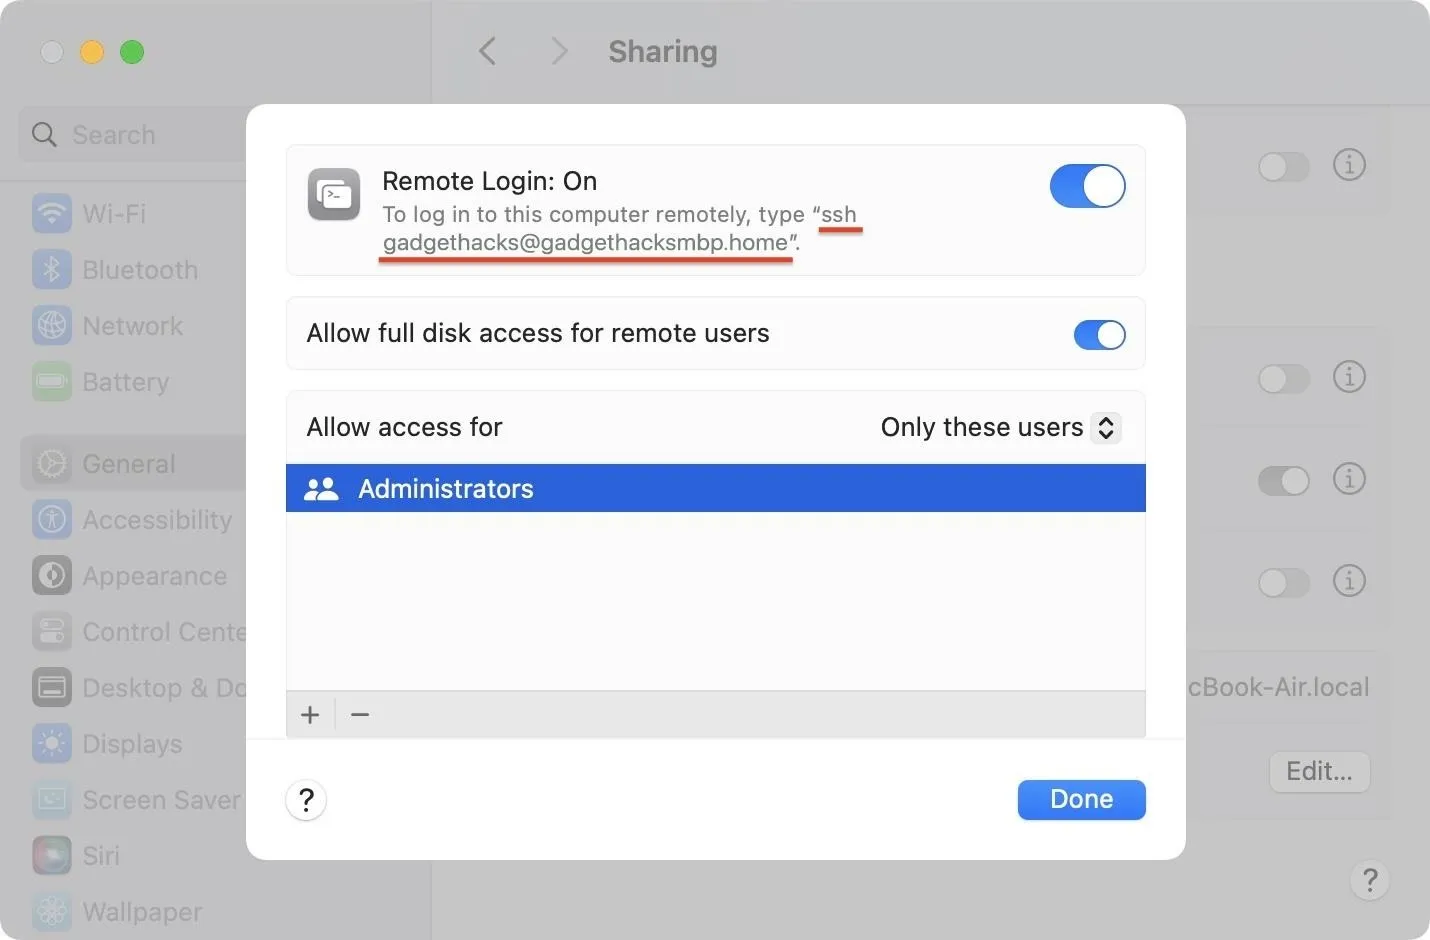
In System Settings, you can also click the info (i) button next to File Sharing to get the .lan or .home address starting with smb://. This will also let you log into your Mac's file server from your iPhone or iPad. For example:
- smb://gadgethacksmbp.lan
- smb://gadgethacksmbp.home
If you also have Remote Login enabled from the Sharing menu — which lets you log into your Mac remotely from another computer via SSH — you can open its options to see an alternative address. You won't be able to use SSH from the Files app on your iPhone or iPad to connect to your Mac when you're away from home or work, but you can still use the .lan or .home address on the local network. It's the same as above but has your username@ in front. For example:
- gadgethacks@gadgethacksmbp.lan
- gadgethacks@gadgethacksmbp.home
Any of these local area network addresses should work. If not, try a different one.
Connect to Your Mac Using the Files App
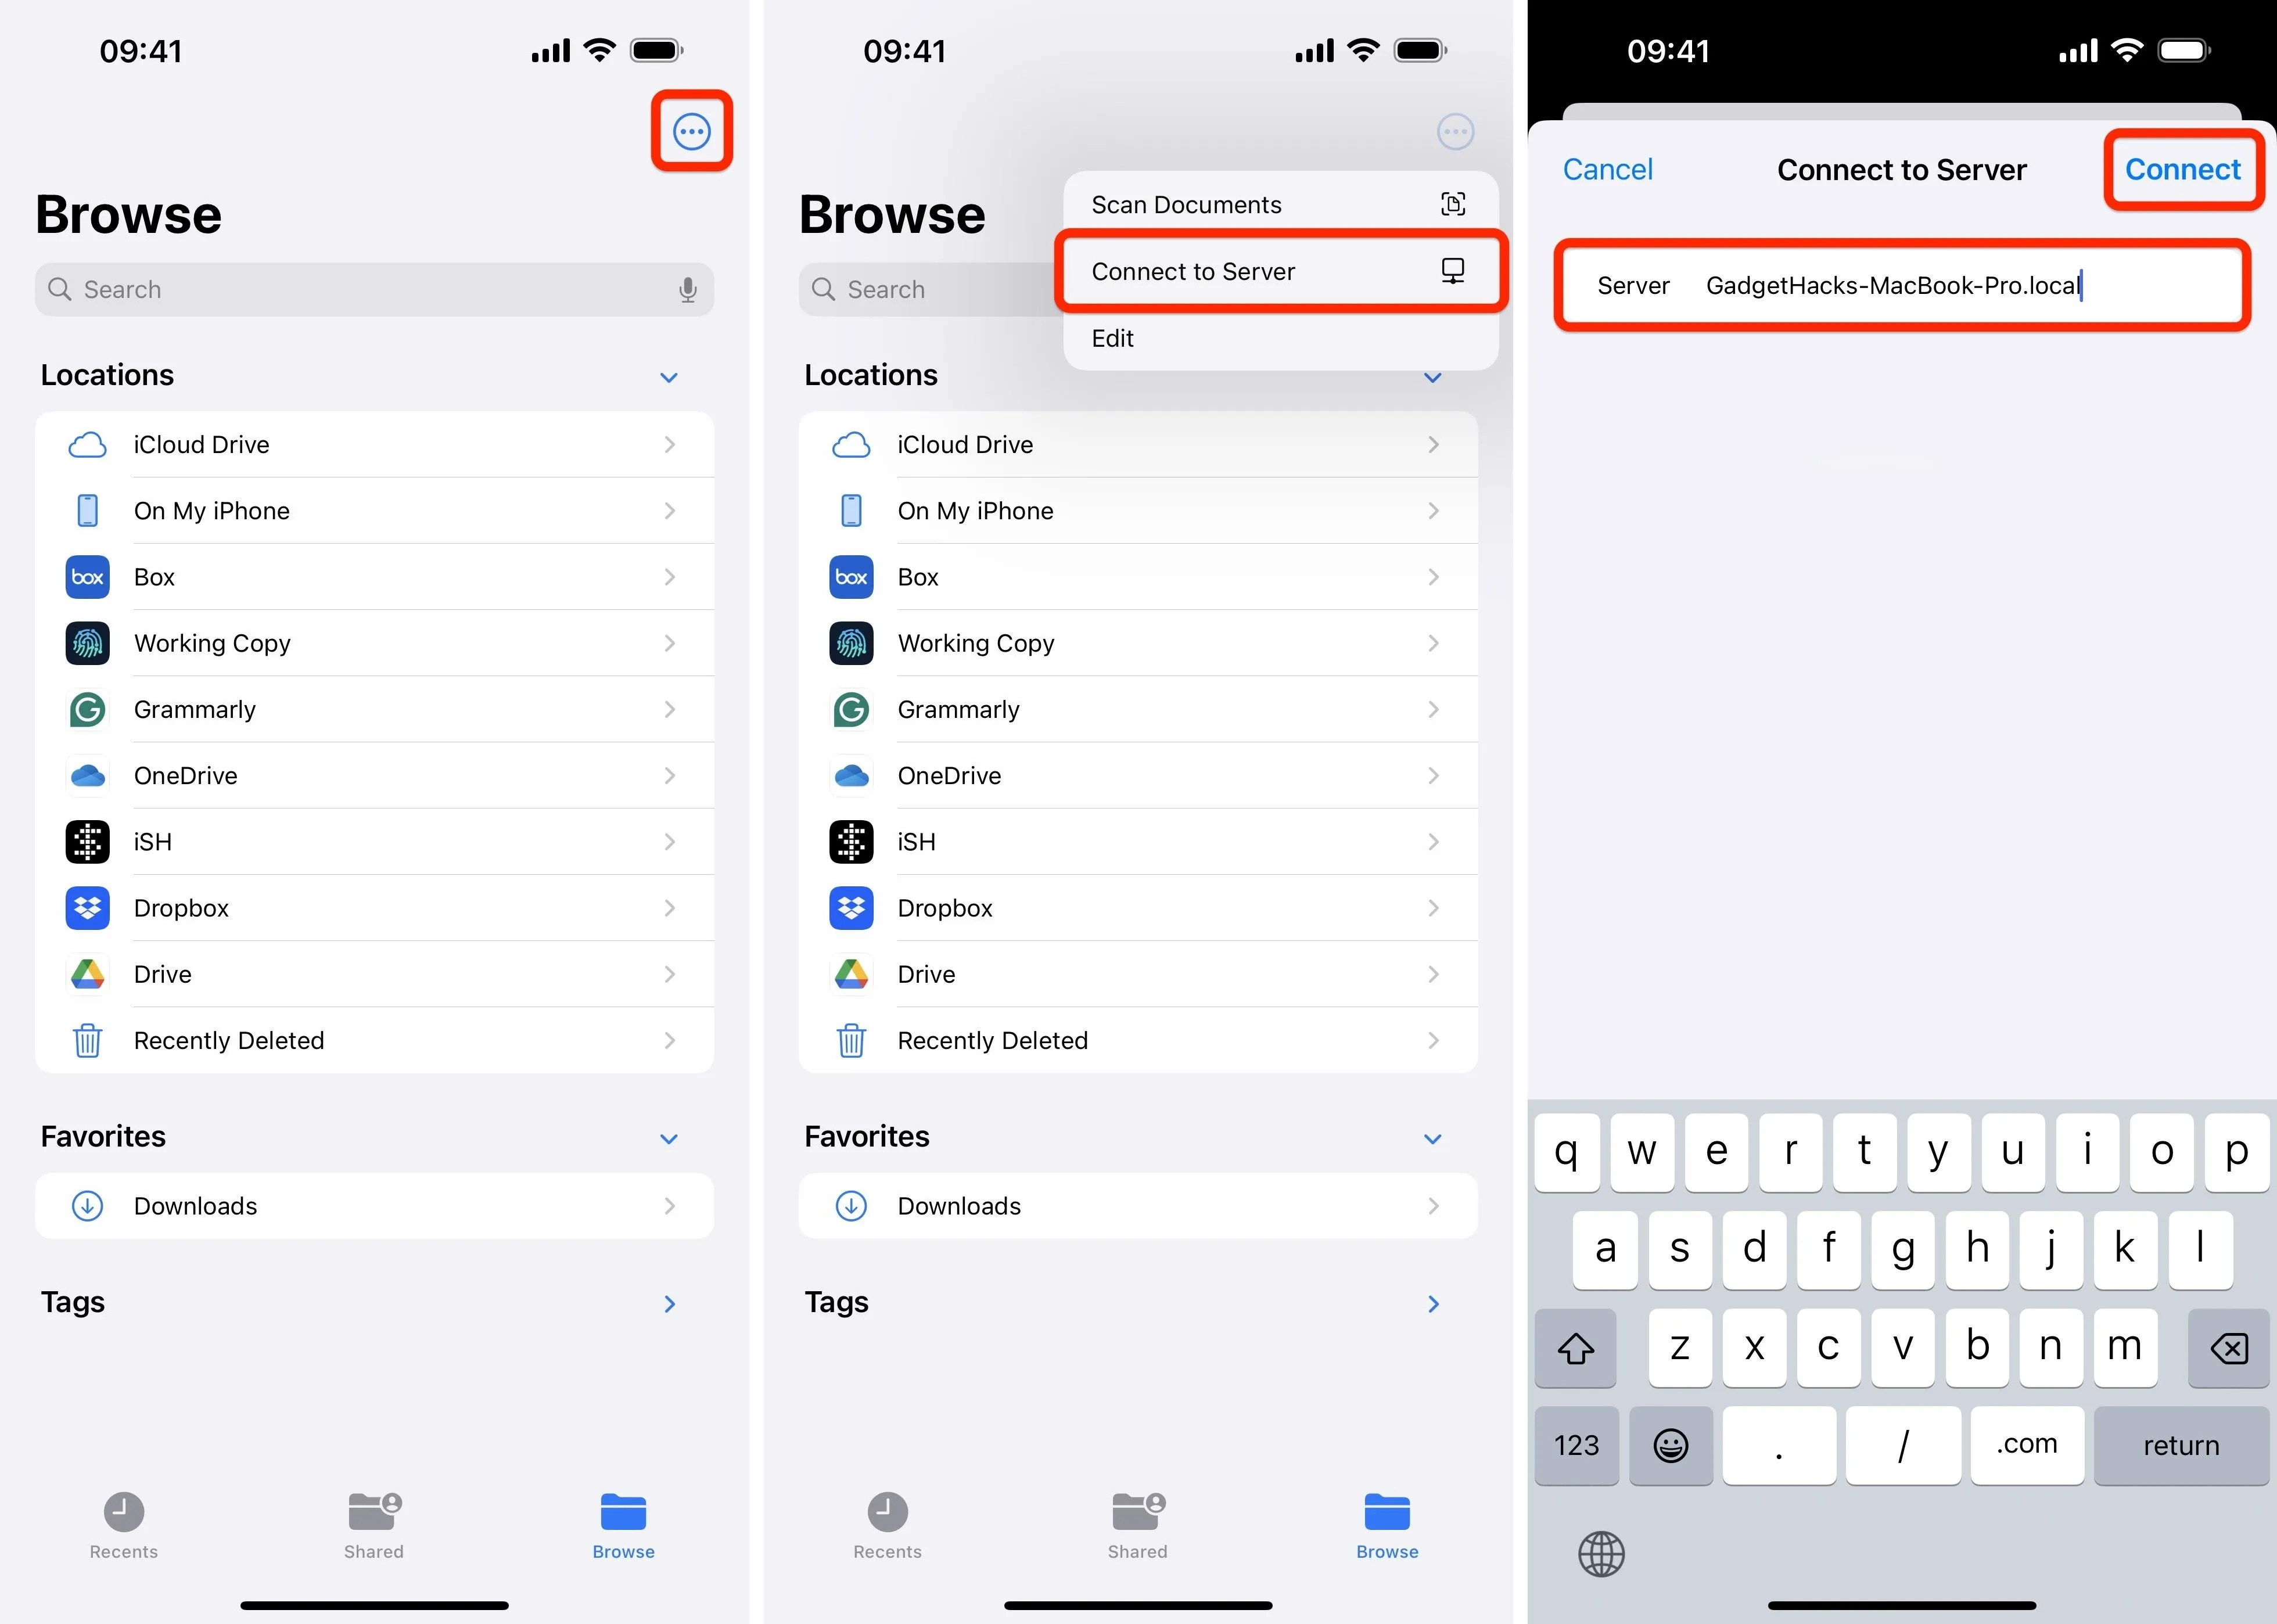
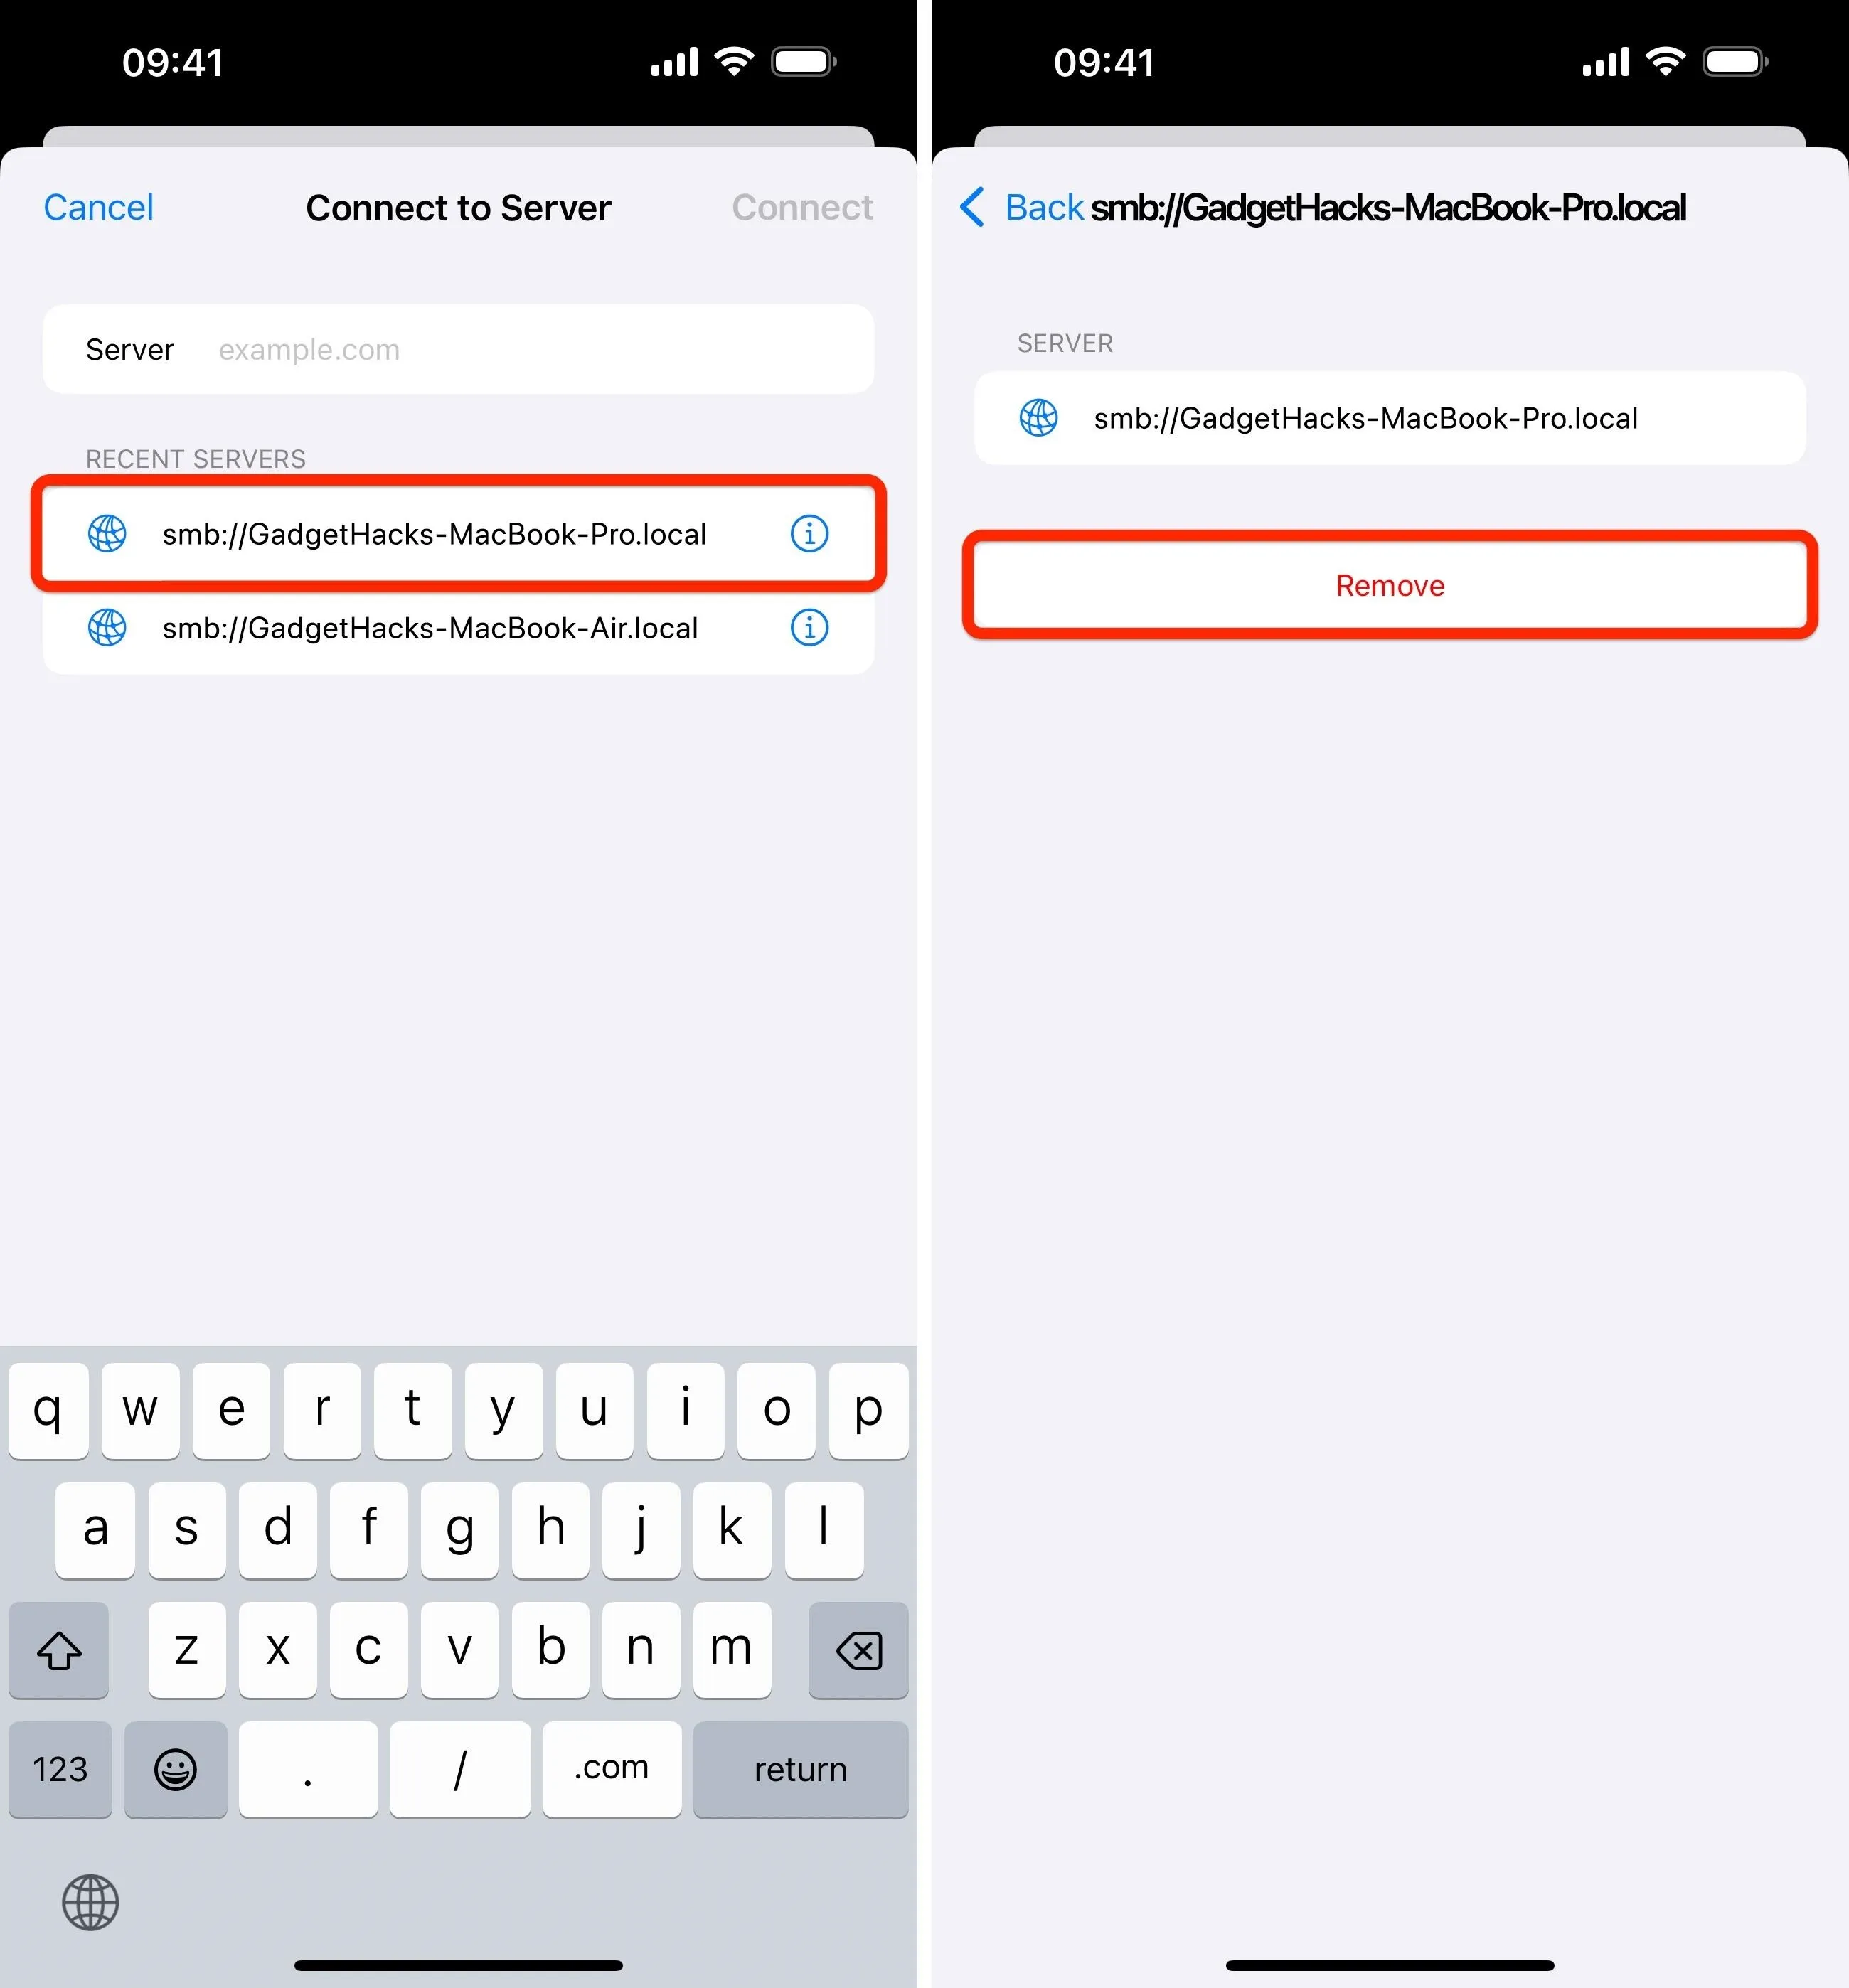
Open the Files app on your iPhone or iPad, tap the More (•••) button to view more options, then choose "Connect to Server." This feature has been around since iOS 13 and iPadOS 13, so it's not new, but many people still don't know about it. In the server field, type or paste one of the local network addresses you found in Step 2.
- GadgetHacks-MacBook-Pro.local
- smb://GadgetHacks-MacBook-Pro.local
- smb://gadgethacksmbp.lan
- smb://gadgethacksmbp.home
- gadgethacks@gadgethacksmbp.lan
- gadgethacks@gadgethacksmbp.home
Then, tap "Connect" to view the login screen.
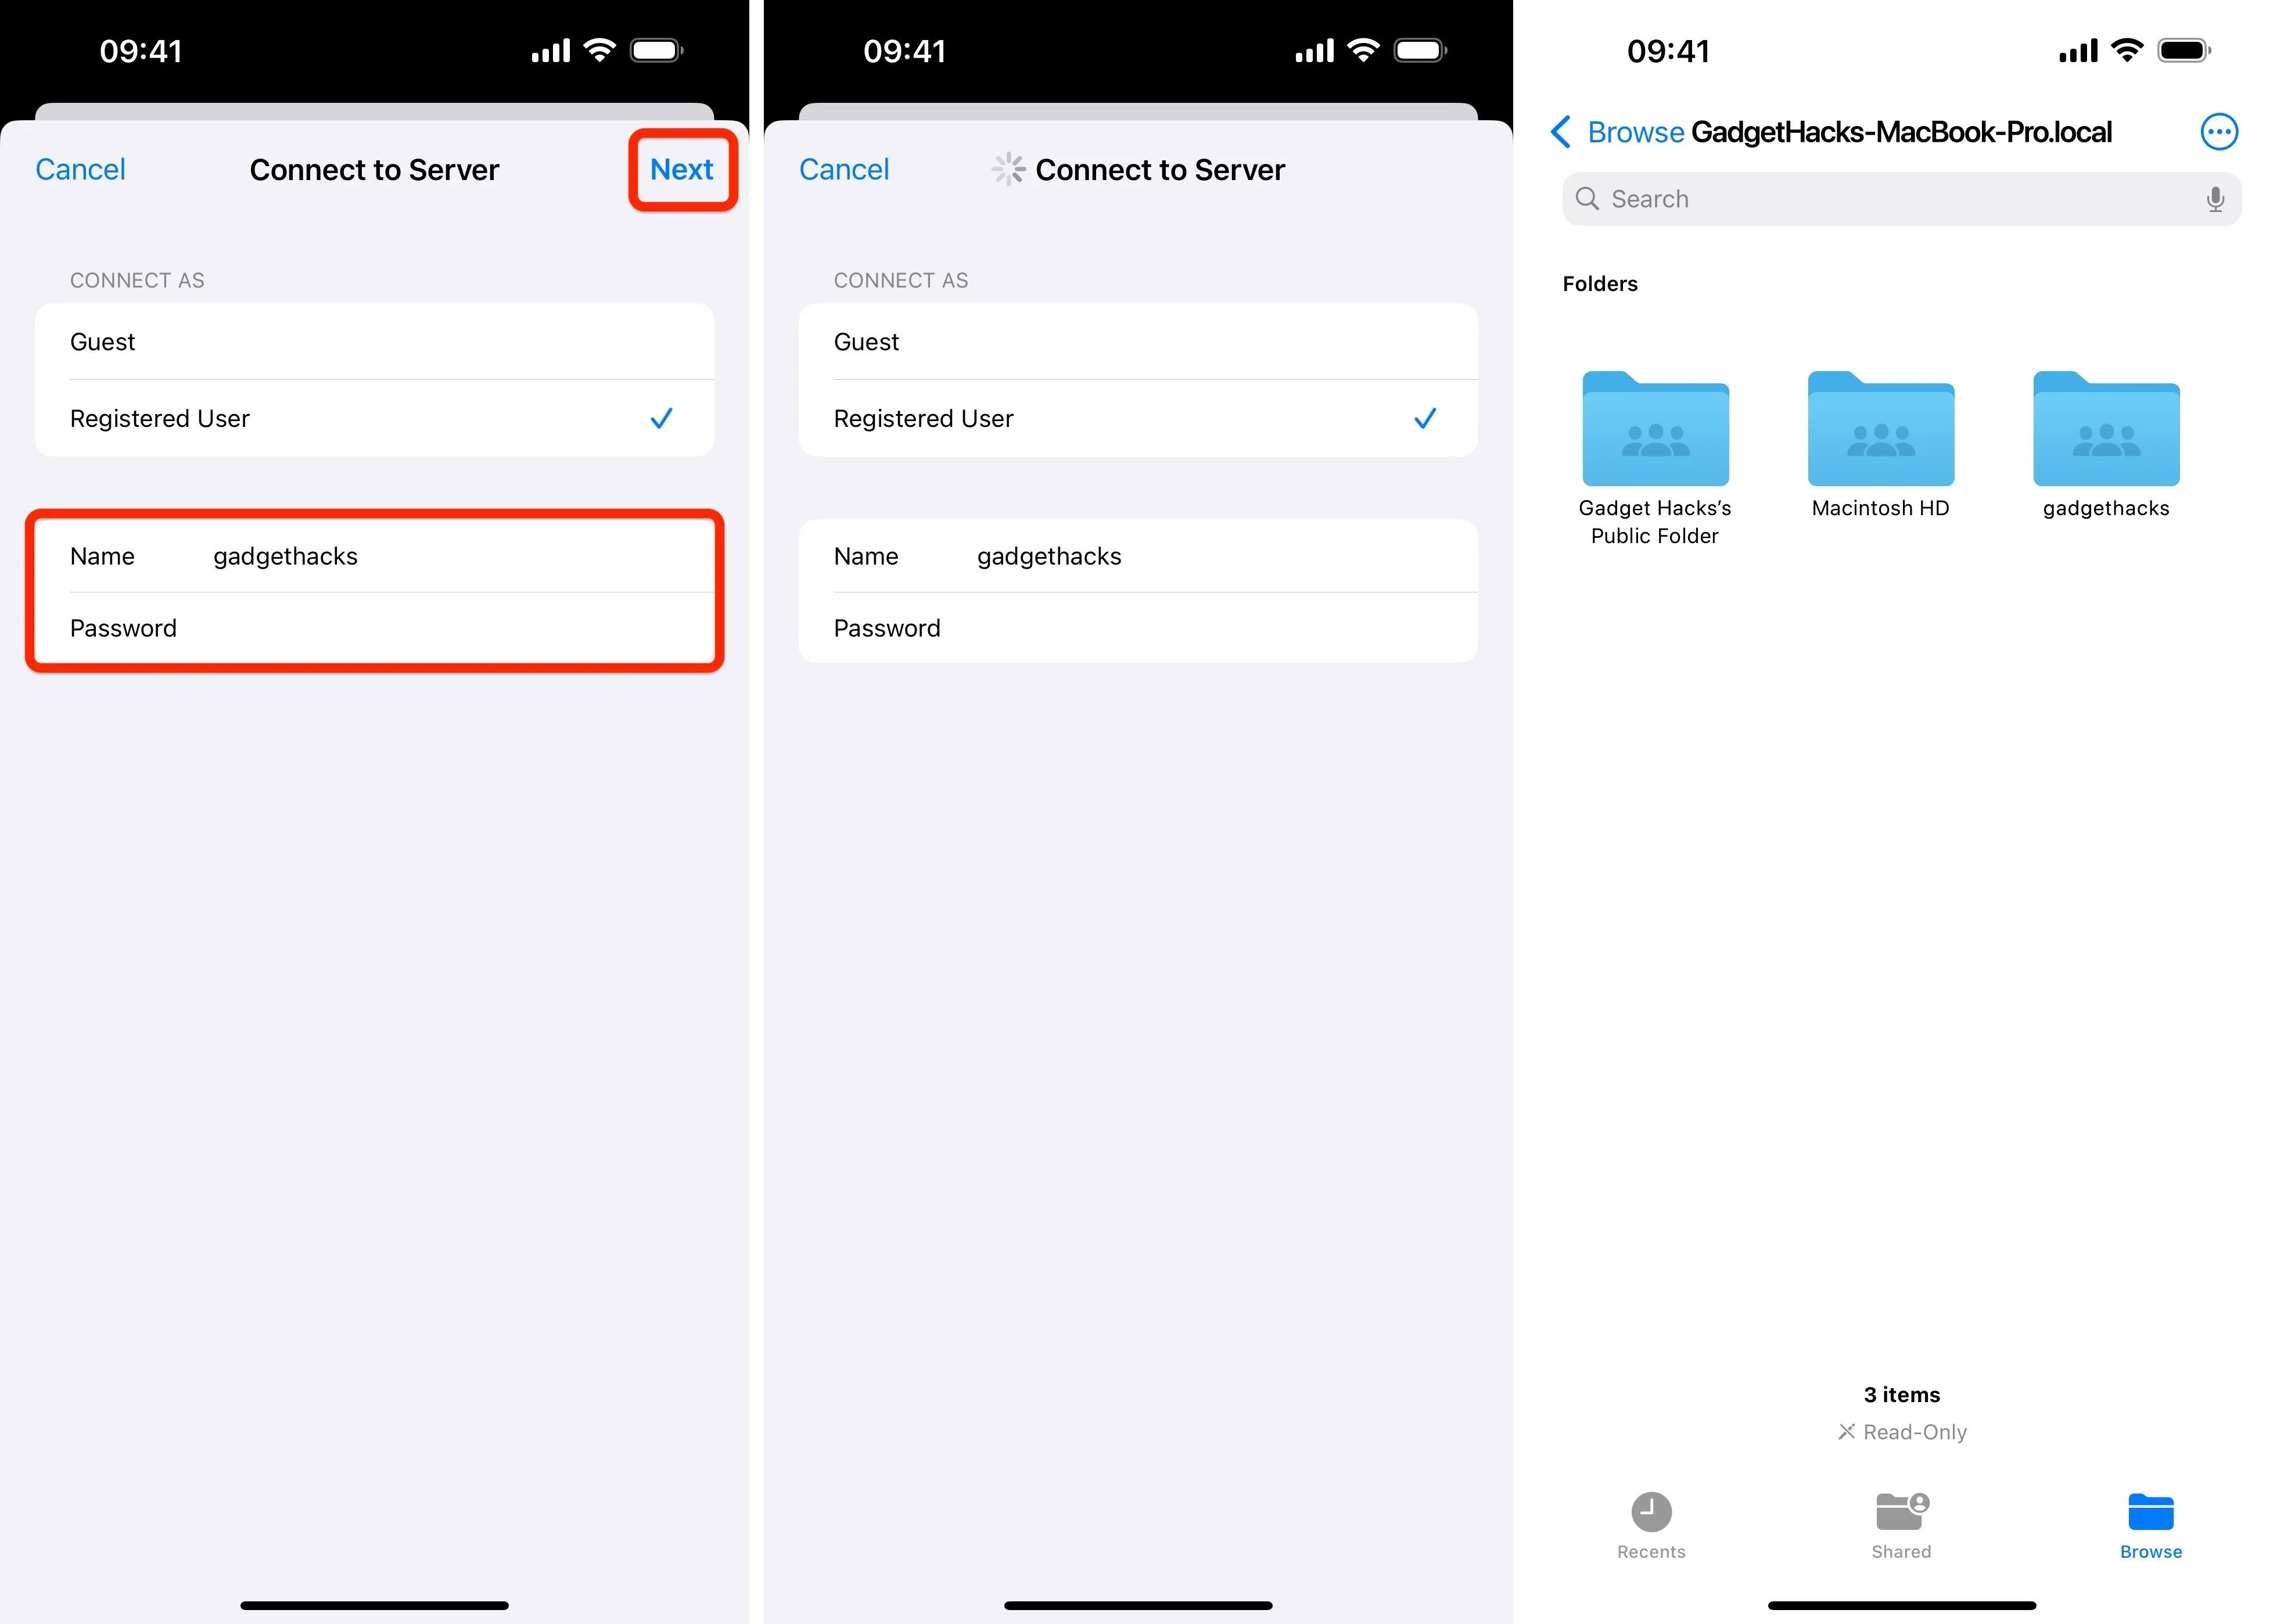
On the Connect to Server page, ensure "Registered User" is checked, then enter the same username and password you would use to log into macOS on your Mac computer. Don't use the password for your Apple ID — it needs to be the password for your Mac. Tap "Next" to connect.
If successful, Files should open the directory that hosts your Mac's public folder, your username's home folder, and the startup disk (Macintosh HD) if you're an admin on the computer.
If you get an error, ensure you type the local hostname in correctly or try one of the alternative addresses. And make sure you enter your credentials correctly before trying again.
Browse and Interact with Your Mac's Files
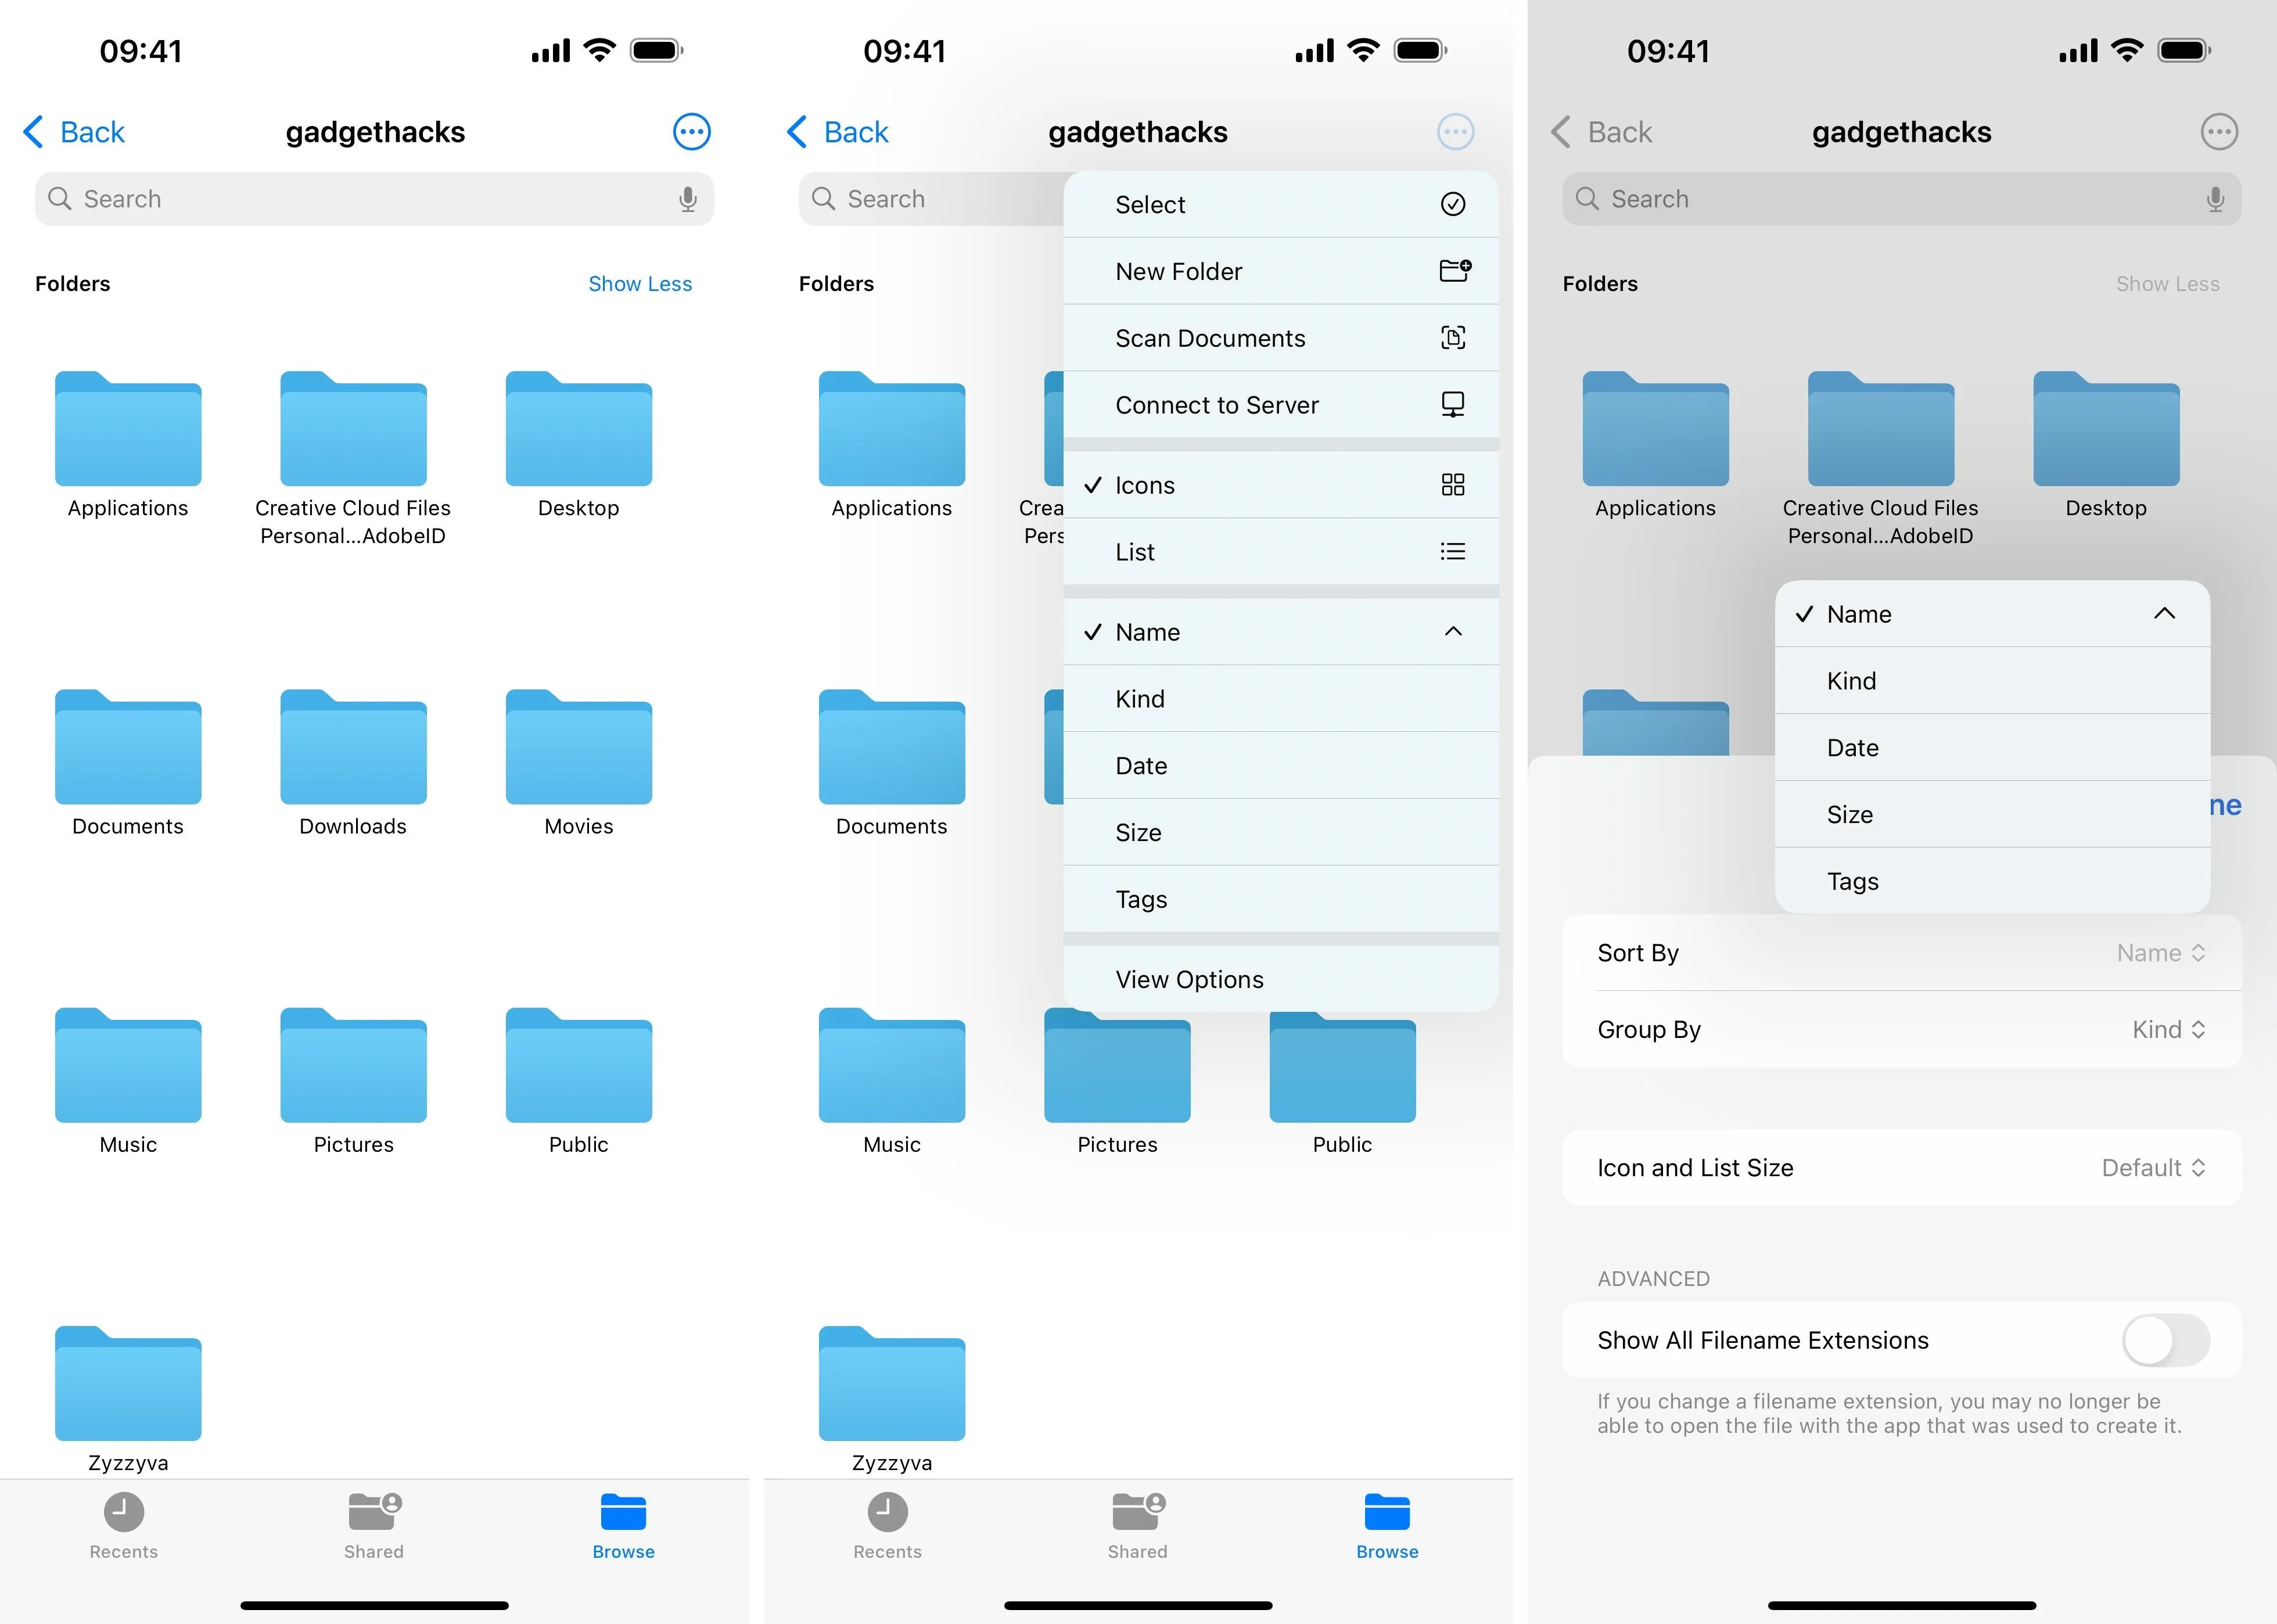
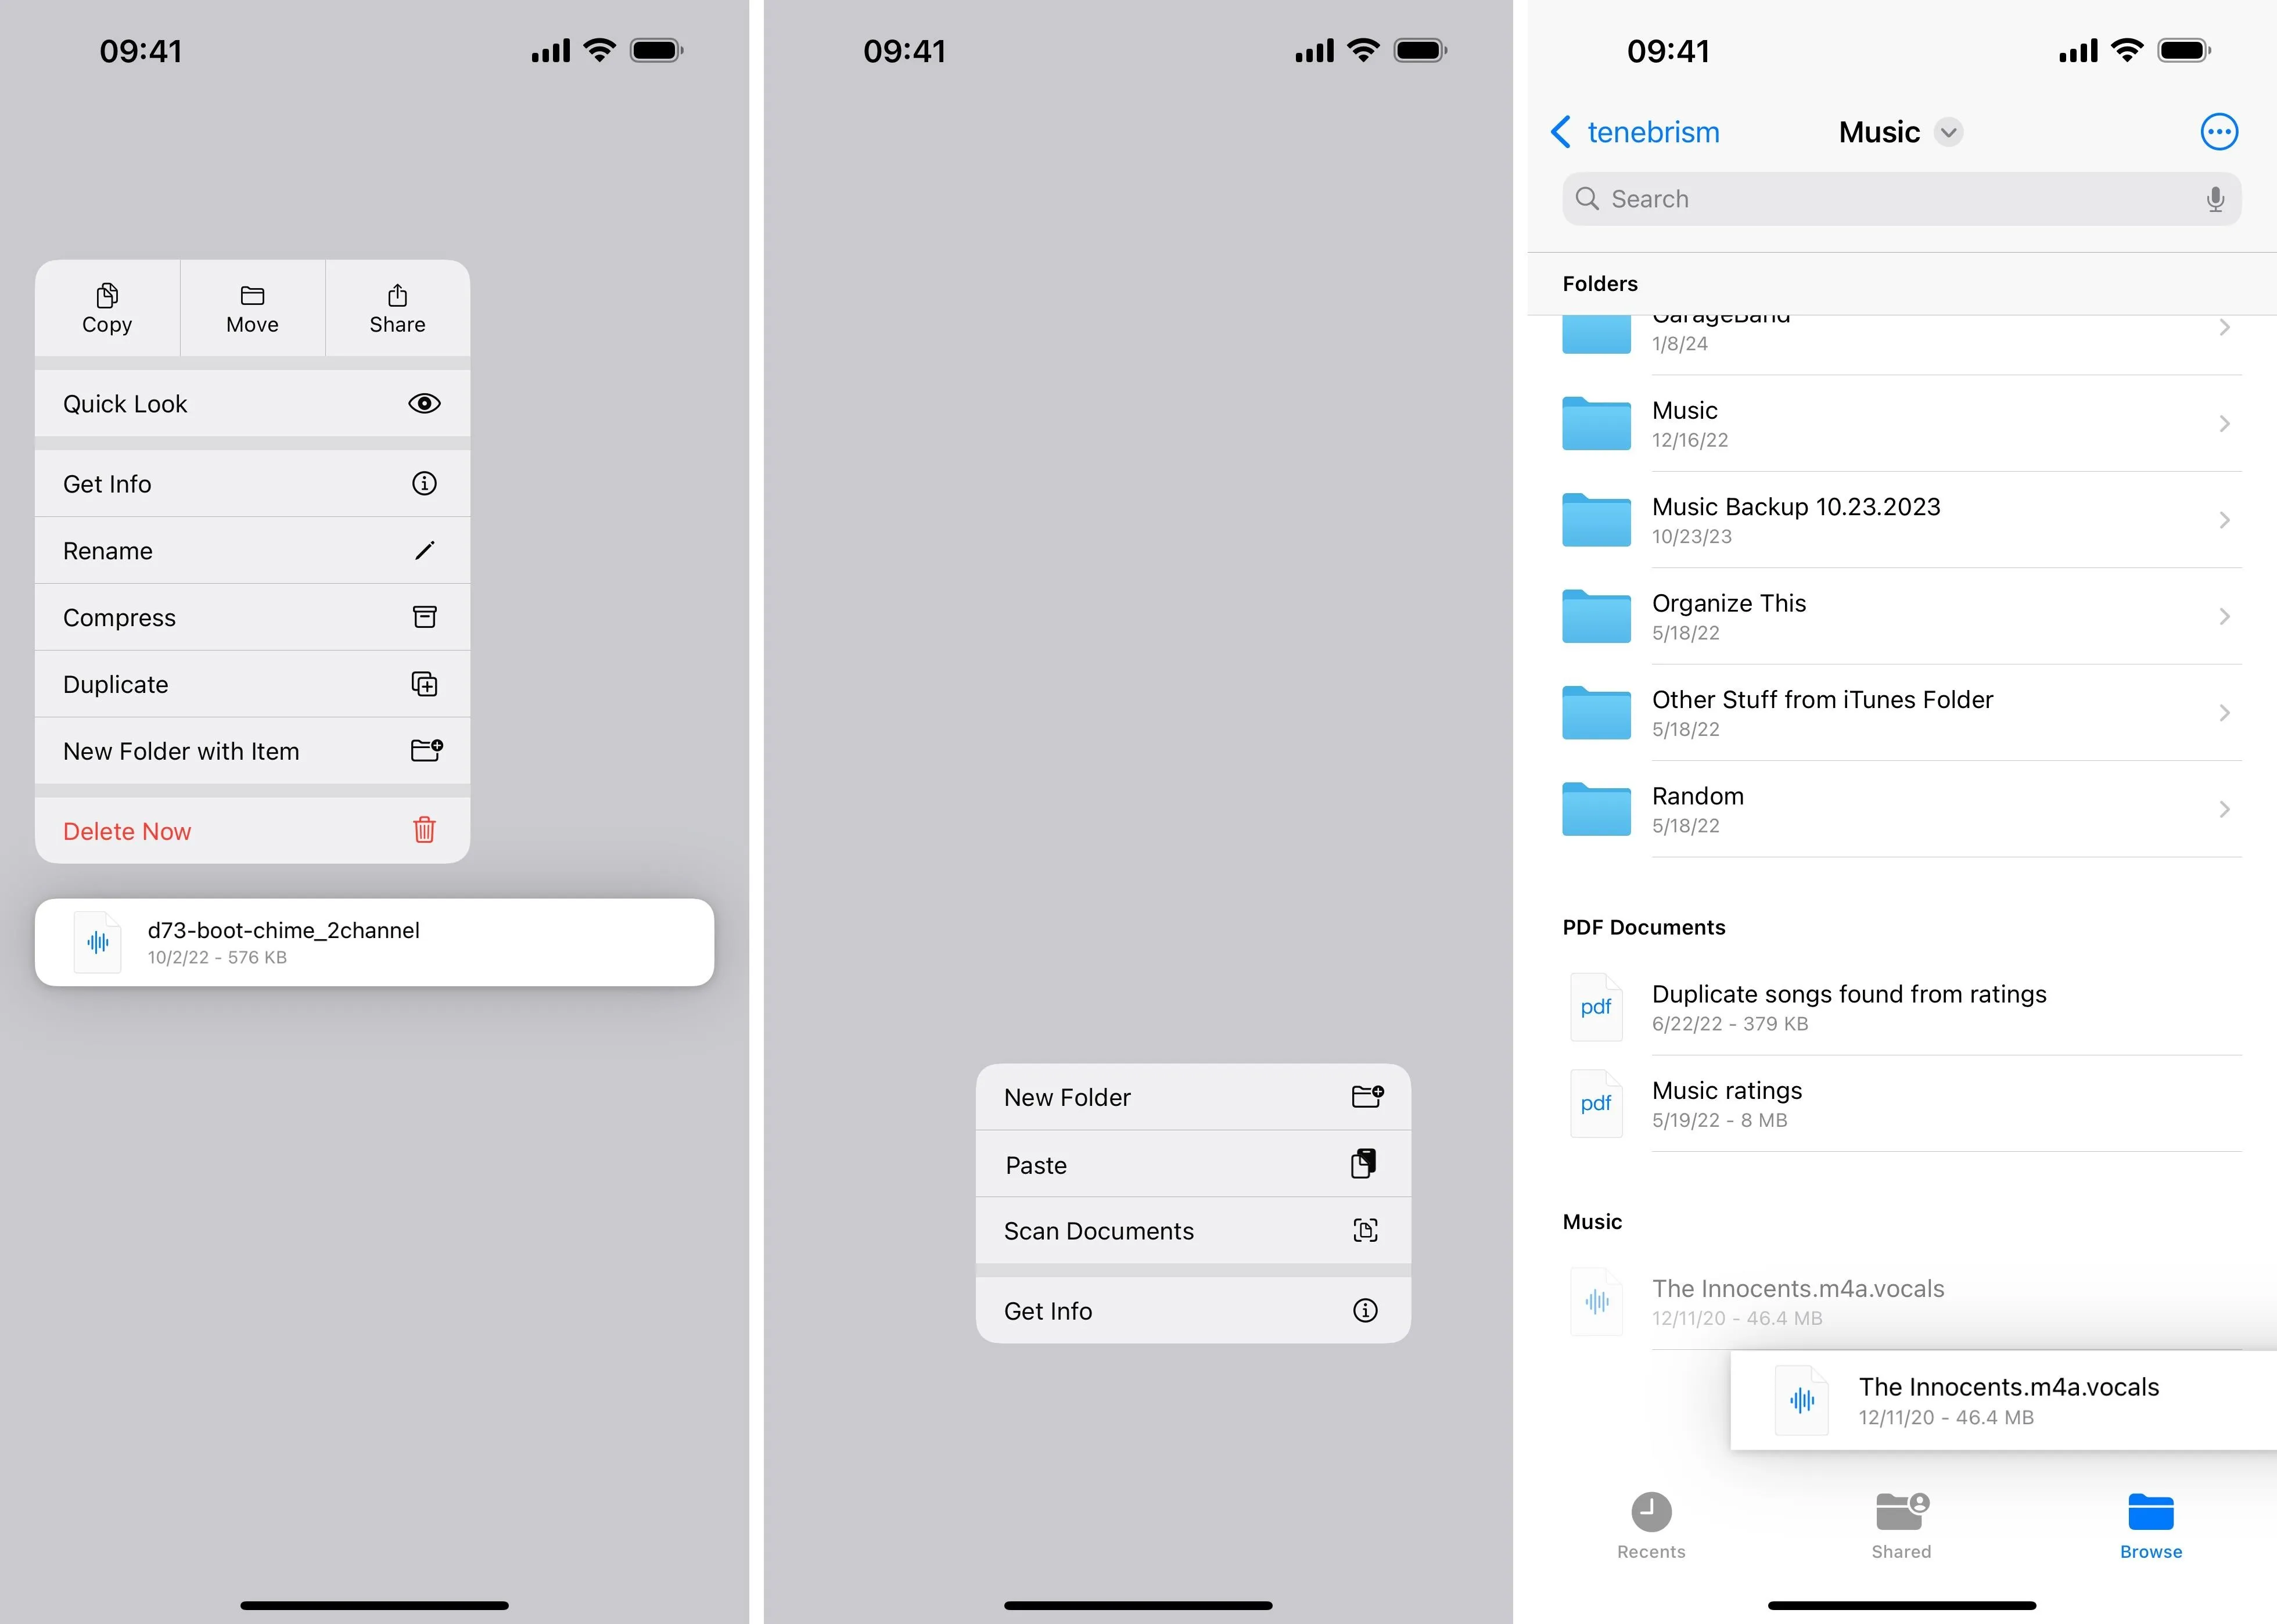
Navigating your Mac's folders works like any other directory in the Files app. You can use the More (•••) icon to open the options menu, where you can select things, create new folders, scan documents, choose icons or list view, and sort and/or filter by name, kind, date, size, or tags.
You can touch and hold or long-press files to perform actions, which may vary based on the file type. For example, an audio file lets me view its info, open it in Quick Look, create a new folder with the item, and rename, compress, duplicate, copy, move, share, or delete it.
Touch and hold or long-press an empty area inside a folder for options to create a new folder, scan documents, get info, see the folder's details, or paste files or folders you've copied to your clipboard. Like many things on iOS and iPadOS, you can also drag and drop files and folders.
Manage Your Mac's File Server in Files
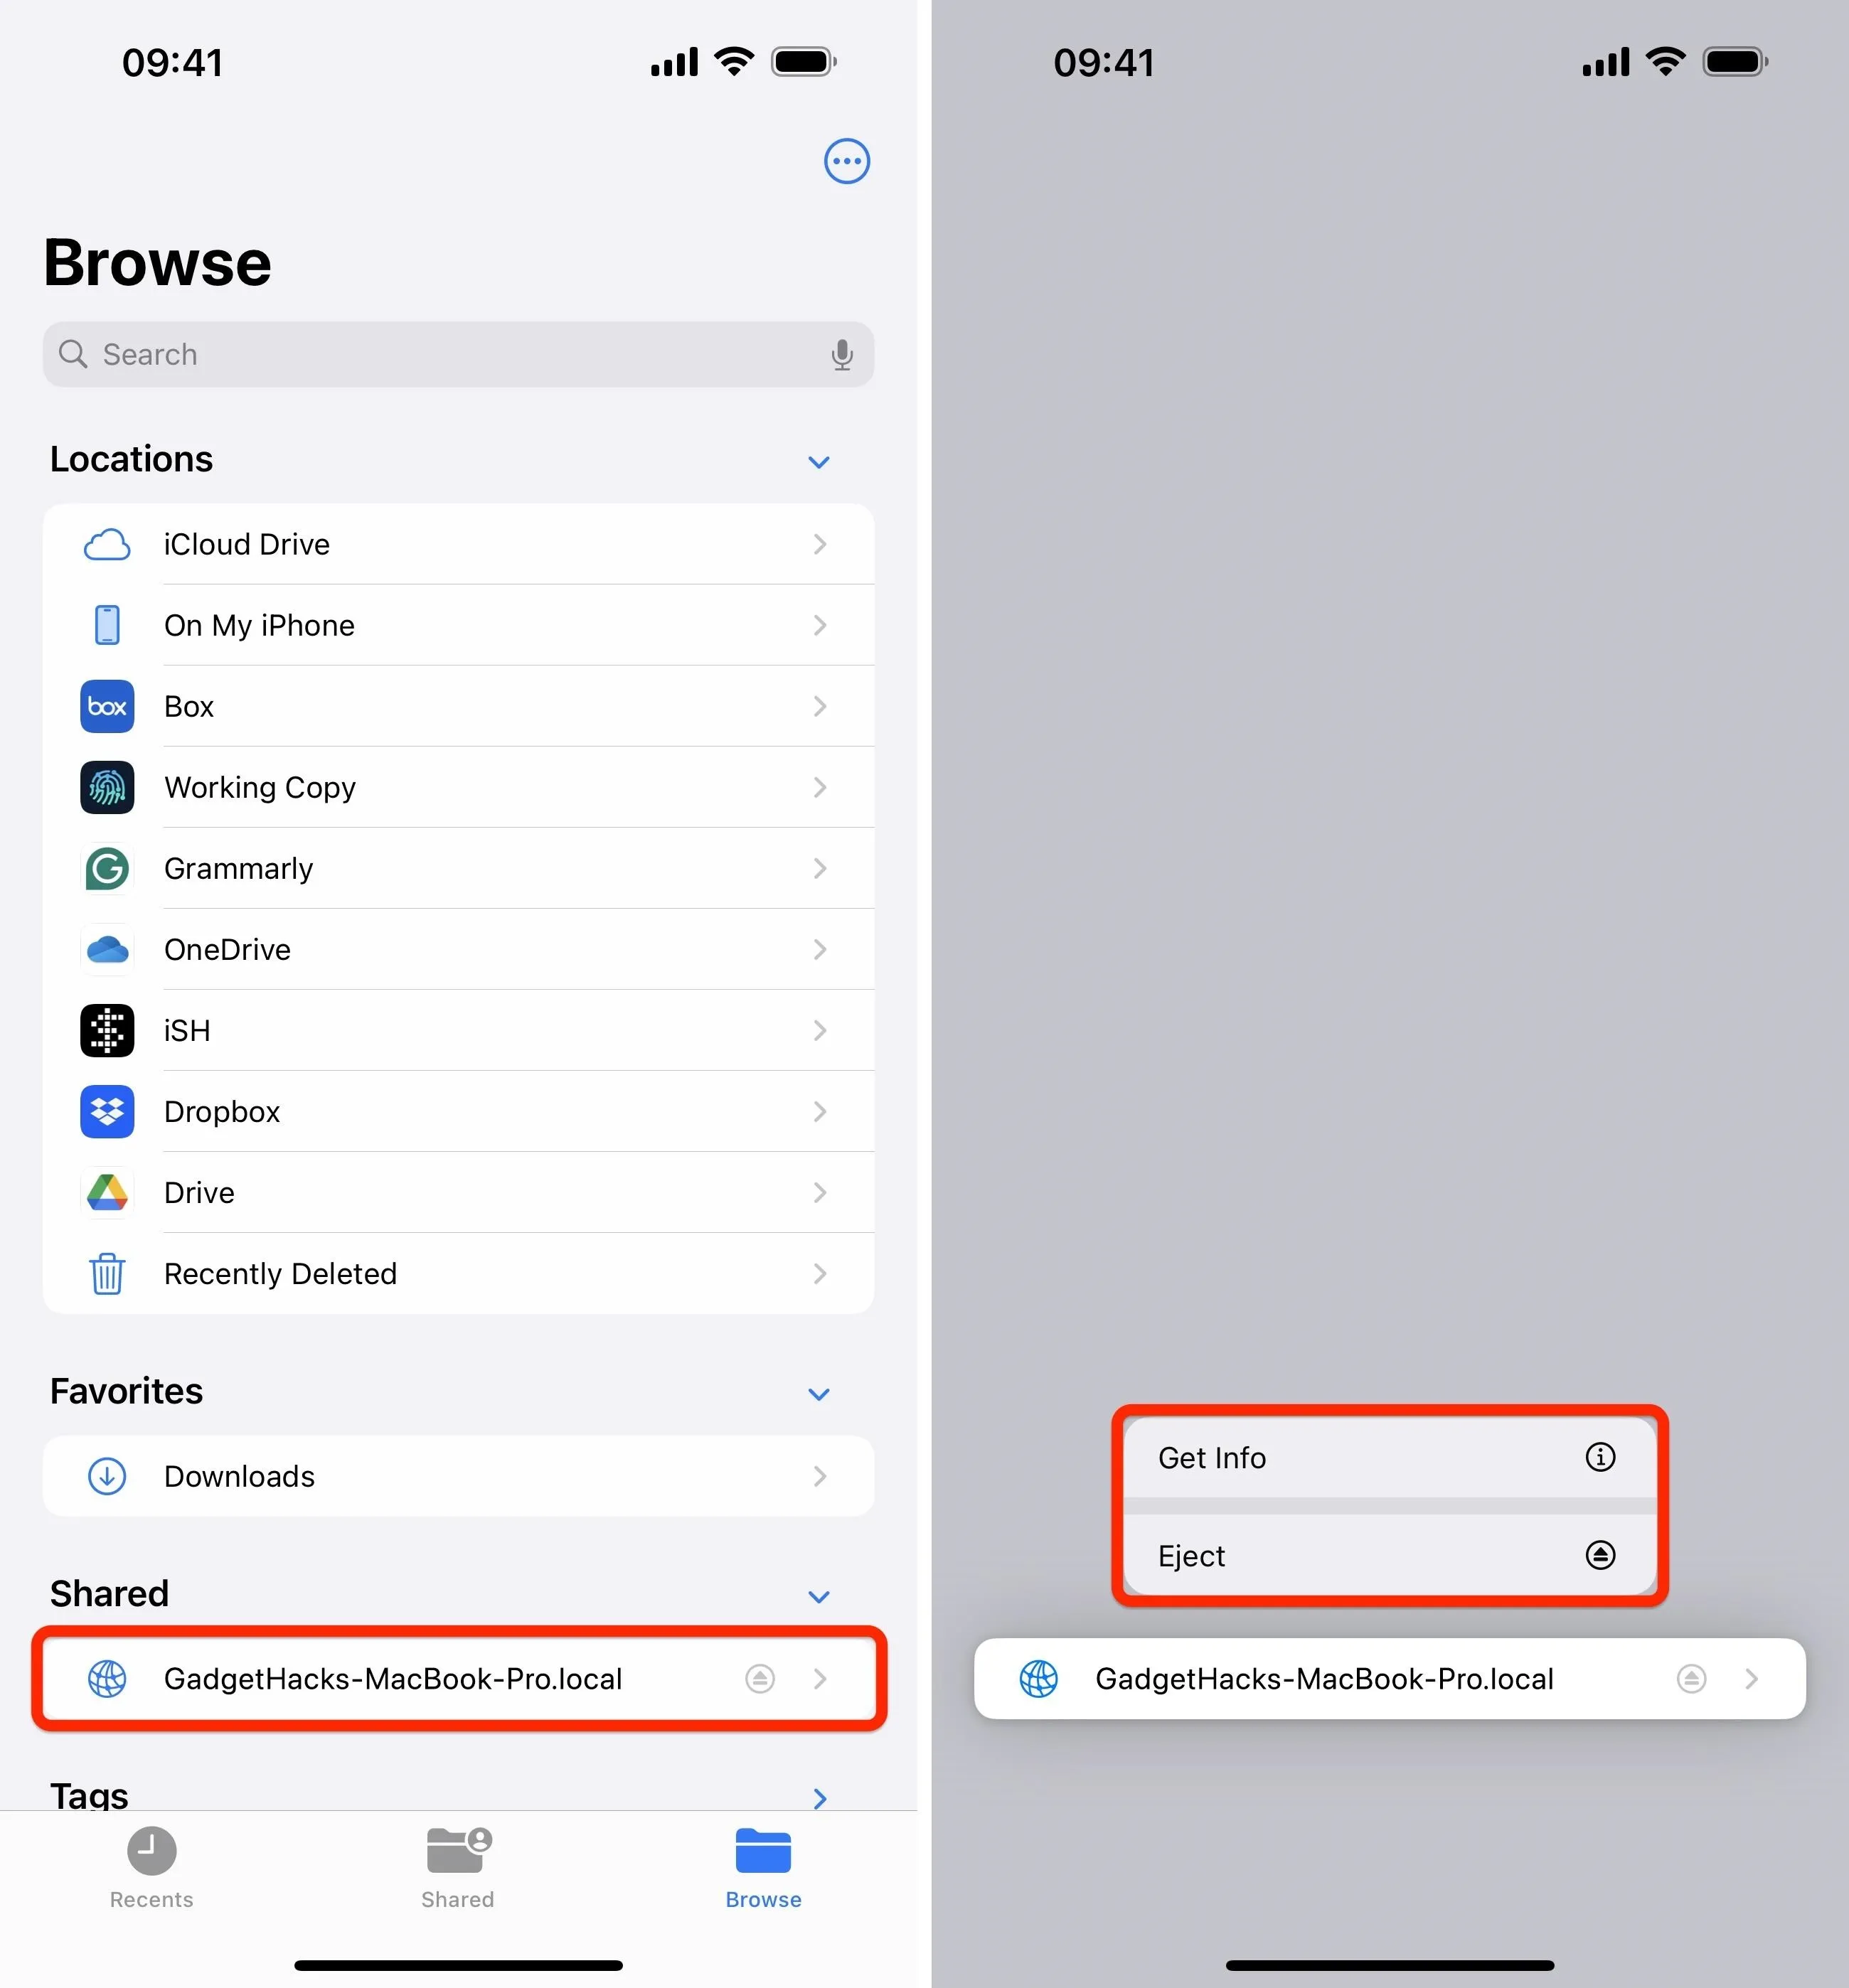
To disconnect from your Mac's file server, find it on the "Browse" tab in the Files app on your iPhone or iPad, then hit the server's eject button or touch and hold the server's name for the "Get Info" and "Eject" options.
You will no longer be connected, but the server will be saved for easy access next time. When you need to get back into your Mac's file server, it should show up under Recent Servers on the Connect to Server page — tap it to get back in. You can also remove the file server from the recently used servers by tapping the info (i) button next to it under Recent Servers and hitting "Remove."
Cover photo and screenshots by Justin Meyers/Gadget Hacks


Comments
Be the first, drop a comment!