


If maintaining privacy is an ongoing battle, the front line is your smartphone. Apple included several new security features in iOS 10, but at the same time, some of the best new functionality comes with potential privacy trade-offs that everyone needs to understand.
New features like lock screen widgets that show detailed info, Raise to Wake, and saved parking locations pose privacy issues, while existing security-related settings and features should still be addressed. So below, we'll explore all of the various settings in iOS 10 that can give you peace of mind and improve your privacy.
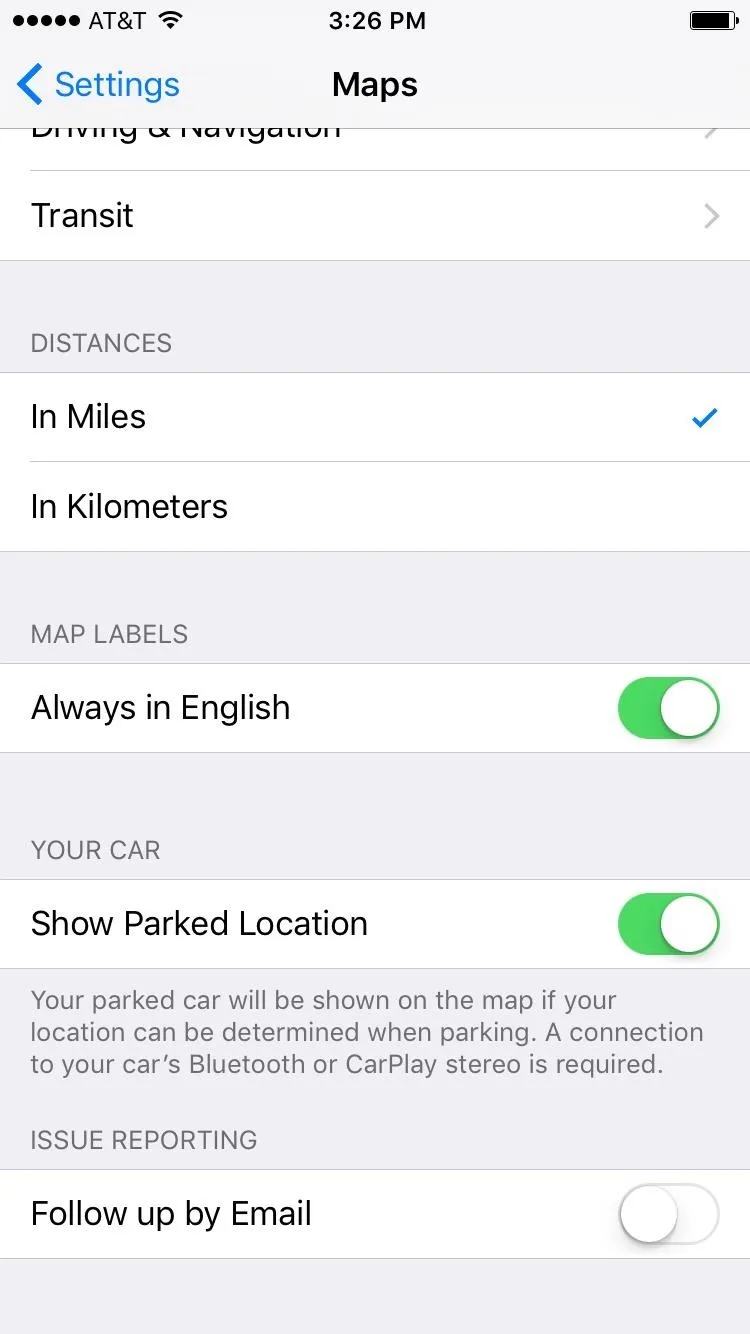
#1: Show Parked Location
Your iPhone now knows where you last parked, and it will give you a notification to help you find your car when you get back. But if you're not comfortable with Apple recording every address you visit, you'll probably want to turn this one off.
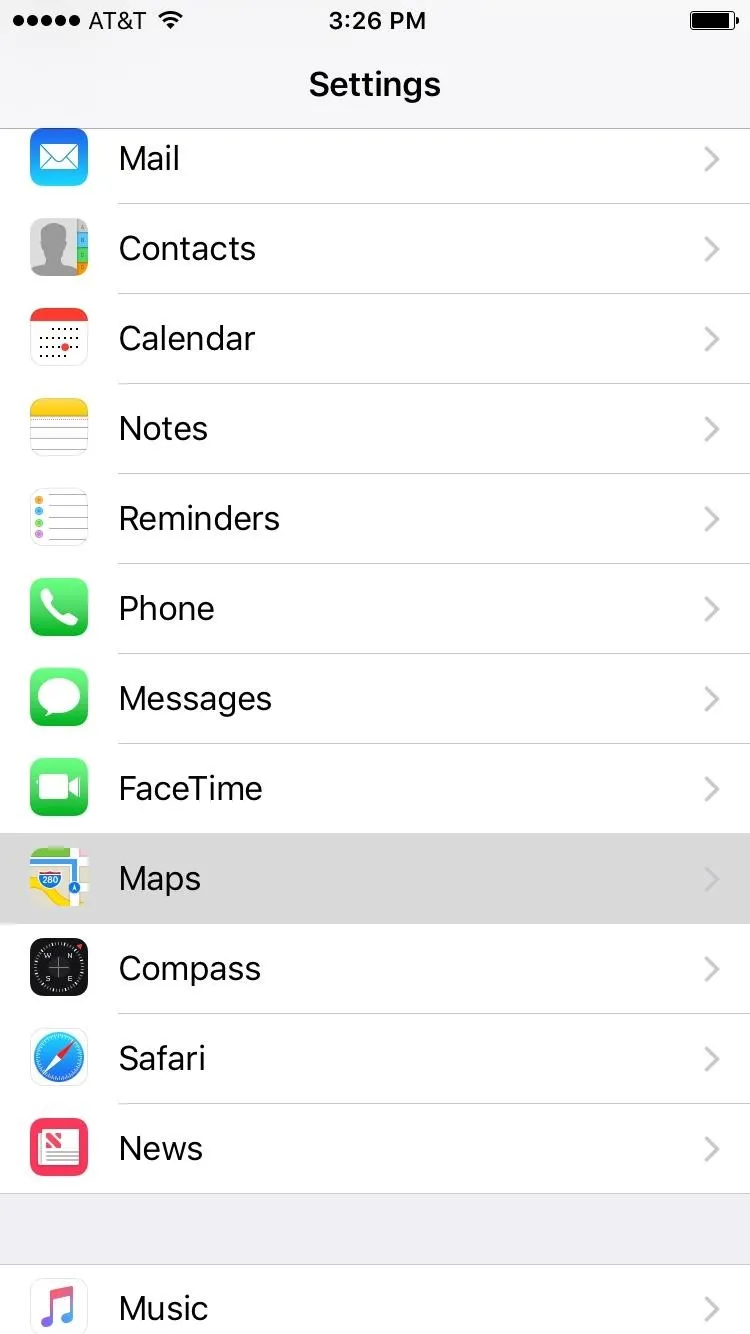
To start, head to the Maps entry in Settings, then scroll down towards the bottom of the next menu. From here, disable the Show Parked Location entry, and from now on, you'll just have to remember where you left your $30,000 possession.
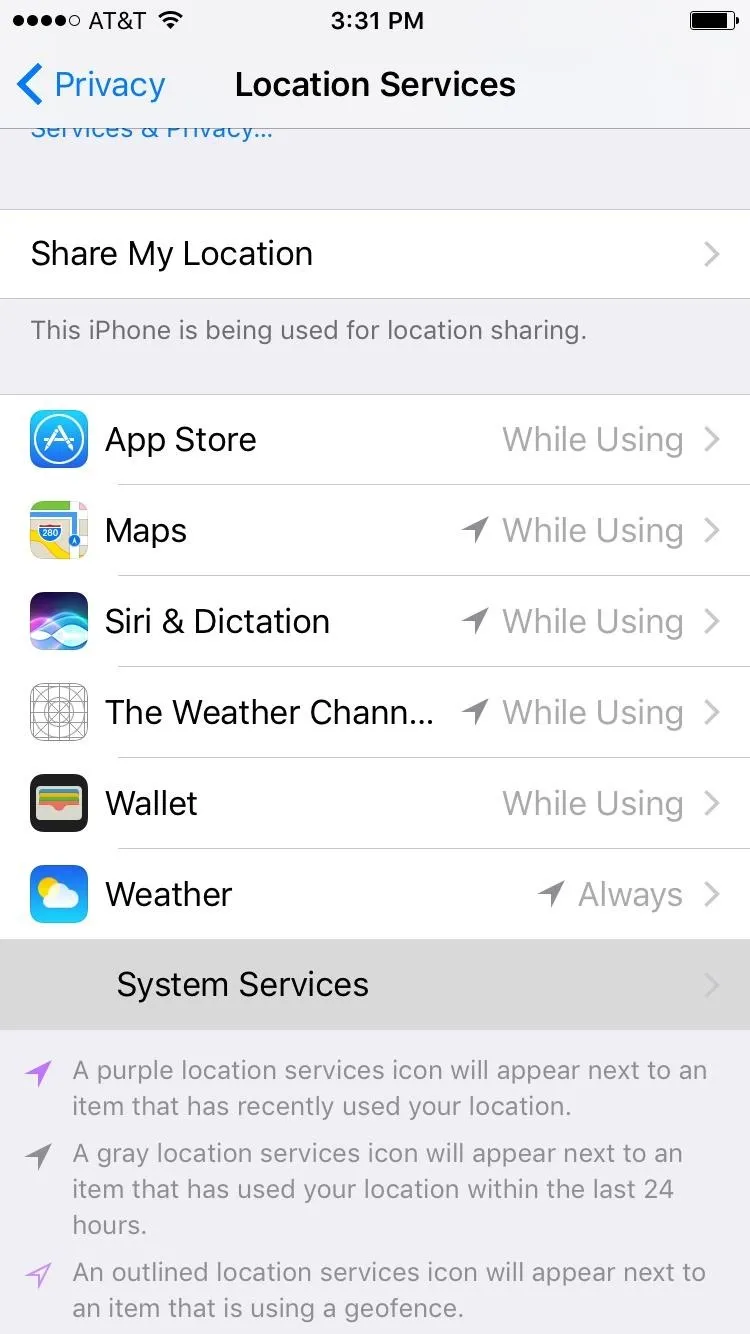
#2: Frequent Locations
This feature has been around for a while, so you may have already addressed it. But iOS saves your most frequently-visited locations so that Apple can keep track of traffic in these areas and give you updates on travel time in your Notification Center.
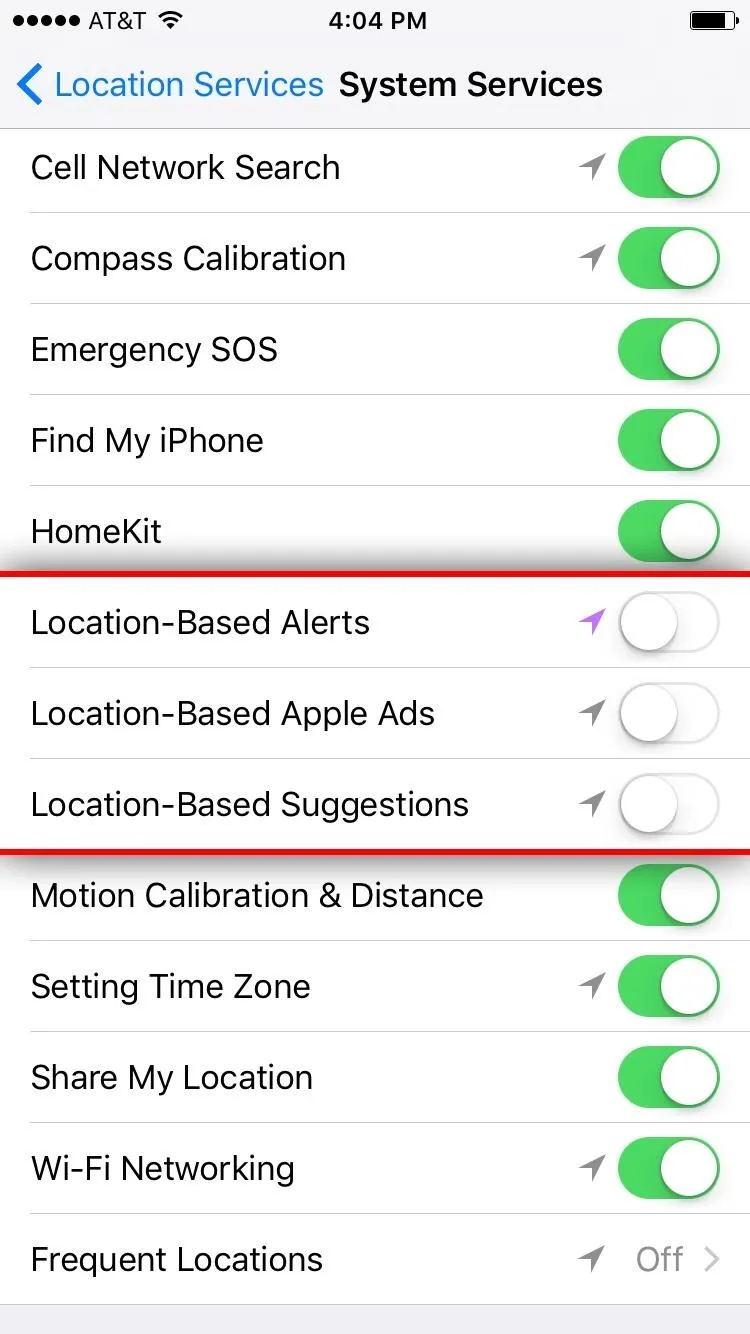
You might already check Maps for this information, or you might just be uncomfortable with Apple knowing your favorite hangouts. So to turn this one off, go to Settings -> Privacy -> Location Services -> System Services -> Frequent Locations. Finally, disable the feature, and your iPhone will stop saving your frequently-visited locations.
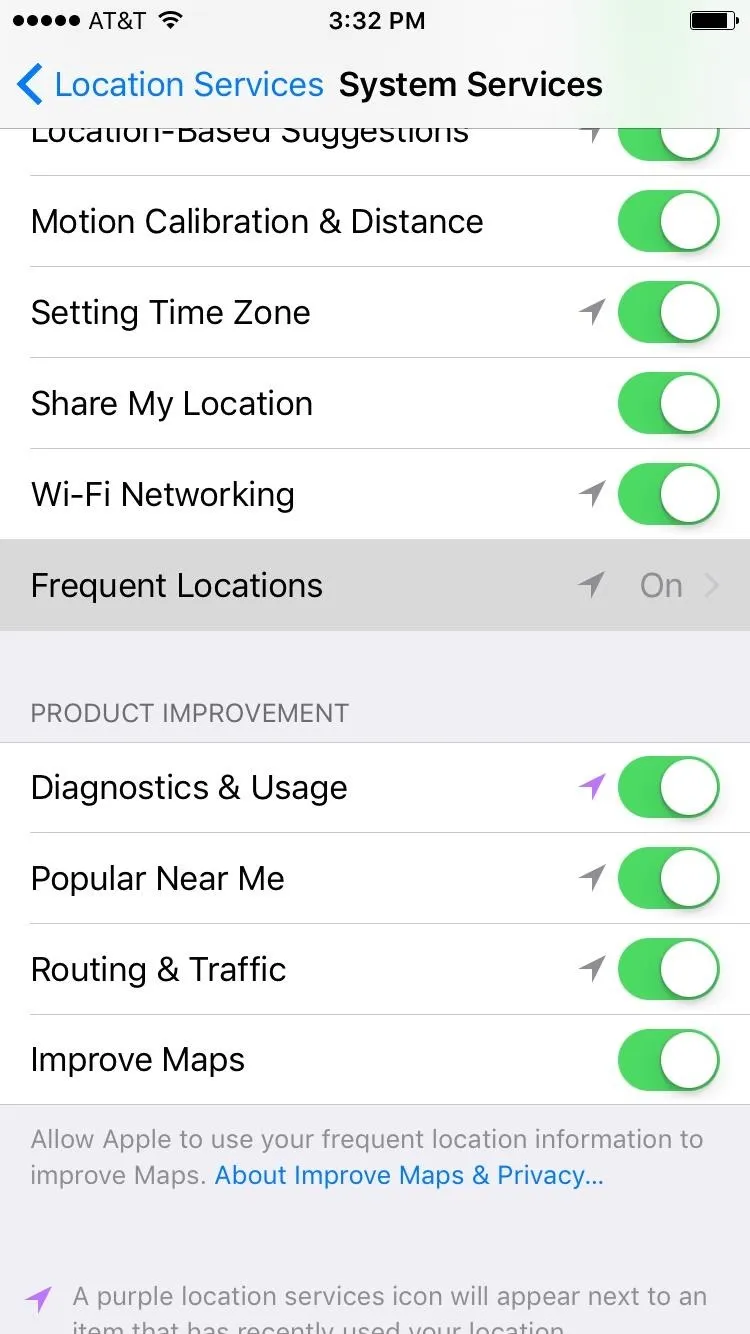

#3: Location-Based Alerts, Apple Ads & Suggestions
There are three almost-creepy features that iOS uses to give you relevant information, and they all track your location constantly.
- Location-Based Alerts will give you geographically-relevant notifications, like a reminder to call someone when you arrive at a certain address.
- Location-Based Apple Ads replaces a similar iAds feature from versions past, and it does exactly what it says.
- Location-Based Suggestions takes the creepy factor even further to suggest apps that you might want to install based on where you are on the map.
To disable any of these features, go to Settings -> Privacy -> Location Services -> System Services, then disable any or all of the Location-Based options shown below.
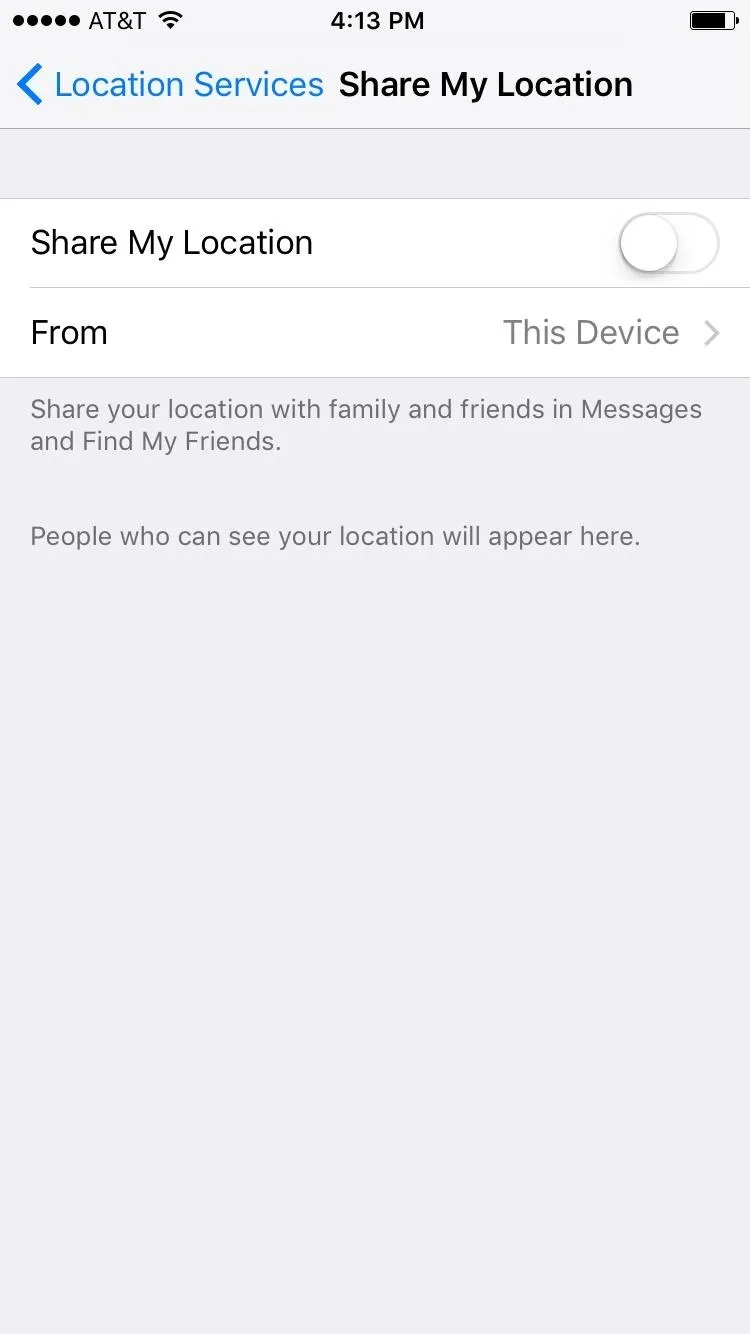
#4: Share My Location
The Find My Friends feature in iOS helps you keep track of loved ones—but, of course, this is a two-way street, so they can track you as well. If you're not comfortable with that, or if you're worried that someone might secretly track your iPhone's location, there's an easy fix. Just head to Settings -> Privacy -> Share My Location, then disable the switch at the top of the screen. When you've done that, your location won't be shared with anyone.

#5: Diagnostics & Usage
Apple gathers information about how you use your iPhone in an effort to help fix bugs and improve the overall iOS experience. This information can also be shared with third-party app developers for streamlining the apps you install.
If you'd rather keep this information private, head to Settings -> Privacy -> Diagnostics & Usage. From here, you've got two options. First, you can disable the Share With App Developers option to prevent third parties from accessing your usage data. Secondly, you could just select Don't Send at the top of this menu, then the information won't be sent to app developers or Apple.


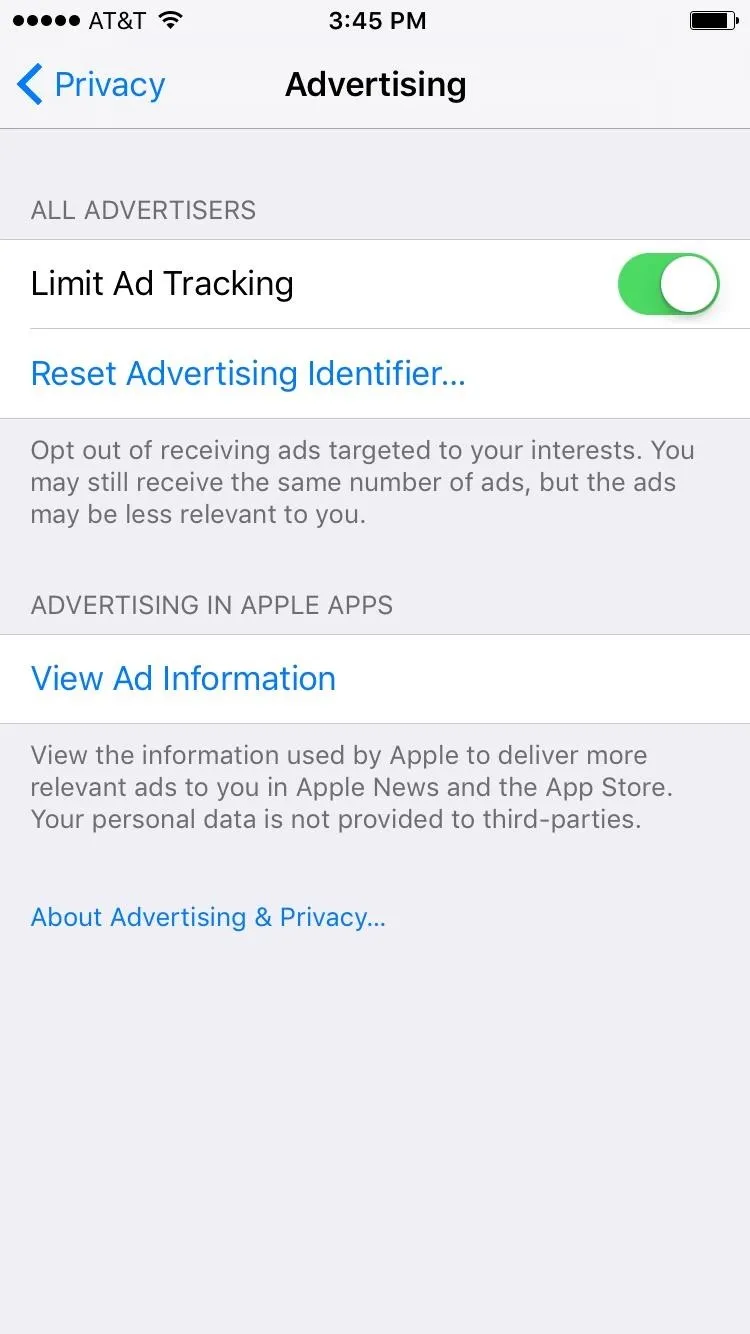
#6: Limit Ad Tracking
In a move that you would expect out of Google, Apple uses information collected from your iPhone usage to serve up relevant ads. If ads are a foregone conclusion, having them targeted specifically towards you might sound like a good idea, but some folks will be uncomfortable with their usage data being shared in the first place.
So to turn this off (for the most part), head to Settings -> Privacy -> Advertising, then enable the switch next to Limit Ad Tracking, and iOS will do exactly that. You'll still see the same number of ads while using your iPhone, and they won't be quite as relevant to you, but far less data will be shared with Apple's advertising partners.
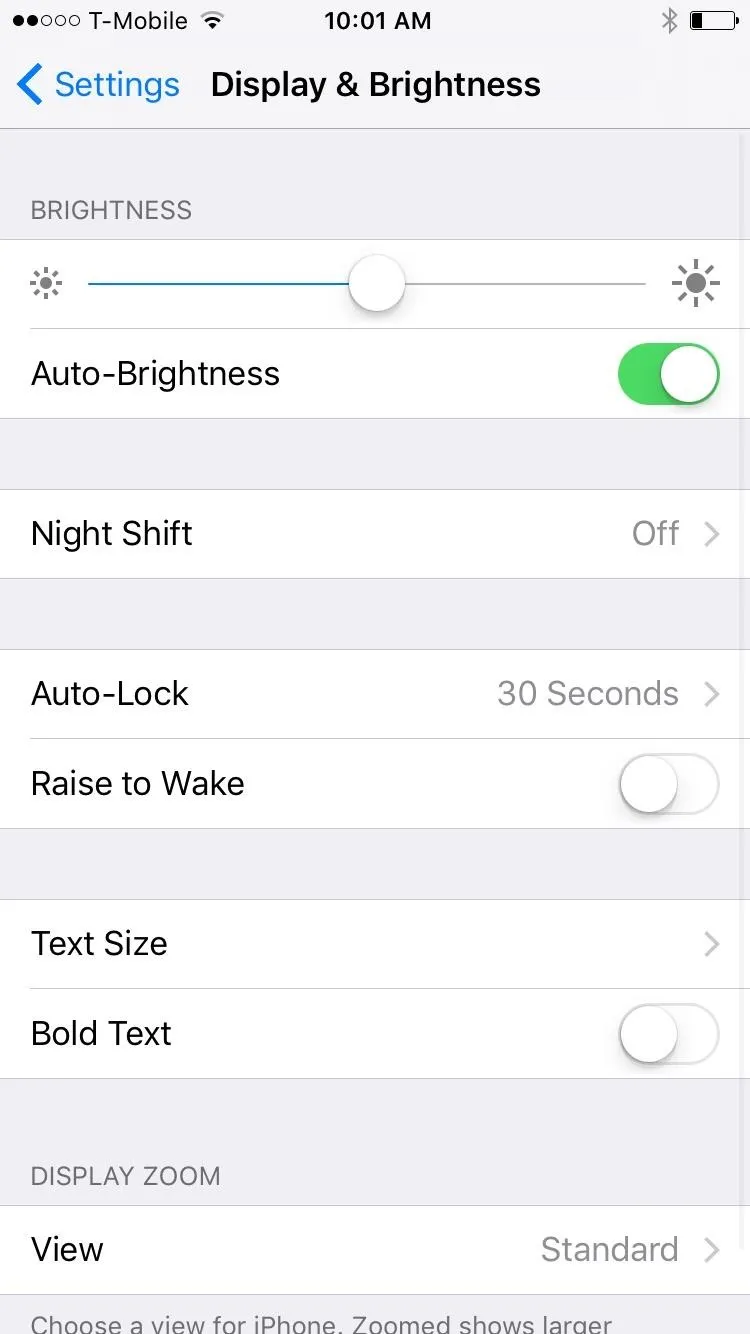
#7: Raise to Wake
To make the new lock screen widgets more accessible, iOS 10 added a Raise to Wake feature that turns your screen on when you pick up your phone. The problem here is the potential for false positives—if your phone is laying on the couch, a little movement could wake your screen, which means that the person sitting next to you gets a full view of all your unread notifications.
If you'd like to disable this one, just head to Settings -> Display & Brightness, then turn off the Raise to Wake option. If you don't use Touch ID, you'll have to press your home button twice to bring up the passcode screen, but that's a small price to pay for the added privacy.
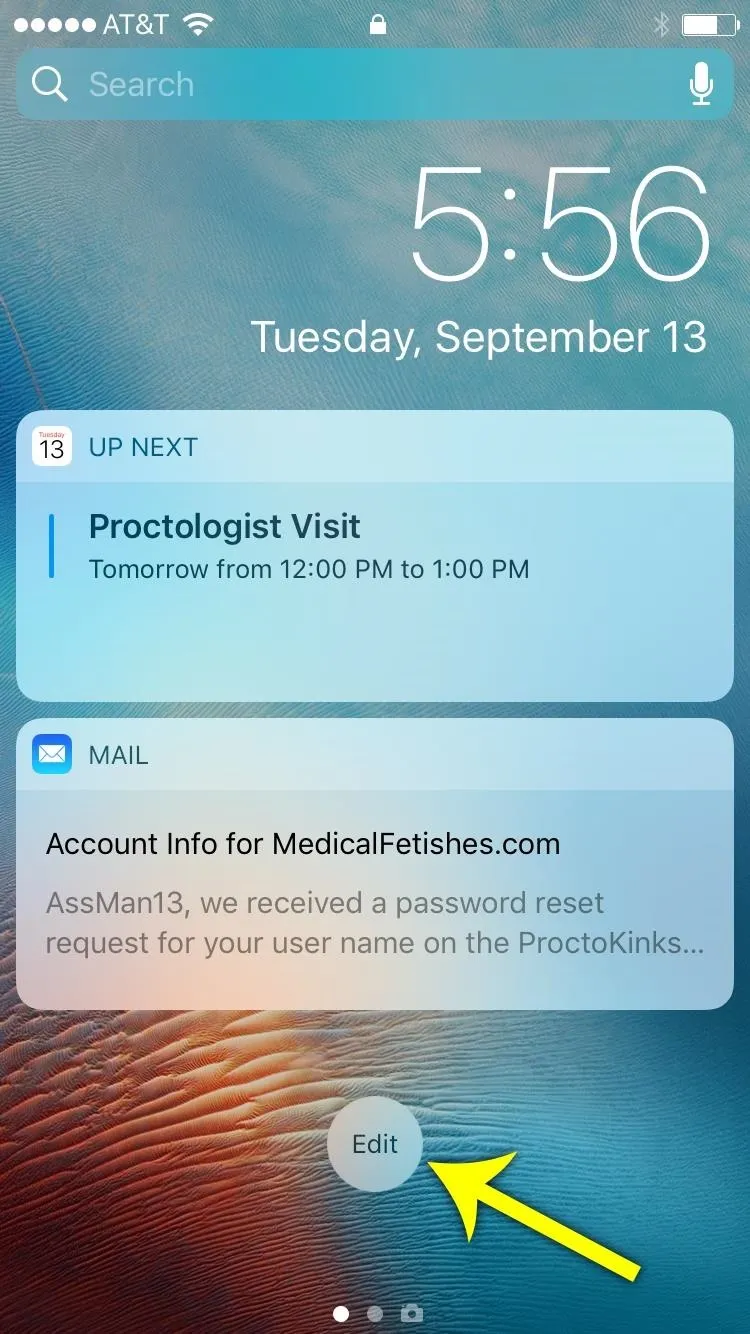
#8: Lock Screen Widgets
One of the biggest new features in iOS 10 is the fact that widgets will now be displayed on your lock screen. It's similar to the Today view in the Notification Center, but it can be accessed directly from your lock screen with a simple swipe.
On the surface, this new feature is all positives. But anyone can see these widgets by simply waking your phone, as no password is needed to access this menu. On top of that, the widgets can display sensitive information, and someone looking over your shoulder could learn more about you than you'd like them to know.
To fix these issues, you could simply scroll down to the bottom of the lock screen widgets menu and tap the "Edit" button, then selectively disable individual widgets that might show sensitive information—but that removes them device-wide, not just on the lock screen. Alternatively, you could just disable the entire lock screen widget system, which is a process I've outlined at the link below.

#9: Reply with Message
The changes to iOS 10's lock screen go beyond just widgets—in fact, you can now use 3D Touch to respond to notifications without even unlocking your phone. But the problem here is that other people can do this, too, which definitely poses some privacy problems. To learn how to disable these new features, make sure to check out our full guide at the following link.


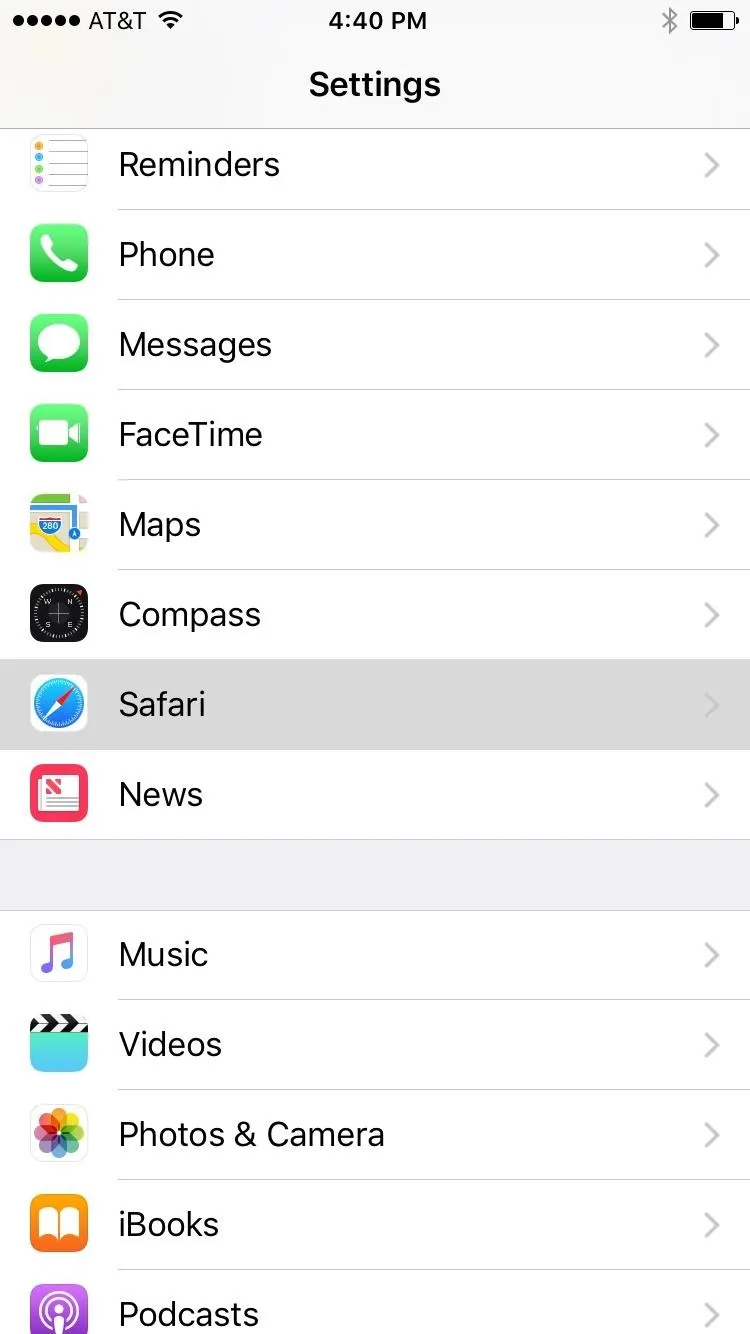
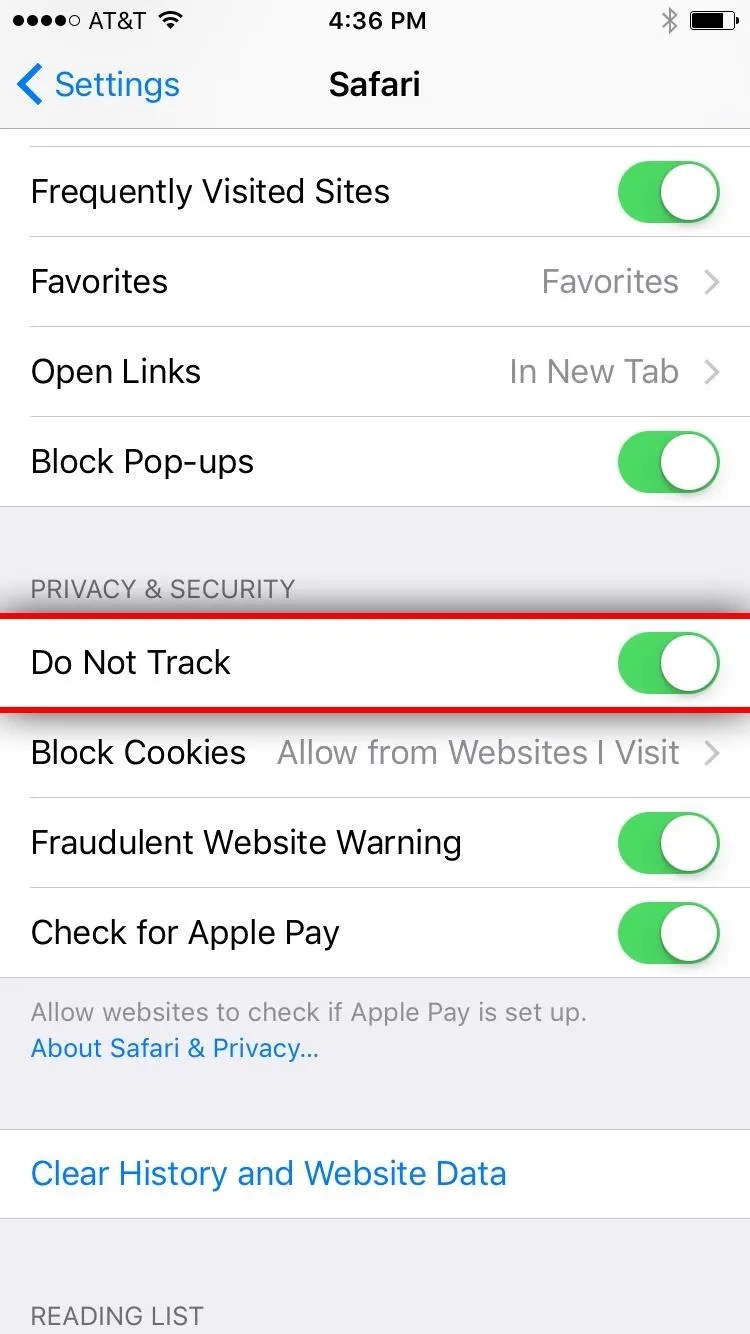
#10: Do Not Track (Safari)
Apple and iOS aren't the only entities that use your information to track your habits and display targeted ads. In fact, this practice is far more common on the internet at large, as your IP address and other info can be logged as you move from one site to another.
If you'd like to prevent this from happening while you browse the web on your iPhone, head to Settings -> Safari, then make sure the Do Not Track option is enabled.
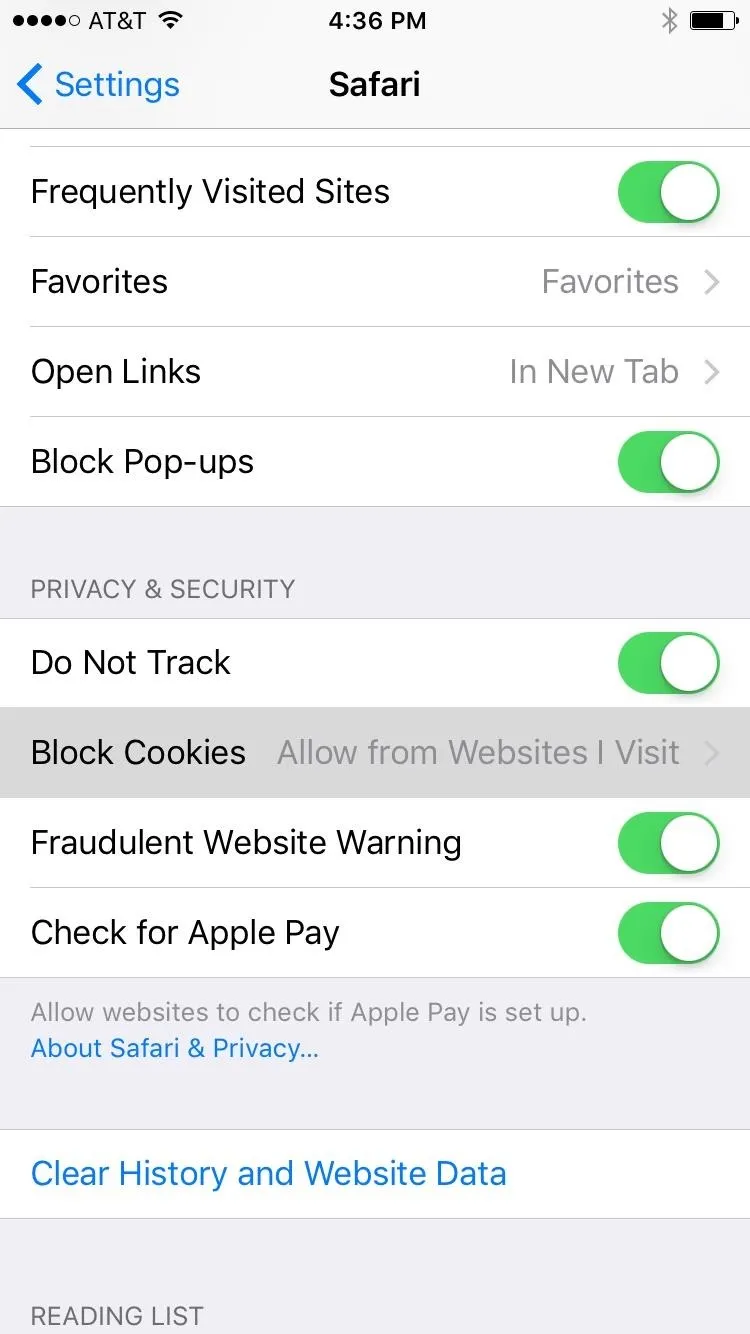
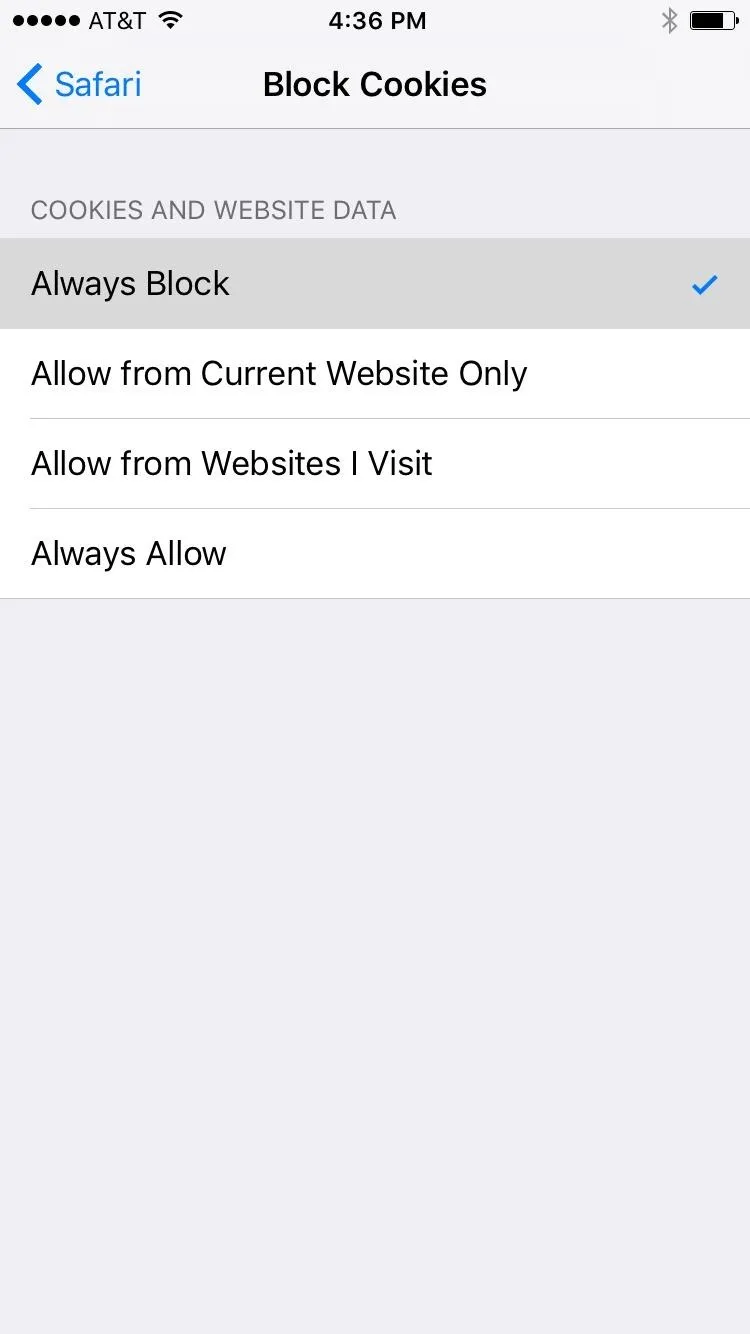
#11: Block Cookies (Safari)
Cookies are another form of internet tracking. If you've ever visited a site for the first time, but somehow, they already had your Facebook profile pic loaded up and ready in the comment section, that was because Facebook left a cookie behind that other sites can read.
To prevent this and similar data from being shared across the sites you visit, head to Settings -> Safari -> Block Cookies. From here, choose Always Block, and tracking cookies will never be saved on your phone. The downside here is that you'll have to log into sites every time you visit them, but it's a small price to pay for such an increase in privacy.
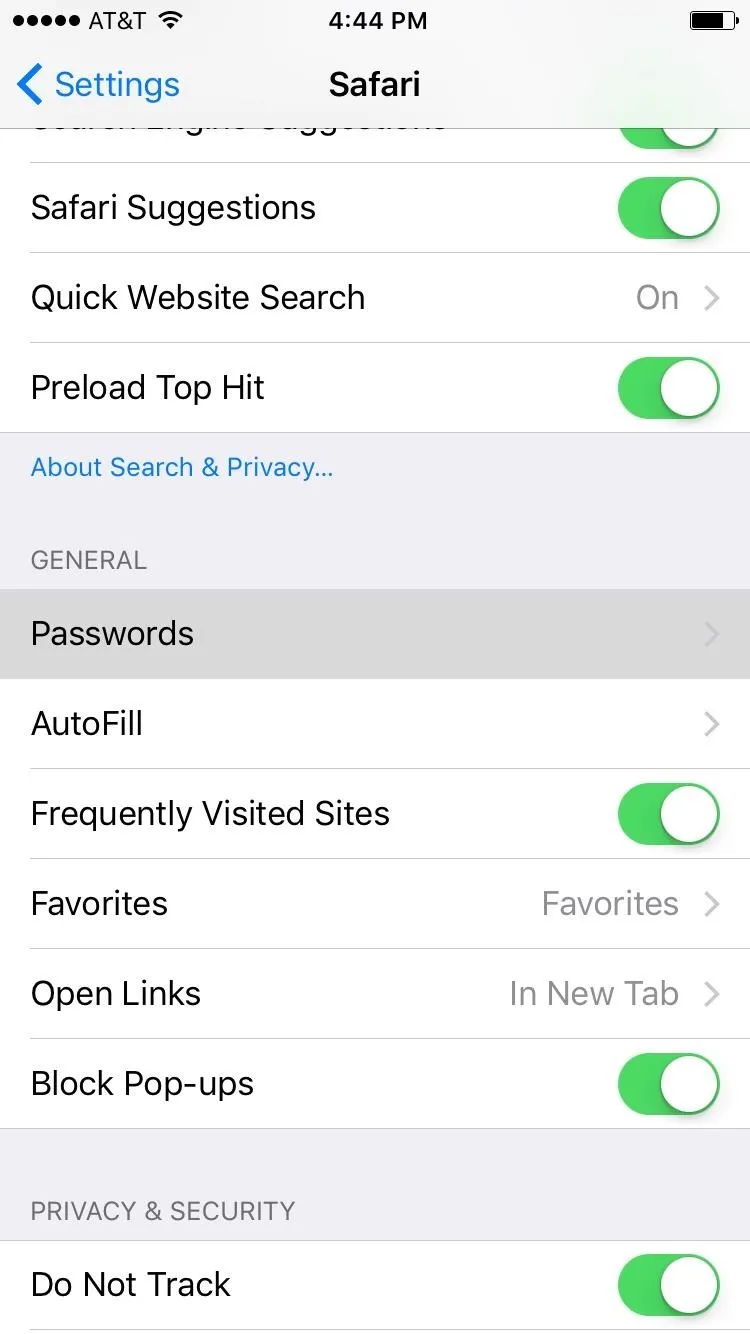
#12: Passwords (Safari)
Safari will offer to save passwords you've entered into websites, which is a handy feature, but also potentially dangerous. If someone were to bypass your lock screen, they could easily use these saved passwords to log into your bank's website, for instance.
So to manage these, head to Settings -> Safari -> Passwords. From here, tap the Edit button at the top of the screen, then select any sites with saved passwords that you'd like to remove. Finally, press the Delete button to get rid of these saved passwords for good.


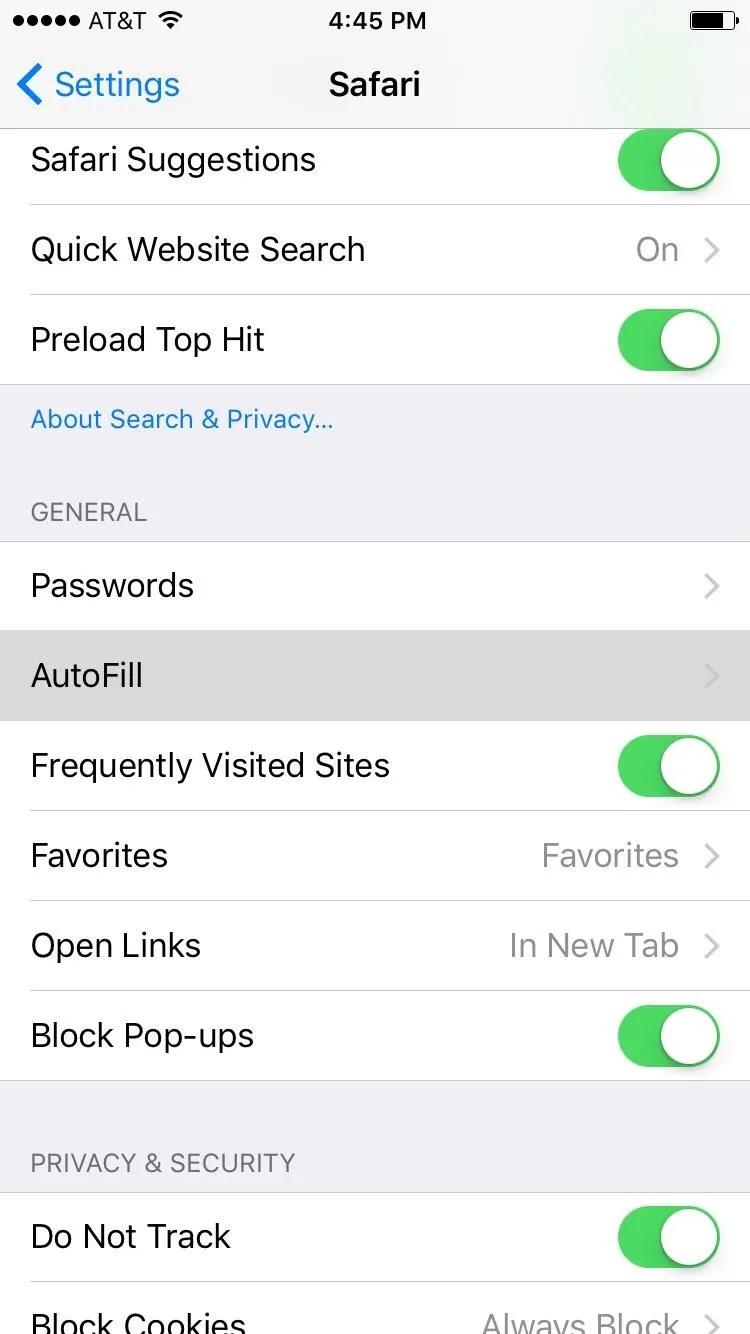
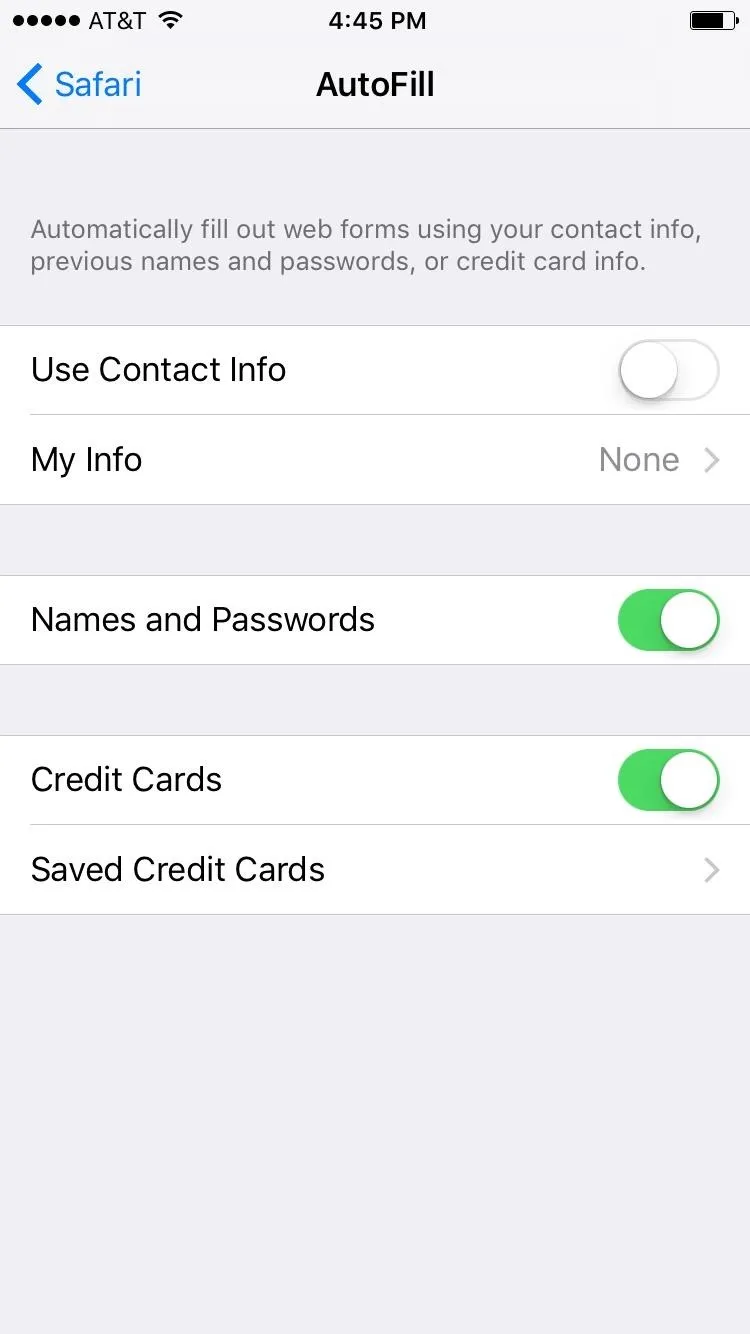
#13: AutoFill (Safari)
Similar to the way Safari remembers your passwords, it will also store information that you've entered into website forms to save you time when you have to enter the same info again. Many times, this is as innocuous as your first and last name, but other information—such as your address, date of birth, and credit card numbers—can also be saved with this "AutoFill" feature.
To choose what information is saved, head to the Settings -> Safari -> AutoFill. From here, you can select My Info or Saved Credit Cards to see what's been saved already, or you can simply disable the toggle switches next to any AutoFill feature.
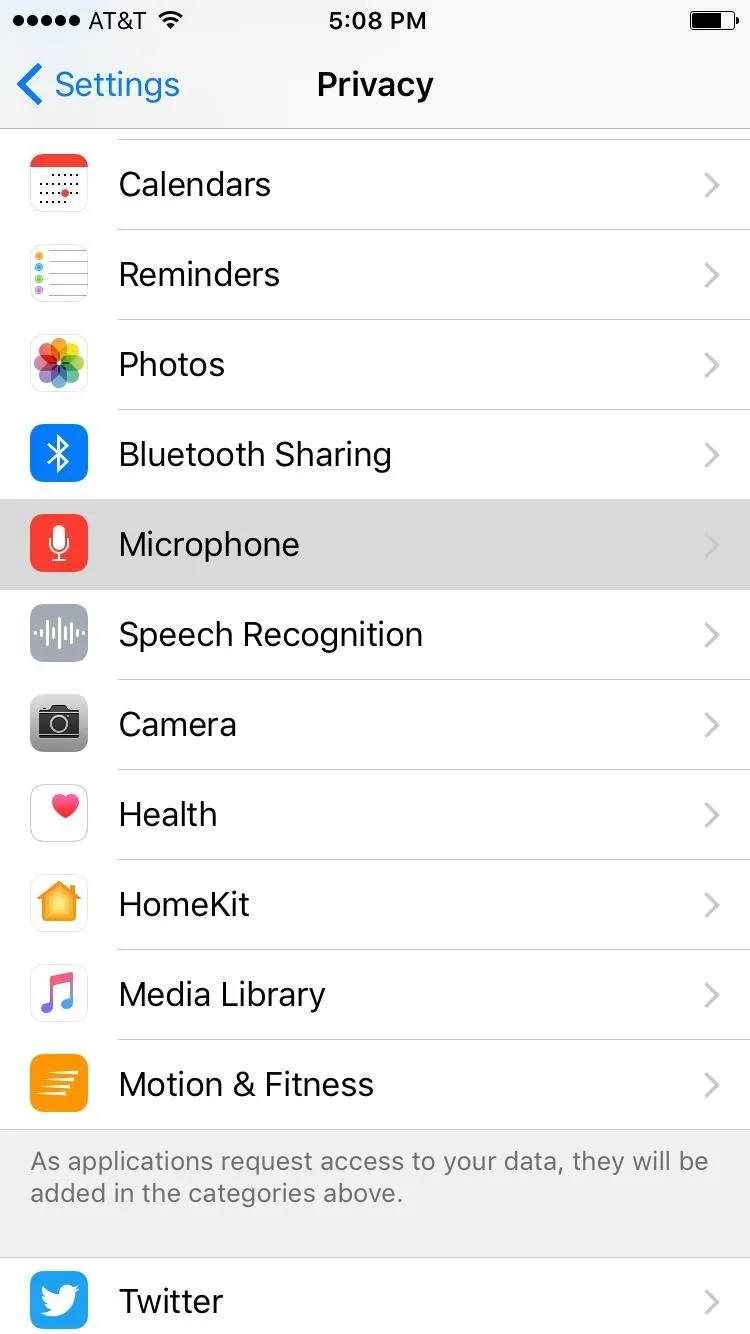
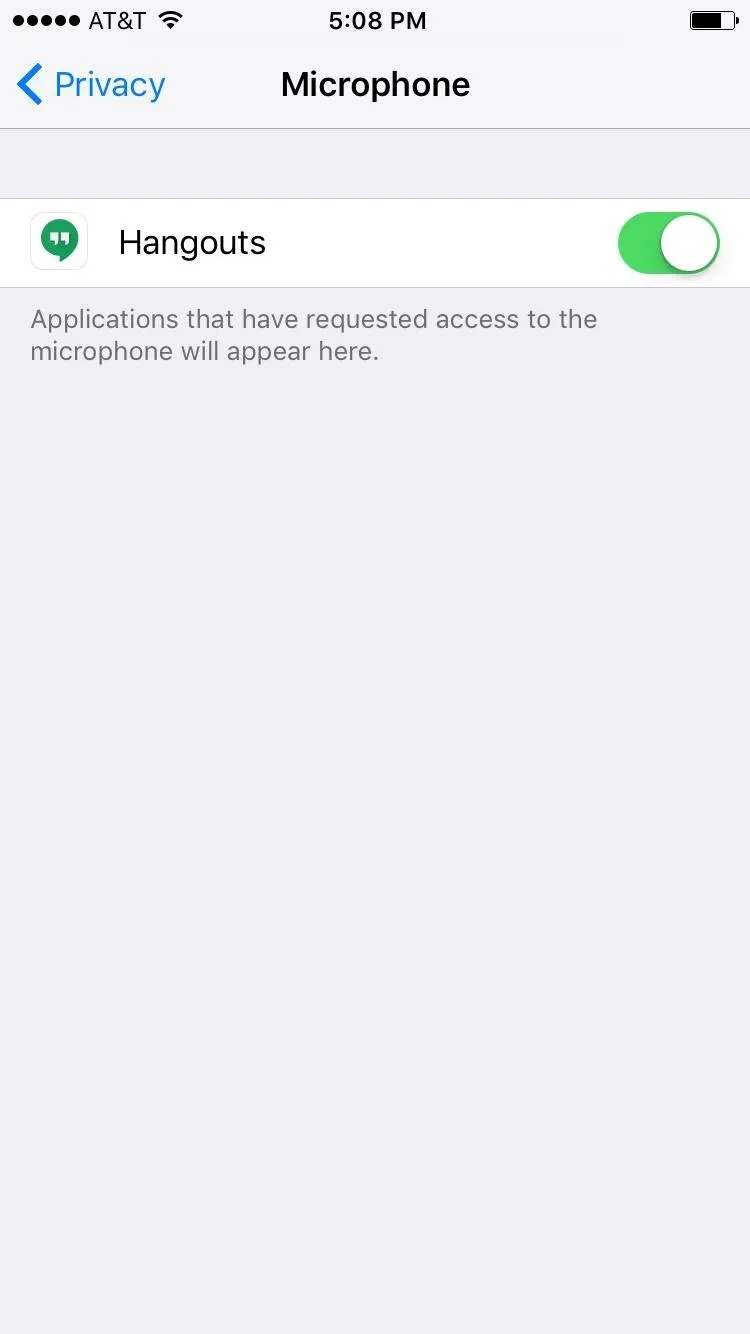
#14: Microphone Access
Certain apps will need to access your iPhone's microphone to record audio. Most apps that ask for this permission are legitimate, but some could be abusing this privilege. So to make sure that only the apps you approve of are accessing your microphone, head to the Settings -> Privacy -> Microphone. From here, disable the switch next to any app if you don't want it to be able to record ambient audio.
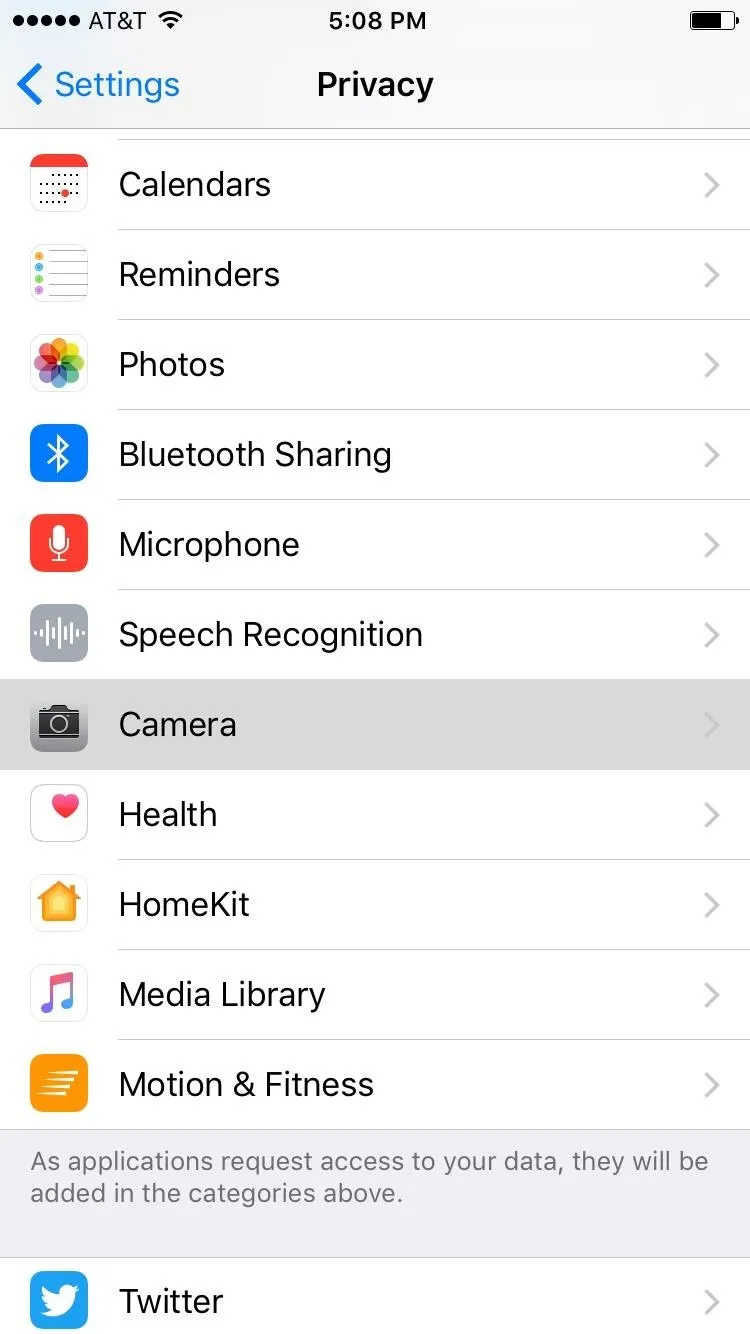
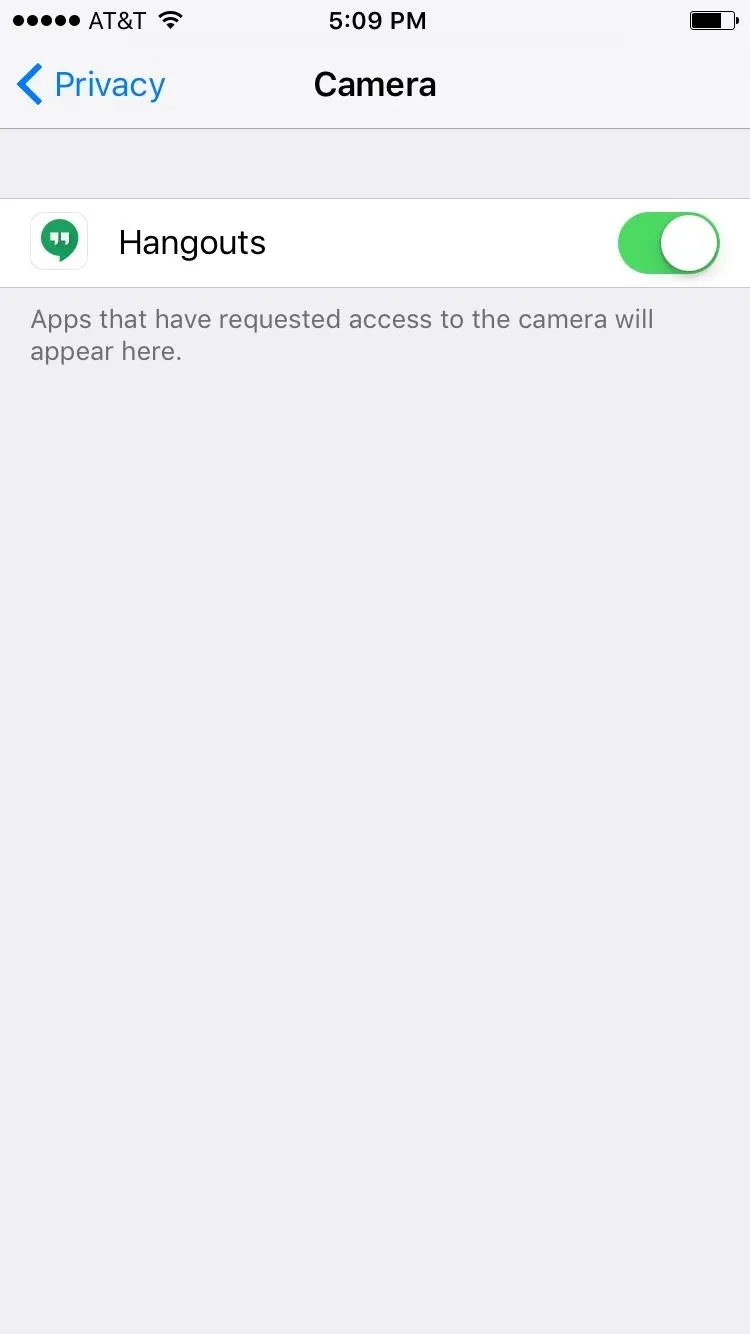
#15: Camera Access
Apps like Snapchat and Instagram obviously need access to your iPhone's camera for their core functionality, but not every app on your phone should have this privilege. So every now and then, you should take the time to visit the Settings -> Privacy -> Camera to see which apps can see you. From here, if you find an app that doesn't belong, simply disable the switch next to it, and the app will no longer be able to access your camera.
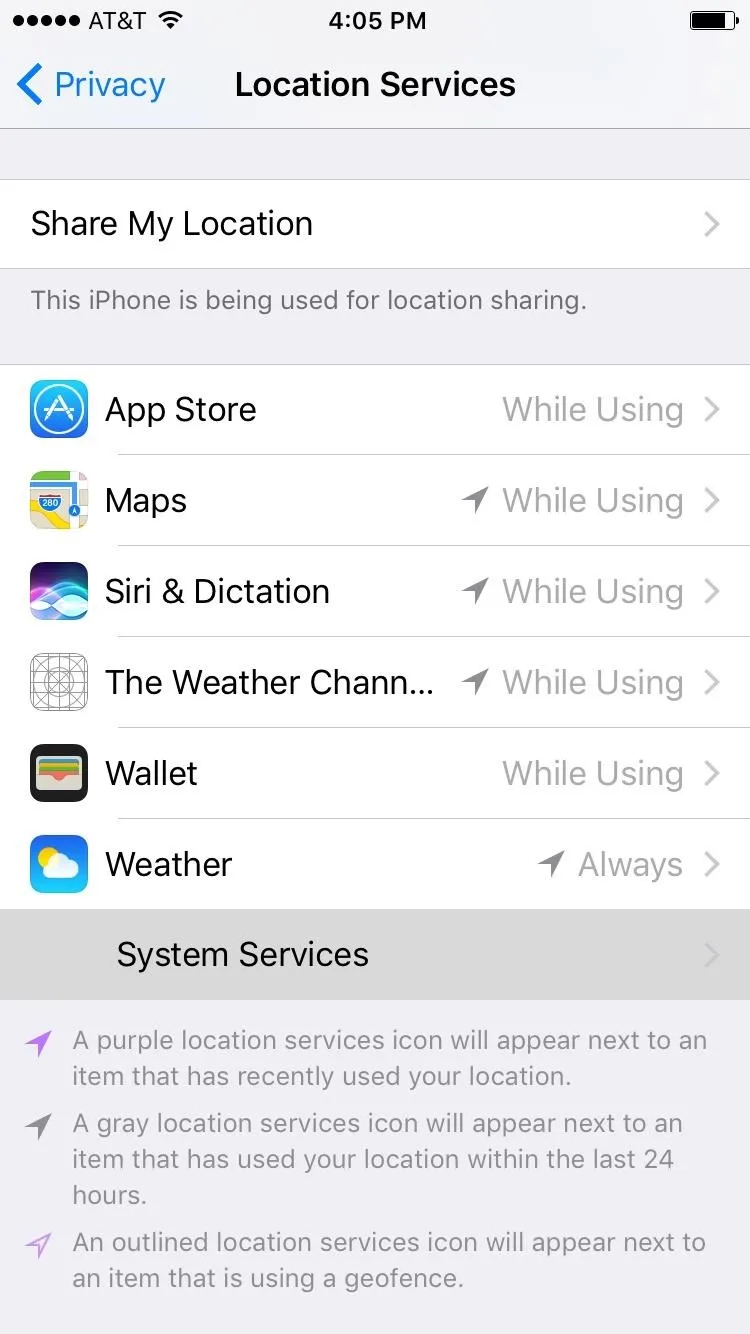
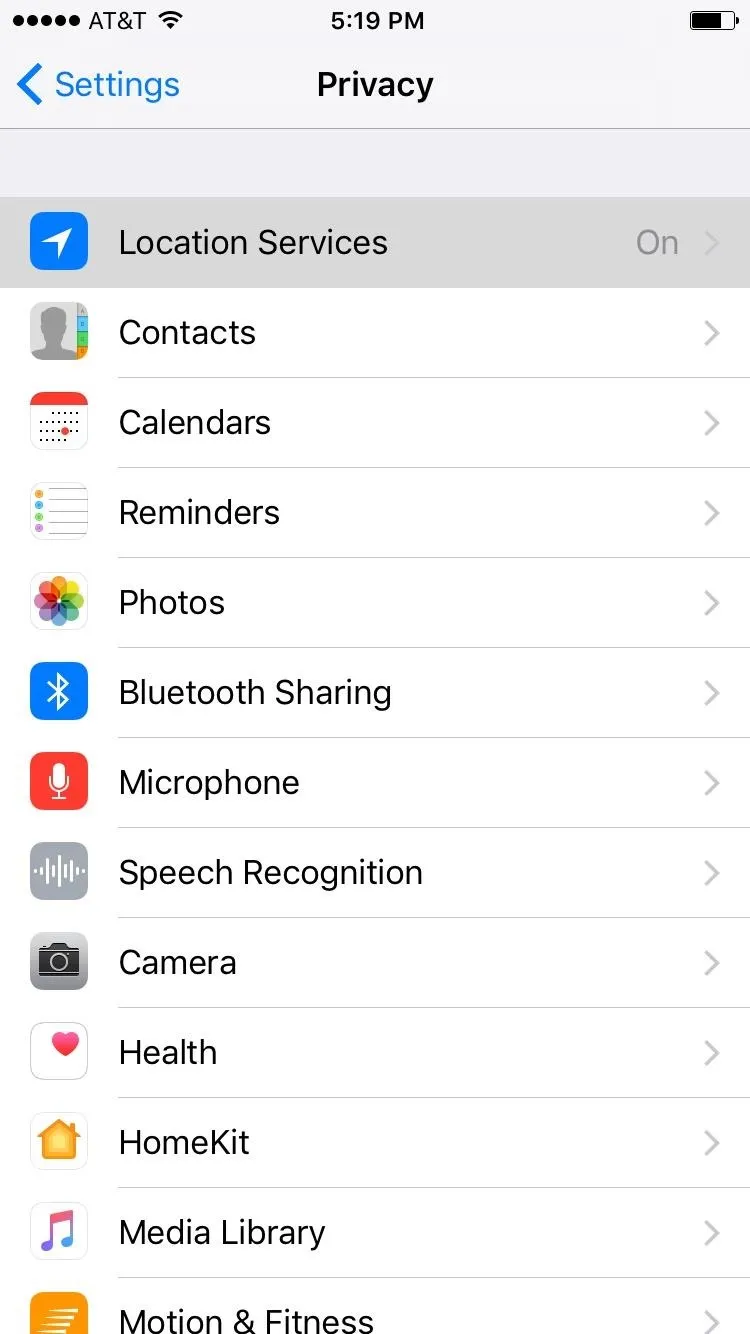
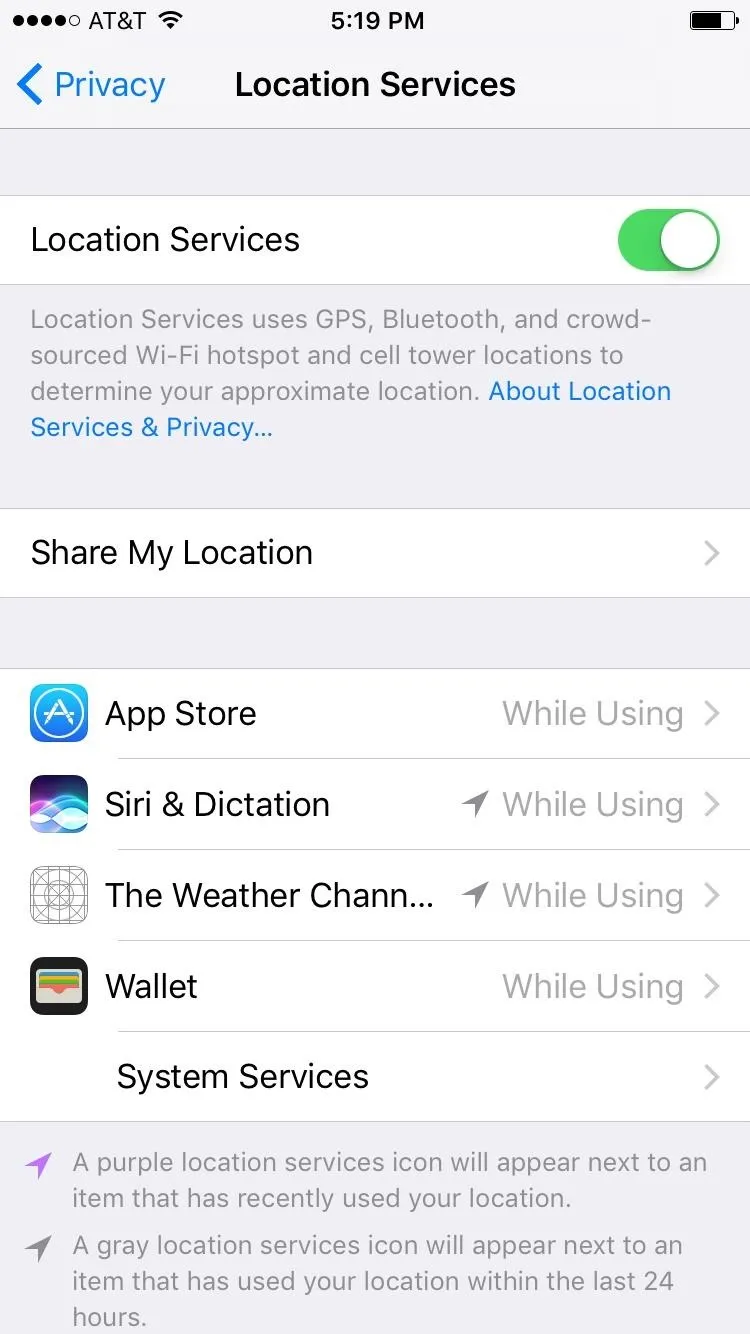
#16: Location Services
Location services empower certain apps to become geographically aware. This is how Maps knows where to put that little blue dot that represents your location, or how Pokémon GO can tell if you're near a Pokéstop. But if you're concerned about privacy, these features can make it feel like an app is spying on you.
To prevent certain apps from accessing your location, head to the Settings -> Privacy -> Location Services. From here, you could disable the switch at the top of the screen, but that would prevent any app from accessing your location. Instead, it would probably be a better idea to simply select any app from the list, then choose "Never" to specify that you don't want this app to know where you are.
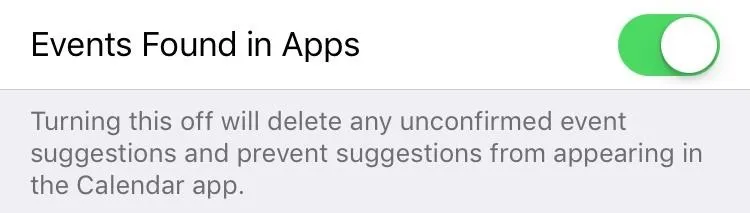
#17: Events Found in Apps
iOS 10 will now scan your Mail and Messages apps for any messages that contain a time, date, or place, then automatically add an event to your calendar based on what it found in your private conversations. This might be good for forgetful folks, but for many of us, it borders on privacy invasion.
To disable this feature, go to the Settings -> Calendar, then you'll find the option at the bottom of the screen. Once you've disabled that switch, you can read more about Events Found in Apps at the following link:
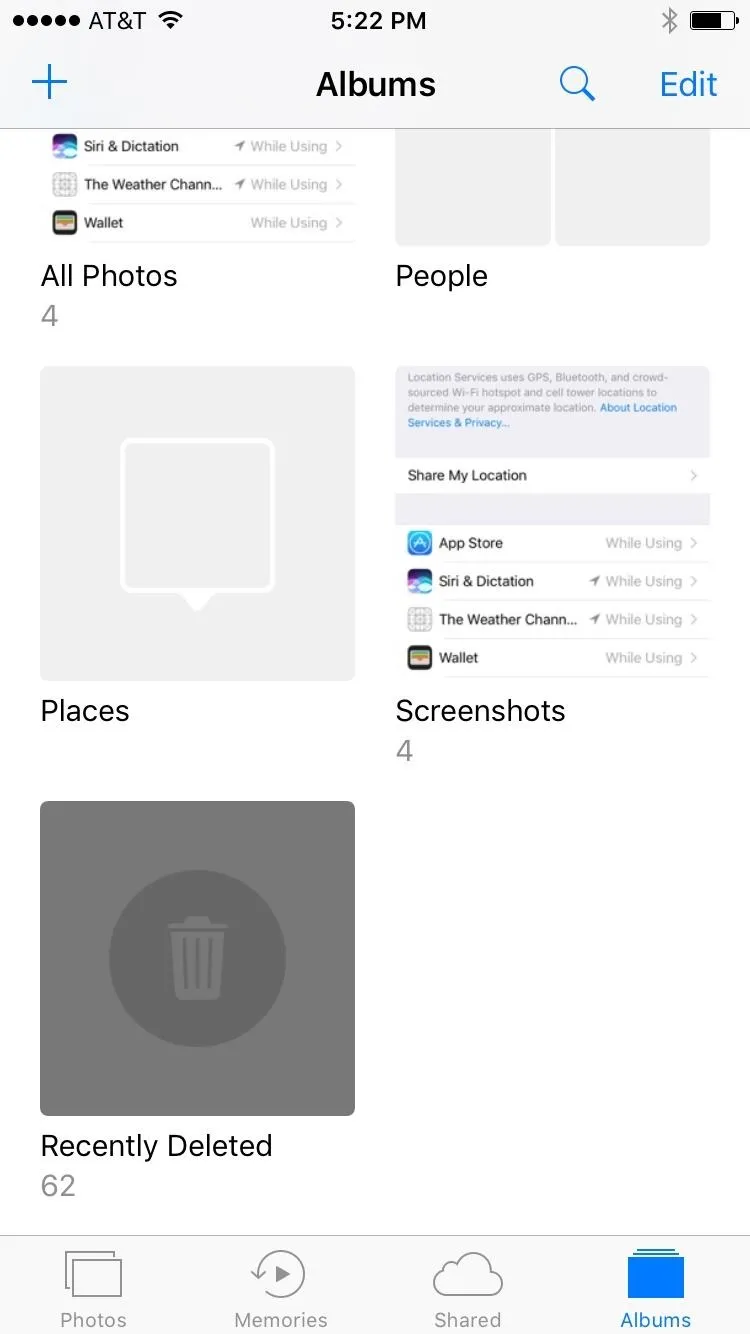
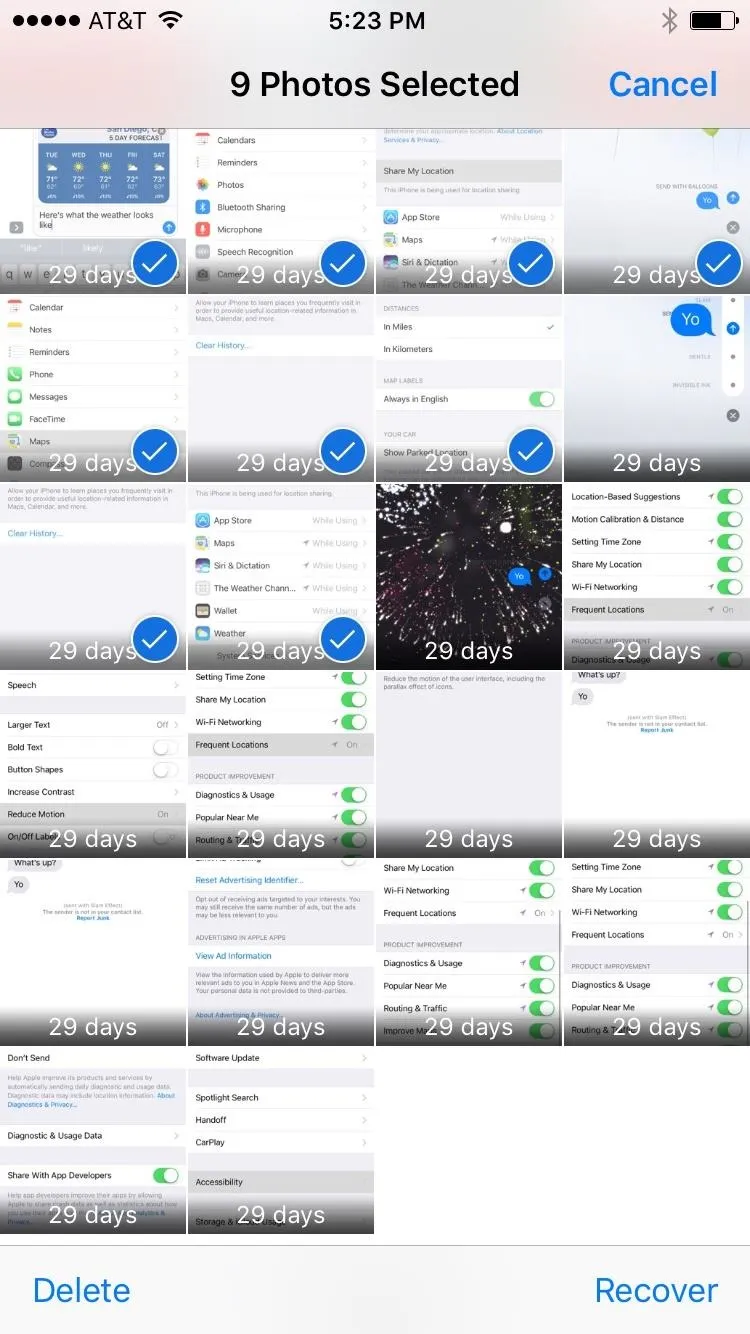
#18: Recently Deleted Photos
From a privacy standpoint, the fact that the Photos app saves deleted pictures for 30 days can be a big problem. If you deleted a sensitive image, someone else could still find it in your Recently Deleted folder. This means that if you want to erase an image for good, you'll have to delete it from the regular Camera Roll in Photos, then head to the Albums tab and delete it again from the Recently Deleted album.
#19: Siri Suggestions
Spotlight Search now saves your search history, so every time you swipe down on your home screen and type in a question, you'll see past searches listed plain as day. This feature could certainly lead to some embarrassing situations, so if you'd like to disable it, check out our full guide at the following link:
#20: App Store Purchases
This next one is actually two different settings, depending on how you've set things up. The issue here is that, if you left your iPhone unlocked shortly after making a purchase through the App Store, someone could come behind you and run up your bill by making additional purchases without your password.
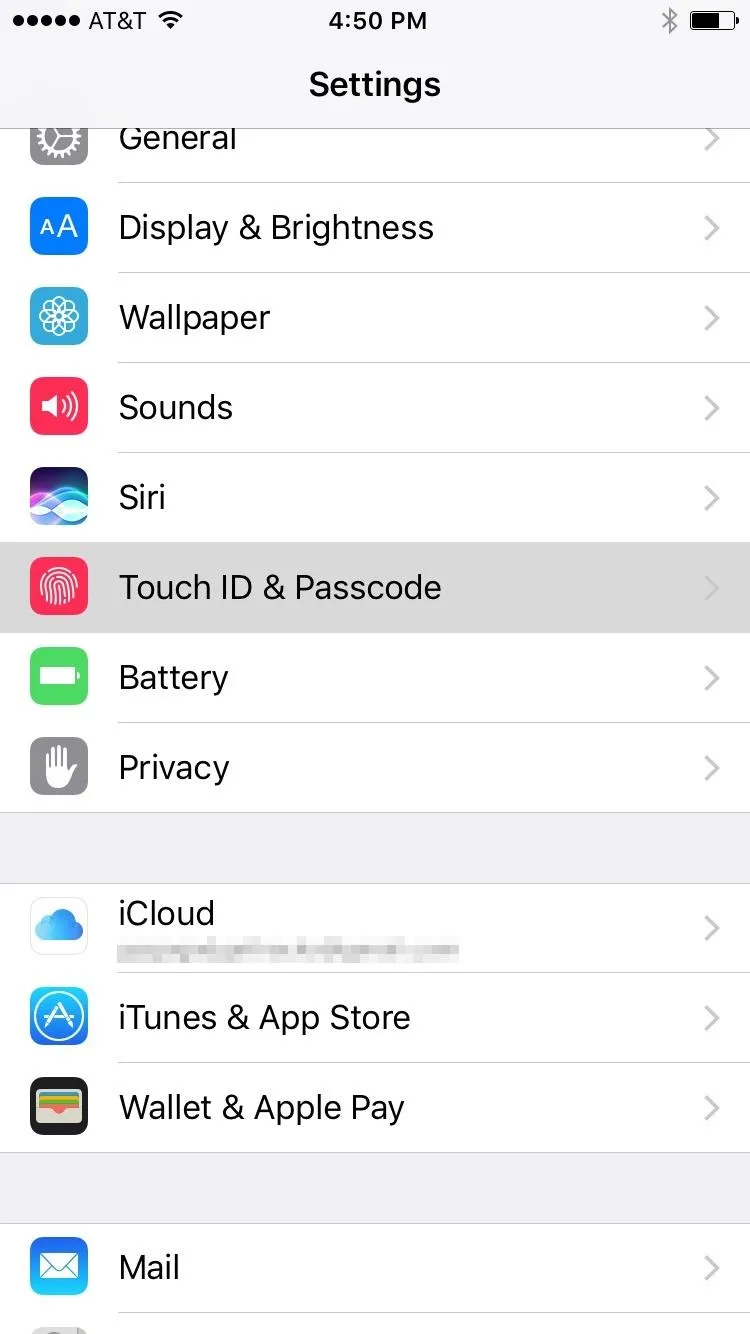
To prevent this, your first option is to head to the Settings -> Touch ID & Passcode, then enable the iTunes & App Store option to require that you scan your fingerprint for every purchase. If you don't have Touch ID configured, or if you don't want to use this setting, head to Settings -> iTunes & App Stores instead. From there, select Password Settings, then choose "Always Require" on the following screen.
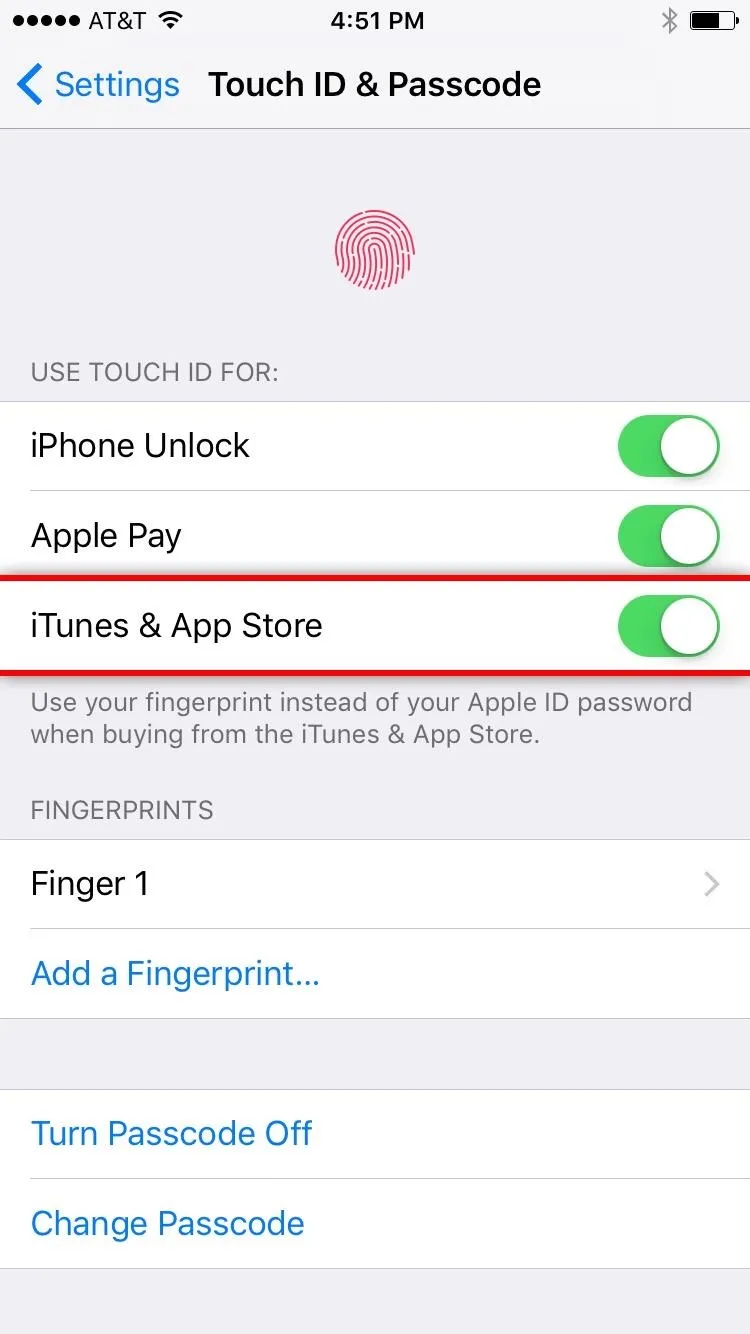
Requiring Touch ID for all iTunes & App Store purchases.
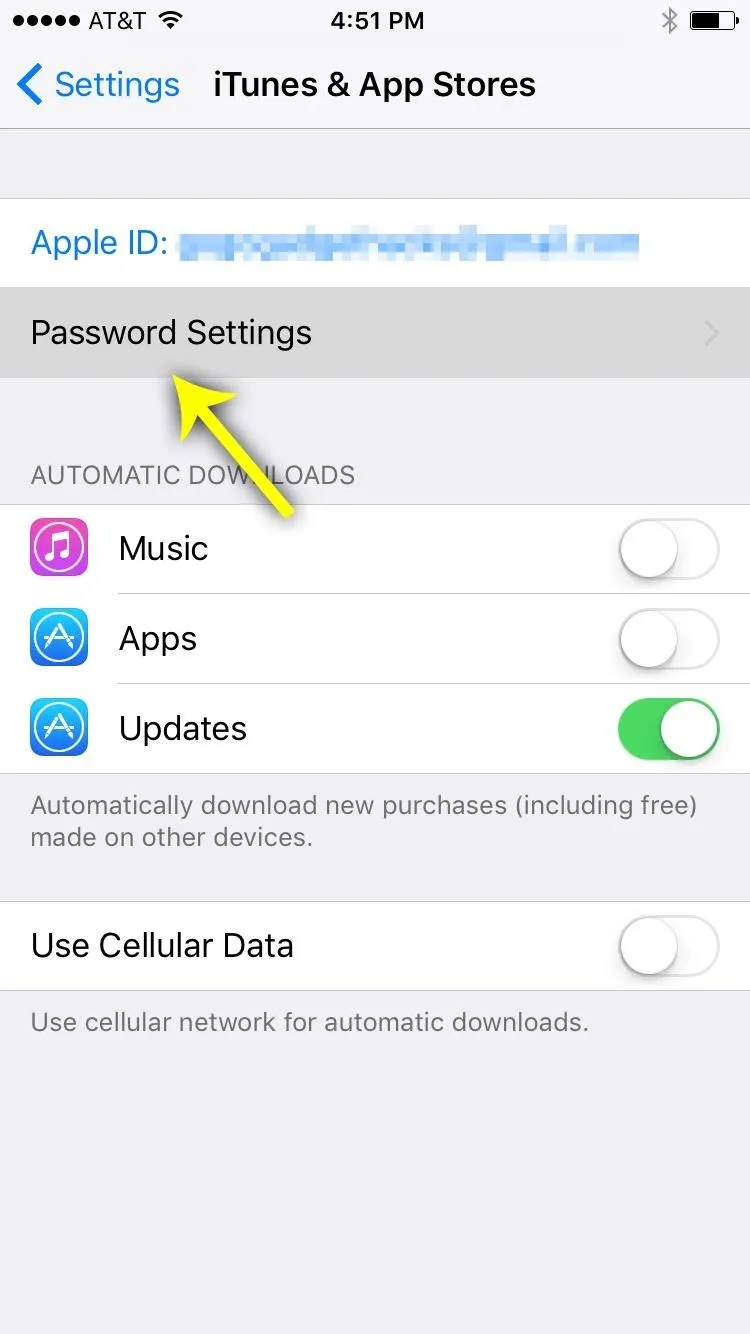
Accessing iTunes & App Store password settings.
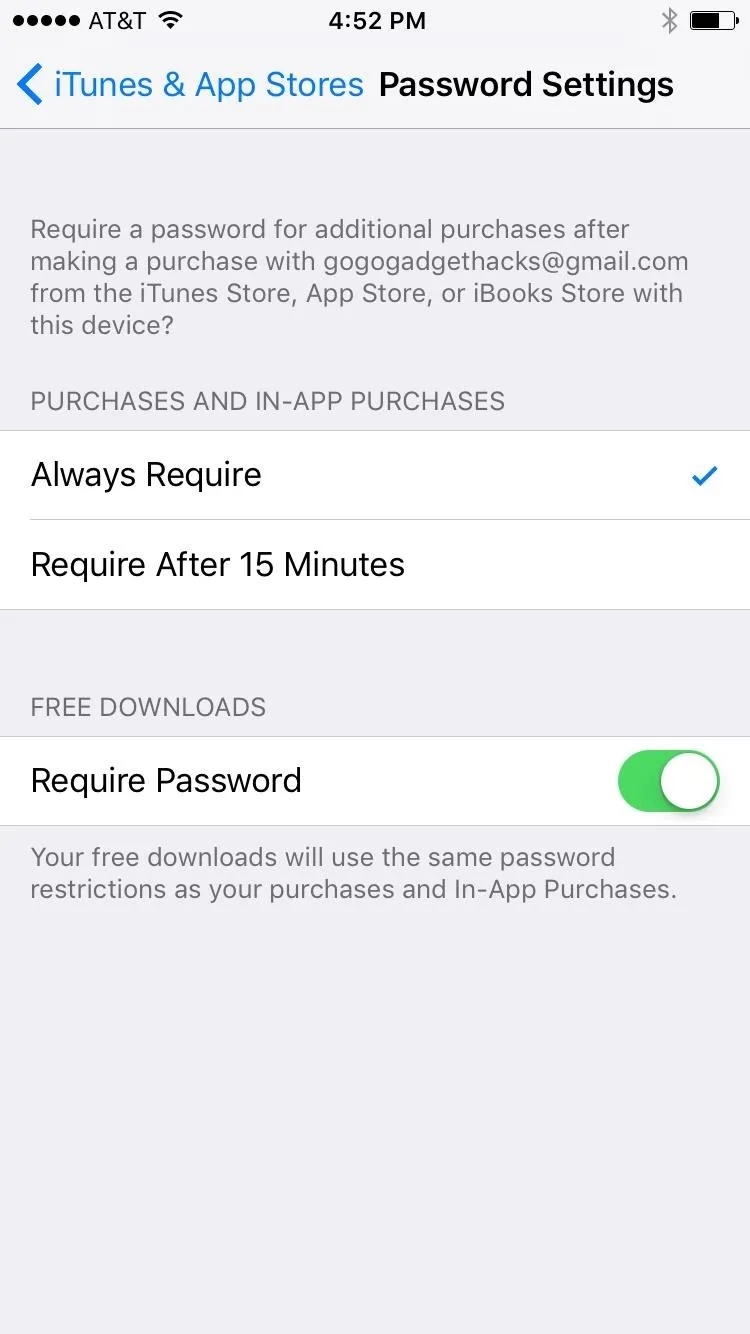
Setting iTunes & the App Store to always require a password for purchases.
Requiring Touch ID for all iTunes & App Store purchases.
Accessing iTunes & App Store password settings.
Setting iTunes & the App Store to always require a password for purchases.
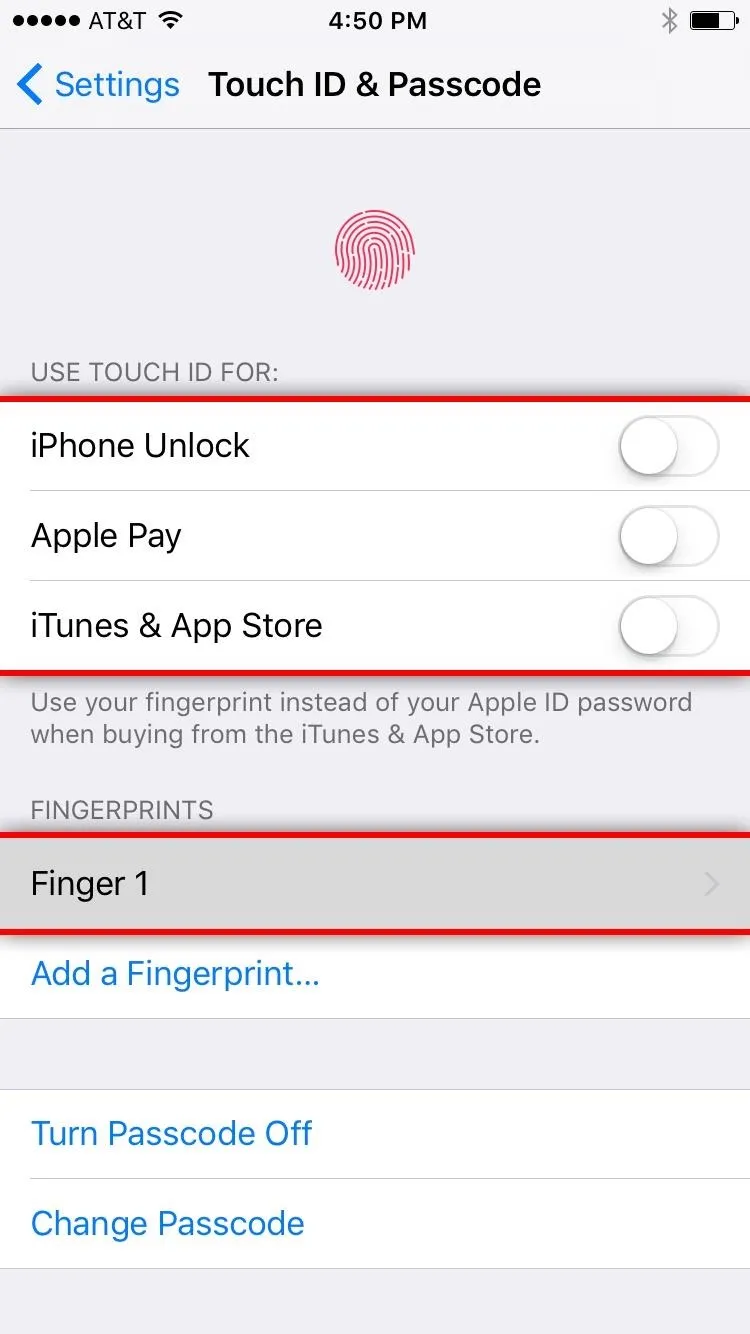
#21: Touch ID & Passcode
Don't get me wrong here, Touch ID is a very effective security measure on some levels. It ensures that many people who would've otherwise left their phone completely unsecured have an easy way to lock their device.
But Touch ID isn't perfect, as iOS 10 stores a copy of your fingerprint in a file. Couple that with the fact that you can't reset your fingerprint like you can reset a passcode, and you've got a serious issue.
The trouble is, if someone were to get their hands on that fingerprint file, your fingerprint would never again be a reliable security measure, no matter what device you use. It can all be summed up with the saying "Your fingerprint is a user name, not a password."
So if you want to be extra safe, consider using a passcode (or an alphanumeric passcode for increased security), and getting rid of Touch ID. To do this, head to Settings -> Touch ID & Passcode, then disable all of the options in the Use Touch ID For section. Next, select each of your registered fingerprints, then tap Delete Fingerprint to remove all records of your fingerprints.

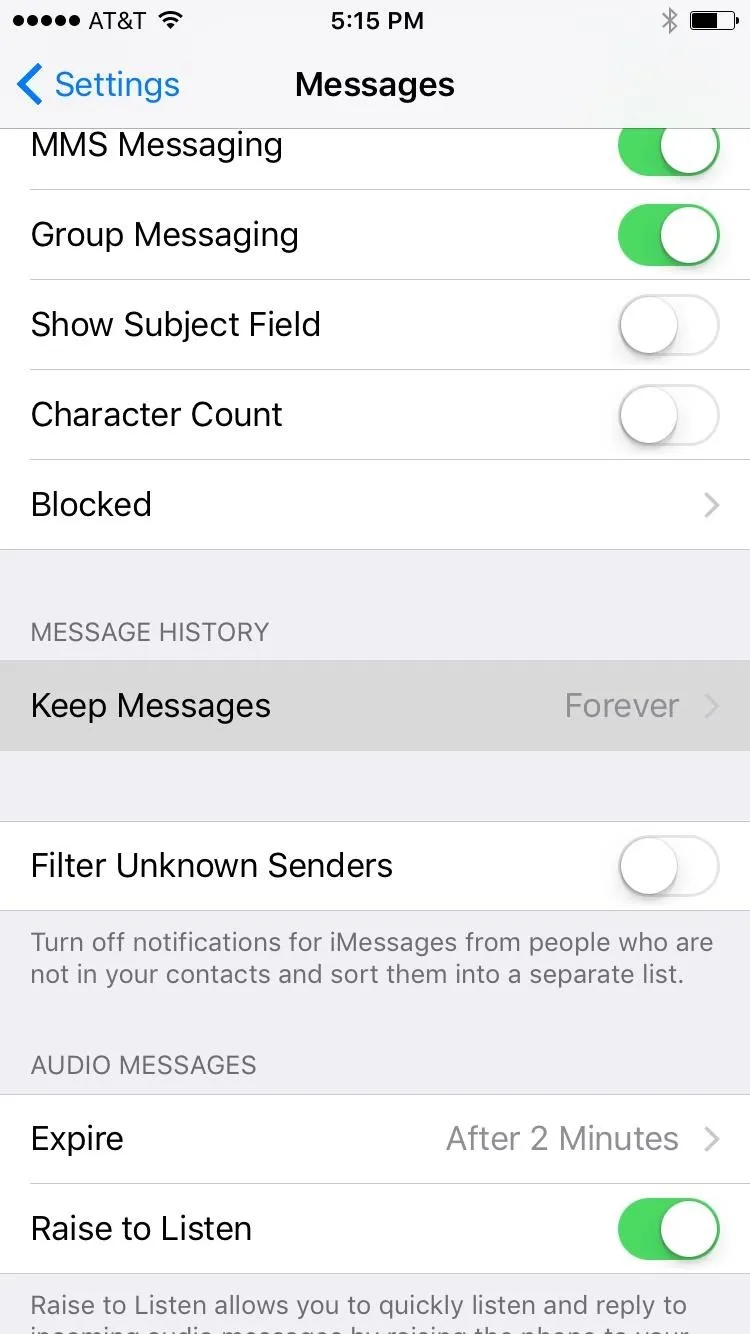
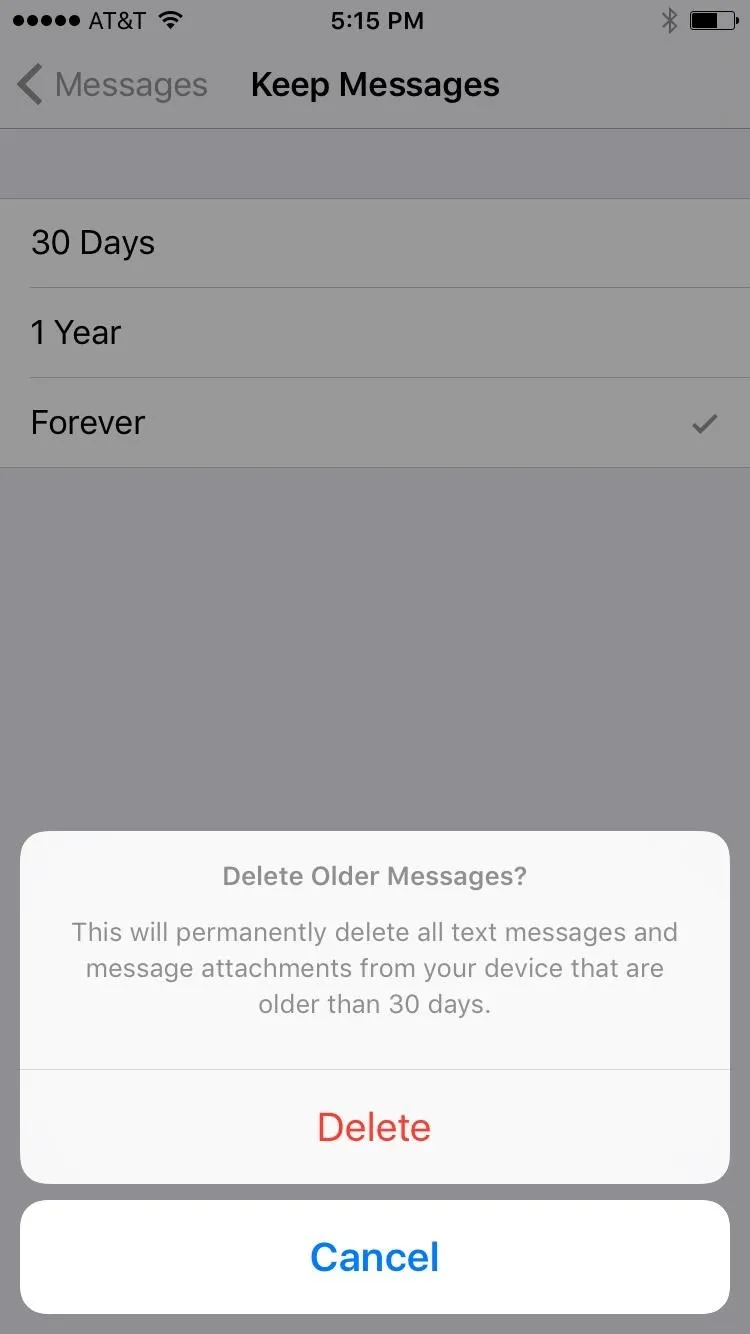
#22: Keep Messages
By default, iOS 10 is set to save all of your text messages indefinitely. Since forever is a pretty long time to have anything laying around, you might want to change this setting just to be on the safe side.
If so, head to the Settings -> Messages -> Keep Messages. From here, choose either "30 Days" or "1 Year," then press Delete on the popup to get rid of your existing messages that fall outside of this time frame. From now on, your oldest messages will be automatically deleted, which leaves far less of a paper trail.
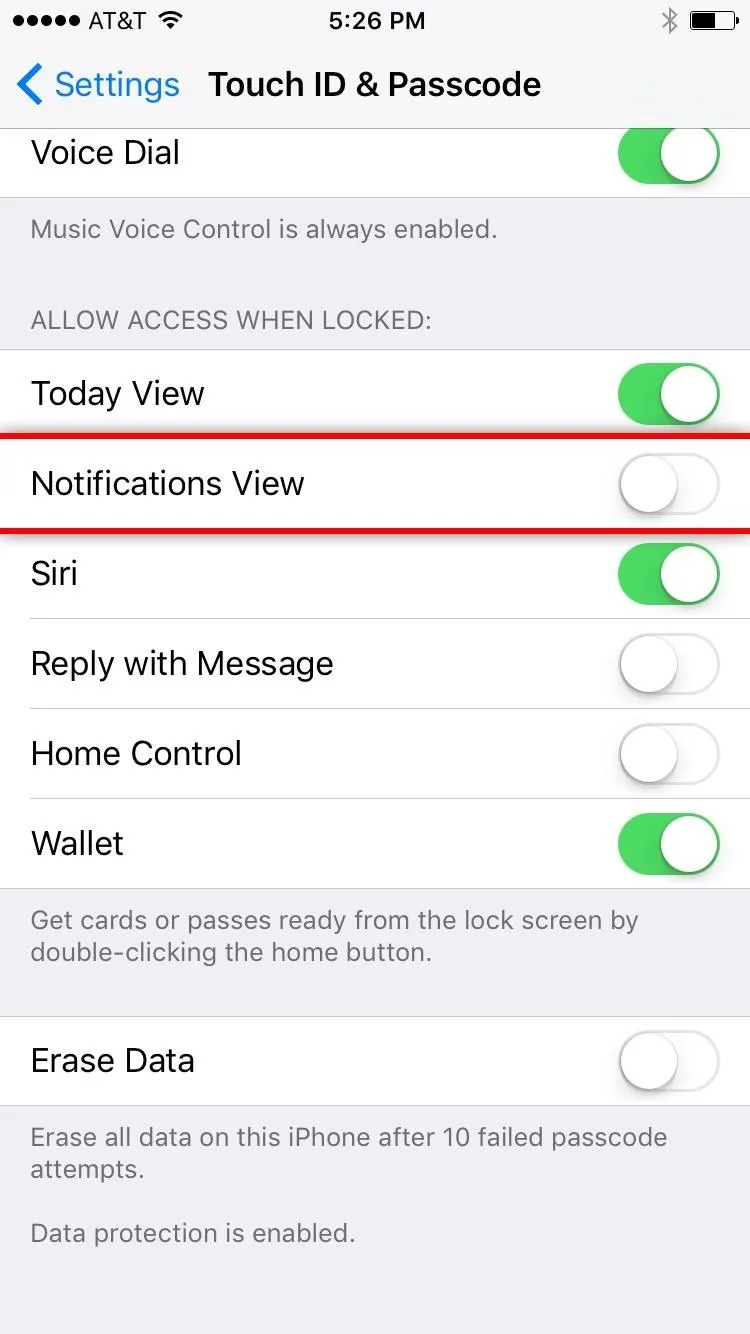
#23: Notifications View
Notifications have been revamped in iOS 10, but one existing feature continues to be problematic. When you receive a new notification, you'll see the message on your lock screen—but so would anybody else that was nearby, especially if you have Raise to Wake enabled.
So if you'd like to remove the notifications from your lock screen, head to the Settings -> Touch ID & Passcode. From here, just disable the Notifications View option towards the bottom of the screen, and your iPhone will be all the more private as a result.
- Follow Gadget Hacks on Facebook, Twitter, Google+, YouTube, and Instagram
- Follow WonderHowTo on Facebook, Twitter, Pinterest, and Google+
Cover photo and screenshots by Dallas Thomas/Gadget Hacks


Comments
Be the first, drop a comment!