How To: The Free Way to Save iPhone Voicemails on Your Mac

The Free Way to Save iPhone Voicemails on Your Mac

Voicemails are like chores for me. I have to listen to them, but never really feel like doing it. When I finally do, most of them get deleted right away, but every so often they'll be one I save and listen to over and over again, whether it's a cute birthday wish from grandma or a hilarious joke from my friend.

When you come across a voicemail that you want to keep forever, transferring it over to your computer makes total sense, but it's not a simple task to do if you have an iPhone. While there are apps like iExplorer and PhoneView, they cost too much to use just for a voicemail here and there.

Instead of handing down any cash, I'm going to show you how to extract all of the voicemails on your iPhone to your computer and convert them into shareable files, all thanks to a few Terminal commands.

Don't worry, the process might sound tedious, but it's straightforward and simple enough to understand as long as you follow the steps below.

Step 1: Back Up Your iPhone

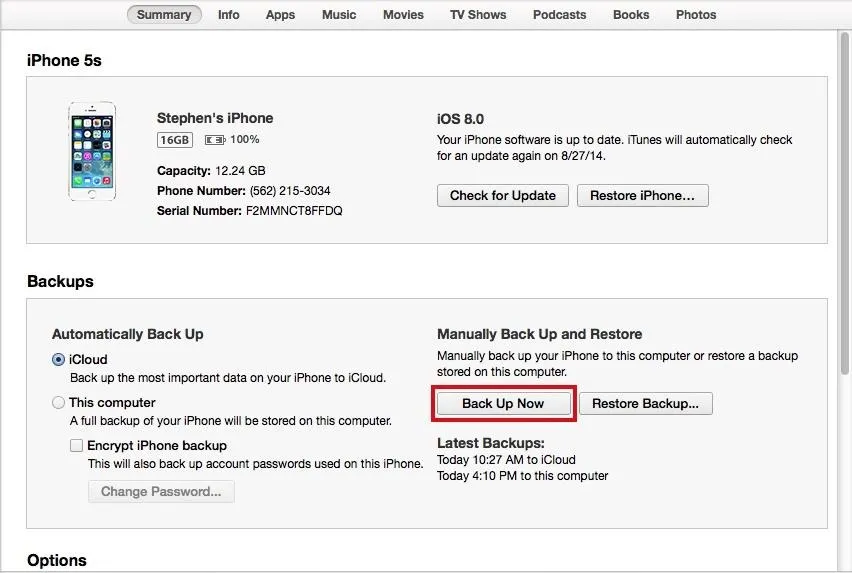
If you want the voicemails from the iPhone you're currently using, you'll need to backup your device through iTunes—not via iCloud. Do so by connecting your iPhone to your computer, opening iTunes, and clicking on Back Up Now from your iPhone's Summary page. If you want to pull voicemails from an older backup, skip directly to Step 2.

Step 2: Find the Backup Folder

After the backup is complete, you'll need to find the folder where the iPhone backup is stored.

  1. Open Finder.
  2. Press and hold down the Option key.
  3. Click Go in the menu bar.
  4. Select Library.
  5. Go to Application Support -> MobileSync -> Backup.
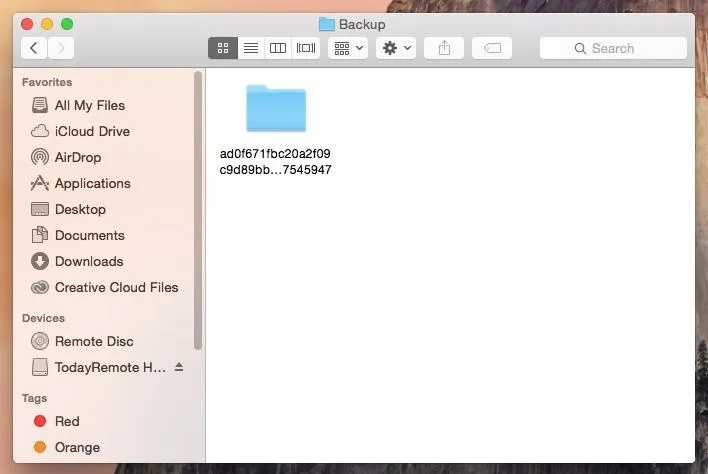
  6. All of your iTunes backups will be in the Backup folder. Show all of your items in List View so that you can see the date for each backup. That way you'll find your most recent backup or older ones that you want to pull voicemails from.

Step 3: Copy & Rename the Backup Folder, Create iOSVoicemails Folder

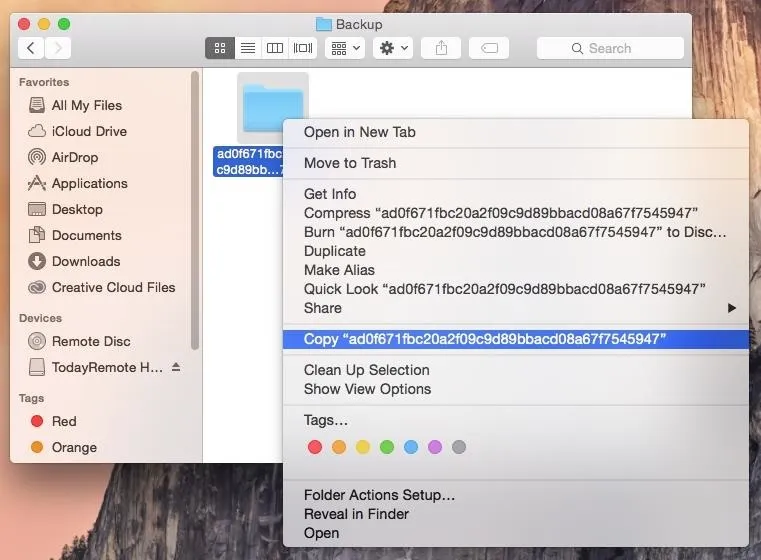
Since you don't want to mess up your backup (for future purposes), we're going to make a copy of the folder and paste it onto your desktop. Simply right-click on the backup folder and select Copy "Backup Folder Name".

Now right-click on an empty space on your desktop and select Paste Item. Since these backups are pretty large, it might take a few seconds for the folder to copy over to your desktop.

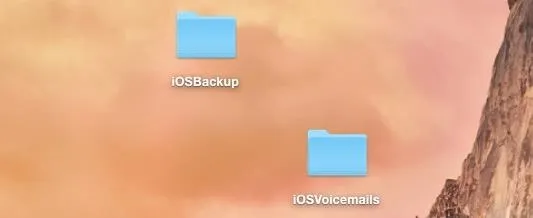
Rename the folder to something easier than those mess of letters and numbers by right-clicking on the folder, selecting Get Info and entering a name into the Name & Extension: box. Let's use iOSBackup as the name, to make things simple.

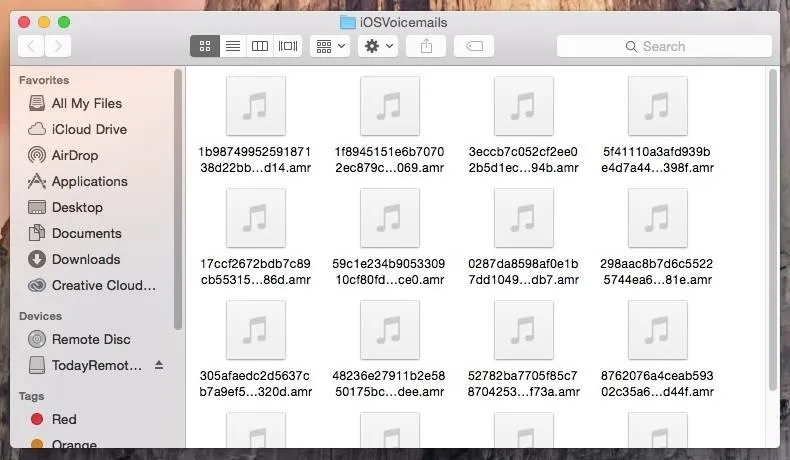
Also, create a folder called iOSVoicemails on your desktop—this is where your voicemails will be saved.

Step 4: Create Script on Your Desktop

In a previous version of this guide, we had a much more complicated way of going about the process of extracting the voicemails from your backup. Thanks to WonderHowTo user Lauren Pattison, the process is now much more simple, thanks to a nifty script she wrote and provided to us.

Open Terminal and enter the following:

cd Desktop

Hit enter. This is to to set the directory. Now you're going to create the script by entering:

vim voicemailscript.sh

Again, hit enter. Now type:

i

This will allow you to insert text. Now type the following text into Terminal, indentations and all. You can copy it here from the file on Pastebin, then paste into Terminal to make things easier.

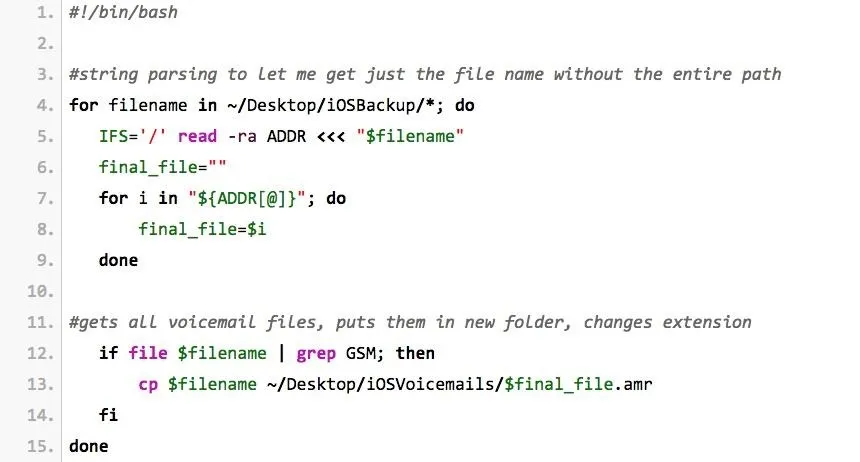
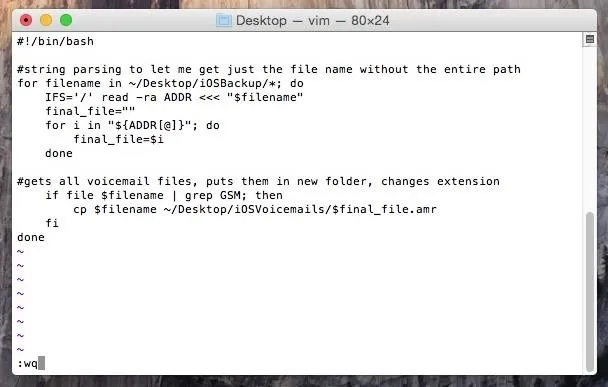
After pasting the text, hit the escape key on your keyboard and type in:

:wq

And hit enter.

Step 5: Make Script Executable, Run It

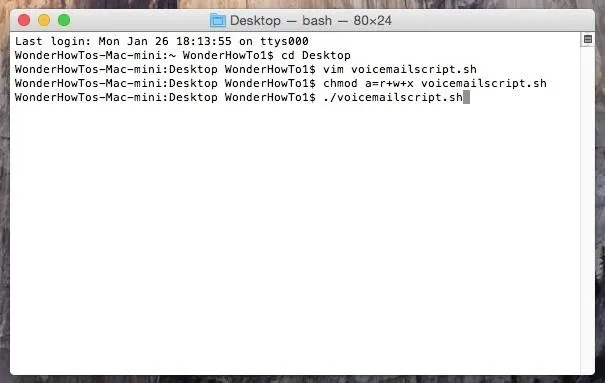
Still in Terminal, type in:

chmod a=r+w+x voicemailscript.sh

Hit enter. This will make the script executable. Finally, type in:

./voicemailscript.sh

And hit enter one more time, which will run the script.

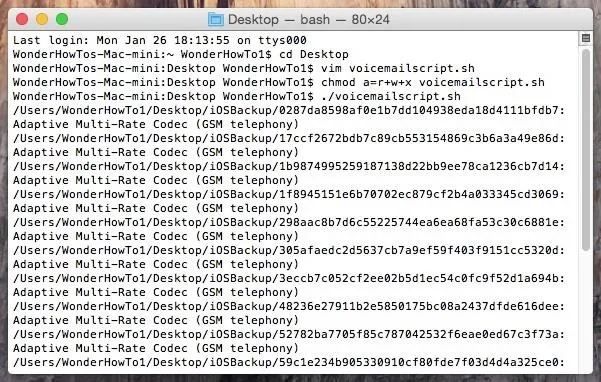
A list of all your voicemails will show up in Terminal.

Step 6: Listen to Voicemails, Convert Them to .M4A

In the iOSVoicemails folder on your desktop, you'll find all of the voicemails from your backup.

When you find the voicemails that you want to keep/share, open them in QuickTime Player, go to File, click on Export and select Audio only....

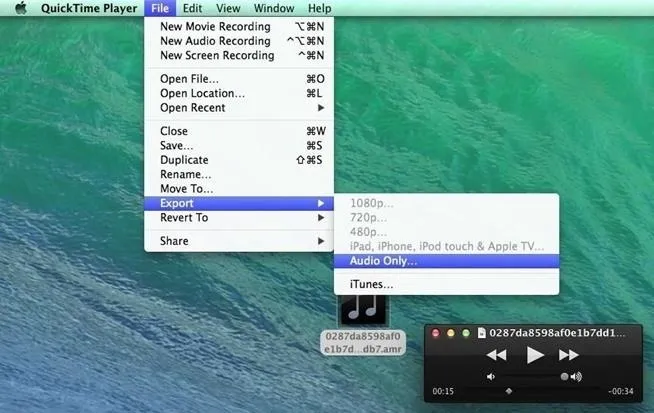
Now press Save and your voicemail will be saved in an .m4a file that you can share and upload on the internet. And that's all there is to it.

Just updated your iPhone? You'll find new emoji, enhanced security, podcast transcripts, Apple Cash virtual numbers, and other useful features. There are even new additions hidden within Safari. Find out what's new and changed on your iPhone with the iOS 17.4 update.

35 Comments

I am getting stuck at the point of looking for which ones are voicemails. the terminal is telling me "argument list too long"

What am I doing wrong?

Hi Lark and Nelson -

I got the same "argument list too long" issue and found a workaround. I also enhanced the tutorial here, using terminal to batch copy and rename instead of the more manual method 1 by 1 via Finder mentioned here.

See below for my notes:

Before running the file command, split the backup into 4 equal parts (iPhoneBackup1,iPhoneBackup2,iPhoneBackup3,iPhoneBackup4). I was getting errors that there were too many files to parse through before doing this.

Once that's done, run the file command but pipe the results to 4 .txt files by running the following from each backup folder:

  • cd ~/Desktop/iPhoneBackup1
  • file | grep GSM > vm1.txt
  • cd ~/Desktop/iPhoneBackup2
  • file | grep GSM > vm2.txt
  • cd ~/Desktop/iPhoneBackup3
  • file | grep GSM > vm3.txt
  • cd ~/Desktop/iPhoneBackup4
  • file | grep GSM > vm4.txt

Use the find and replace feature in TextEdit to modify each of the 4 text files with file names in them to remove the following string at the end of each line:

  • : Adaptive Multi-Rate Codec (GSM telephony)

You will now be left with 1 file name on each row. Save and close the file.

Create a folder called Voicemails on the desktop. Now we will use the output files to batch copy the voicemail files only to the "Voicemails" folder on the desktop.

  • cd ~/Desktop/iPhoneBackup1
  • cp `cat vm1.txt` ../Voicemails/
  • cd ~/Desktop/iPhoneBackup2
  • cp `cat vm2.txt` ../Voicemails/
  • cd ~/Desktop/iPhoneBackup3
  • cp `cat vm3.txt` ../Voicemails/
  • cd ~/Desktop/iPhoneBackup4
  • cp `cat vm4.txt` ../Voicemails/

Now that we have all the voicemails in one folder, run the following command to batch rename them so they have an .amr extension.

  • cd ~/Desktop/Voicemails
  • for i in ; do mv "$i" "$i.amr"; done

Continue with the tutorial to save the files using QuickTime.

I am stuck also at point 4, I do not have mac but a regular PC, I was able to go to dos and to change directory but I was not sure how to find hidden files in Dos. (GSM files) all the backup files are just with no extension.

I have found Cygwin to handle running Linux/Unix/BSD commands. It presents a NIX environment in Windows. I was able to use bash in Cygwin. To get the files. There is also a typo in the body of the text, but it is correct in the screen shot. Line 4 should have, including the quotes: "${ADDR@}" instead of without the square brackets around the @, like in the body.

Mine ran fine with square brackets, but only extracted 2 voicemails of (?) total. I know it didn't get them all, because it didn't include the most recent.

I'm stuck on Step 4. It says, "No such file or directory" and I've double-checked that I did name it "iOSBackup". See screenshot. Thanks.

You forgot the / between ~ and Desktop, try that! And make sure there's a space between cd and ~. That was my mistake the first time.

Your screenshot doesn't quite make sense to me, but on step 4, if you are flipping between the tutorial and the terminal window, make sure you are actually back in TERMINAL window when you hit "escape" key, per instruction. I THOUGHT I was in the window, wasn't, and then got your error when I tried to run the script. I remade the script and it went fine.

After identifying the audio files, an easier way to add .amr extension to all of them is using this command

for i in ; do mv "$i" "$i.amr"; done

On step 4, no problem getting into the folder, but once I try the "grep" command, nothing happens.

Here's a screenshot.

Am I doing something wrong?

Or, is there another way to go about this? THANKS!!!!

Dunno, it works. Perhaps grep on "Adaptive".

I had that the first time, and it turns out I didn't name the backup folder correctly. Use the exact name as given above. Then redo the last step that runs the script.

I followed the tutorial and was about to run the script when ./voicemailscript.sh: line 5: ${ADDR@}: bad substitution came up. I am not sure how to fix this part of it

They haven't updated the article to mention this yet, but the issue you're having is because you didn't add spaces to the beginning of some lines to make the indentations match what they look like in the screenshot.

The lines should all have 0, 4, or 8 spaces added to the beginning of them, depending how they appear in the screenshot (the most indented lines have 8 spaces, second most have 4, and not indented at all have 0).

For Windows, download Cygwin. If you have VLC 2.1.5, forget about QuickTime, if you don't have VLC, get it, but make sure you are using version 2.1.5. (As of this writing Jan 27, 2015) Don't use anything lower there are buffer overflow exploits. When installing Cygwin, make sure you have vim (or some other text editor). Follow the instructions above.

In the script, to get to your "Desktop" you may use the notation:

c:/Users/<your user name>/Desktop/iOSBackup/ for your source directory and your destination can be c:/Users/<your user name>/Desktop/iOSVoicemails/$finalfile.amr as your destination directory. Just be sure to put the square brackets around the ${ADDR@} the at sign. It is in the screen shot but not in the text.

Run the script. The resulting .amr files don't need to be converted, VLC will play them. I'll try on my Mac when I get home, I suspect VLC will also work without having to convert to mp4.

Oh, to find the iTunes backup file in Windows, the full path should look like this %AppData%\Apple Computer\MobileSync\Backup. This is the location of the directory you want to copy to your desktop.

Open the Terminal app. You can find it with a Spotlight search, or you can find it in the Utilities folder where your Applications are.

I entered all of the commands from step 5 but nothing happened... I did not name the folder "iOSVoicemails" is that the problem???

So... I'm getting this message...?

Last login: Fri Feb 6 12:51:17 on ttys000
mc-130-49-16-83:~ jksport07$ cd Desktop
mc-130-49-16-83:Desktop jksport07$ vim voicemailscript.sh
mc-130-49-16-83:Desktop jksport07$ chmod a=r+w+x voicemailscript.sh
mc-130-49-16-83:Desktop jksport07$ ./voicemailscript.sh
./voicemailscript.sh: line 16: syntax error: unexpected end of file
mc-130-49-16-83:Desktop jksport07$

Once all the .amr files are saved in the IOSVoicemails folder I realized that they are not sorted chronologically because now they all have the same created date in the "Get Info". Is there a way to find a date and timestamp for these voicemails? I took screenshots of the visual voicemail on my iPhone to match them up, but without the same chronological order, it's not very helpful, unless I listen to each one to find a match, but when there's 3 years worth of voicemails that is a little time consuming. Any help on this? Many thanks

I am doing everything like it says and the last time I hit enter in the terminal is just does nothing. The list of voicemails does not pop up and no voicemails are in the iOSVoicemails folder. Can someone help me?

I believe I have the exact same issue as Samantha Curtis -- no voicemail list pops up, either in the terminal or in the iOS Voicemail folder:

Last login: Thu Feb 19 18:01:13 on ttys000
Jamess-Air:~ jamesfrost$ cd Desktop
Jamess-Air:Desktop jamesfrost$ vim voicemailscript.sh
Jamess-Air:Desktop jamesfrost$ chmod a=r+w+x voicemailscript.sh
Jamess-Air:Desktop jamesfrost$ ./voicemailscript.sh
Jamess-Air:Desktop jamesfrost$

This is my first foray into typing into the terminal, and it's a little daunting. I hope I didn't mistype and cause a fatal error or something...

As I just mentioned on another comment, you probably didn't name the source folders exactly as instructed. Fix them, then rerun the script.

Ok, so I finally ran it semi-successfully, but it only recovered 2 of the voicemails, not including the most recent one which I actually wanted. I know there are somewhere between ~24 and 100+ total. And both of the ones it DID get had been deleted.

I went back to iPhone and DOUBLE deleted all voicemails except the one I wanted. Then I re-made the backup, and replaced the desktop copy, and finally re-ran the script. Oddly, it STILL recovered TWO vm's, but one was the correct one.

Thanks

Hi, at the end of step five, when it says a list of all my voicemails should appear it Terminal, it does not. Hitting enter just goes to the next line in Terminal, with nothing happening. I've gone through the process twice, same result... Any thoughts? Thanks very much.

I've tried this but am having the same problem that others have reported: After running the script, no list of voicemails is produced, and nothing is in the folder. I've triple-checked folder names and spacing in the script. All I get is a new line in terminal with a small box as in Aaron's screenshot above. Any other suggestions?

If you have encrypted your backup - THIS WILL NOT WORK. Each file in the backup is encrypted and the file command will not identify anything as a .gsm file. It's all just 'data' and the script will skip over everything.

You will need to make a new, unencrypted backup to extract the voicemails in this manner. Uncheck 'Encrypt iPhone Backup' the next time you make a backup and it should work. If it's greyed out, you likely will need to delete a profile that manages your security, such as a BYOD policy with work or MS Exchange. Good luck!

Hey Guys! After getting stuck on step 4 I decided to find a better way and I found one. It's easy and takes about 3 minutes. Save your memories :)

Thank you so much for this!! Even thought my iphone display broke, I was able to recover saved voicemails from my kids from a backup. Now I'm wondering if there is a way to get the date and timestamp for each voicemail. I'm a total novice, so any help would be much appreciated!

Thanks for sharing! I have 2 questions:

  1. I did all steps and ALL of my voicemails (even ones i thought i deleted on my phone and ones that do not appear on my VM list on the phone) were saved into the folder. In the future, is there a way to prevent that from happening again? (I took the long way this time and manually deleted all the VMs i didn't want.)
  2. Is there a way to see which voicemails are from which phone number/saved caller id? With your steps, there's way to identify the voicemails.

Thank you!!

Thank you so much for this information! I'm a total newb requiring very clear instructions and I was able to follow every step and I now have all my Voice Mails on my desk top! The only hard part, which wasn't that hard was finding how to open a terminal, which I used Finder to locate. Not sure if there is a faster way. THANK YOU THANK YOU THANK YOU!!

This is a great tutorial . I had to make a slight modification to make it work for me though.

I realized it wasn't processing anything. It was only taking about a second. So I originally added and "echo $filename" statement to see what it was actually looking through. I found it was only going through the folders and not the files themselves. I had to tell it to look at the files as well using this addition: ~/Desktop/iOSBackup/**/* .

If you don't follow, that's okay. You can just copy the slightly modified code below and give it a shot.

Also, make sure the backup is not encrypted (you'd have to make sure that's unchecked in iTunes) and that the folder matches what's in the code (I'm not sure if capitals matter, but just make them the same).

#!/bin/bash

#string parsing to let me get just the file name without the entire path
for filename in ~/Desktop/iOSBackup/* ~/Desktop/iOSBackup/**/*; do
IFS='/' read -ra ADDR <<< "$filename"
final_file=""
for i in "${ADDR@}"; do
final_file=$i
done

#gets all voicemail files, puts them in new folder, changes extension
if file $filename | grep GSM; then
cp $filename ~/Desktop/iOSVoicemails/$final_file.amr
fi
done

I hope this helps.

Thanks N L! I was able to get the script to work after updating with your changes.

I am so bummed that I'm having so much trouble getting this to work. My dad died two weeks ago and my birthday was yesterday. I'm trying to find the voicemails he left me on past birthdays and my stupid iphone had automatically deleted messages older than July 2018. Any help would be much appreciated. this is what i get:

Last login: Thu Jan 31 07:37:20 on ttys000
MacBook-Pro:~ taratiarra$ cd Desktop
MacBook-Pro:Desktop taratiarra$ vim voicemailscript.sh
MacBook-Pro:Desktop taratiarra$ chmod a=r+w+x voicemailscript.sh
MacBook-Pro:Desktop taratiarra$ ./voicemailscript.sh
MacBook-Pro:Desktop taratiarra$ vim voicemailscript.sh
MacBook-Pro:Desktop taratiarra$ chmod a=r+w+x voicemailscript.sh
MacBook-Pro:Desktop taratiarra$ ./voicemailscript.sh
./voicemailscript.sh: line 31: syntax error: unexpected end of file

Share Your Thoughts

  • Hot
  • Latest