


It's easy to back up and restore your iOS devices using iCloud, but there are a few downsides to encrypted iCloud backups. For one, Apple holds the key to decrypt all the data. Plus, you're limited to only 5 GB of data for free before you have to upgrade your storage to 50 GB, 200 GB, or 2 TB.
While your purchase history of apps, books, movies, music, and TV shows will be saved, the content itself will not be redownloaded automatically after restoring from an iCloud backup. Additionally, any media that was not purchased from iTunes, photos that weren't stored in the local Photos app, your call history, the home screen setup, and other data will not be backed up using iCloud.
For a complete backup of your iOS device, you'll want to use iTunes.
iCloud vs. iTunes Backups
If you go the iCloud route, it's very convenient since you don't have to hook up to a computer, and these are the things that are backed up in iOS 13 and later:
- App data
- Apple Watch backups
- Device settings
- Home screen and app organization
- iMessage, text (SMS), and MMS messages (unless you already store messages on iCloud using Messages in iCloud)
- Photos and videos (unless you already store them on iCloud using iCloud Photos)
- Purchase history from Apple services, like your music, movies, TV shows, apps, and books (but not the content itself)
- Ringtones
- Visual Voicemail password (requires the SIM card that was in use during backup)
However, while iCloud backups are encrypted, Apple does hold the key to decrypt them if necessary. That's one reason to choose encrypted iTunes backups instead since Apple cannot decrypt those.
Also, iCloud backups hold the encryption key for Messages in iCloud, if you have that enabled. Still, you can disable iCloud backups so that the encryption key for Messages in iCloud is stored on-device only. If both are disabled, iMessages, texts (SMS), and multimedia (MMS) can only be saved in an iTunes backup.
In addition to the items you can backup via iCloud, an iTunes backup will also save your call history and other vital data, but it will not back up:
- Content from the iTunes and App Stores
- PDFs downloaded directly to Apple Books
- Content synced from iTunes, like imported MP3s or CDs, videos, books, and photos
- Data already stored in iCloud Photos, Notes, Files, Reminders, etc.
- iMessages, texts (SMS), and multimedia (MMS) already stored in iCloud
- Face ID or Touch ID settings
- Apple Pay information and settings
- Apple Mail data
- Activity, Health, and Keychain data (unless you choose an encrypted iTunes backup)
Apps, iTunes purchases, and PDFs can, however, be seamlessly restored by syncing content with iTunes, which is another good reason to avoid going iCloud-only. However, the best option is to use both iCloud and iTunes backups, that way everything that can be saved is and so you get daily backups with iCloud when you're not around your computer.
Update iTunes on Your Mac or Windows PC
Before continuing, it's important to have the latest iTunes version for your computer. Depending on which operating system and OS version you have, updating may differ.
Installing & Updating on macOS
If you're running iOS 13 or later and have a Mac, you'll want to be on at least iTunes 12.9.5, which is included in the macOS Mojave 10.14.5 and 10.14.6 updates. Open your Systems Preferences app, then click "Software Update" to see if you're on that version and to update if not.
Installing & Updating on Windows
If you're running iOS 13 or later and have a Windows PC, you'll want to be on at least iTunes 12.10.7.3 on Windows. You can download the latest version from the Microsoft Store if running Windows 10 or download the newest version from Apple's website for other Windows versions, then run the installer.
To update iTunes if you already have it installed, if you got it from the Microsoft Store, it should update automatically, but you can still visit the "Downloads and Updates" pane of the Microsoft Store app to check manually.
If you downloaded it via Apple's site, in iTunes, click on "Help," then "Check for Updates." Alternatively, you can have it check for updates automatically; click on "Edit," then "Preferences," open the "Advanced" tab, then select "Check for new software updates automatically."
Locate Your iPhone on Your Mac or Windows PC
Using a good Lightning to USB or Lightning to USB-C cable, connect your iPhone to your MacBook, iMac, Mac Pro, other Mac computer, or Windows PC. If the connection is good, iTunes may open automatically, but not always. So if it doesn't, open iTunes.
If you see an "Unlock iPhone to Use Accessories" notification appear on your iPhone, unlock your iPhone using Face ID, Touch ID, or your passcode to proceed. Then, if prompted, tap "Trust This Computer" on your iPhone, and follow the on-screen steps to trust it. You can always untrust the computer later.
Next, click the iPhone button on the top left of iTunes, under the playback controls. If you don't see it, make sure your cable is connected correctly and not damaged. After clicking the button, choose "Summary" from the left column if it's not already selected.

Choose a Backup Option
Under the Backups section, there are two choices for backing up your iPhone with iTunes: "Automatically Back Up" and "Manually Back Up and Restore." To do it automatically, there are a few options:
- iCloud: Back up the most important data on your iPhone to iCloud. It includes app data, device settings, messages, photos, and more.
- This Computer: A full backup of your iPhone will be stored on this computer. It includes music and videos not purchased or downloaded from Apple Music and other items not uploaded to your iCloud. This is a good option if you don't have a lot of iCloud storage, or if you want to archive a backup when joining a beta.
To back up your iPhone onto your computer, choose "This Computer." If you choose "iCloud" instead, you can still back up your iPhone onto your computer manually, as you'll see below.
Encrypt Your Local Backups (Optional)
For more security and privacy, you may want to consider encrypting your backups. Select "Encrypt local backup" or "Encrypt iPhone backup." Doing so allows passwords stored in iOS to be saved so that you don't have to reenter them when you restore your apps, data, and settings. It also stores your personal health and activity data from your iPhone and Apple Watch, your call history, website history, and Wi-Fi settings.
They do not, however, include Face ID, Touch ID, or device passcode information.
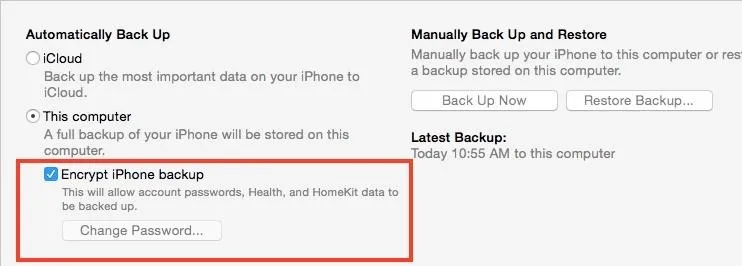
When you choose "Encrypt local backup," iTunes will ask you to enter and verify a password for your backup. Click "Set Password" and all future backups will be password-protected. Just don't lose your password since you need it to restore your iPhone to one of those encrypted backups should you need to later. If you want a new password, click on "Change Password" and enter a new code.

(Tip: use an app like LastPass to store your passwords. Either that or let your computer store it in the keychain when you set the password.)
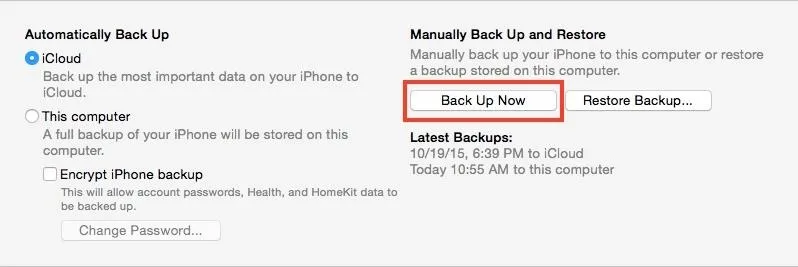
Back Up Your iPhone
Once you've chosen "This computer" and decided on whether to encrypt backups or not, every time you connect your iPhone to your computer with iTunes open, iTunes will create a new backup. However, you can also back up manually. To do so, click on "Back Up Now" under the Manually Back Up and Restore section. If your backup is encrypted, you may have to enter your passcode on your iPhone to begin the backup.
When it's done backing up your device, you'll see the date and time change under the Latest Backup section to "Today" and the current time.
If you don't want to use a cable going forward, make sure "Sync with this iPhone over Wi-Fi" is checked in the Options under the backup preferences. Then, whenever your iPhone is plugged into power and is connected to the same Wi-Fi network that your Mac or Windows PC is, the computer syncs your selected content automatically.
Additionally, if you want to simplify the process of backing up your iPhone, you can enable a feature so that your iPhone is automatically backed up every time you connect your device to your Mac. To do this, scroll down to the bottom of the Summary screen and click on the "Automatically sync when this iPhone is connected" option.
Manage Backups (Optional)
Your computer may not have unlimited storage space, so you may have more iPhone backups than you need wasting space on your hard drive. In iTunes, you can delete old or duplicate backups.
With iTunes open, click on either "iTunes" or "Edit," then select "Preferences." Next, select the "Devices" tab, and you'll see a list of all of your device backups. The name of the device will appear for each backup, so you'll be able to tell iPhone from iPad or iPod touch backups, as well as new iPhone ones from old iPhone backups, hopefully. The dates and times of the last backup are also listed for each one.
If you see a lock icon next to a backup, that means it's archived (more about that in the next step) or encrypted. To remove a backup, click on the backup, then on "Delete Backup," and then on "Delete" in the pop-up that appears. You can also right-click the backup and choose "Delete" from there.
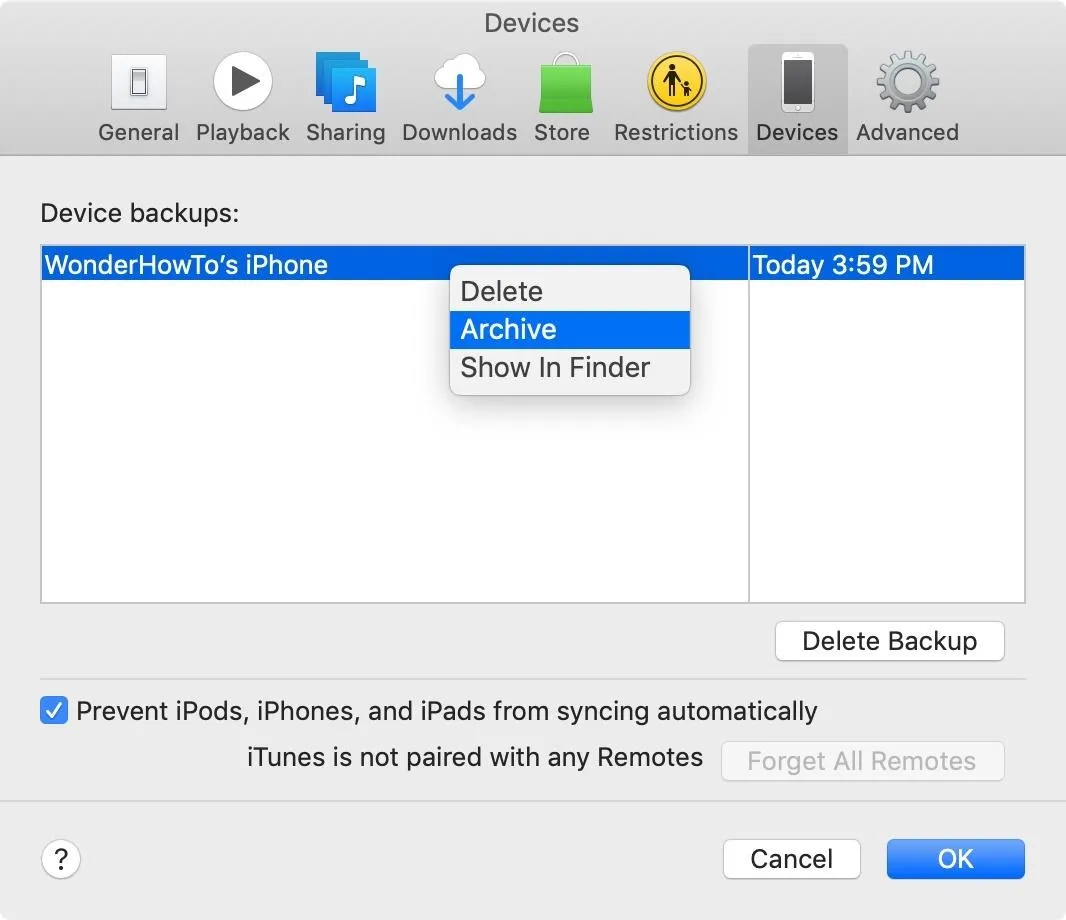
Archive Backups (Optional)
By default, iTunes only keeps a single backup of your iPhone on your computer, in most cases. Whenever you create a new backup, the previous one is overwritten, but you can change the setting of your backup to keep it archived on your computer in case you ever want to restore your device using an older backup.
The most obvious reason for doing so is if you are joining an iOS beta since you cannot restore to the last stable version of iOS from a beta backup — you'd need the backup from the last stable version you ran.
In macOS, go back to the "Devices" tab in the "Preferences," right-click on the backup you want to save, then choose "Archive" to lock the backup and make it so that it isn't written over with future backups. A lock icon next to the backup name means the backup is archived. On Windows, the process is a little bit more laborious but not impossible. Check out our full archiving guide to see how.
iTunes Backups Are Worth the Hassle
Both backup methods have their advantages. Although iTunes lets you save more content without giving Apple a description key, it doesn't provide the on-the-go convenience that iCloud backups do. Additionally, using iCloud grants you the ability to restore deleted content on your iOS device. But since you're not restricted to only using one method, use them both to ensure you're always covered.
Cover photo and screenshots by Neil Gonzalez/Gadget Hacks


Comments
Be the first, drop a comment!