


Imagine your iPhone adapting to each app you open — text that's always the right size, buttons you can spot at a glance, and a steady cursor that never blinks — all without touching your system-wide settings. It sounds like magic, but it's all thanks to a tucked-away feature.
With Per-App Settings (introduced in iOS 15), you avoid the one-size-fits-all trap: Mail can have larger text while Instagram can stay at standard size. You can get cross-fading transitions in the Notes app while preventing your Home Screen and App Switcher from getting crazy slow. And you can boost contrast in a photo editor without affecting your widgets or Lock Screen.
In iOS 18, you get two updates: hidden apps aren't left out in the cold, and you can fine-tune the cursor's blinking behavior in every text-enabled app.
Below, you'll learn how to add visible and hidden apps to Per-App Settings, tweak every available preference — including the new cursor controls — and remove apps when you want to revert to defaults. Keep reading to give each app on your iPhone exactly the look and feel you need. (These instructions also work for iPadOS.)
Why per-app settings matter on your iPhone
Adjusting text size, bold text, or contrast for your whole iPhone can lead to inconsistencies — some apps ignore system settings, while others end up looking distorted. Per-app settings solve this by letting you tailor only the apps you choose. For instance:
Text size: You might prefer large text when checking email but normal size for reading Twitter.
Bold text: Enabling bold labels in one app makes menus easier to parse without forcing bold text everywhere else.
Button shapes and labels: Adding shapes or underlines to tappable text-only buttons or on/off symbols can make small elements easier to identify.
Contrast and transparency: For image-heavy or graphic editors, boosting contrast just for that app ensures controls don't get lost against colorful backgrounds.
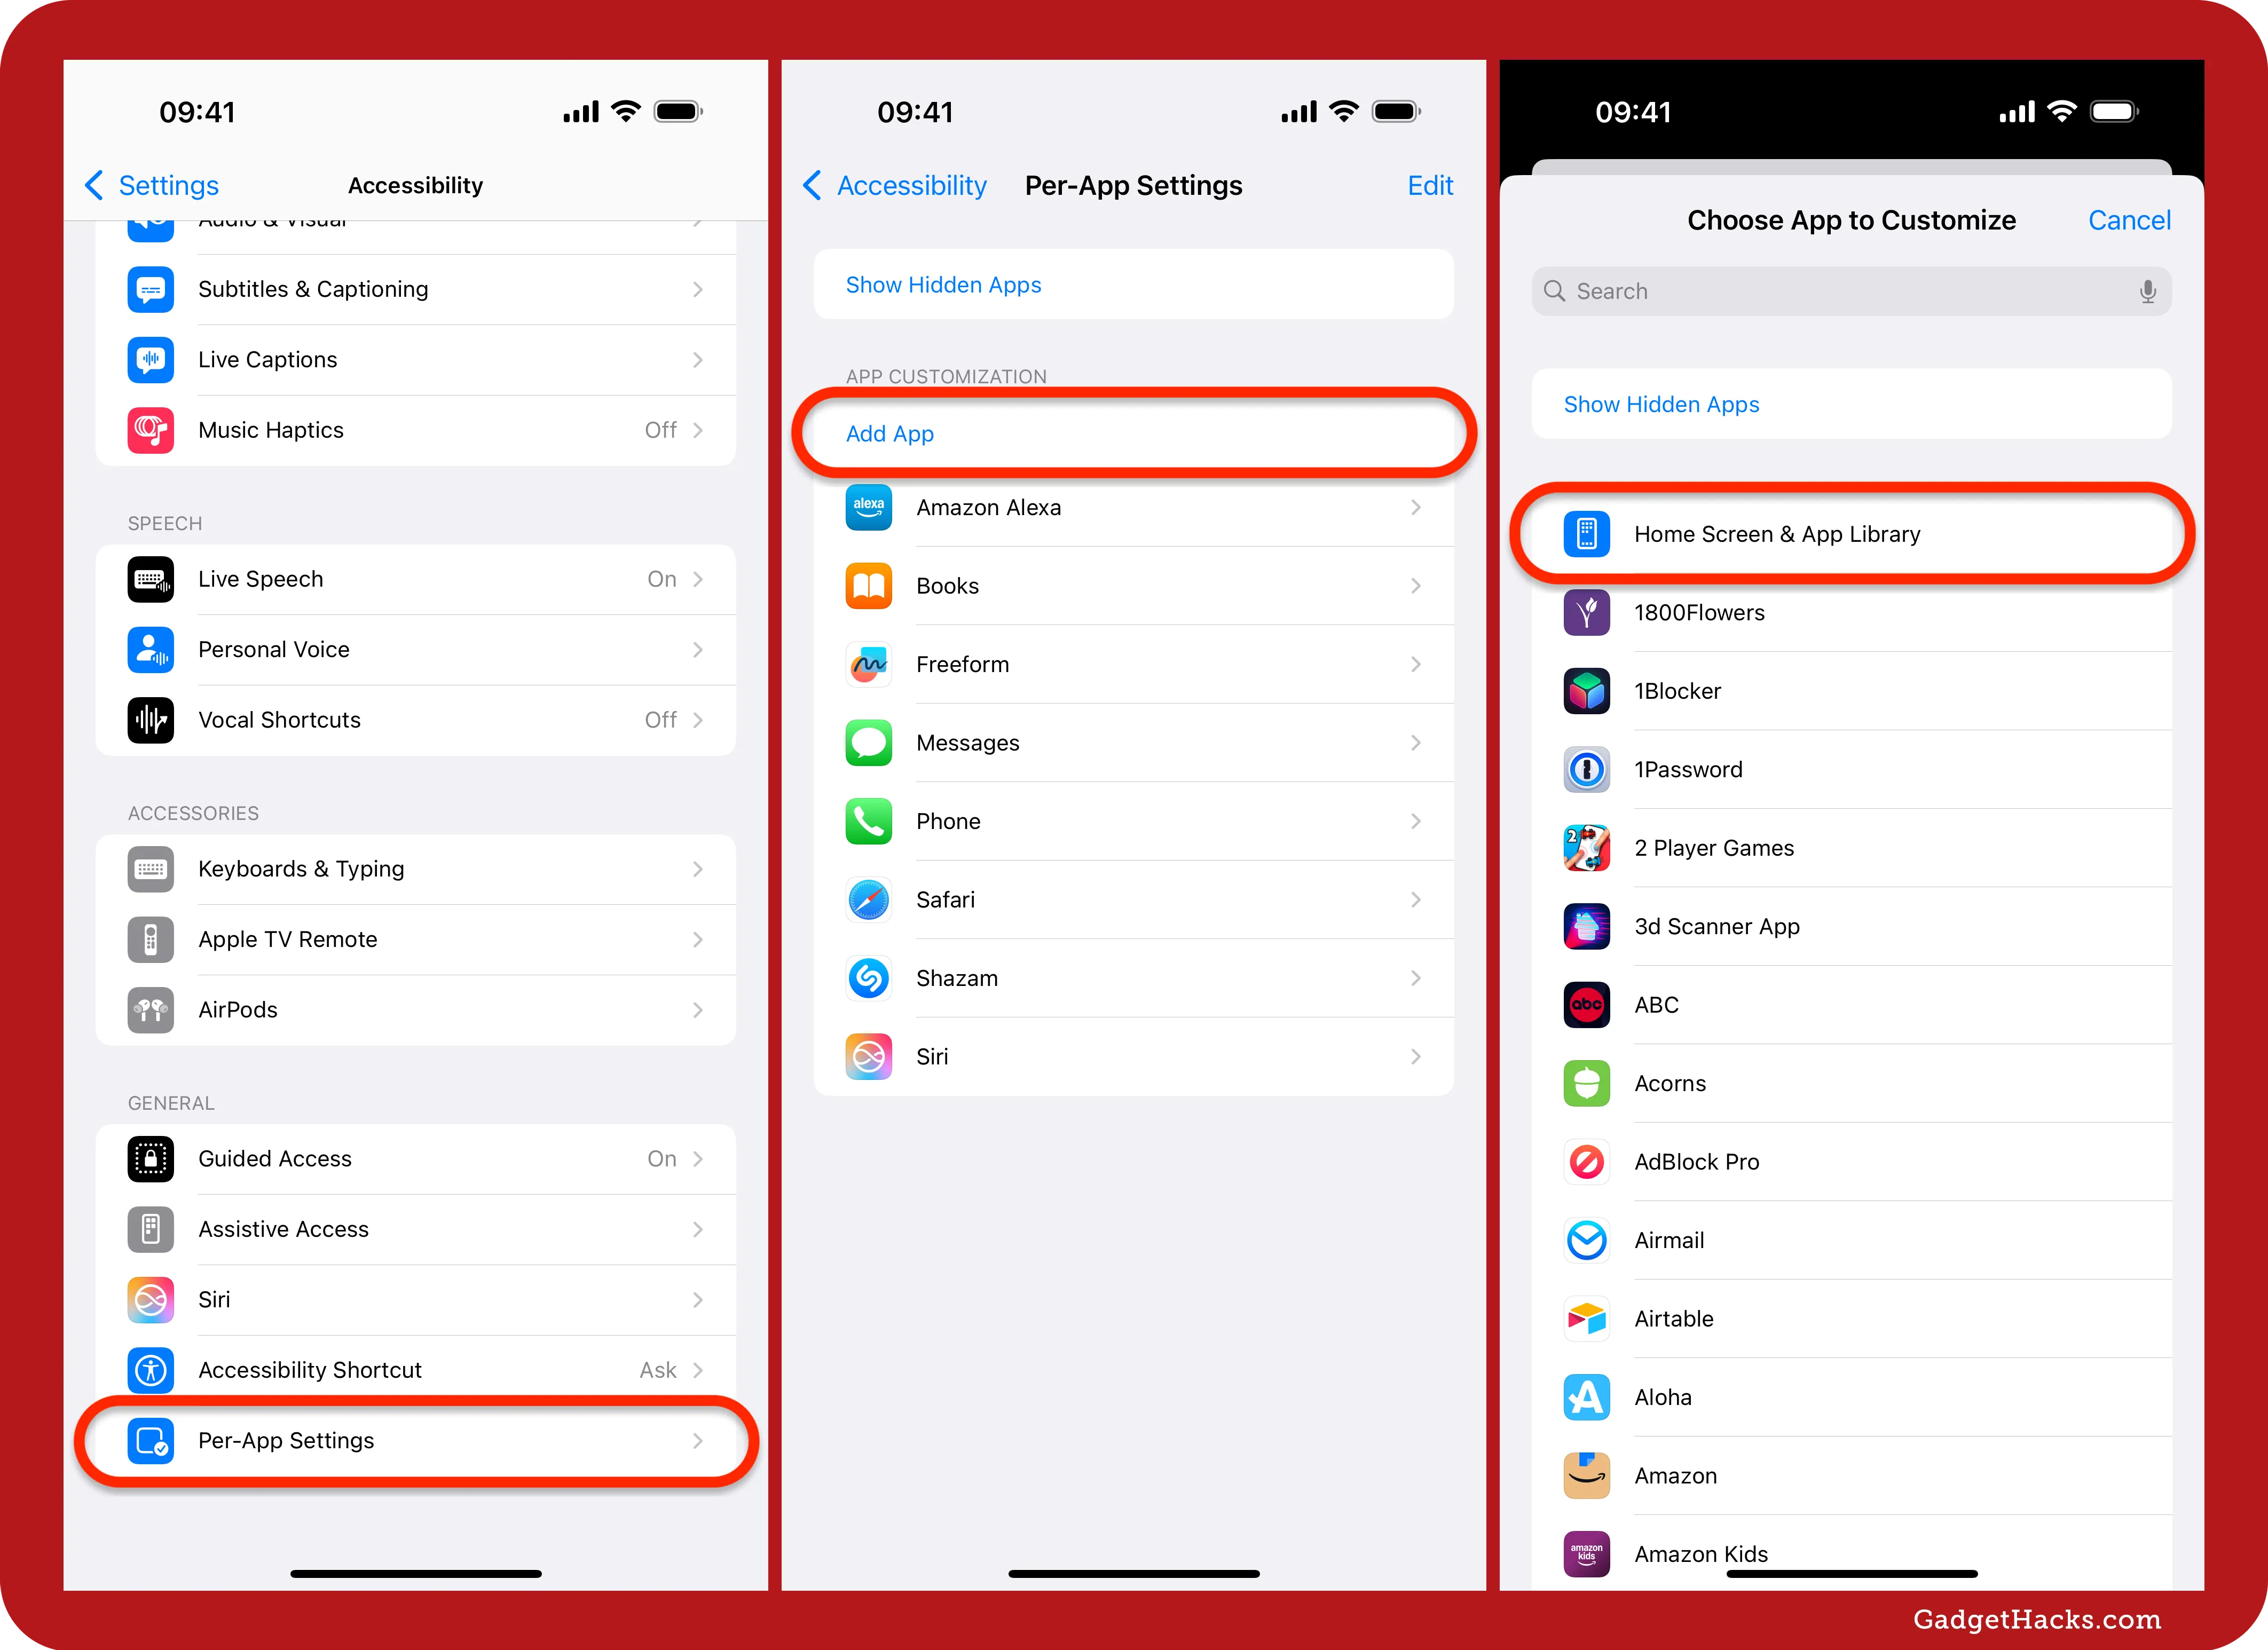
Adding apps to customize
In the Settings app, navigate to Accessibility » Per-App Settings. Then, tap "Add App" to open the searchable app list, which includes Apple and third-party apps, plus system items like Home Screen & App Library and Siri. However, you won't find any hidden apps here, such as Code Scanner, Print Center, Diagnostics, Field Test, or Remote. Live Captions was an option, but it was removed in iOS 18 since it has a dedicated configuration menu in Settings.
If you want to tweak an app you've hidden, a feature available since iOS 18, tap "Show Hidden Apps" and authenticate yourself to have them appear in the list.
Find and tap the app you want to customize, and it will immediately appear in the Per-App Settings list. That means you can only add one app at a time. If you want multiple apps, repeat these steps for each one.
Configuring each app's preferences
Once an app is listed under Per-App Settings, tap its name to reveal all available options. If it's an app you've hidden, tap "Show Hidden Apps" and authenticate yourself to have them appear in the list.
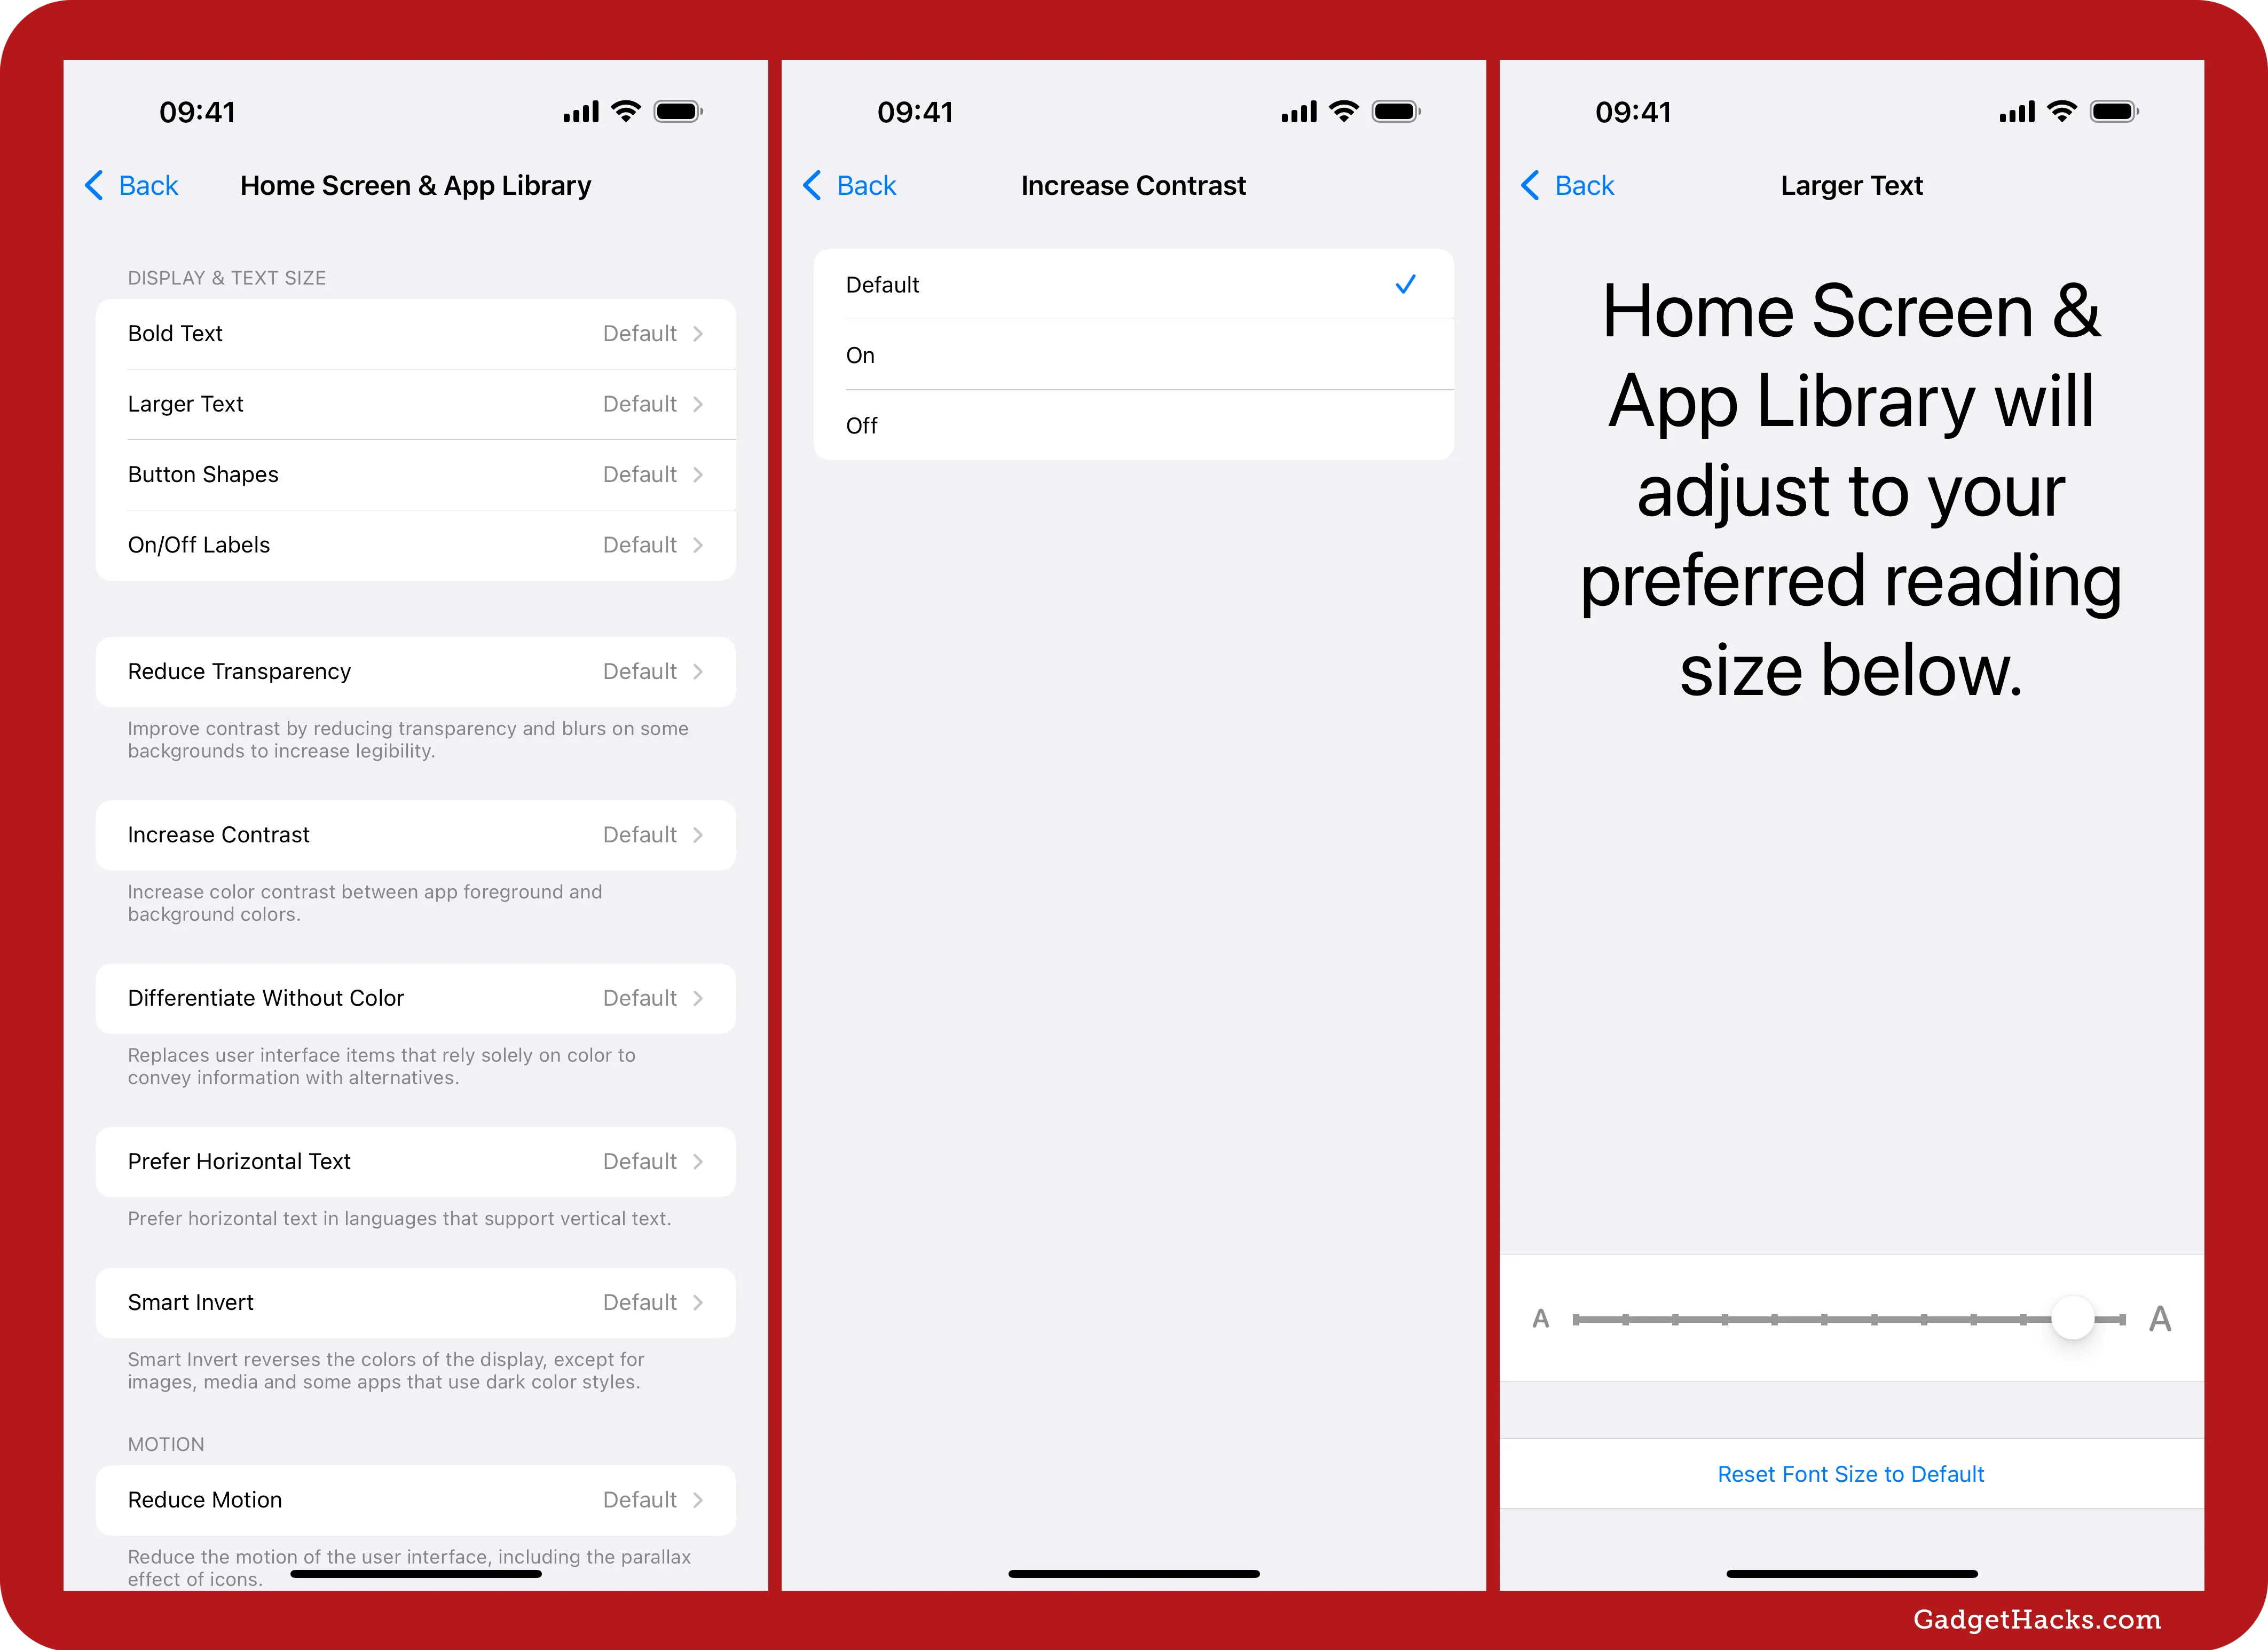
Each option offers Default, On, and Off choices, except Larger Text, which shows a slider with an option to "Reset Font Size to Default," and Auto-Play Animated Images, which is just a toggle switch.
While all options will be available for all apps, they won't all apply to the app you're customizing. For example, toggling off Auto-Play Animated Images for Messenger won't prevent GIFs from auto-playing in Facebook chats, but if you turn it off in Messages, you'll have to press play on GIFs to view them in action.
When you choose Default for an option, it uses the default preference set system-wide. For instance, if you have Reduce Motion enabled for all of iOS, that will be the default, and you can turn it off in specific apps.
Here's what each setting does:
Bold Text: When on, it bolds most text visible on the screen.
Larger Text: This lets you increase or decrease text on the screen to your preferred reading size. It's tied to the Text Size control in Control Center, where you can adjust text size for just the app you're currently in. Changing the size in Per-App Settings will update the slider in Control Center and vice versa.
Button Shapes: When on, it adds shapes around tappable text-only elements to make them appear more like buttons.
On/Off Labels: When on, it adds the universal symbols for "on" and "off" to toggle switches — a vertical line for on and a circle for off.
Reduce Transparency: When on, it improves contrast by reducing the transparency and blurring on some backgrounds to increase legibility.
Increase Contrast: When on, it increases color contrast between the app's foreground and background colors.
Differentiate Without Color: When on, it replaces the user interface elements that rely on color to convey information with alternatives.
Prefer Horizontal Text: When on, vertically displayed texts, which is common in some languages, will appear horizontally.
Smart Invert: When on, it reverses most colors on your display, including in some apps that use dark color styles. It will not affect photos, videos, and other types of visual media, including app icons.
Reduce Motion: When on, it lessens the user interface's motion, including the parallax effect seen for Home Screen icons.
Prefer Cross-Fade Transitions: When on, it reduces the motion for user interface controls that slide in when appearing and disappearing. This setting only appears when Reduce Motion is enabled system-wide or just in the app you're customizing.
Auto-Play Animated Images: When on, the Messages app automatically plays animated images, such as GIFs and Live Stickers.
Auto-Play Video Previews: When on, it automatically plays any video previews shown in apps like the App Store.
Prefer Non-Blinking Cursor: When on, the cursor indicator in text fields will not blink, so you can see it always. This option has been available since iOS 18.
Tip: Always test changes by opening (or force-quitting and reopening) the app after you toggle a setting. Some apps may require a relaunch before you see any of the adjustments you've made.
See it in action
Below, you can see what happens when you enable Bold Text, Larger Text, and Smart Invert for Home Screen & App Library. Here are a few things you'll notice if you try a similar configuration:
App, widget, and folder labels become larger and thicker and stand out more.
Text on some app icons will appear bold, like the date on Calendar.
The status bar time appears heavier, which persists whenever you're in any app that shows the status bar.
Quick Actions (long-press menus on icons) show large, bold text for easier readability.
The wallpaper inverts colors, but apps, widgets, and folder icons remain as they were.
Similar effects can be seen in the Today View, App Library, Notification Center, Lock Screen, Control Center, App Switcher, Face ID overlays, and the widget gallery.
When you switch to another app, those tweaks vanish — keeping all other apps at their standard appearance. That is unless you see the status bar in the app or pull down Control Center or Notification Center, which will retain the changes.

For an app like Safari, changing text boldness will affect the app's UI elements, like the address bar, menu settings, tab switcher, bookmarks, history, and start page, but it may also affect some text on webpages. Increasing or decreasing the text size will also affect all of those UI elements, but it won't do anything to webpages or their Reader views since Safari has its own built-in text resizer for that.
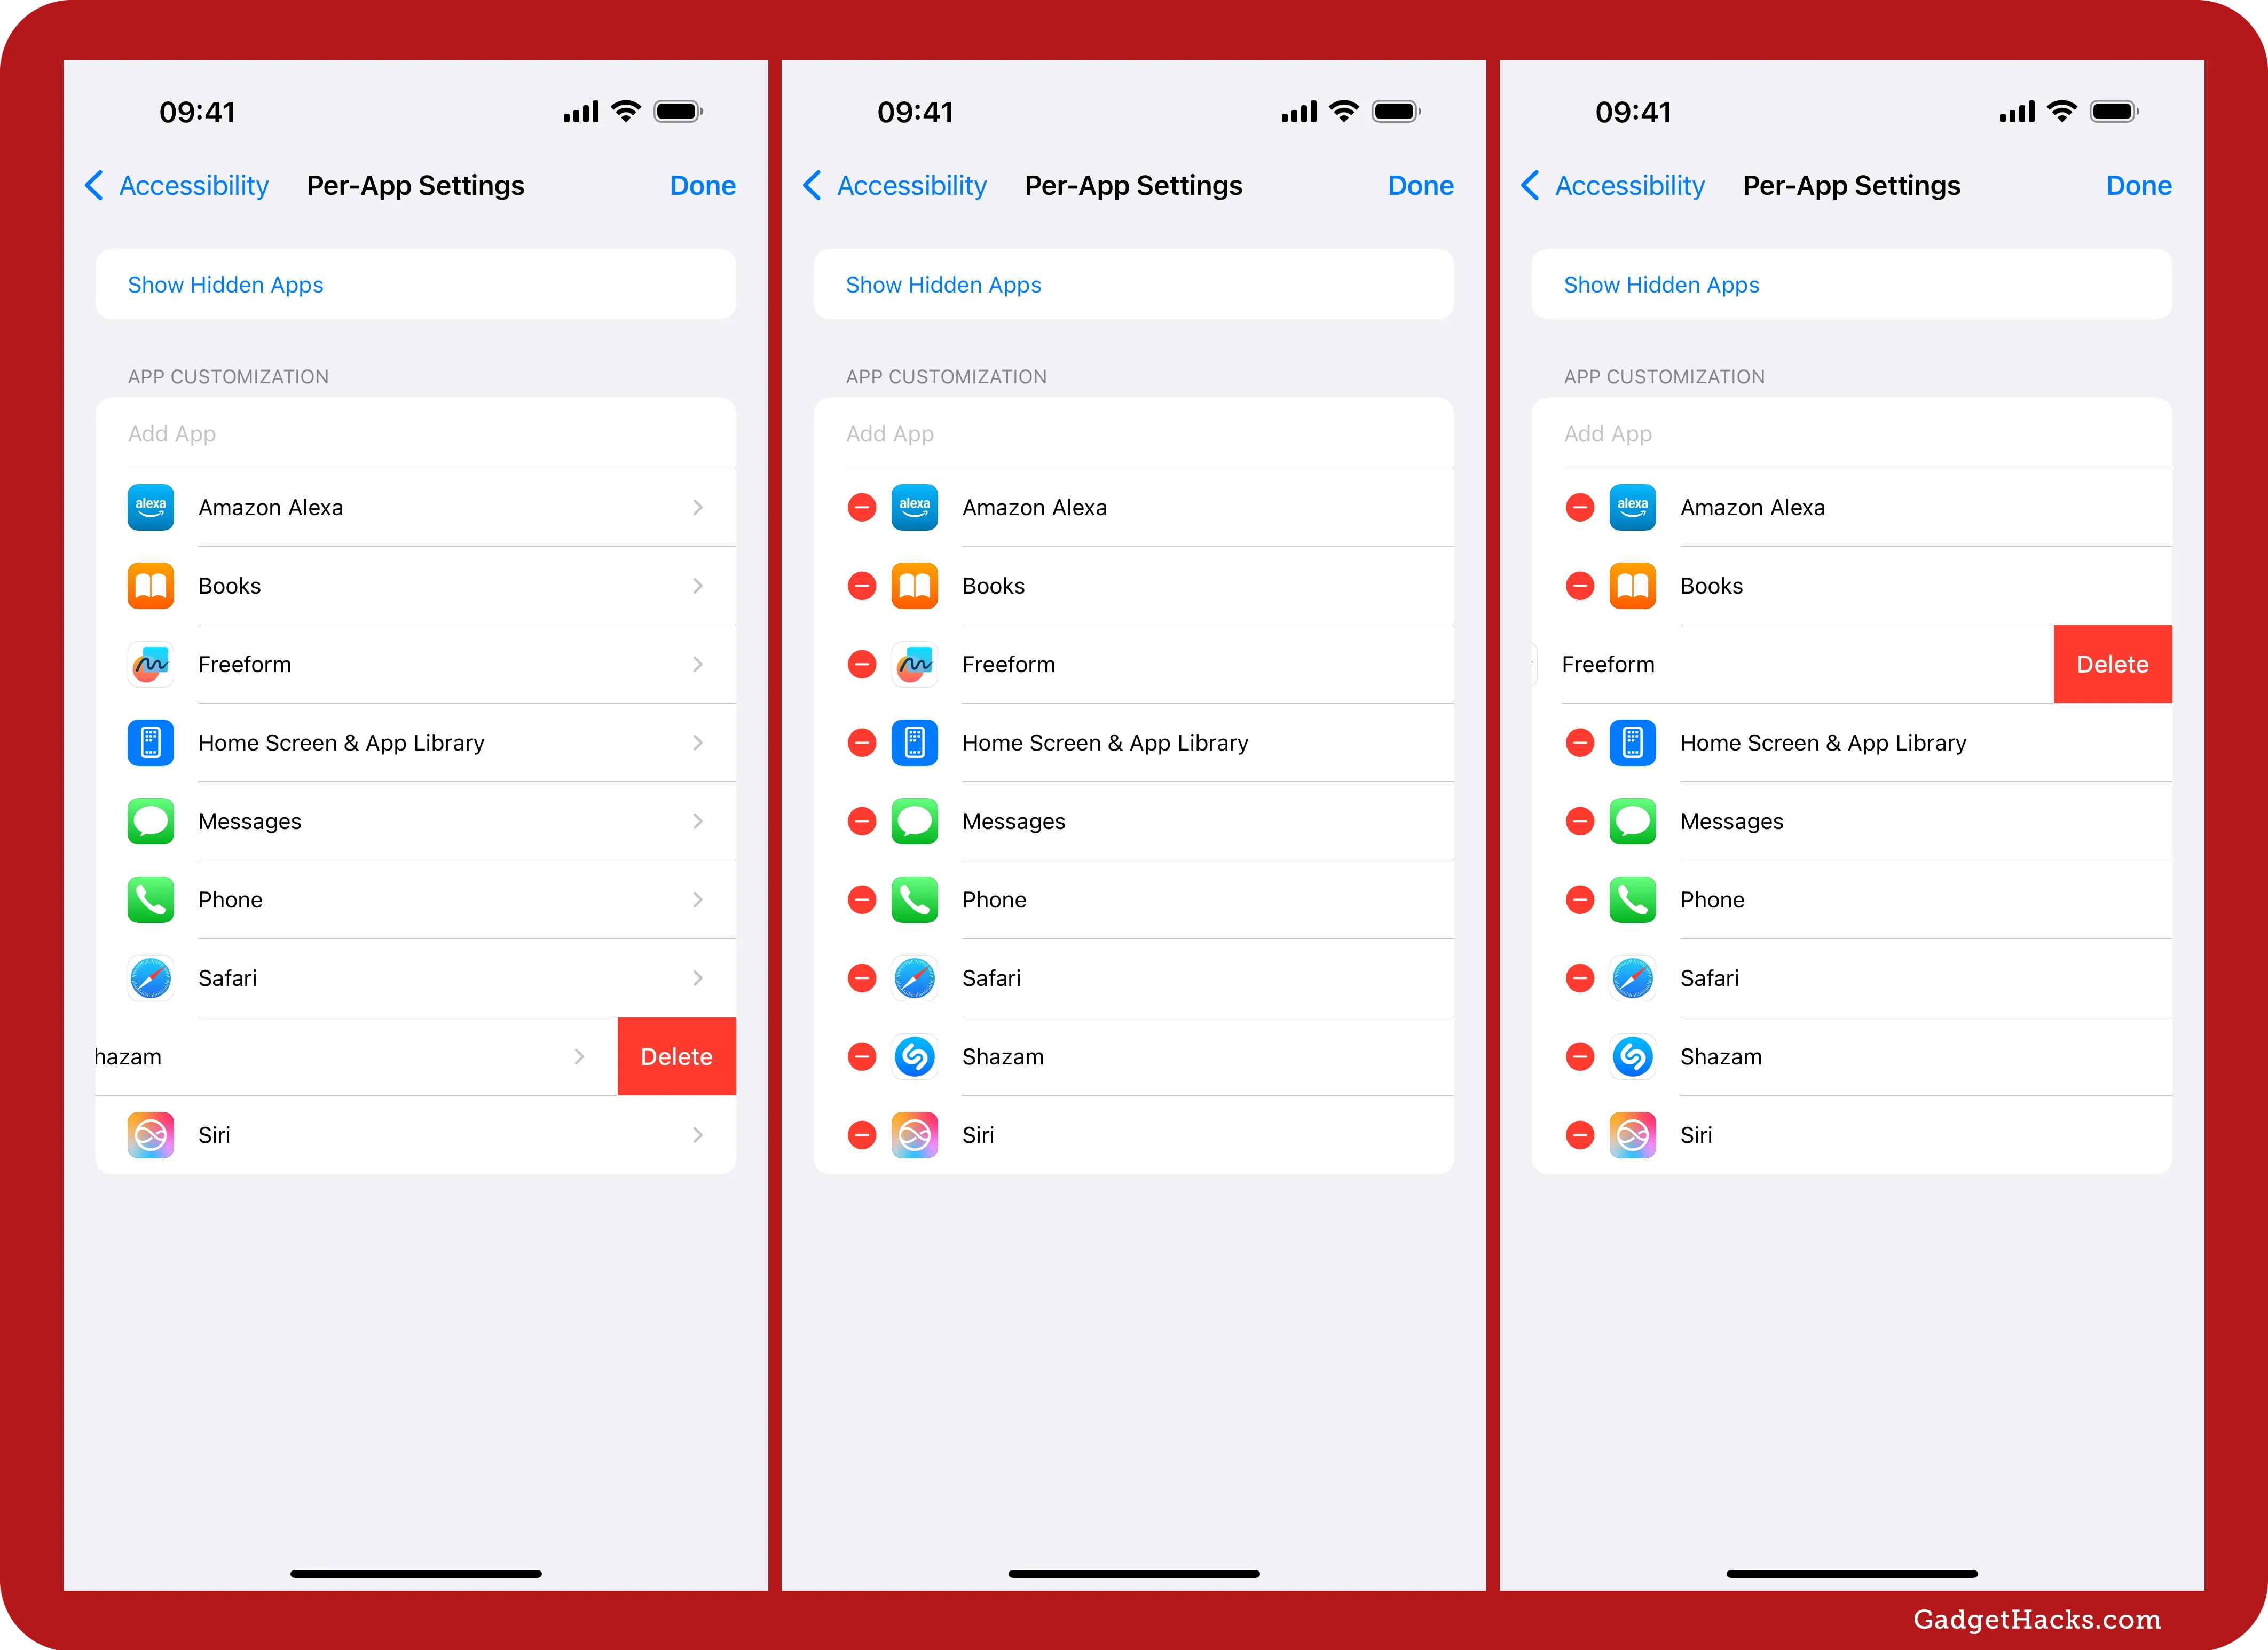
Removing apps from Per-App Settings
If you decide you no longer need custom tweaks — or if an app update resets things unexpectedly — remove it to revert to system defaults:
Go to Settings » Accessibility » Per-App Settings.
Tap "Show Hidden Apps" and authenticate if necessary.
Long-swipe left on the app name you want to delete or short-swipe left and tap "Delete" when it appears.
Alternatively, tap "Edit" at the top, then tap the minus (–) icon next to the app and confirm with "Delete."
Removing the app resets every preference (text size, bold text, contrast, etc.) back to defaults, which is a lot faster than trying to change each option manually for the app.
Don't Miss: Add More Domain Extensions to Your iPhone's Keyboard Shortcut to Type Email Addresses or Website URLs Faster
Cover photo by Gadget Hacks.


Comments
Be the first, drop a comment!