The devices in the new iPhone 16 series lineup have one feature no other iPhone models have: a physical Camera Control button. If you use your iPhone to take photos or record videos, the Camera Control speeds up the process and gives you immediate control over adjusting settings and values using intuitive gestures. But what exactly can you do with it?
As its name suggests, Camera Control first seems like just another addition to the stock Camera app, but dig deeper, and you'll find that it packs more power and potential than just that. So, let's take a closer look at what this button can do, how it works, and why it could change how you use your iPhone's camera.
Jump to a Section
Supported Devices
- iPhone 16 Pro Max (Apple A18 Pro) [2024]
- iPhone 16 Pro (Apple A18 Pro) [2024]
- iPhone 16 Plus (Apple A18) [2024]
- iPhone 16 (Apple A18) [2024]
Physical Design
The new Camera Control hardware interface is not a physical button in the traditional sense. It's a recessed, touch-sensitive switch on the right side of the iPhone, below the Side button. It uses a combination of force sensors and haptic feedback to simulate a tactile "click" and responds to gestures like taps, presses, and swipes to control various camera functions.
Camera Control Uses
Camera Control is directly tied to your iPhone's stock Camera app, as shown below. But it's not limited to just that app. Here's everything you can or will be able to do with Camera Control on your iPhone:
1. Perform Quick Actions in Camera
The beauty of the Camera Control button is its ability to streamline your experience with your iPhone's built-in Camera app. Plus, it can hide unnecessary on-screen elements that would normally clog your display and make shots harder to compose. You can also access Camera quickly from anywhere on your iPhone, even from your locked Lock Screen — no more fumbling with shortcuts or tapping icons.
Here's a quick breakdown of the core actions you can perform:
- Click once from anywhere to open the Camera app.
- Click once to snap a photo (when a photo mode is set on launch) or start a video recording (when Video mode is set on launch).
- Click and hold to record a video, then release to save it.
- Lightly press twice to open the settings picker overlay, which extends from the bezel.
- Lightly press once in the settings picker overlay to select a setting and enter its thinner value slider or options picker.
- Slide or swipe your finger to change between options (in a picker control) or adjust values (in a slider control).
- Lightly press once to open the overlay directly to your last-selected setting.
These core gestures are simple, fast, and designed for those spur-of-the-moment shots when every second counts. It also closely mimics real cameras, where all the work is done through physical buttons, not touchscreens.

However, you can still use the touchscreen to navigate the overlay and choose and adjust settings. For example, when adjusting a specific setting in the thinner slider or picker, you can swipe the overlay out to expand it to the larger settings selector. You can also swipe through the menus and tap to select items.
Available Camera Settings
The Camera Control button works in the Camera app's settings menu overlay for the following features. However, note that you won't see all of these options in every camera mode.
- Exposure: Darken or brighten the screen by changing the exposure value (EV) from no less than -2 to no more than 2.
- Depth: Decrease or increase the background depth-of-field effect in ƒ-stops when in Portrait mode. When in Photo mode, this setting automatically enables Portrait mode for the image.
- Zoom: Zoom in or out using optical or digital zoom.
- Cameras: Change the field of view to the selfie camera (as of iOS 18.1) or a specific rear camera lens.
- Style: Change the Photographic Style.
- Tone: Deepen or lighten the mood by decreasing or increasing the tone.
This gesture-based interface keeps your hands off the screen and your focus on framing the shot — a big plus when you want to keep the viewfinder free of distractions. However, the learning curve can be a bit steep; it may be too easy to accidentally switch between settings or miss the gesture altogether. But with some practice, the swipe-to-adjust method feels incredibly fluid and intuitive.
2. Access Visual Intelligence
One of the most exciting aspects of the Camera Control button is its integration with Apple's new Visual Intelligence feature, which is coming later this year in iOS 18.2 with other Apple Intelligence features. This will make it possible to point your iPhone's rear camera system at the things around you to learn about them or add data quickly to certain apps.
For example, point at a restaurant to instantly see its ratings, menu, and reservation options on the screen. Point at an event poster to automatically add the event to your calendar. Or point at an animal to learn things such as what breed it is.
- Don't Miss: How to Generate Text, Images, and Insights with Apple Intelligence's Built-in ChatGPT Integration

3. Control Third-Party Apps
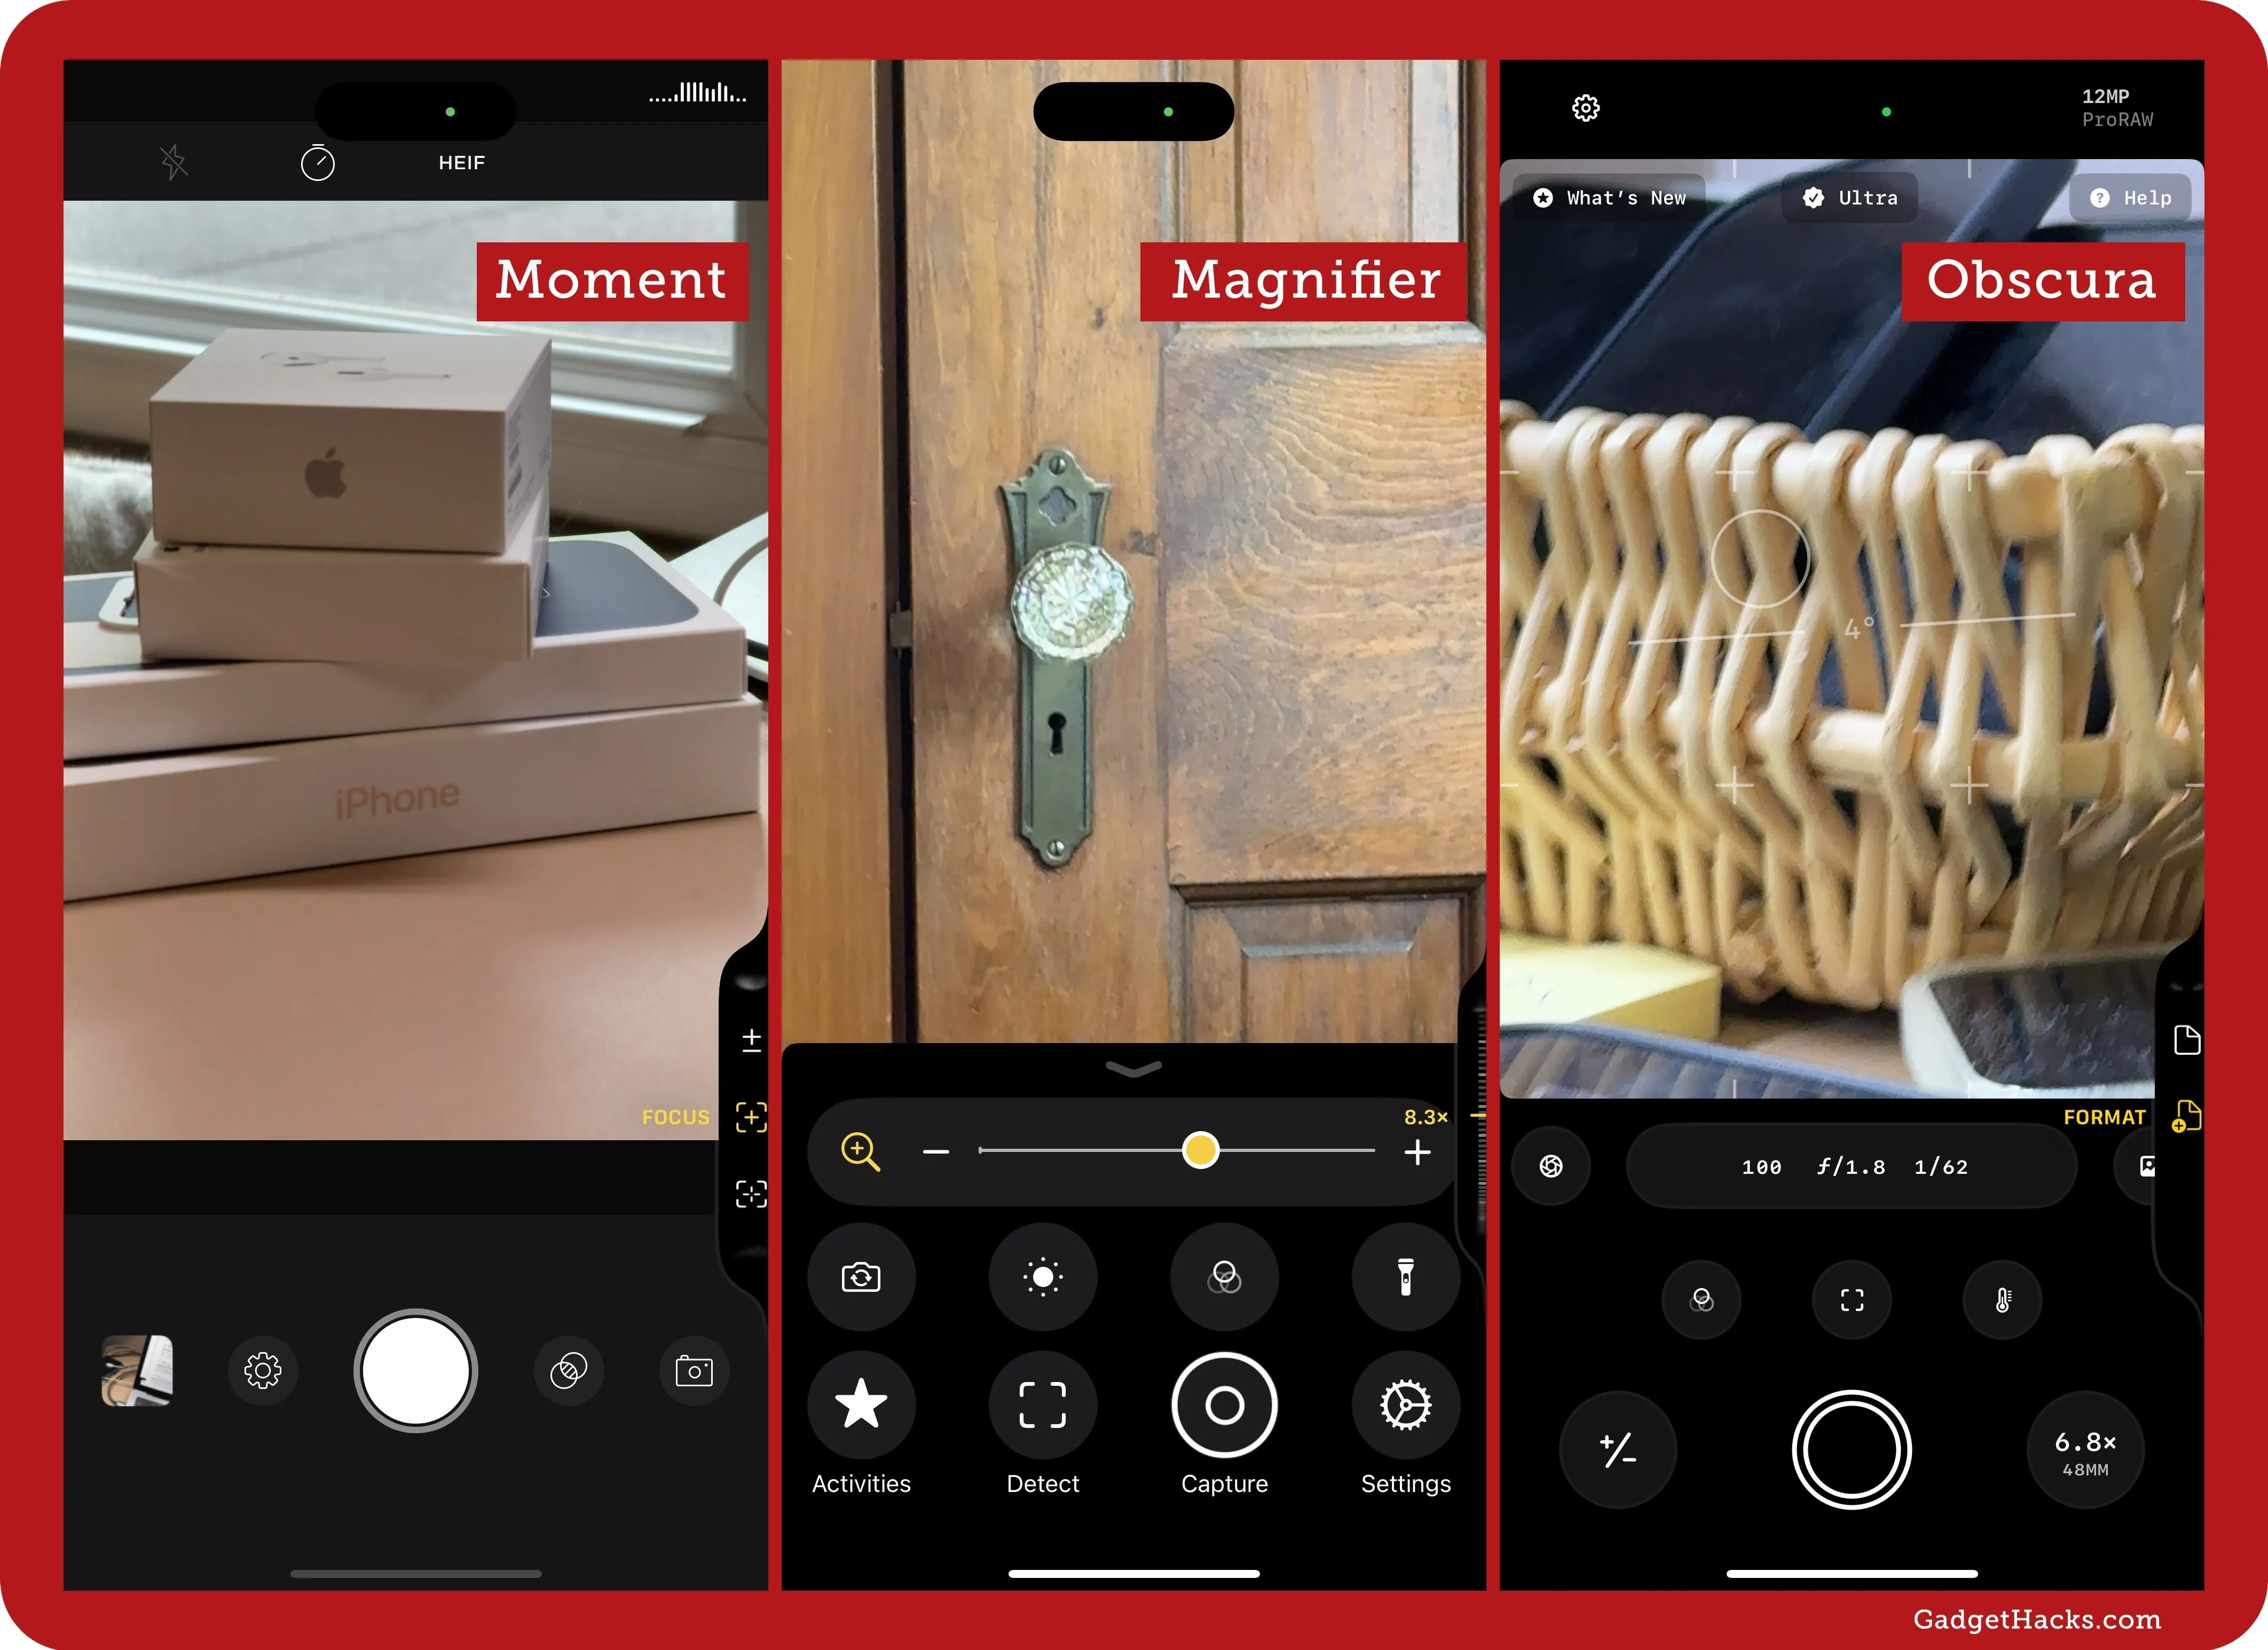
Apple has various Camera Control APIs available for app developers, so some of the apps you currently use may already be compatible with Camera Control. When the minimum support is added, clicking the Camera Control in a supported third-party camera app will snap a photo or start and stop video recording.
Developers can also build deeper functionality, allowing you to launch their apps using Camera Control from anywhere on your iPhone. Even better: developers can add custom overlays in their apps, giving you quick access to pick from controls and adjust values. Apple's zoom and exposure controls can be integrated into third-party apps' Camera Control overlays, but developers are free to build custom controls.
- Useful Resource: Always-Updated List of Apps That Support the Camera Control Button on iPhone 16 Series Models
The Downsides of Camera Control
Of course, no feature is perfect. While the Camera Control button has enormous potential, its early implementation has a few rough edges. Swiping to adjust settings can sometimes feel imprecise, and the learning curve may frustrate users expecting a more straightforward operation. It's easy to accidentally trigger the wrong setting or swipe past your intended option, interrupting your shooting flow.
However, Apple's commitment to refining these features — especially with the addition of machine learning — suggests that Camera Control will improve with time. Future software updates may iron out some of these quirks, making it a more reliable tool for both casual users and photography enthusiasts alike.
In the meantime, there are ways to customize Camera Control:
Customizing Camera Control's Options
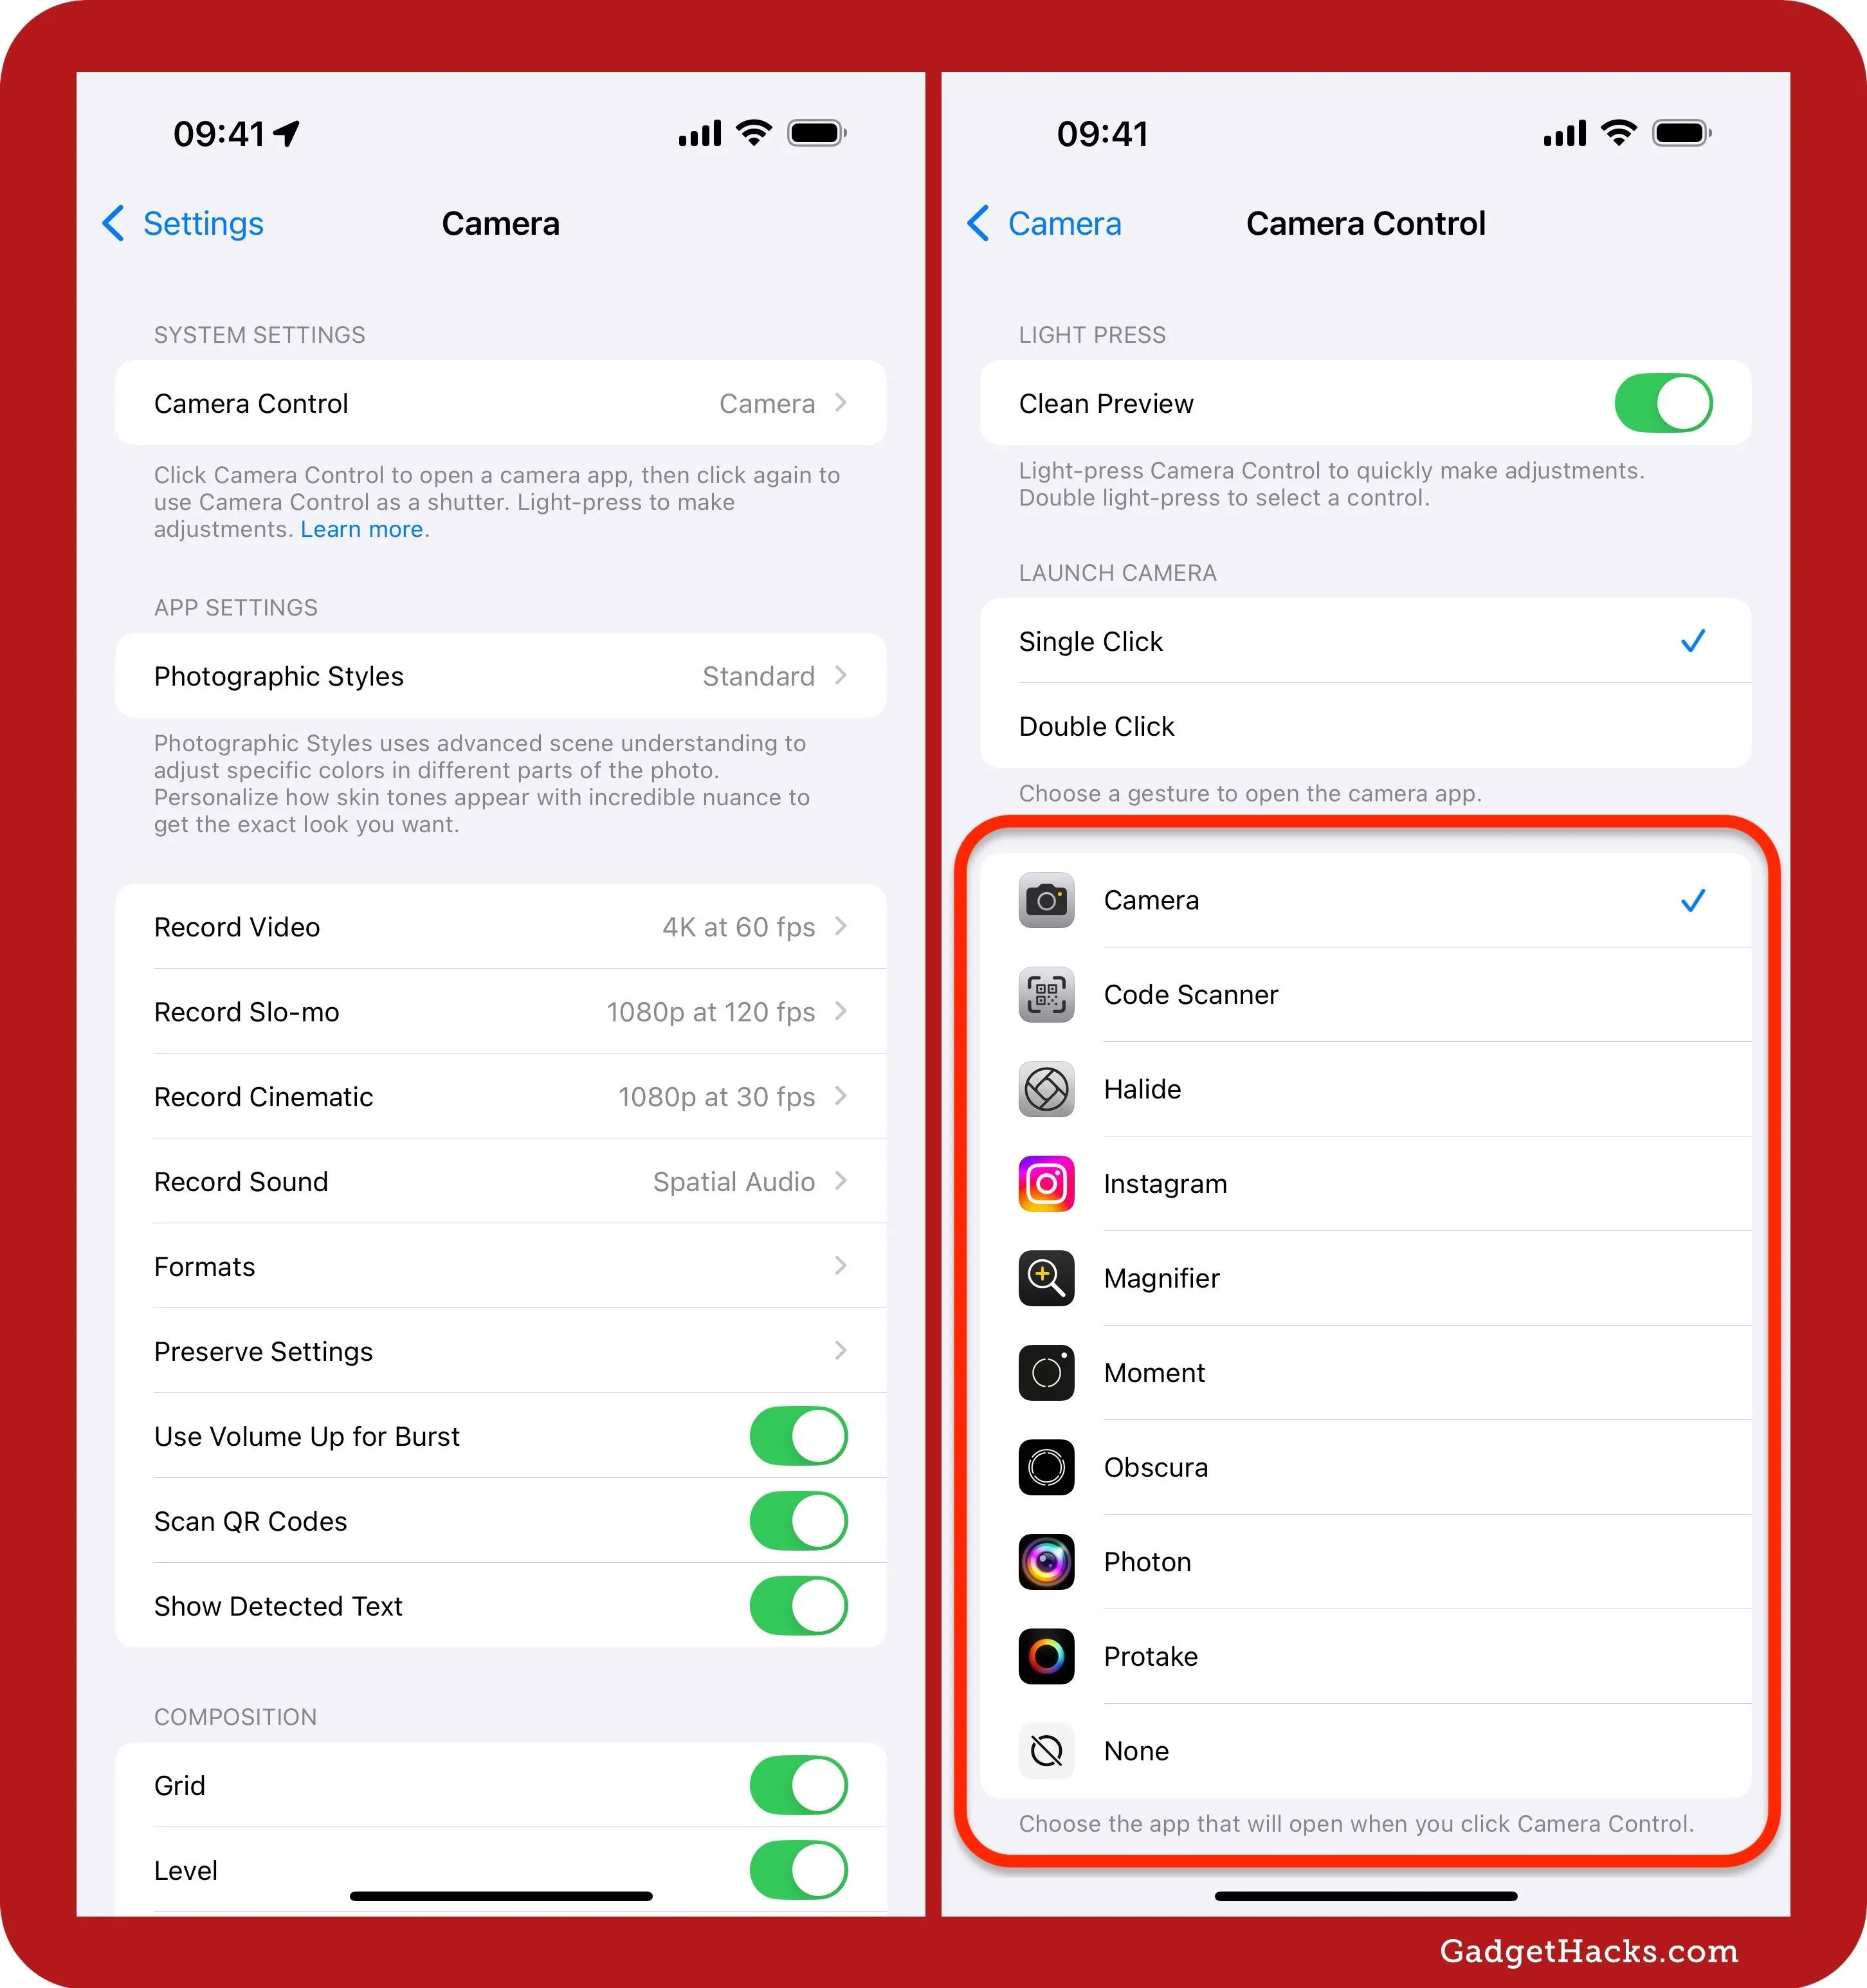
The Camera Control button has a few customization options available via Settings » Camera » Camera Control, as well as in Settings » Accessibility » Camera Control. You can assign an app, turn the clean preview on or off, adjust your preferred gestures, and change the pressure sensitivity and speed.
Assign an App
If you don't want to use the Camera Control with the Camera app, you can switch it in Settings » Camera » Camera Control so that one click will open Apple's Code Scanner or Magnifier app. You can also assign it to a third-party app if you have any compatible ones installed on your iPhone. For example, one click could open apps such as Halide, Instagram, Moment, Obscura, Photon, and Protake.
Enable/Disable Clean Preview
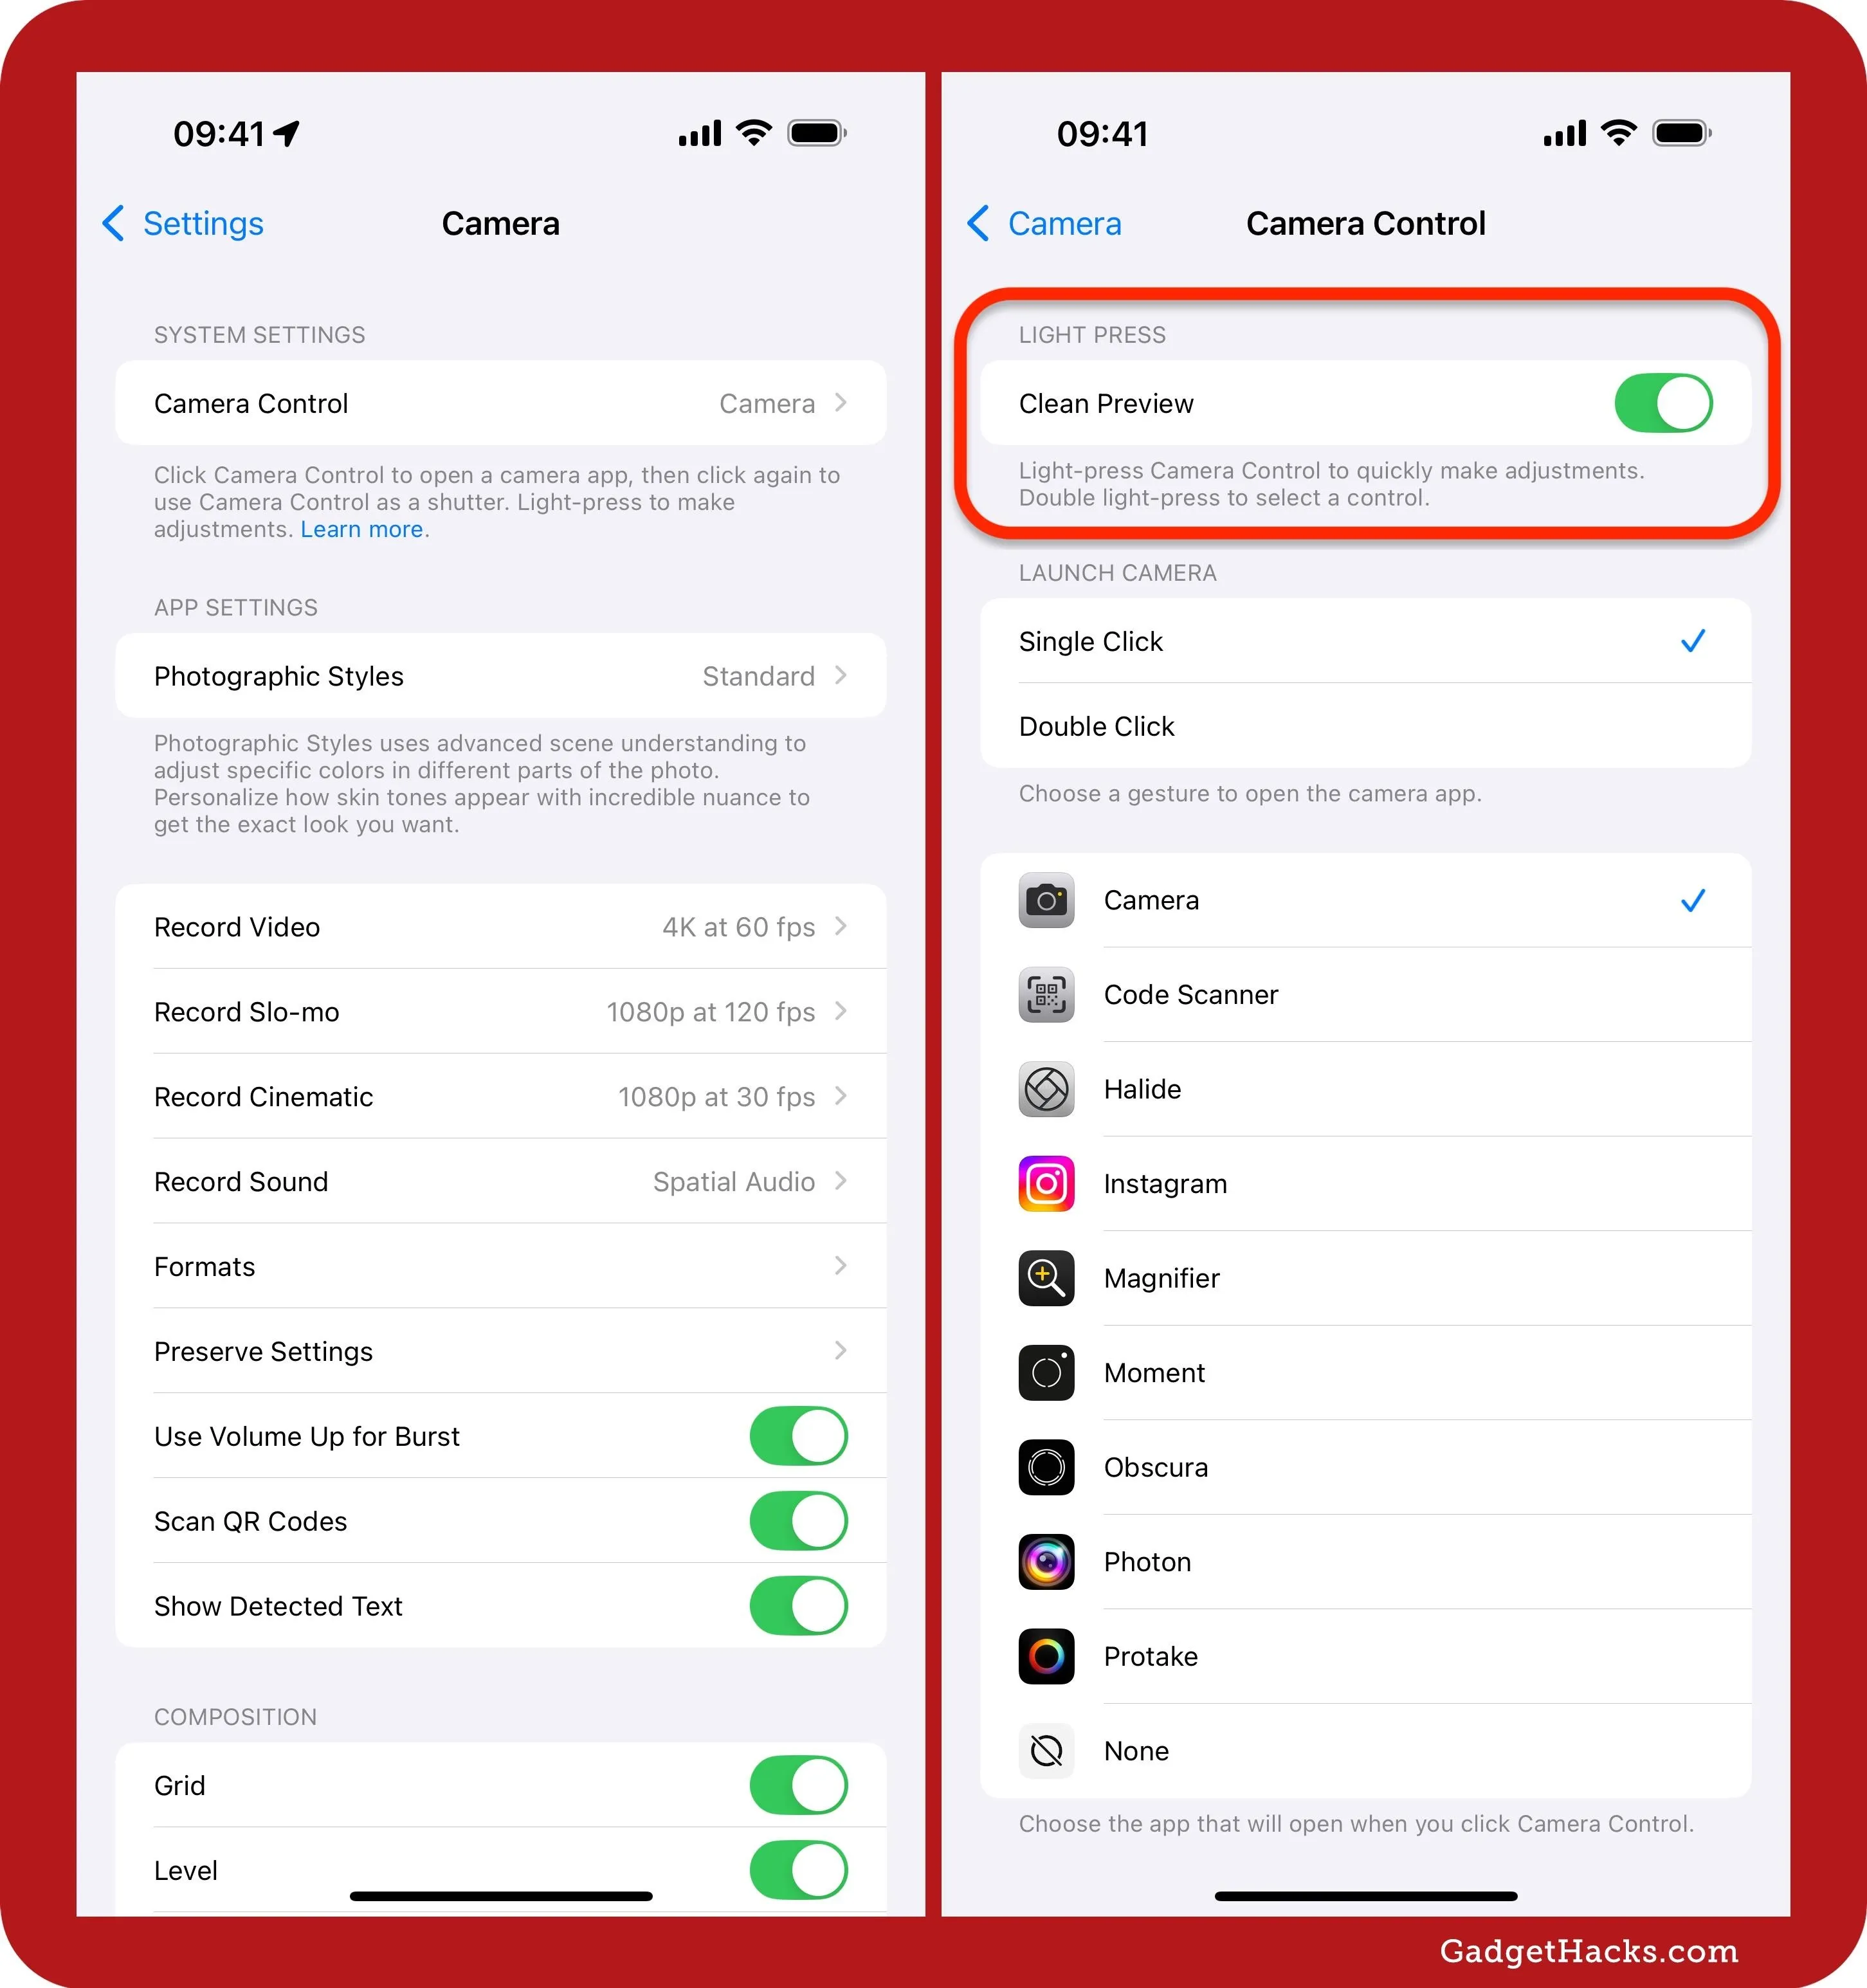
You can disable "Clean Preview" in Settings » Camera » Camera Control so that the rest of the app's user interface remains on the screen instead of being hidden. Keeping this feature on will continue to hide unimportant UI elements when the Camera Control overlay is active in Camera or another app.
Change the Launch Gesture
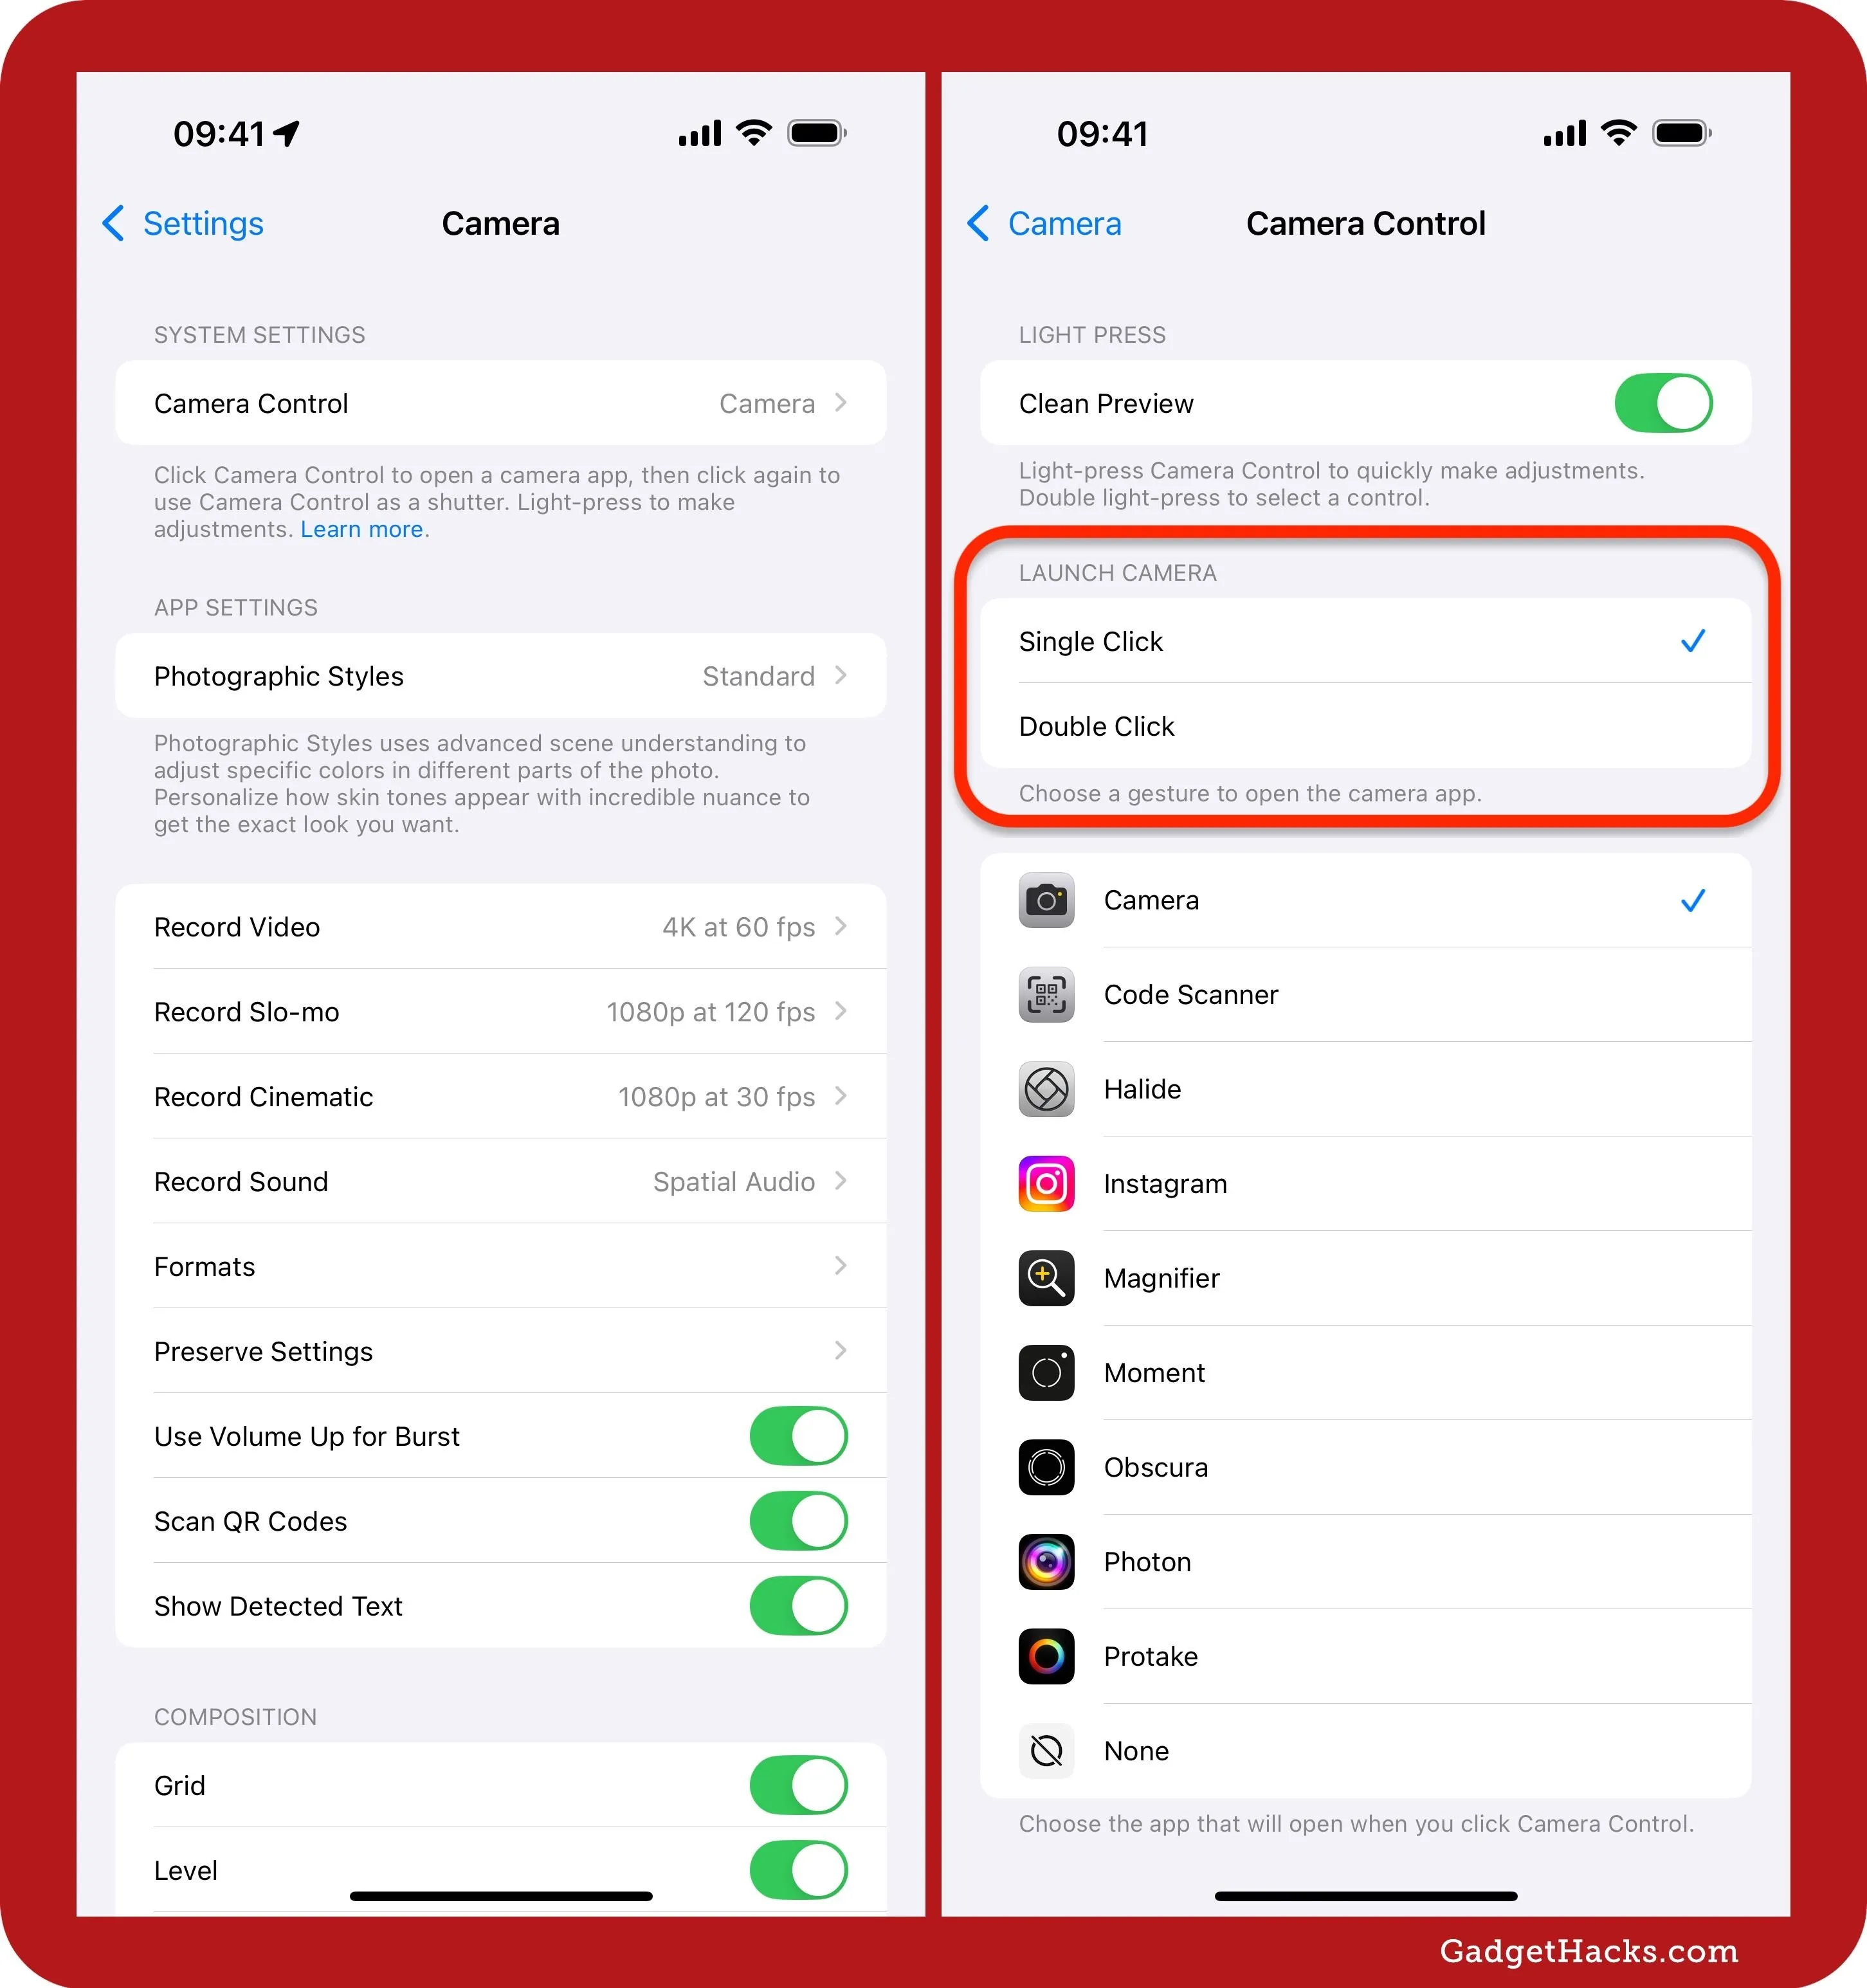
In Settings » Camera » Camera Control, you can also switch the gesture to open the assigned app. By default, a single click of the Camera Control will open Camera or whatever app you reassigned the button to. But you can change it to use a double-click instead, which will reduce the number of times you accidentally trigger it.
You can adjust the button's double press speed and sensitivity to better suit your needs, making it as responsive — or as relaxed — as you like. Whether you prefer quick snaps or deliberate framing, this feature ensures that Camera Control works harmoniously with your shooting style.
Enable or Disable It
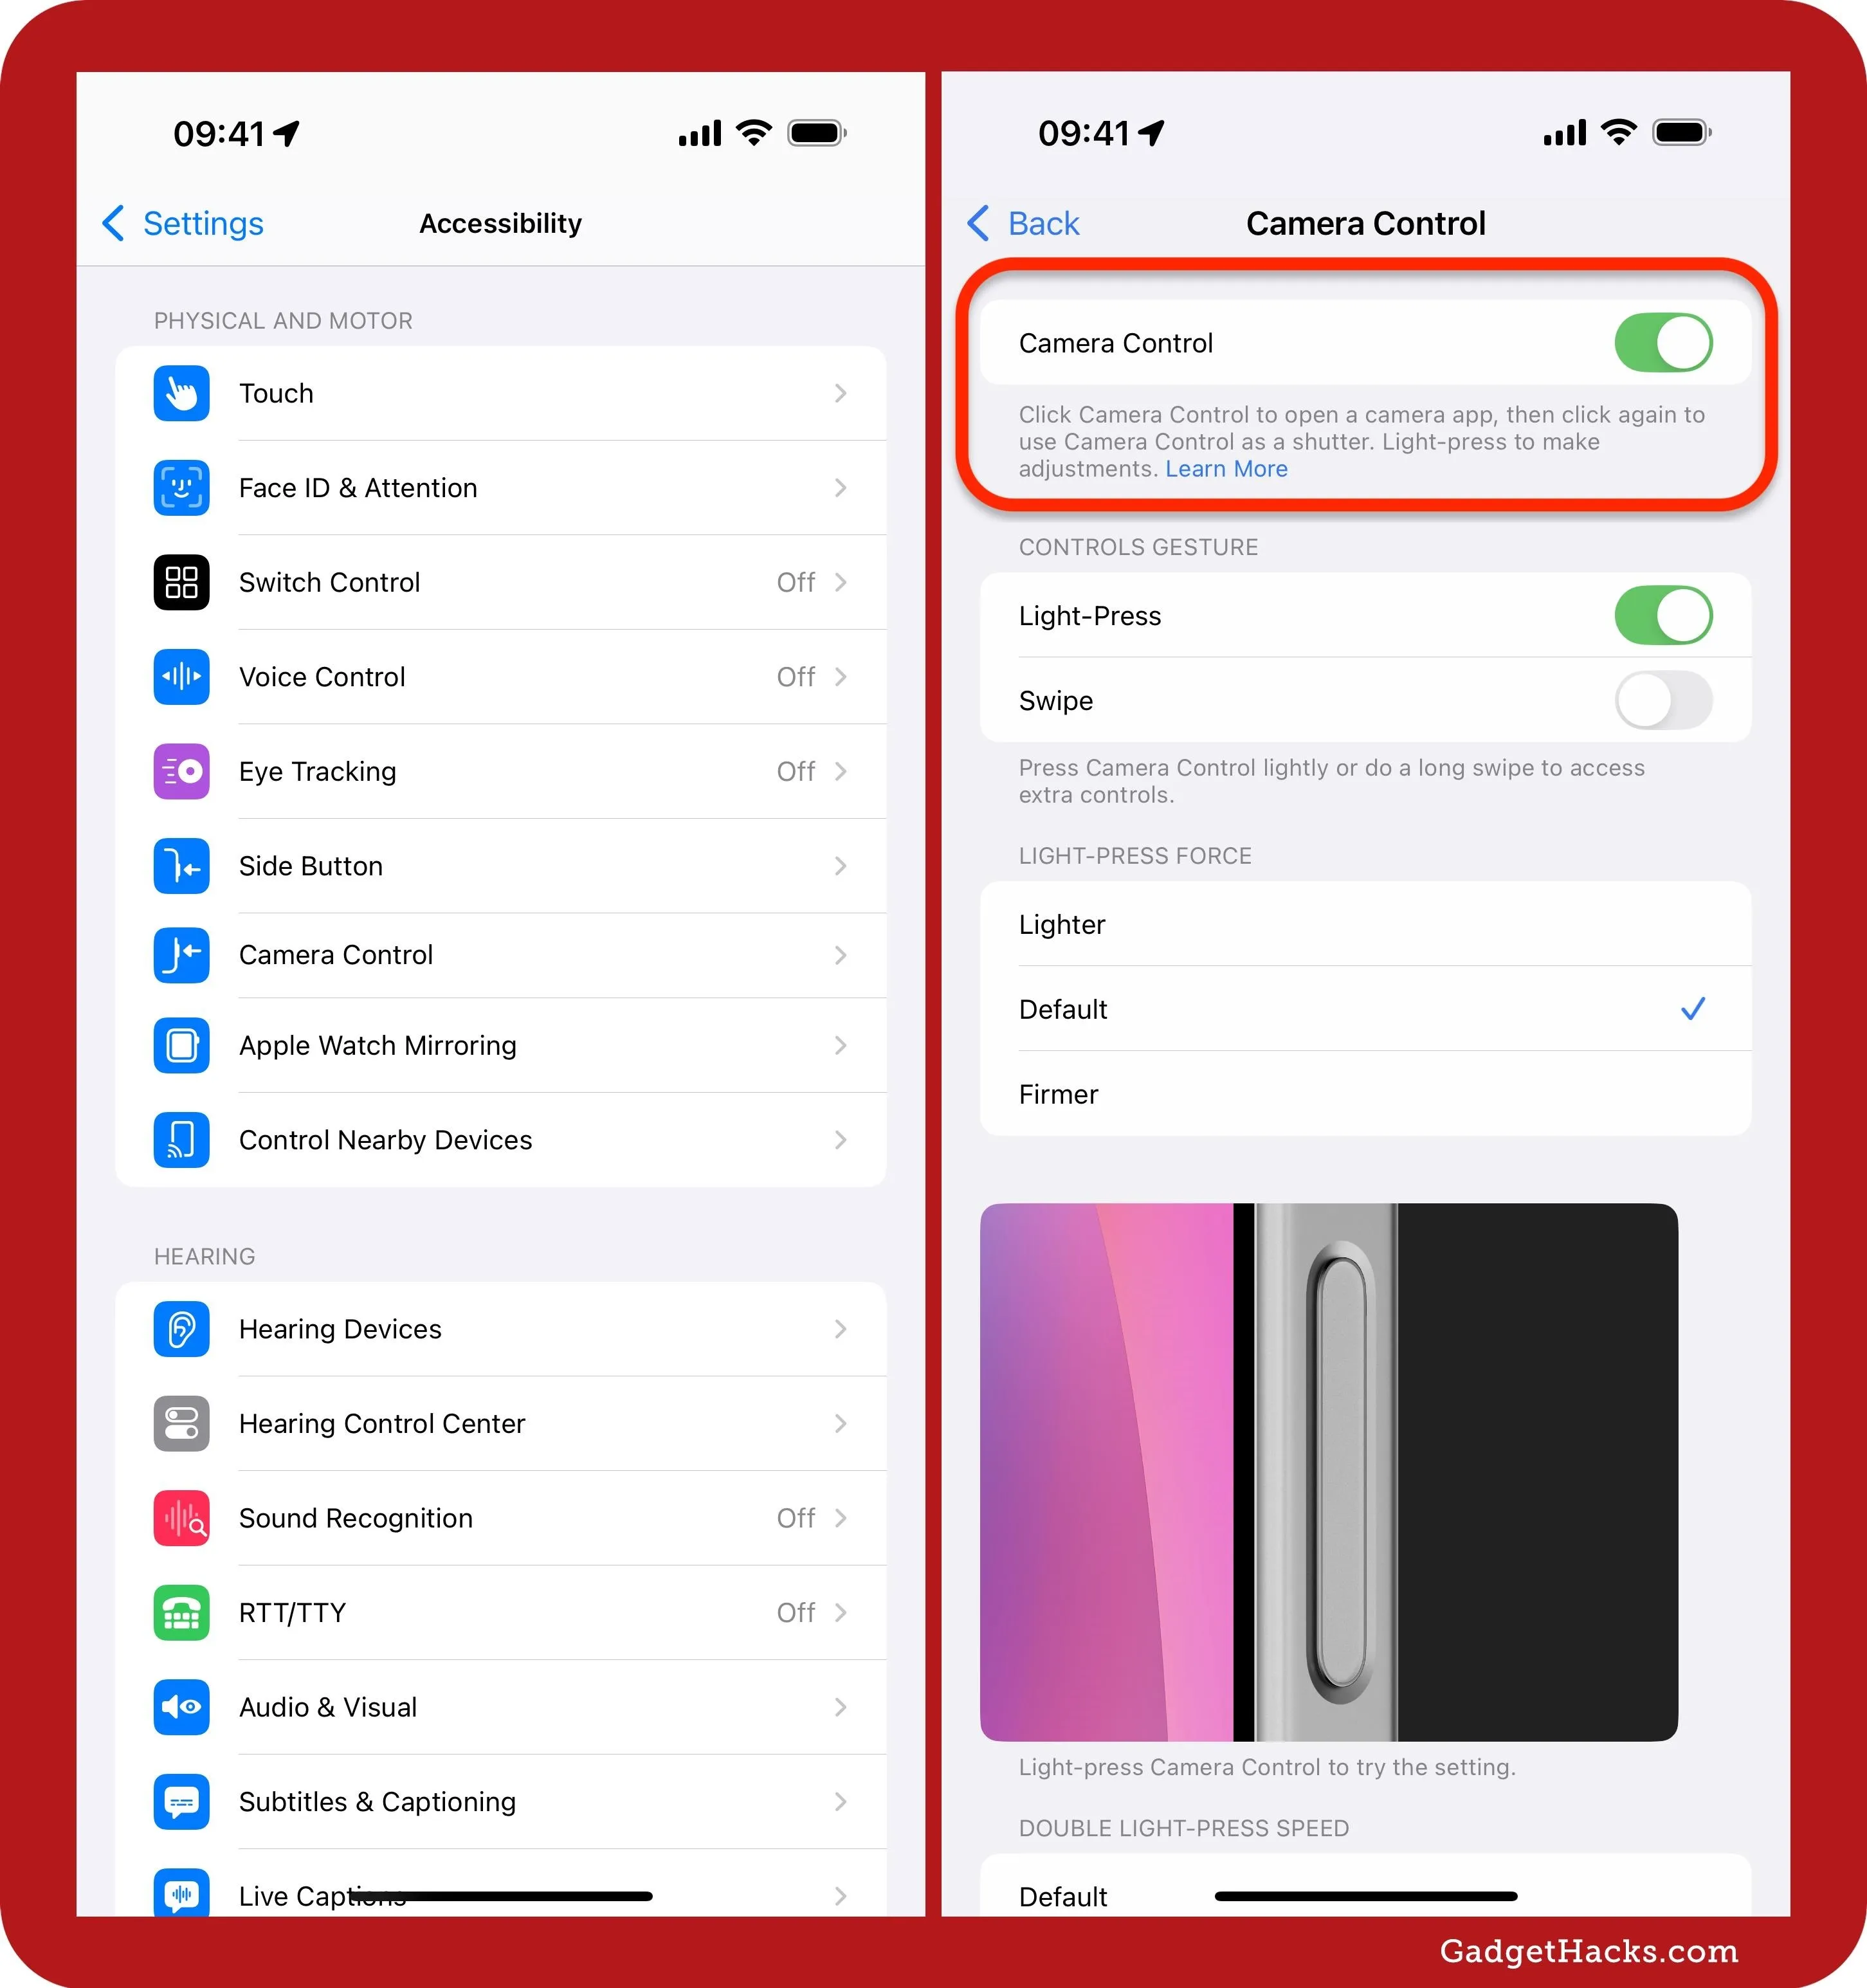
At the top of Settings » Accessibility » Camera Control, you can toggle the "Camera Control" switch off if you don't like using it. This essentially makes the Camera Control button on your iPhone useless. But you can always turn it back on by toggling the switch again.
Pick Different Control Gestures
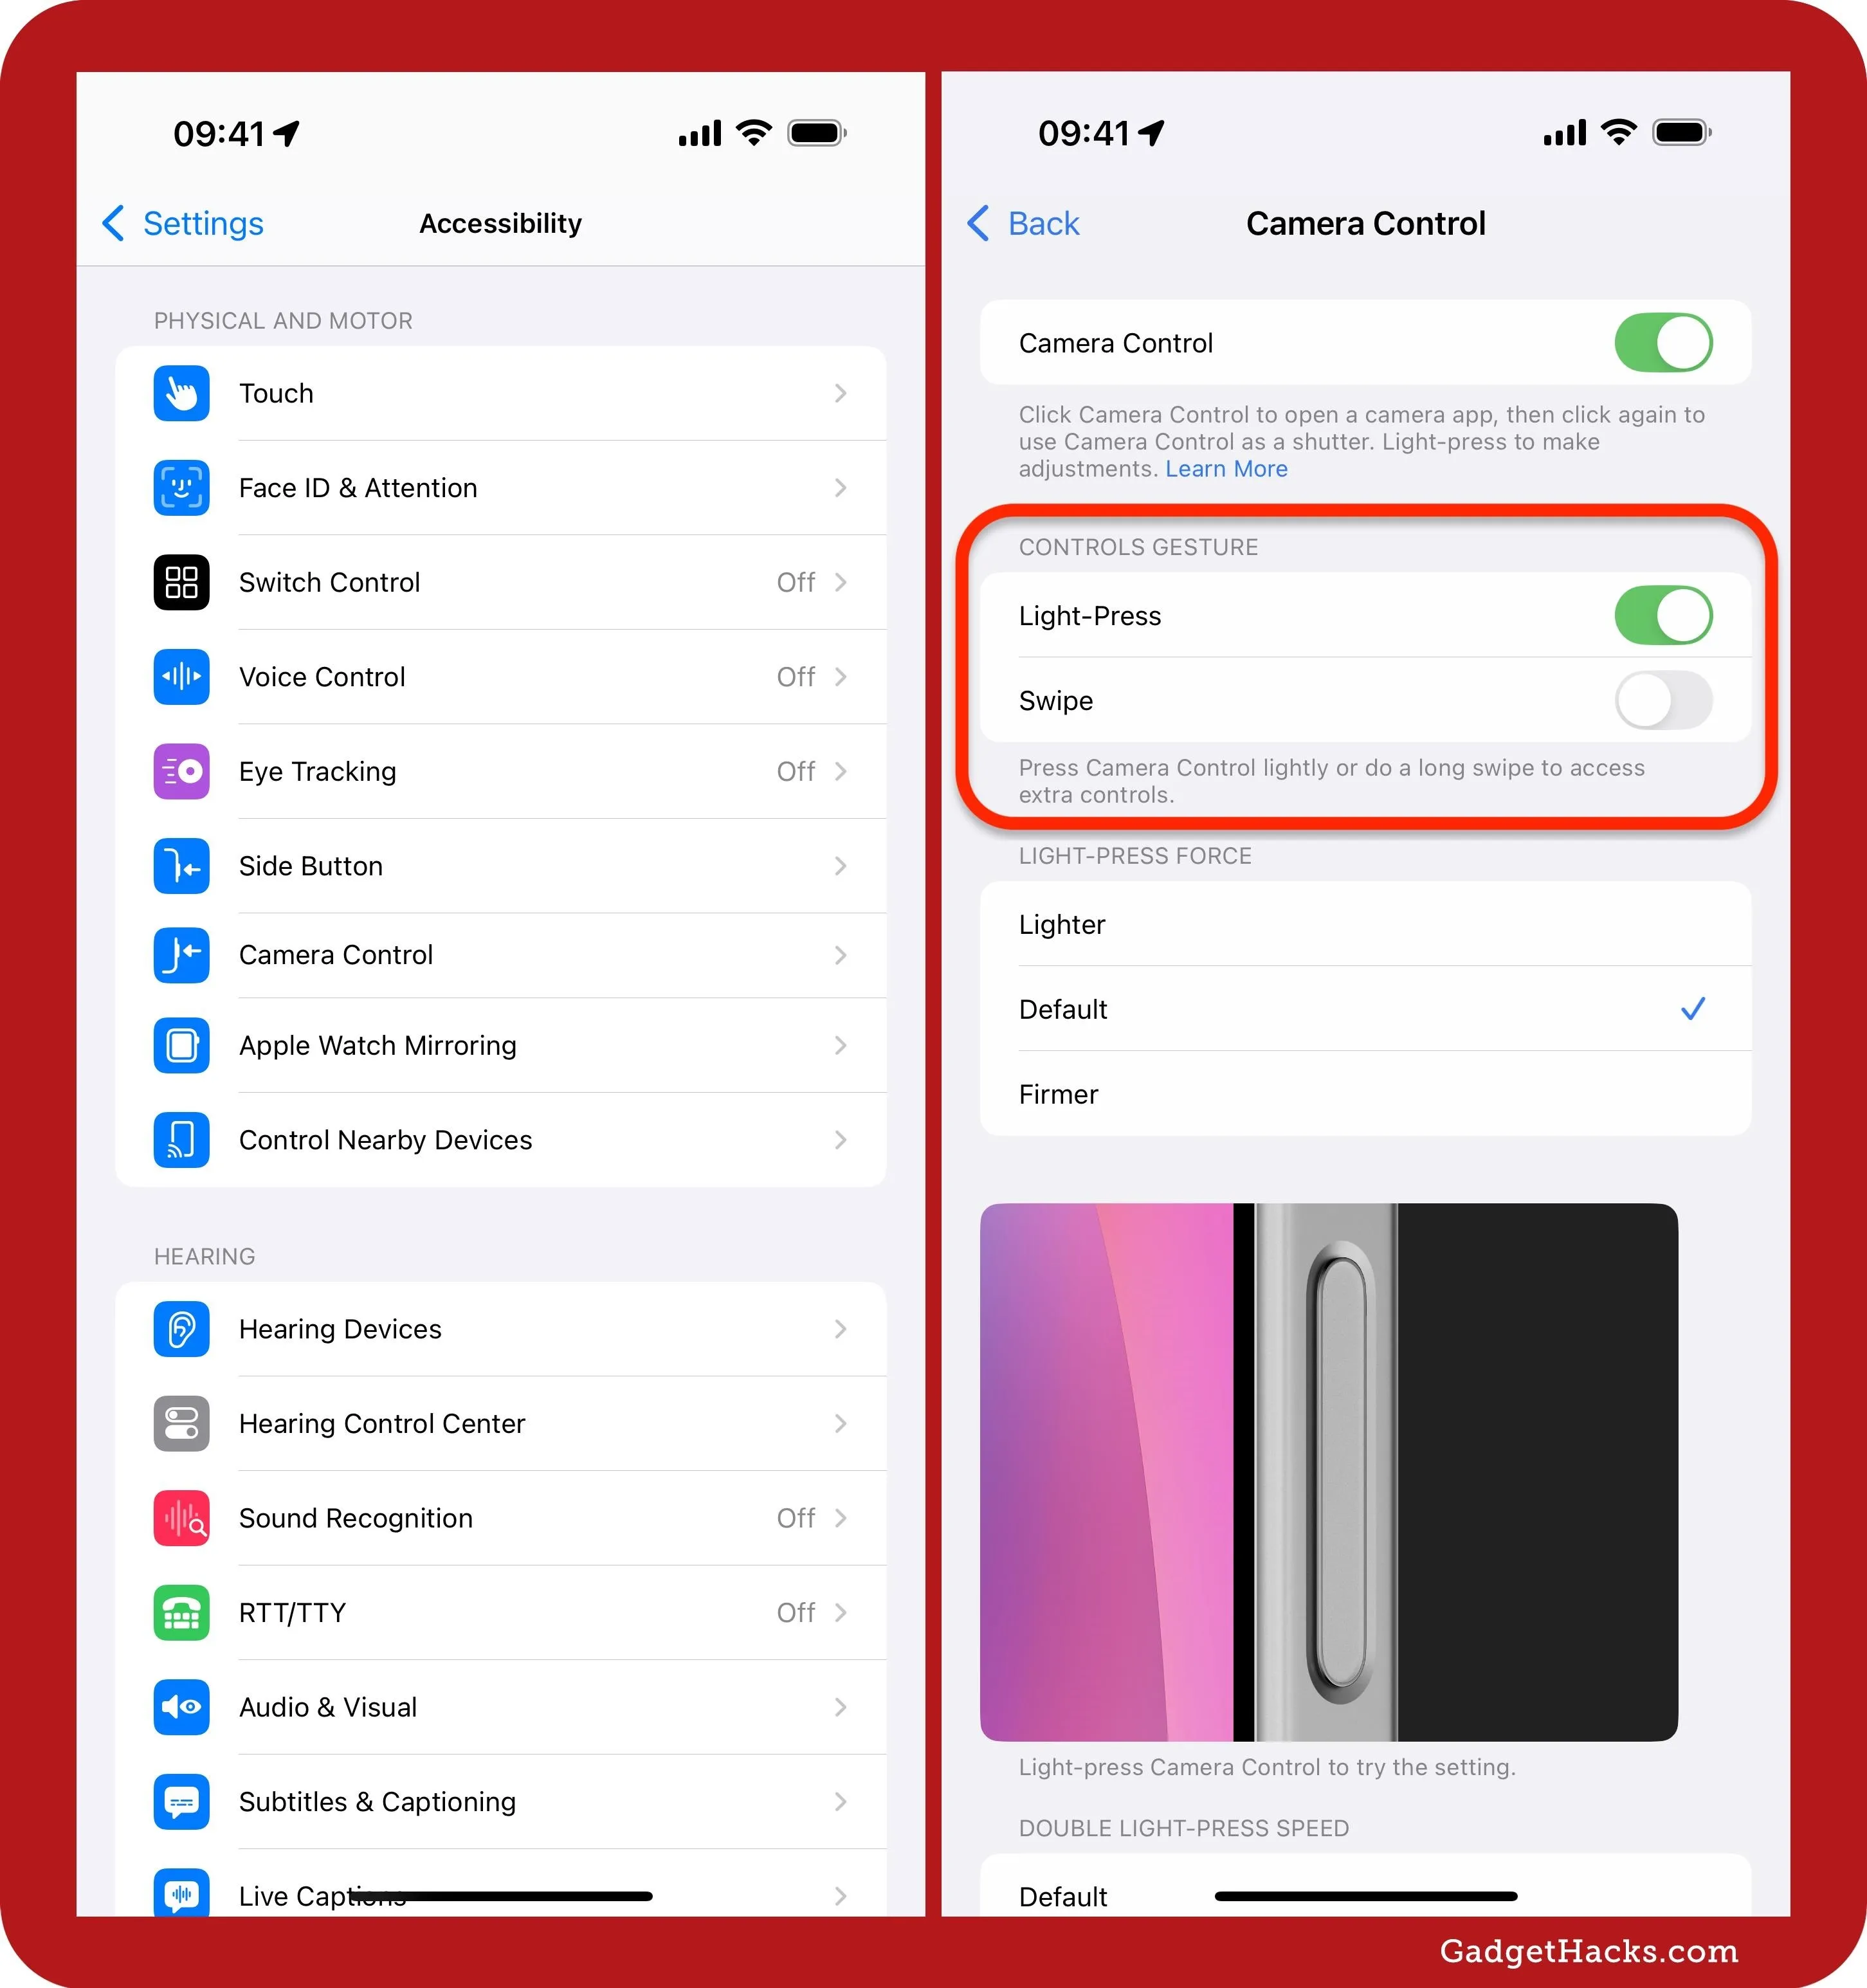
When you need to pick a setting to adjust in Camera or another camera app, you lightly press the Camera Control twice. By default, to adjust the currently selected setting, you would then lightly press the Camera Control once and swipe the button to pick a control or adjust the value. But you can change how this works in Settings » Accessibility » Camera Control » Controls Gesture:
- Light-Press (On): Lightly press twice to open the overlay and once to select a setting or open the last-used setting.
- Light-Press (Off): Light-presses no longer work at all.
- Swipe (On): Long-swipe the button to open the last-used setting.
- Swipe (Off): Long-swipe no longer works, but you can still swipe normally to scroll through settings and adjustments.
- Both on: Lightly press twice to open the overlay, lightly press once to select a setting, or lightly press once or long swipe to open the last-used setting.
- Both off: Light presses and long swipes no longer work at all.
Change the Light-Press Force
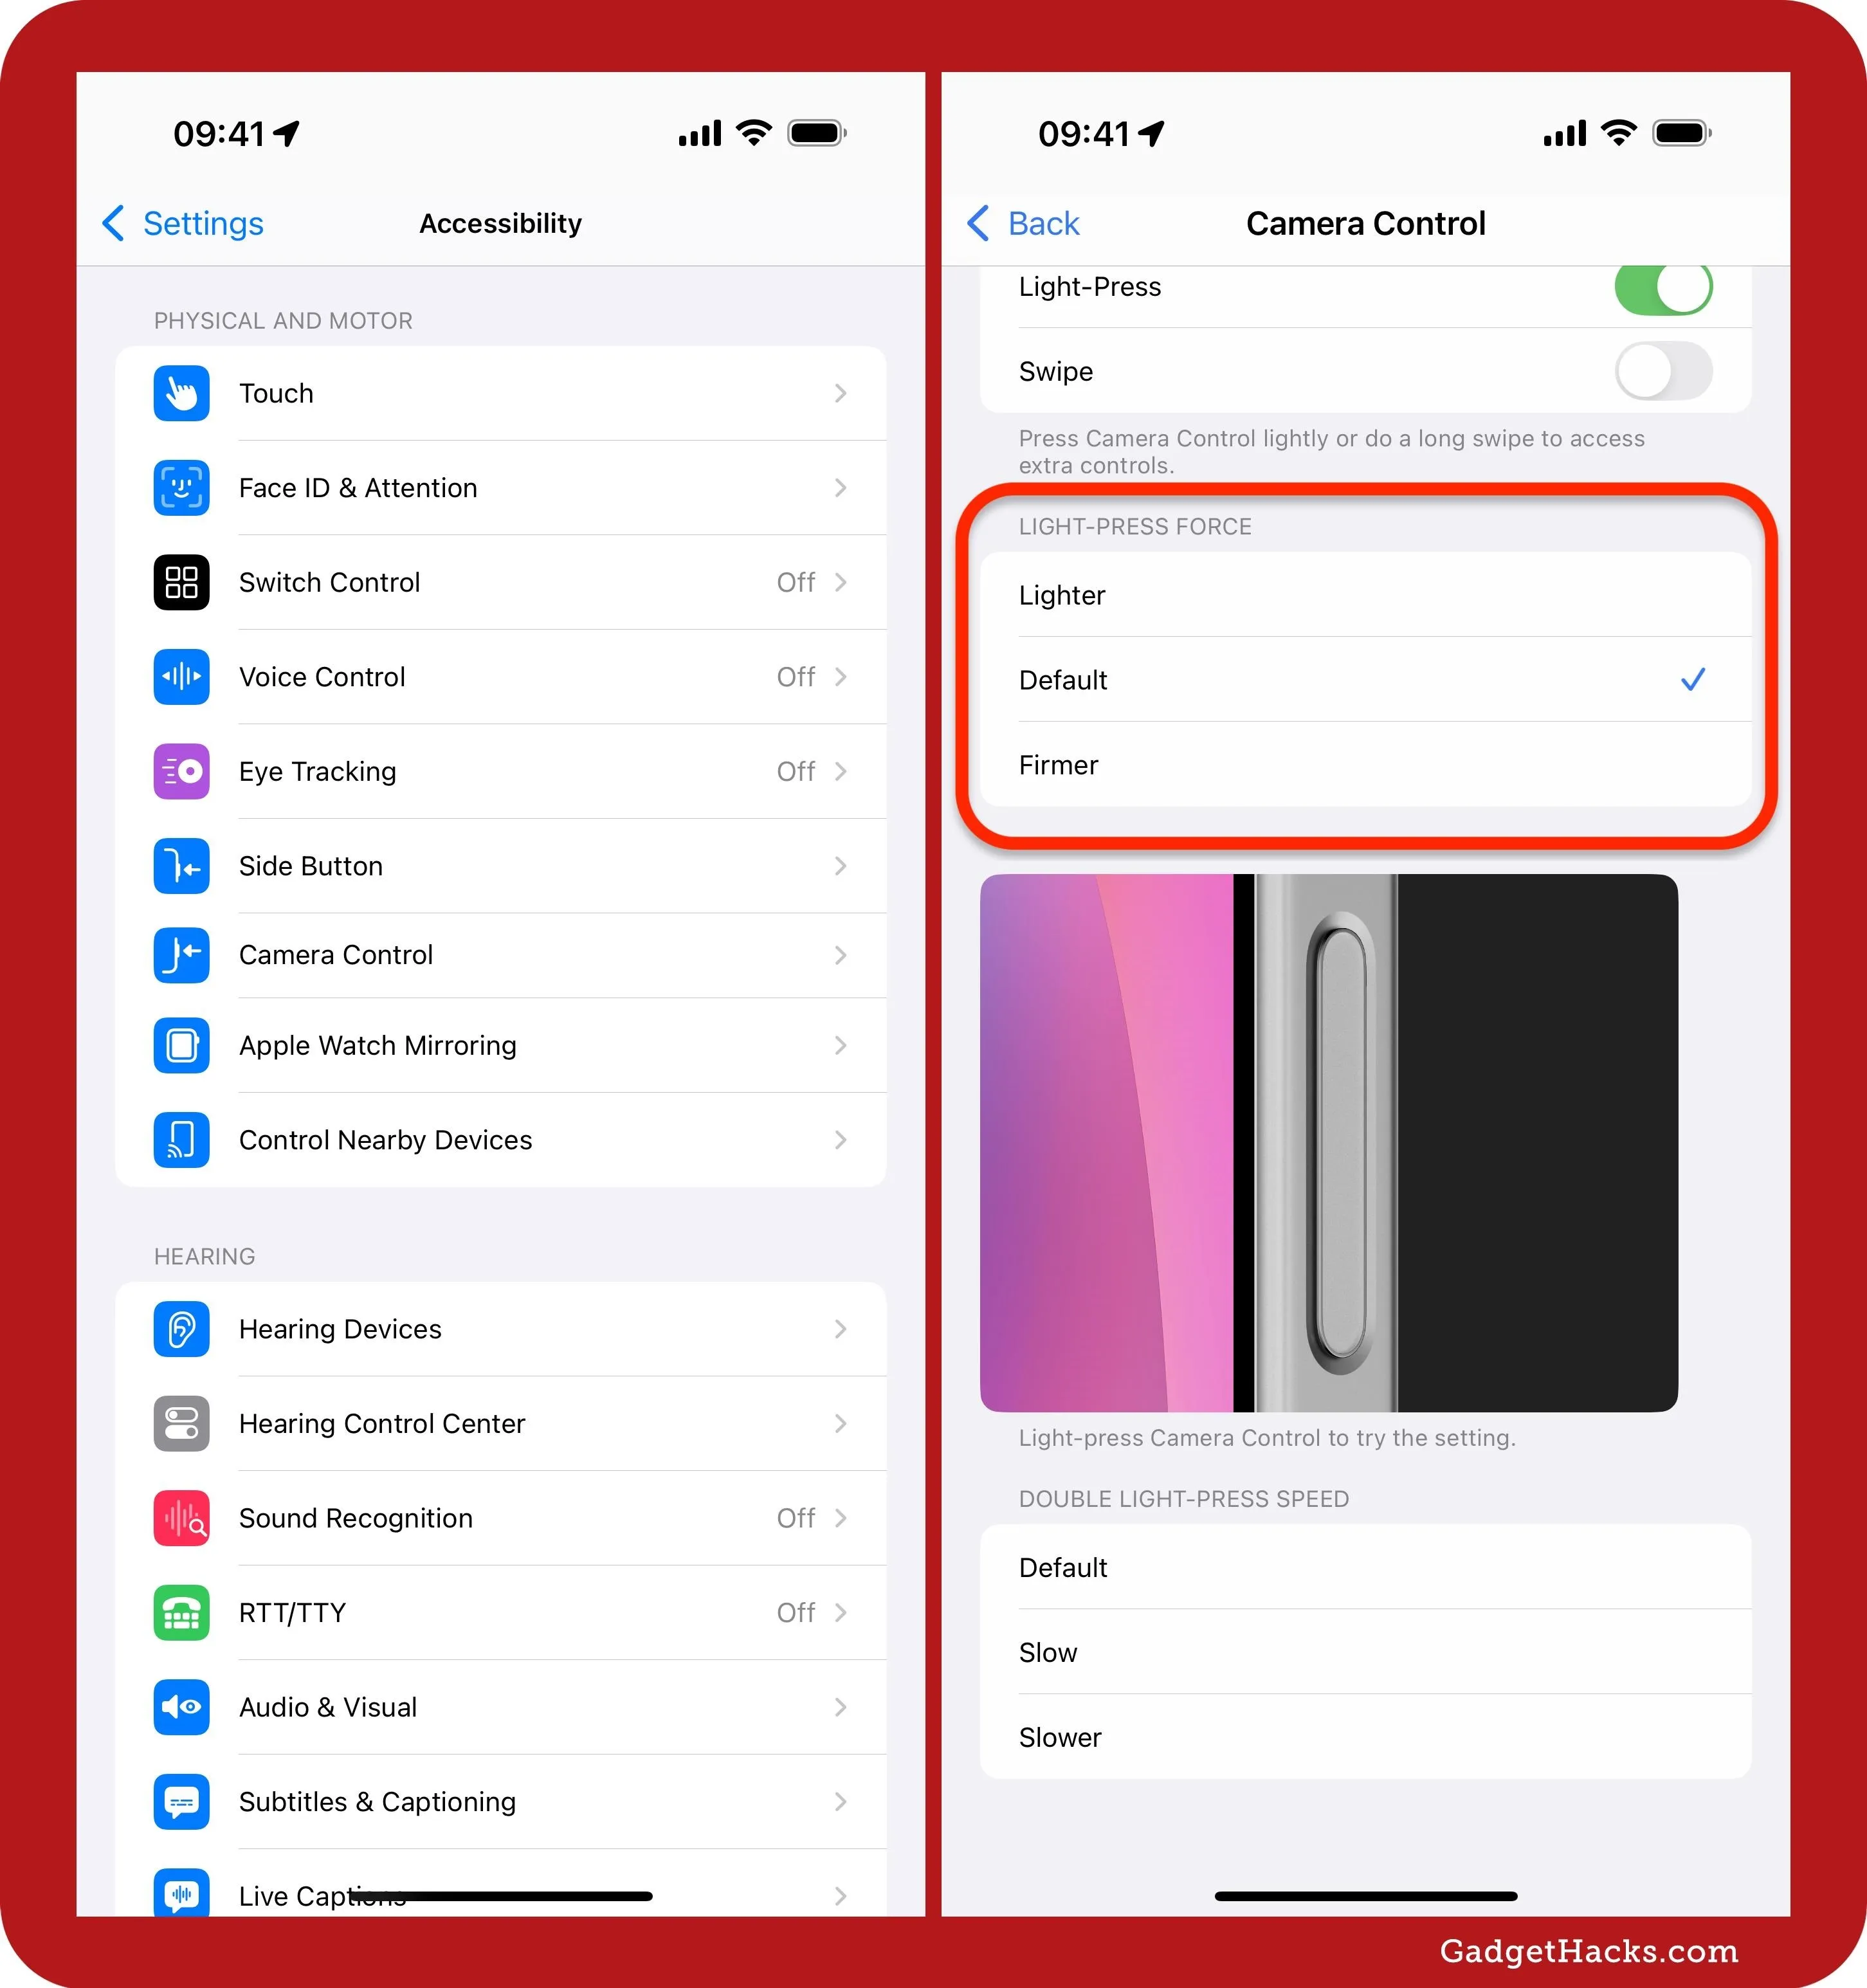
If you're still using light-press functionality, you can change the amount of force required to trigger it from "Default" to either "Lighter" or "Firmer." This can be done in Settings » Accessibility » Camera Control » Light-Press Force.
Change the Double Light-Press Speed
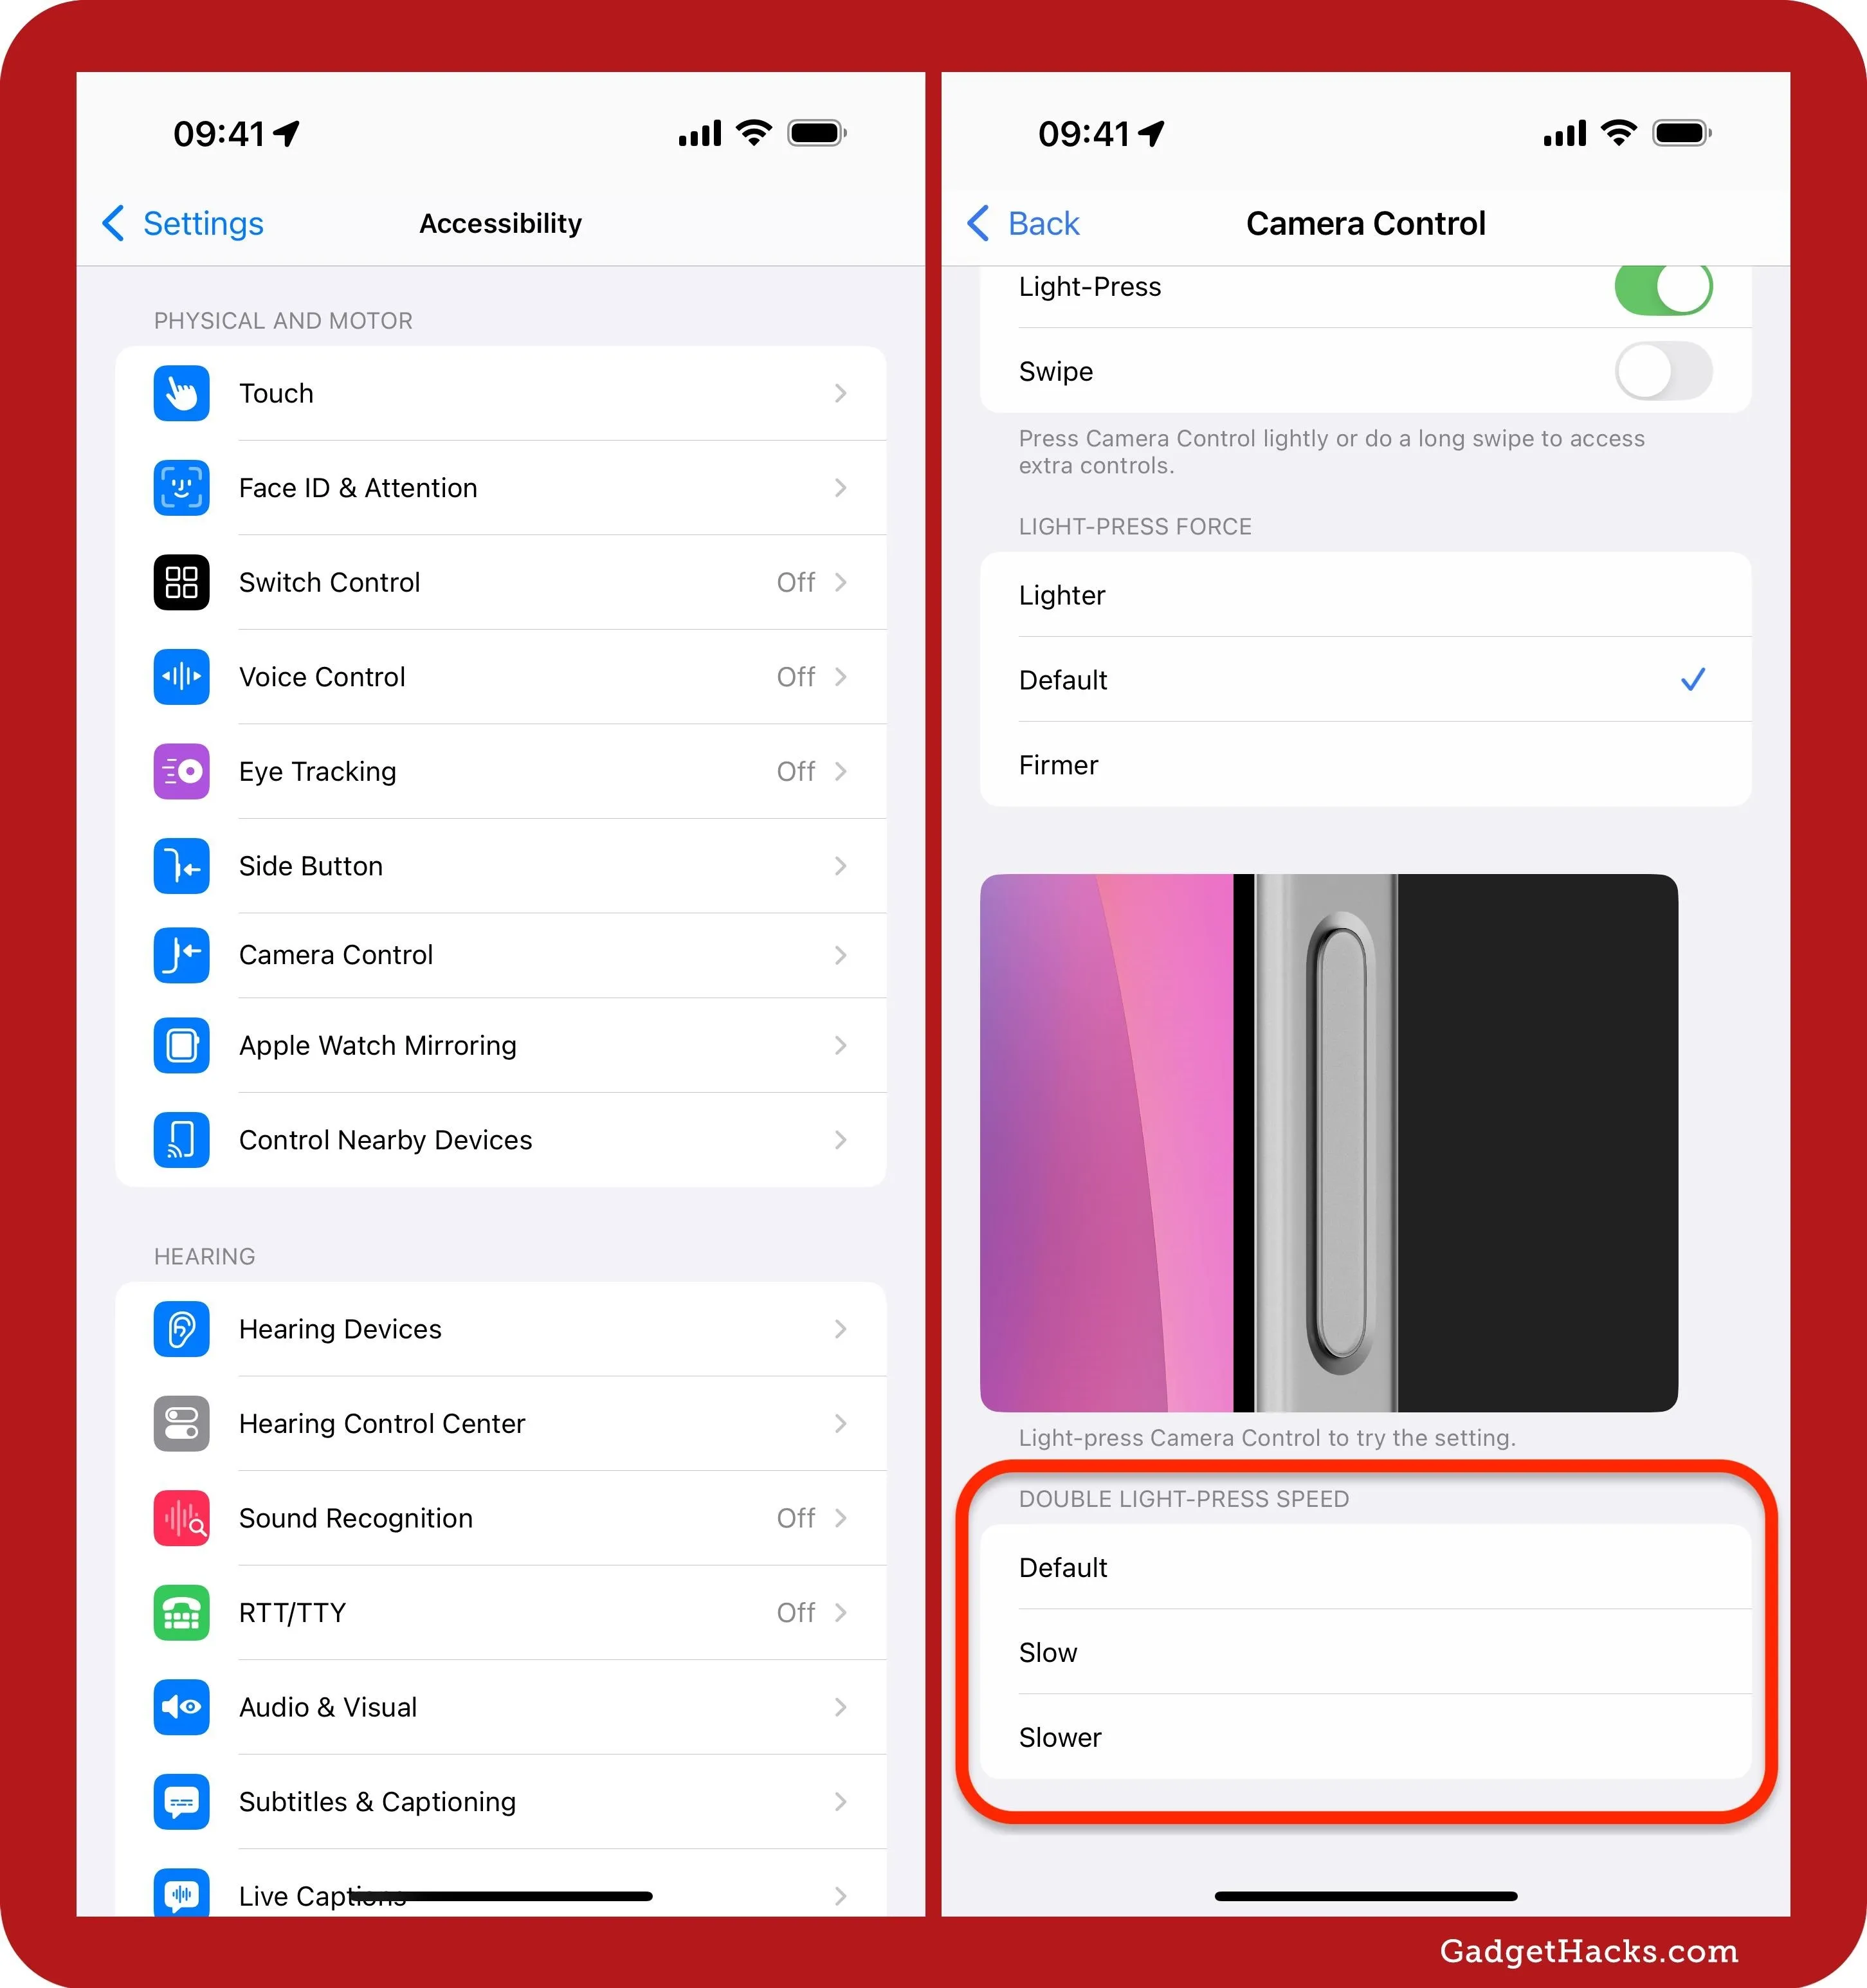
If you want to change the speed at which you light press on the Camera Control, which is helpful if you can't trigger the action because you're not fast enough, you can change it from "Default" to either "Slow" or "Slower" in Settings » Accessibility » Camera Control » Double Light-Press Speed.
The Camera Control button on the iPhone 16 series is an ambitious and exciting addition to Apple's camera suite, offering quick access and advanced features that streamline your photography experience. It's not perfect, and its precision will take some time. But for those willing to invest a little time learning its gestures and nuances, Camera Control has the potential to elevate the way you capture photos and videos.
Cover image and screenshots by Justin Meyers/Gadget Hacks




Comments
Be the first, drop a comment!