
An edited video with lots of different clips needs great transitions to be successful. Transitions support your story and message, and without any, there's always a chance that your audience might lose track of what's going on and when. When editing in Enlight Videoleap for iOS, you can easily add cut, dissolve, iris, wipe, slide, and fade transitions to your video clips with just a few taps.
Even if you're just editing a video to share with friends and family, transitions are a vital part of the editing process because they not only help your shots fit comfortably together and make your story less confusing, they also set a specific tone or mood, which is needed if you're editing a more serious project.
Videoleap makes transitions easy, but before going any further to see how, make sure you update "Enleap Videoleap Video Editor" so you have all the latest features.
Find the Media You Want to Cut
If you're already working on an existing project, skip over to Step 2. If not, tap on the red-and-white plus (+) sign to add a video or photograph to your project. The media importer will appear. Tap on the bottom left tab to choose an album from your Photos app, or tap the bottom right "Stock" tab to view stock videos and images, some of which are free. Select the video or photo to add it to your timeline.
To add more clips to your project, tap the red-and-white plus (+) sign that appears next to any clips you've already added. They will drop in on either side of a clip already in the timeline, depending on where your playhead is. However, one clip is enough to use transitions because you can apply them to the beginning or end of a solo clip, and you can also use the "Split" tool to create different clips from one.
Once you add all your video clips and pictures, you can tap-and-hold on a clip to either change its position or drag it down to the trash can to delete it.


Scale to Your Video Format (If Needed)
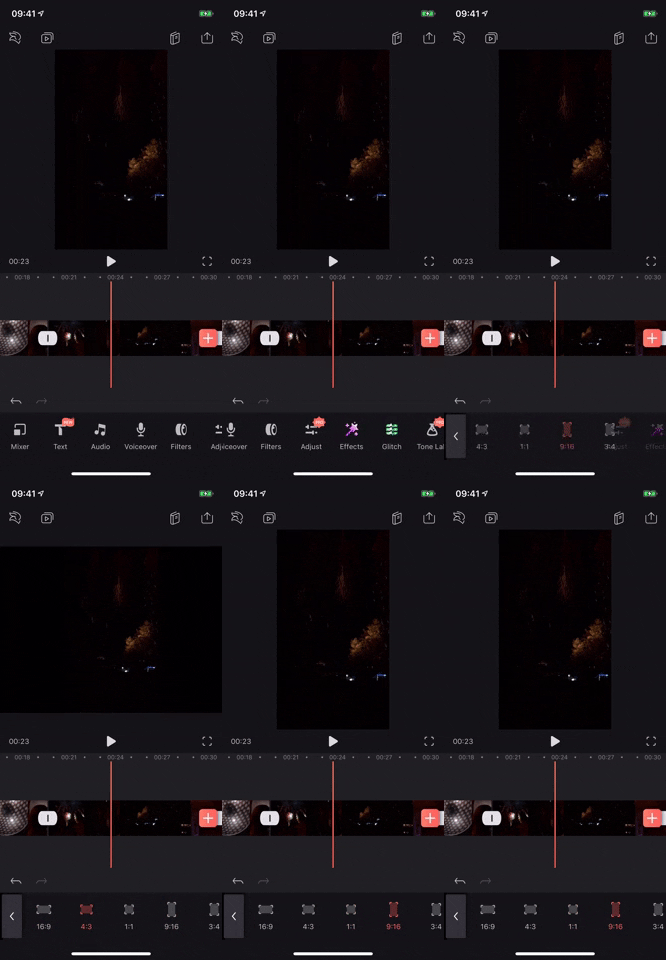
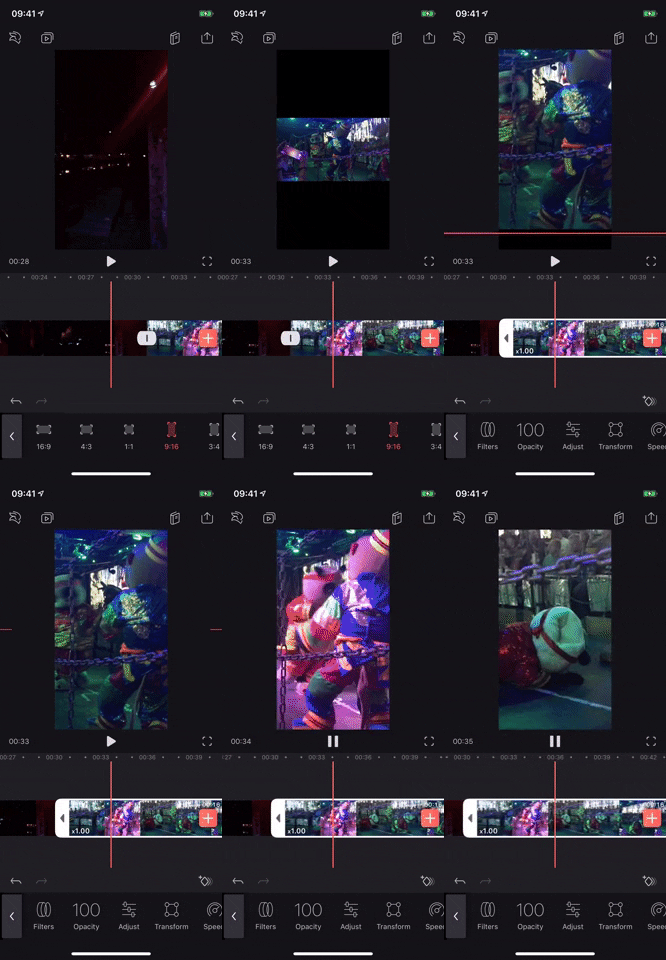
If your video clips have different sizes, you should scale them to the same format to create a cohesive story. It's not easy to watch a landscape video transition into a vertical one with black bars on the left and right sides.
To adjust clips, first, make sure no videos or images are selected on the timeline. If so, tap somewhere else to unselect them. Next, scroll through the editing tools at the bottom and select "Format." Choose a format for all your videos, then fit each clip into the new format by tapping on each clip and pinching in or out to decrease or increase its size, respectively.


Add Transitions
Now that all your clips are in order and the same size, it's time to use the "Transition" tool to improve your project. Although it's easy and quick to add a transition between clips (it just takes a few taps), it's a bit more complicated when using transitions at the beginning or end of the entire project, no matter if it's just one clip or a timeline full of different media.
Add Cuts
Videoleap automatically adds transitions if you add more than a single clip or photo to your project. These are called cuts, which are the most basic type of shot transition, allowing for continuity between clips. The two clips play one after the other, where one image instantly replaces another.
Add Clip-to-Clip Transitions
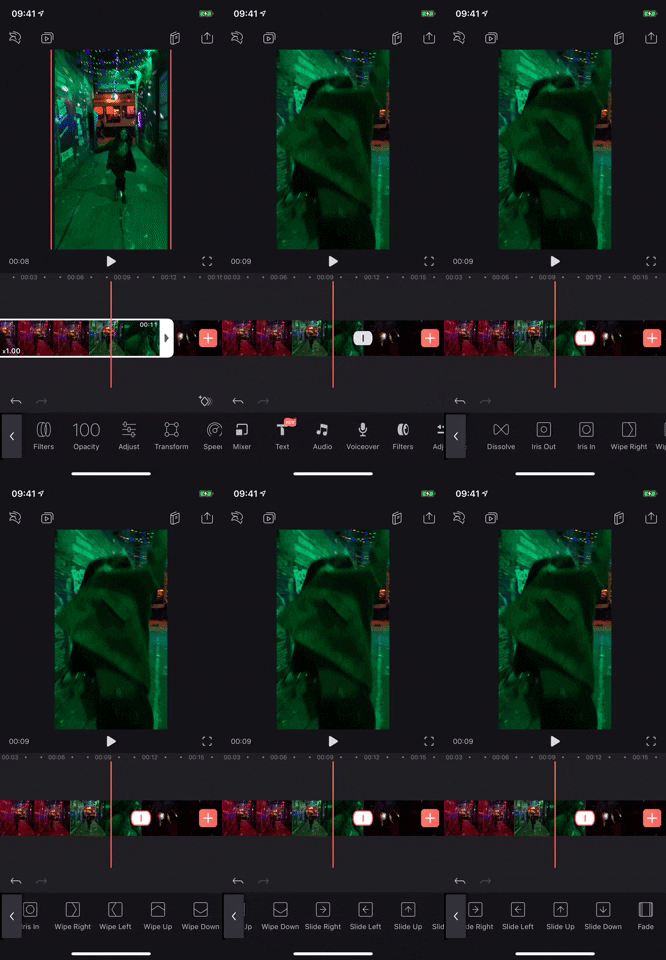
To add your transition between video clips, tap in the dark gray area in the timeline so that no clip or photo is selected. It will reveal the transition icon, a white, rounded square with a vertical line in the middle, in between all of your media. If a clip is selected, the transition icon won't appear before or after the selected clip.
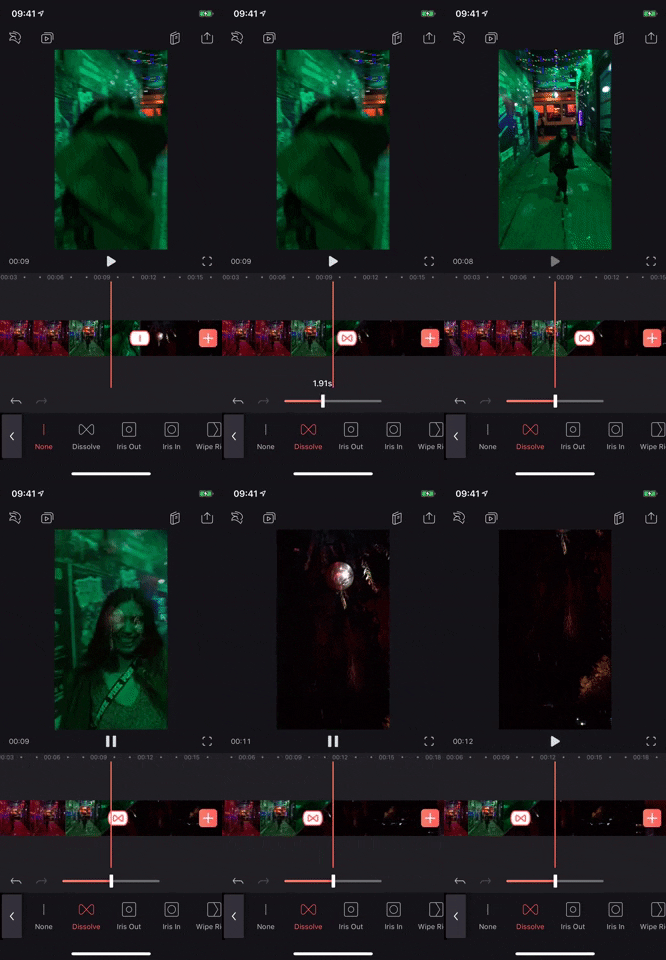
Select the transitions icon for where you want to add the transitions, and the toolbar will change to show all of the available clip-to-clip transitions. All of these transitions, except "None," will move the second clip forward so that it appears under the first during the transition, which means your timeline's length will be slightly shorter for the adjustment. It does not expand either video clip itself, just moves the second clip.
- None: One clip instantly replaces another. This is the cut we just talked about above.
- Dissolve: One clip gradually replaces another. The first clip's ending will change opacity until it's no longer visible, revealing the second clip during the process.
- Iris Out: Starting from the center of the frame, a small circle will open up revealing the clip underneath it, and it will continue expanding like a shutter opening until the circle is gone and the second clip is wholly in the frame.
- Iris In: Starting from outside the frame, a circle will start devouring the first clip, revealing the second clip around it. The circle will continue getting smaller, like a closing shutter, until it disappears in the center and the second clip is entirely in the frame.
- Wipe Right, Left, Up, or Down: The first clip will be pushed off the screen, either from left to right (Right), right to left (Left), bottom to top (Up), or top to bottom (Down), revealing the second clip in the process.
- Slide Right, Left, Up, or Down): The first clip will be pushed off the screen by the second clip, either from left to right (Right), right to left (Left), bottom to top (Up), or top to bottom (Down).
- Fade: The end of the first clip is dissolved quickly into a black screen, then dissolves back into the second clip. Basically, the first clip fades out quickly and the second one fades in.
Whenever you select a transition, you can move the bar on the slider underneath your timeline to decrease or increase the length of the transition. If you reduce the transition, it will happen more quickly and will only push the second clip forward a tiny bit in the timeline. When you increase the transition, it works more slowly, and it will push the second clip forward another second or two.


Add Fades Ins & Fade Outs
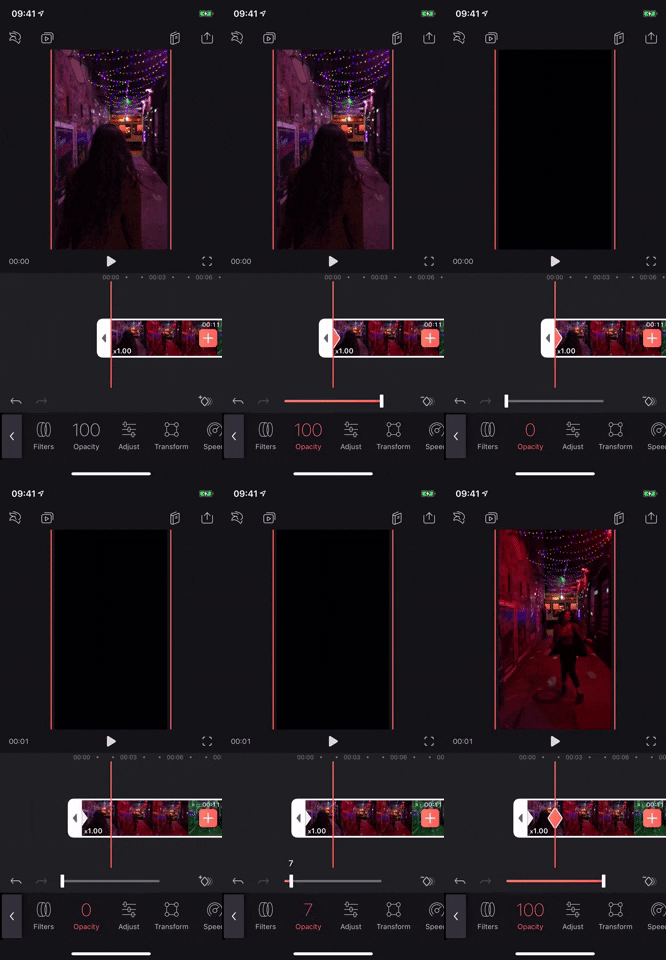
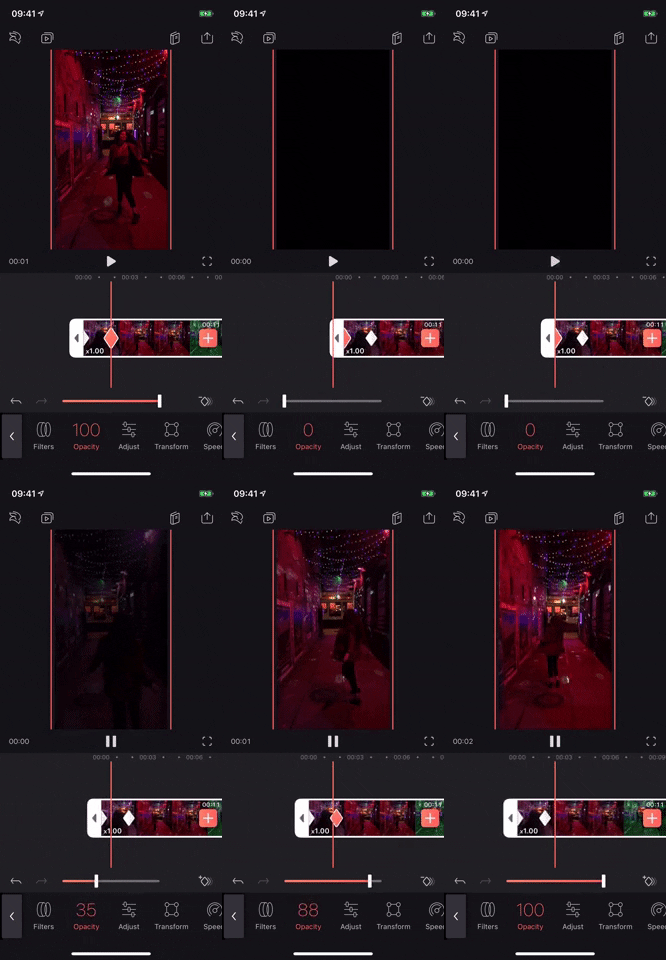
If you want to add a fade in or fade out to a single clip, you must use the keyframe feature. To do this, place the playhead at the beginning or end of a clip, tap on the clip, and add a keyframe marker by tapping the diamond icon with a plus sign. Next, tap on "Opacity" and set it to zero using the slider. Now position the playhead a few seconds forward or backward in the clip, set the "Opacity" to 100, and a keyframe will automatically show up. Play your video back to view the fade.


Mix Clips Together
Finally, you can use the "Mixer" tool, which can be used for transitions between clips, though it's not officially used for that. Instead, its focus is to mix clips over one another, but that doesn't mean it can work for transitions. With it, you can use the following transitions.
In Animations:
- Fade In: This will make the top clip's opacity go from zero to 100 in the selected timespan, at the beginning of the clip, showing the bottom layer clip or clips during the transition.
- Slide Left, Right, Up, or Down: This will push the top clip into the frame at the beginning of the clip to overtake the bottom layer, either right to left, left to right, bottom to top, or top to bottom. For sliding out, it will do the same thing, except it will push the top clip out of the frame in the direction specified.
- Scale Up or Down: When scaling up, the top clip frame will start from the center, not visible, and will appear tiny, continuing to scale up in size until it takes over the bottom layer. When scaling down, the top clip will be enlarged, taking over the bottom layer right away, and will shrink down to normal size.
- Spin CW or CCW: The former will spin the top clip clockwise from the middle while it scales up to take over the entire bottom layer. The latter will do the same, only counterclockwise.
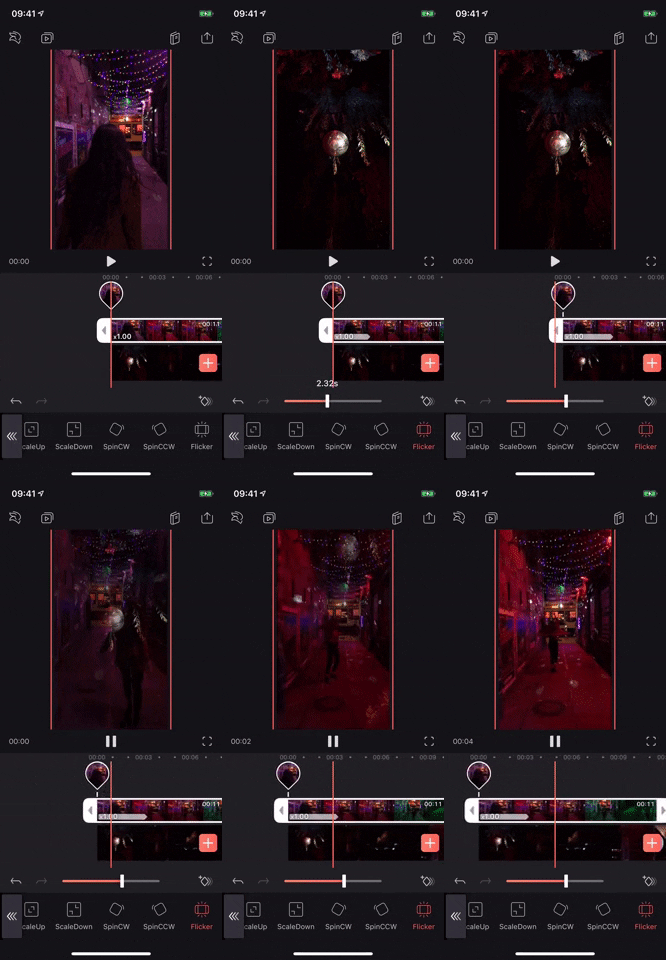
- Flicker: This will make the top clip flicker on and off for the length of the animation, showing the bottom layer during the off parts. The top clip takes over when the animation ends.
Out Animations:
- Fade Out: This will make the top clip's opacity go from 100 to zero in the selected timespan, at the end of the clip, showing the bottom layer clip or clips during the transition.
- Slide Left, Right, Up, or Down: This will push the top clip out of the frame at the end of the clip so that the bottom layer takes over, either right to left, left to right, bottom to top, or top to bottom.
- Scale Up or Down: When scaling up, the top clip frame will expand in size until it fades out into the bottom layer. When scaling down, the top clip frame will shrink in size until it's no longer visible, showing the bottom layer in the process.
- Spin CW or CCW: The former will spin the top clip clockwise while it scales down into nothingness, revealing the bottom layer in the process. The latter will do the same, only counterclockwise.
- Flicker: This will make the top clip flicker on and off for the length of the animation, showing the bottom layer during the off parts. The bottom layer takes over when the animation ends.
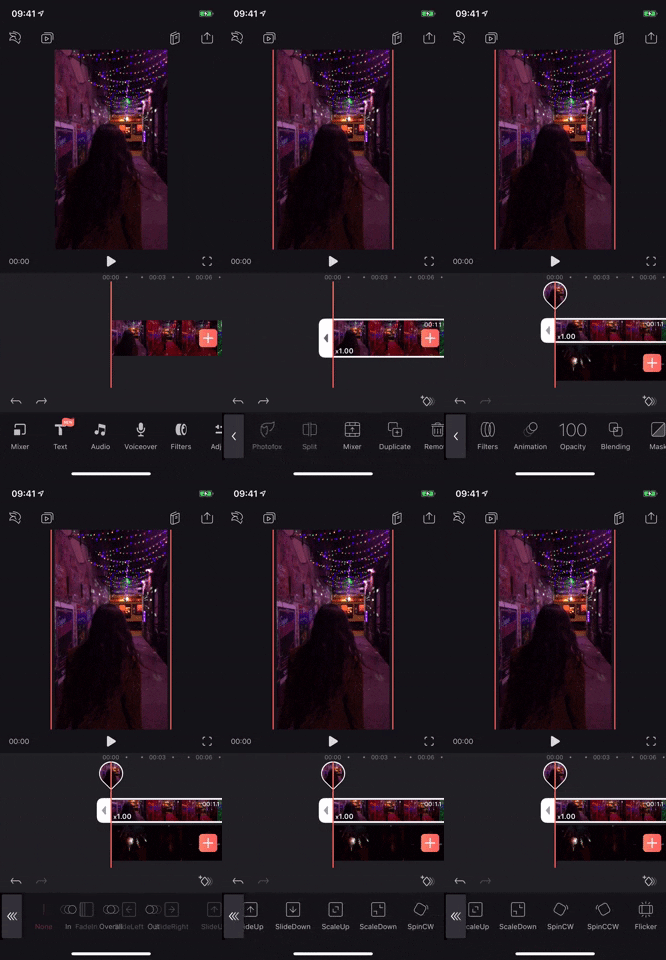
Tap on a clip, then scroll to the right in the toolbar until you reach the "Mixer" tool. When you tap on it, it will place the selected clip above any other clips after it, giving you an overlay effect. If there are no clips after it, it will provide you with the option to add another clip before continuing.
Next, with the top clip selected, tap on "Animation" in the toolbar, and use either "In" or "Out," depending on where you want to add the transition, i.e., the beginning or end of the clip. You can do both if you wish. Select from one of the transitions above, then move the bar in the slider to make the animation shorter or longer.


This article was produced during Gadget Hacks' special coverage on smartphone-based video creator tips for filming and editing. Check out the whole Videography series.
- Follow Gadget Hacks on Pinterest, Reddit, Twitter, YouTube, and Flipboard
- Sign up for Gadget Hacks' daily newsletter or weekly Android and iOS updates
- Follow WonderHowTo on Facebook, Twitter, Pinterest, and Flipboard
Cover photo, screenshots, and GIFs by Nelson Aguilar/Gadget Hacks





Comments
Be the first, drop a comment!