Enabled from the moment you first booted up your device, there's a feature deep in the iPhone's settings that automatically backs up your device in the background. As long as you're connected to Wi-Fi and a power source and your screen is locked, your photos, text messages, apps, and everything in-between gets safely stored to your iCloud account.
But if those three criteria aren't met and your iPhone ends up getting lost, stolen, or broken, then you're left with an outdated iCloud backup that might not contain all of your latest media, data, and settings.
That's why you should manually update your iPhone — but not by connecting it to your computer and using iTunes because no one has time for that. Instead, do it all directly through your iPhone. It's simple, it's quick, and best of all, you can even restore your latest backup in an emergency, all from the palm of your hand.
What Gets Stored in an iCloud Backup
Since iCloud backups works a little differently than the ones created in iTunes, you should know what gets stored to your iCloud when you back up to it from your iPhone:
- Purchase history for music, movies, TV shows, apps, and books
- Photos and videos (unless iCloud Photo Library setting is enabled, then they're already stored to your iCloud, so you don't have to worry)
- Device settings
- App data
- Home screen and app organization
- iMessage, text (SMS), and MMS messages
- Ringtones
- Voicemail
- Health data
- HomeKit configuration
Any music, apps, or other media that isn't purchased from the iTunes, iOS App Store, and iBooks Store will not be backed up to iCloud, so if you have those sorts of files, an iTunes backup is suggested.
Connect to Wi-Fi
Before we get into backing everything up, you'll need to make sure you're connected to a Wi-Fi network, otherwise, you won't be able to back up your iPhone. You can use a hotspot from a local coffee shop or something similar, but those tend to be finicky, so I would suggest a more legitimate Wi-Fi network, like at home, school, or work.
Backing Up from Your iPhone
Begin by going to Settings, tapping your name up top, then "iCloud." Next, scroll down and tap on "iCloud Backup." At the bottom, you'll see the date of your last iCloud backup, as well as the option to "Back Up Now."
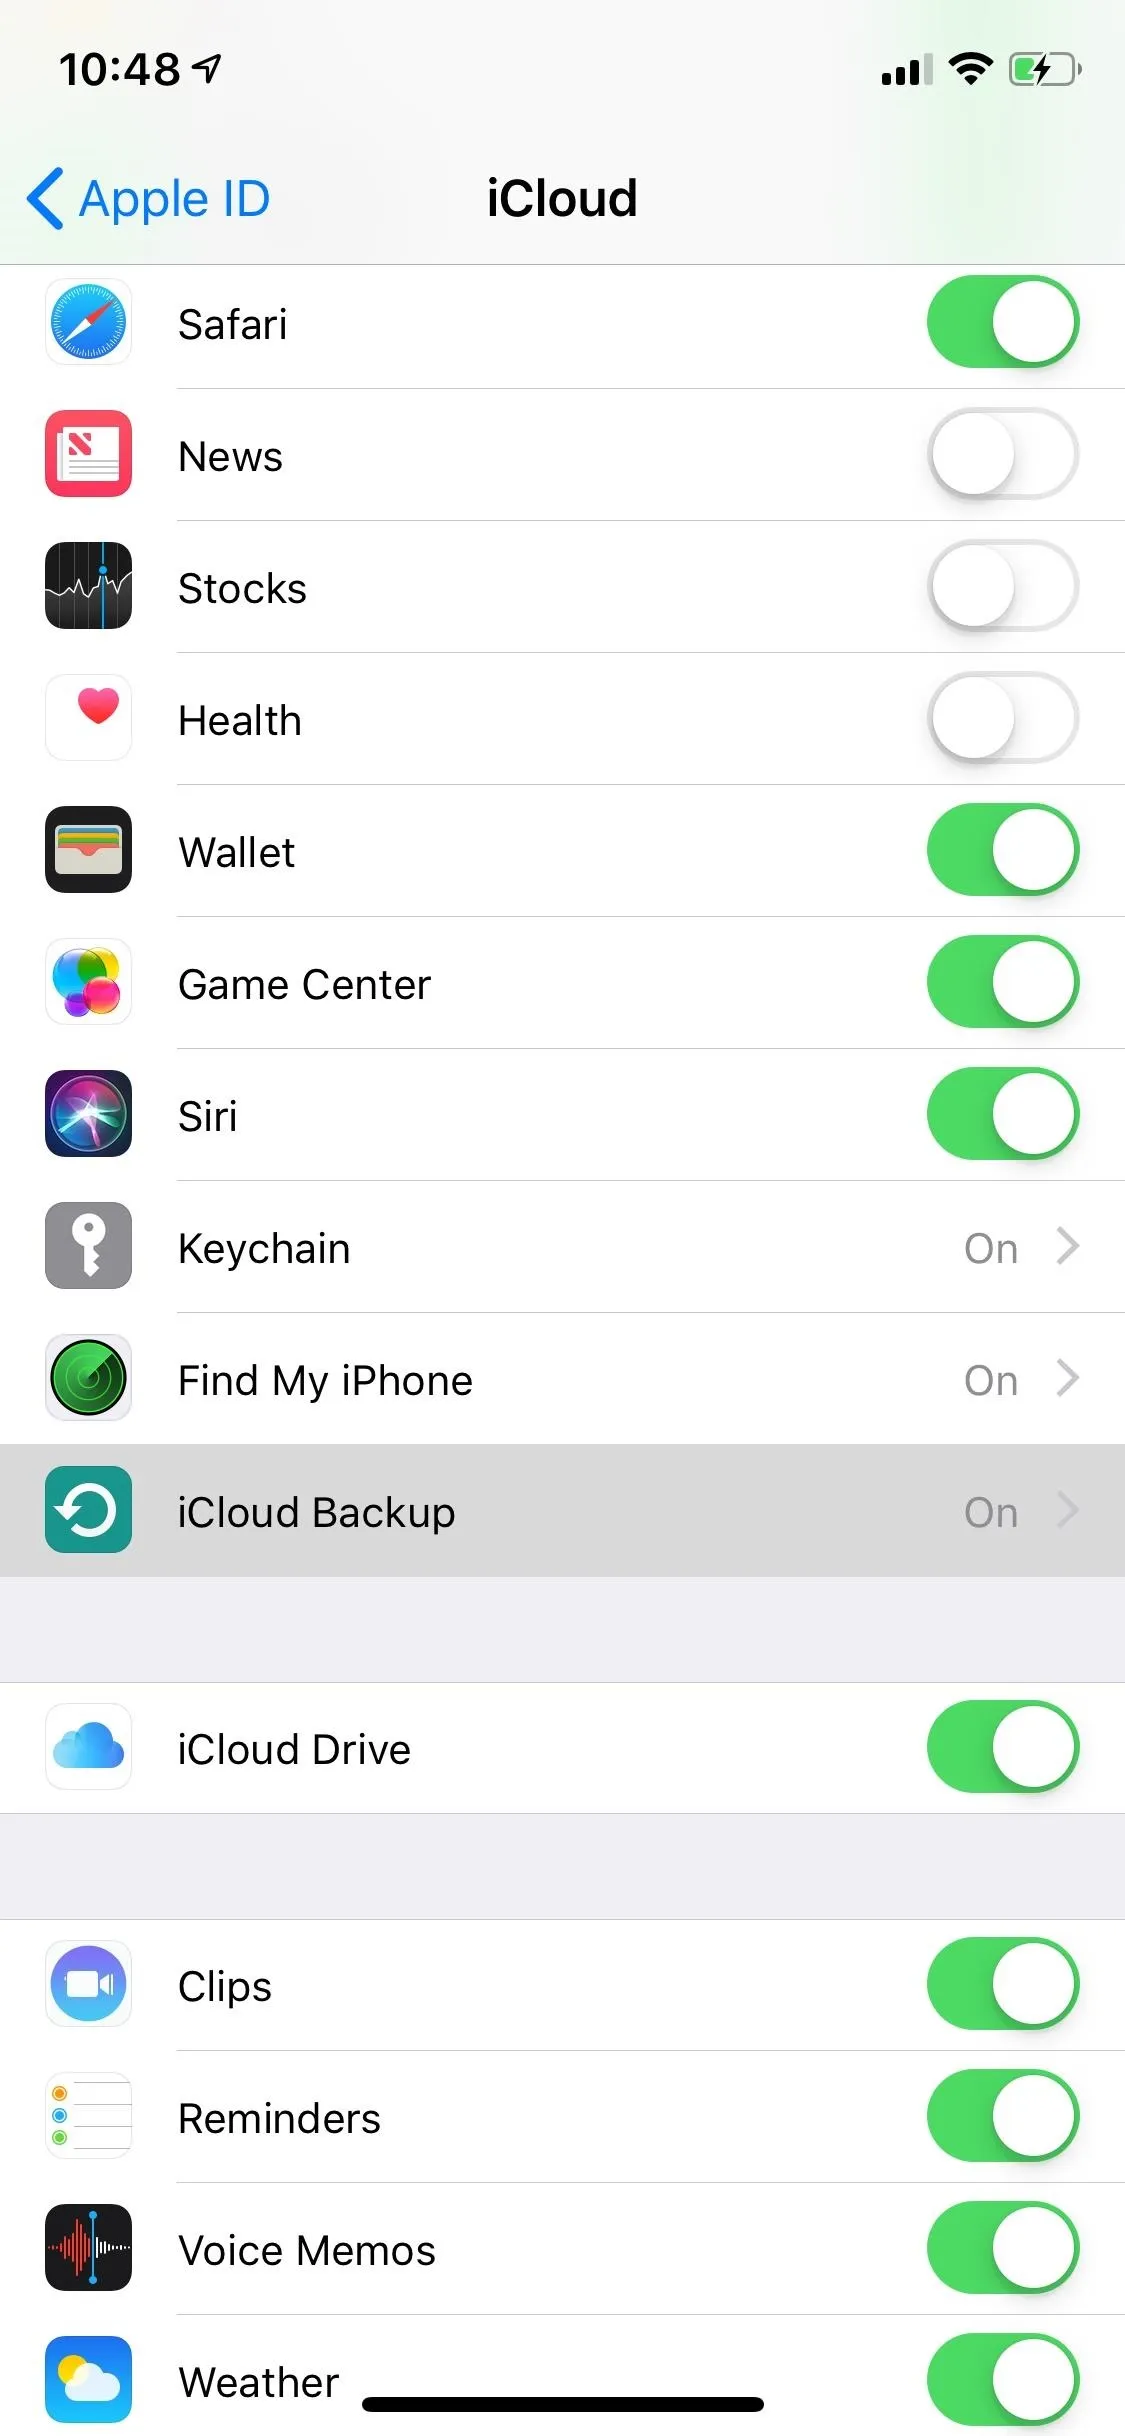
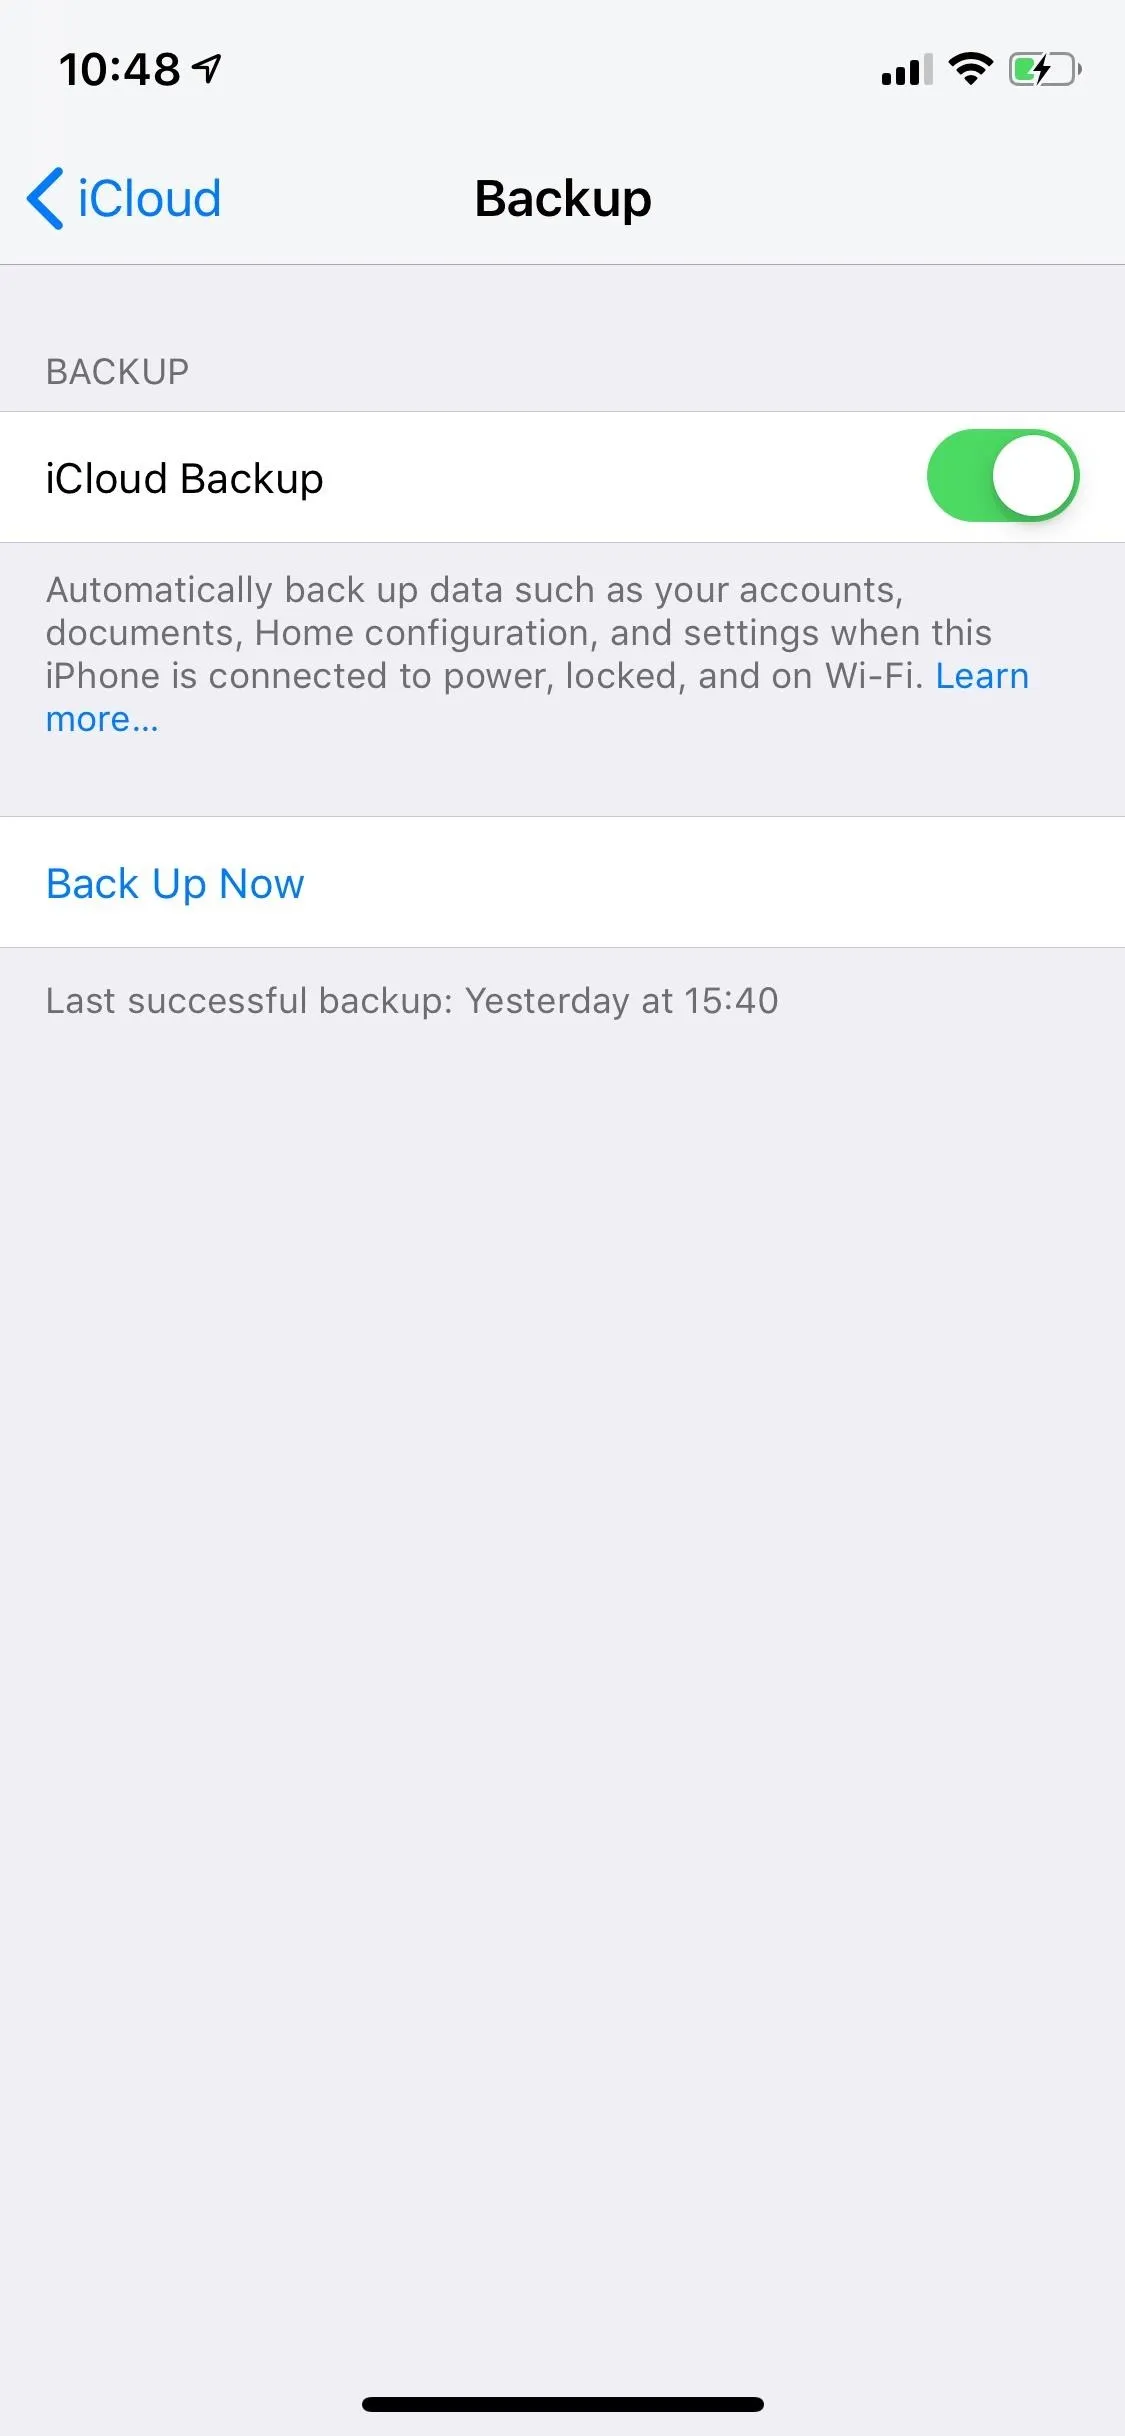


Depending on the quantity and size of the files you have on your device, it might take some to finish. You can also choose to cancel the backup at any time if the process is taking too long and you need to use your iPhone.

Once the process is finished, you will see you latest backup and the time it finished, which you should remember for whenever you have to restore it at a later time.
Restoring a Backup from Your iPhone
Restoring an iCloud backup isn't as straightforward as backing it up — there is no "Restore" button anywhere in the settings. So instead, what we have to do is reset the entire device. Obviously, you'll only want to do this if you're getting a new iPhone, you just obtained a used one and are resetting it, or you want to start with a "clean slate" but still want your apps, pictures, etc.
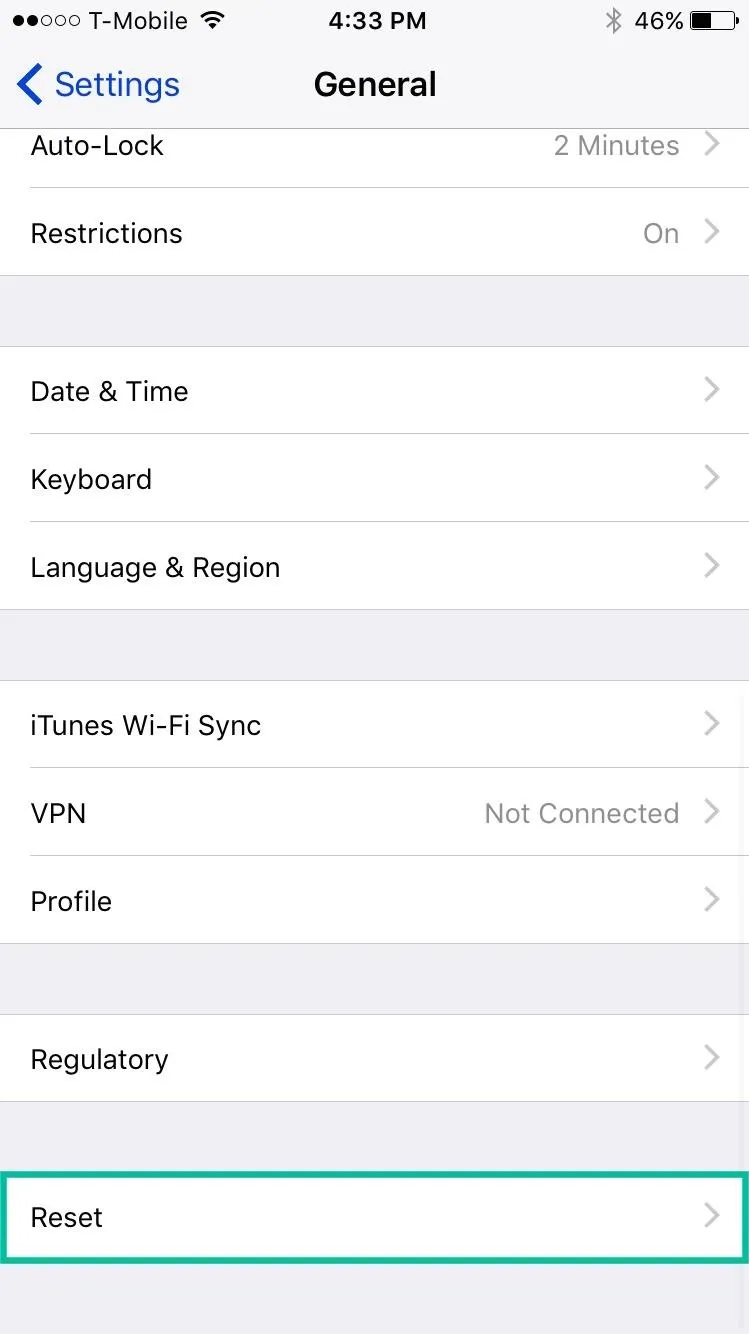
Do this by going to "General" in Settings, and tap "Reset." You'll then see several different reset options, but you only need to select "Erase All Content and Settings." Enter your lock screen passcode (twice if needed), hit "Erase iPhone," and enter your iCloud password to finish the process if you have Find My iPhone enabled.
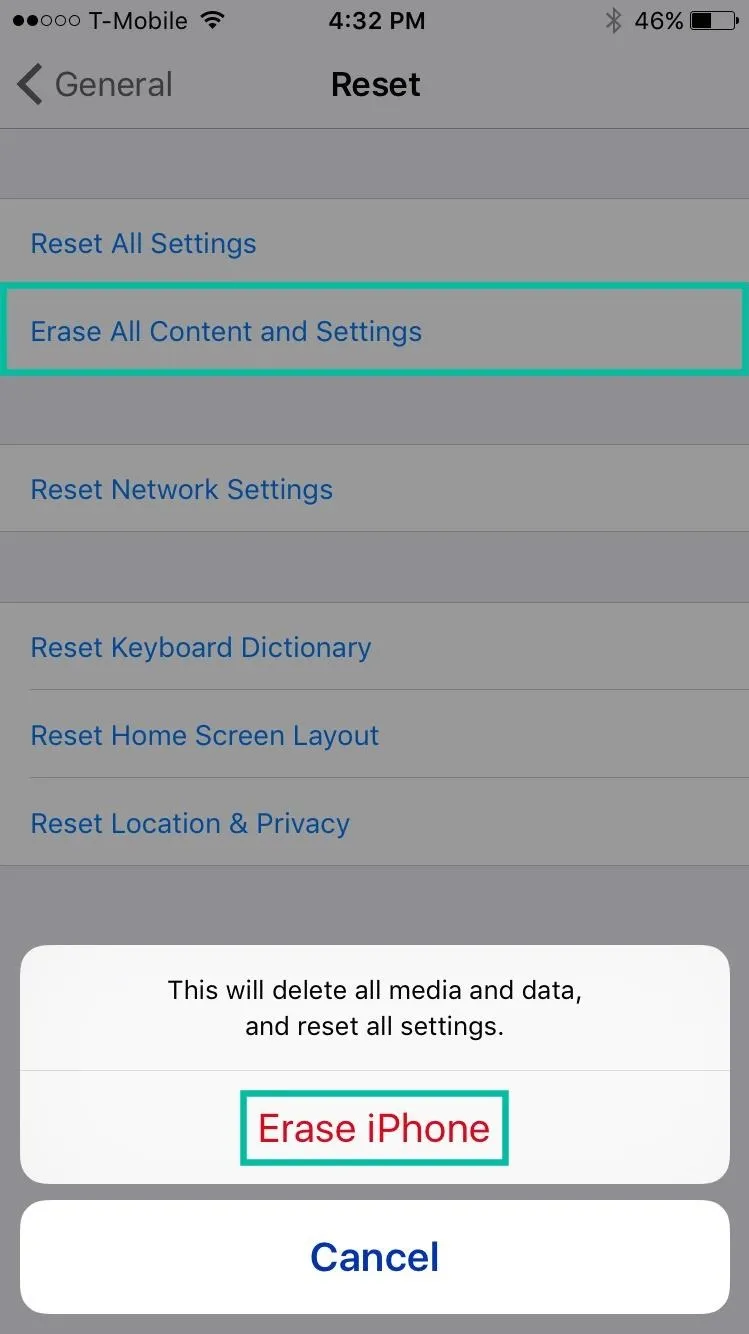


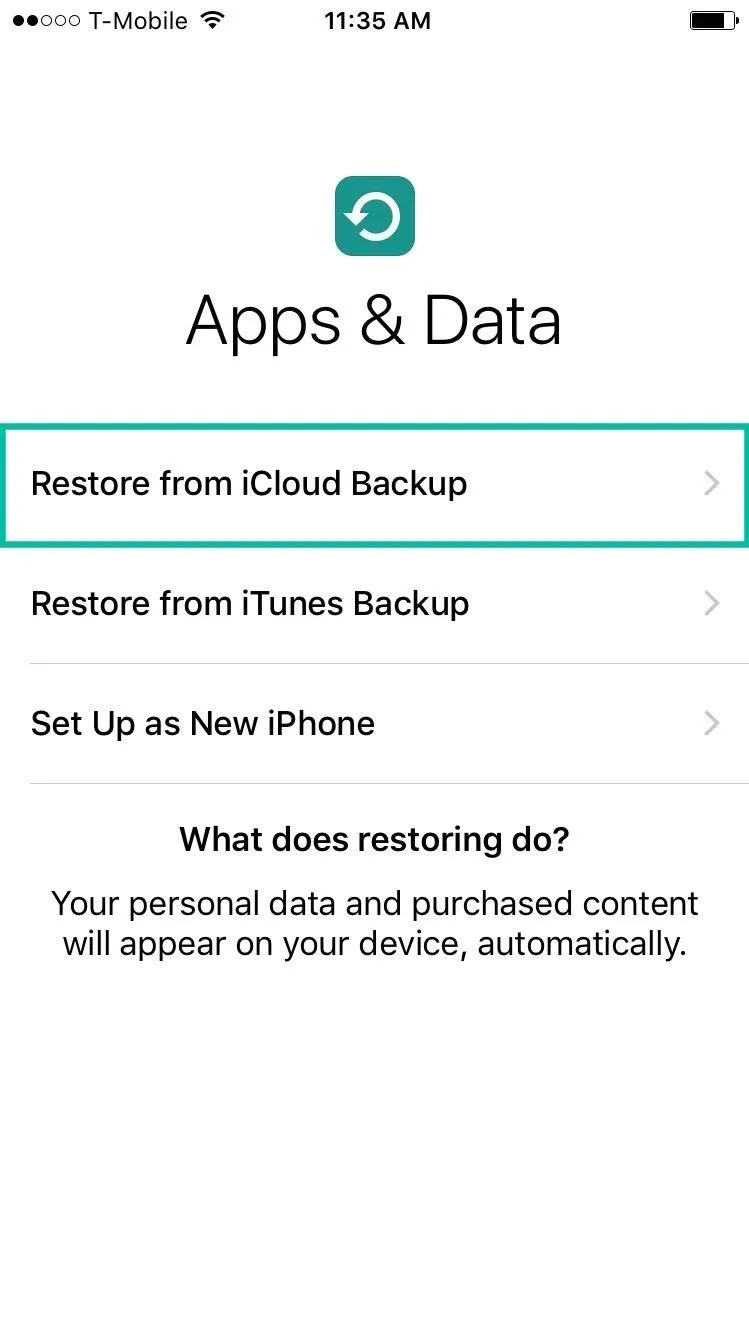
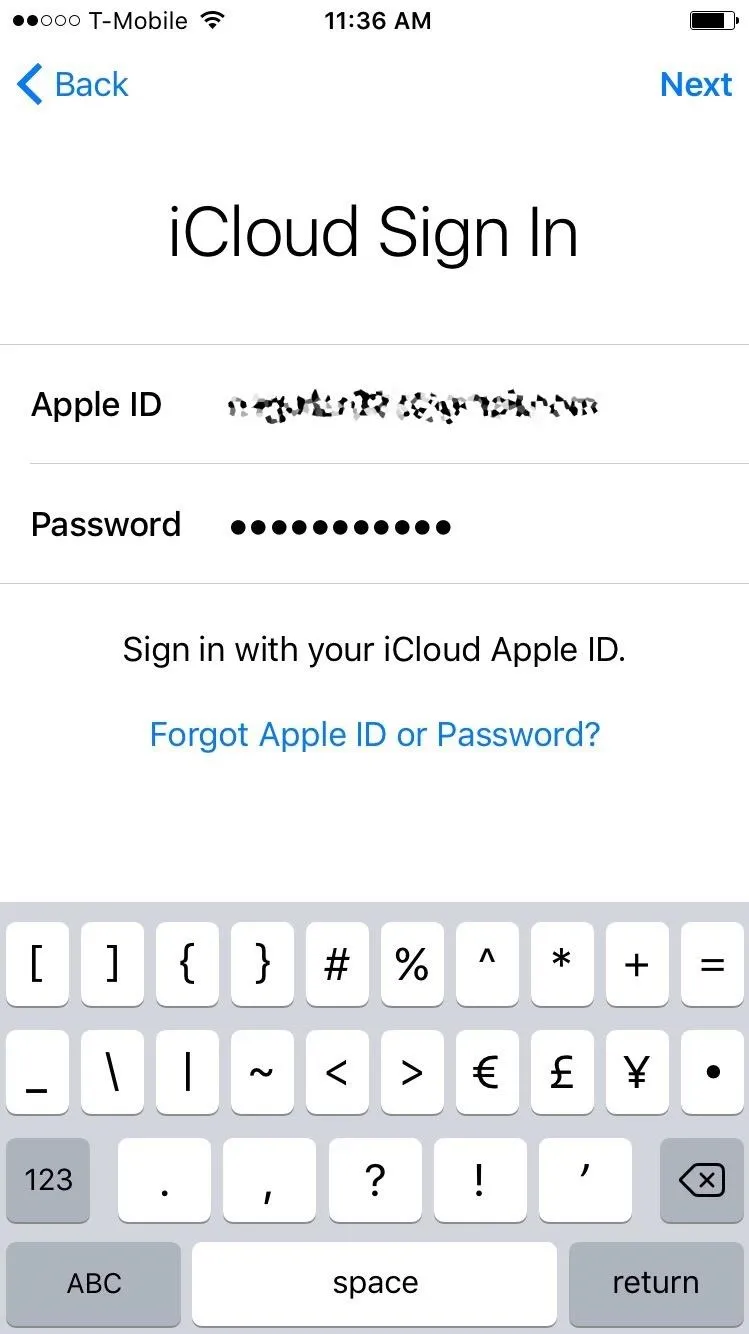
Your iPhone will then go through the process of wiping all of your media, data, and settings, then boot back up like a brand new device. Connect to Wi-Fi, tap on "Restore from iCloud Backup" when prompted, and enter your Apple ID and password to continue.


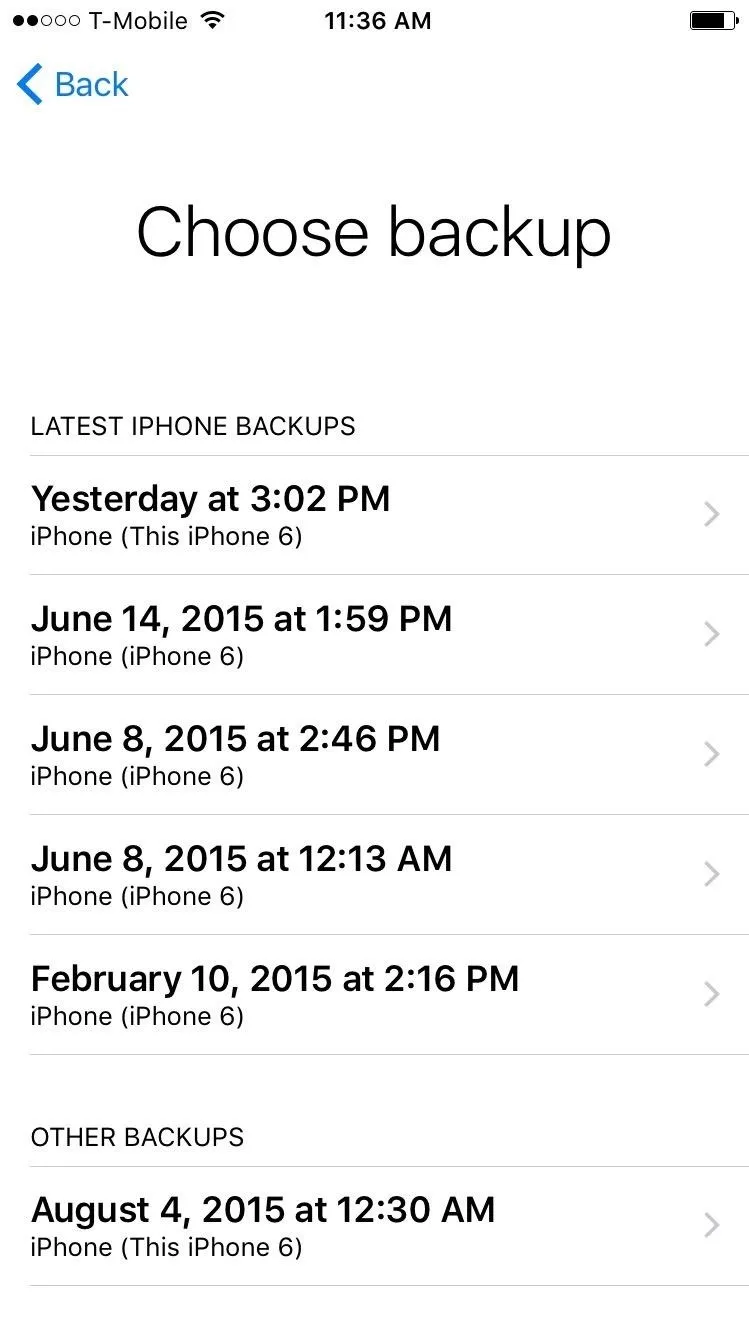
You'll see your past backups listed — tap on the latest one, which should be the one you most-recently created. After selecting it, your iPhone will begin the restoration process.
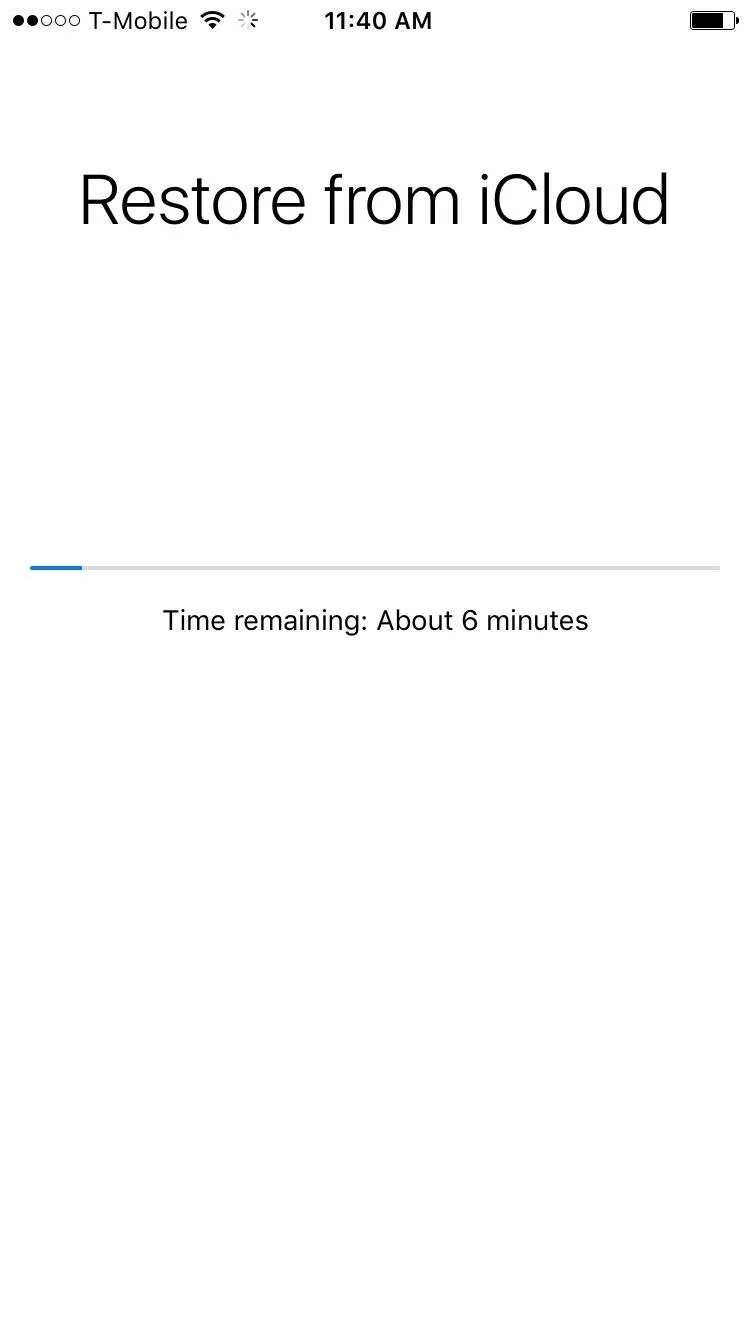


When finished, you'll be asked to enter your iCloud information in order to update your settings, as well as set up Apple Pay. Once that's done, you'll be taken to your home screen, where all of your backed up photos, videos, apps, settings, and more will be available.
- Follow Gadget Hacks on Pinterest, Reddit, Twitter, YouTube, and Flipboard
- Sign up for Gadget Hacks' daily newsletter or weekly Android and iOS updates
- Follow WonderHowTo on Facebook, Twitter, Pinterest, and Flipboard
Cover image and screenshots by Nelson Aguilar/Gadget Hacks


Comments
Be the first, drop a comment!