

With Unc0ver, Pwn20wnd was the first to jailbreak an iPhone and iPad running iOS 12 versions. While it initially couldn't work on all devices, it's an entirely different story now. Unc0ver currently works up to iOS 13.5 for most A7 to A13-powered devices. Plus, Chimera, another jailbreak tool, supports a similar range of models on iOS 12 to 12.3 and iOS 12.4.
For those unfamiliar, jailbreaking means unlocking restrictions on iOS to gain access to apps and tweaks not allowed by Apple. Doing so lets you transform your iPhone's interface and features, by way of the Cydia or Sileo apps. And while the list of available tweaks have shrunk due to how difficult jailbreaking has become, a steady stream of compatible tweaks continue to trickle out and keep the community alive thanks to passionate developers.
The process is pretty straightforward for both methods, but because they're semi-untethered, you'll need to re-enable the one you use with the same steps below each time your iPhone reboots or shuts down. It's also worth noting that the Unc0ver tool installs Cydia on your iPhone, while Chimera uses the newer Sileo app. If you're having trouble with any of the steps below, try the Checkra1n jailbreak instead.
Things to Consider
The Unc0ver jailbreak method works for most iOS devices powered by A7 to A13 processors running iOS 11 to iOS 12.4.1 and iOS 13 to iOS 13.5. For phones, that ranges from the iPhone 5S to iPhone SE (2020) models.
As for the Chimera jailbreak, it also supports A7 to A12X devices. But for phones, A12 support is limited to iOS 12 to iOS 12.1.2, so that'd be the iPhone XS, XS Max, and XR. You can jailbreak A12 devices from iOS 12.1.3 to 12.3 and 12.4, but you only get nonce support. All other iPhone models are supported from iOS 12 to iOS 12.3, in addition to iOS 12.4.
Some iOS beta versions are supported on both Unc0ver and Chimera, but we're just focusing on stable iOS releases in this jailbreak guide.
Supported on UncOver:
- iPhone SE (2nd Generation) (iOS 13–13.5)
- iPhone 11 (iOS 13–13.5)
- iPhone 11 Pro/Pro Max (iOS 13–13.5)
- iPhone XR (iOS 12–12.4.1 | iOS 13–13.5)
- iPhone XS / Max (iOS 12–12.4.1 | iOS 13–13.5)
- iPhone X (iOS 11–12.4.1 | iOS 13–13.5)
- iPhone 8 / 8 Plus (iOS 11–12.4.1 | iOS 13–13.5)
- iPhone 7 / 7 Plus (iOS 11–12.4.1 | iOS 13–13.5)
- iPhone 6S / 6S Plus (iOS 11–12.4.1 | iOS 13–13.5)
- iPhone SE (iOS 11–12.4.1 | iOS 13–13.5)
- iPhone 5S (iOS 11–12.4.1)
Supported on Chimera:
- iPhone XR (iOS 12–12.1.2) | (nonce only: iOS 12.1.3–12.3 | iOS 12.4)
- iPhone XS / Max (iOS 12–12.1.2) | (nonce only: iOS 12.1.3–12.3 | iOS 12.4)
- iPhone X (iOS 12–12.3 | iOS 12.4)
- iPhone 8 / 8 Plus (iOS 12–12.3 | iOS 12.4)
- iPhone 7 / 7 Plus (iOS 12–12.3 | iOS 12.4)
- iPhone 6S / 6S Plus (iOS 12–12.3 | iOS 12.4
- iPhone SE (iOS 12–12.3 | iOS 12.4)
- iPhone 5S (iOS 12–12.3 | iOS 12.4)
Step 1: Download & Install UncOver or Chimera
There are a few different ways to install the Unc0ver and Chimera tools on your iPhone to jailbreak. The first method is ideal, though Apple could cause issues with it in the future. The second method is better, except that it requires you to redo the process unless you have a paid developer account.
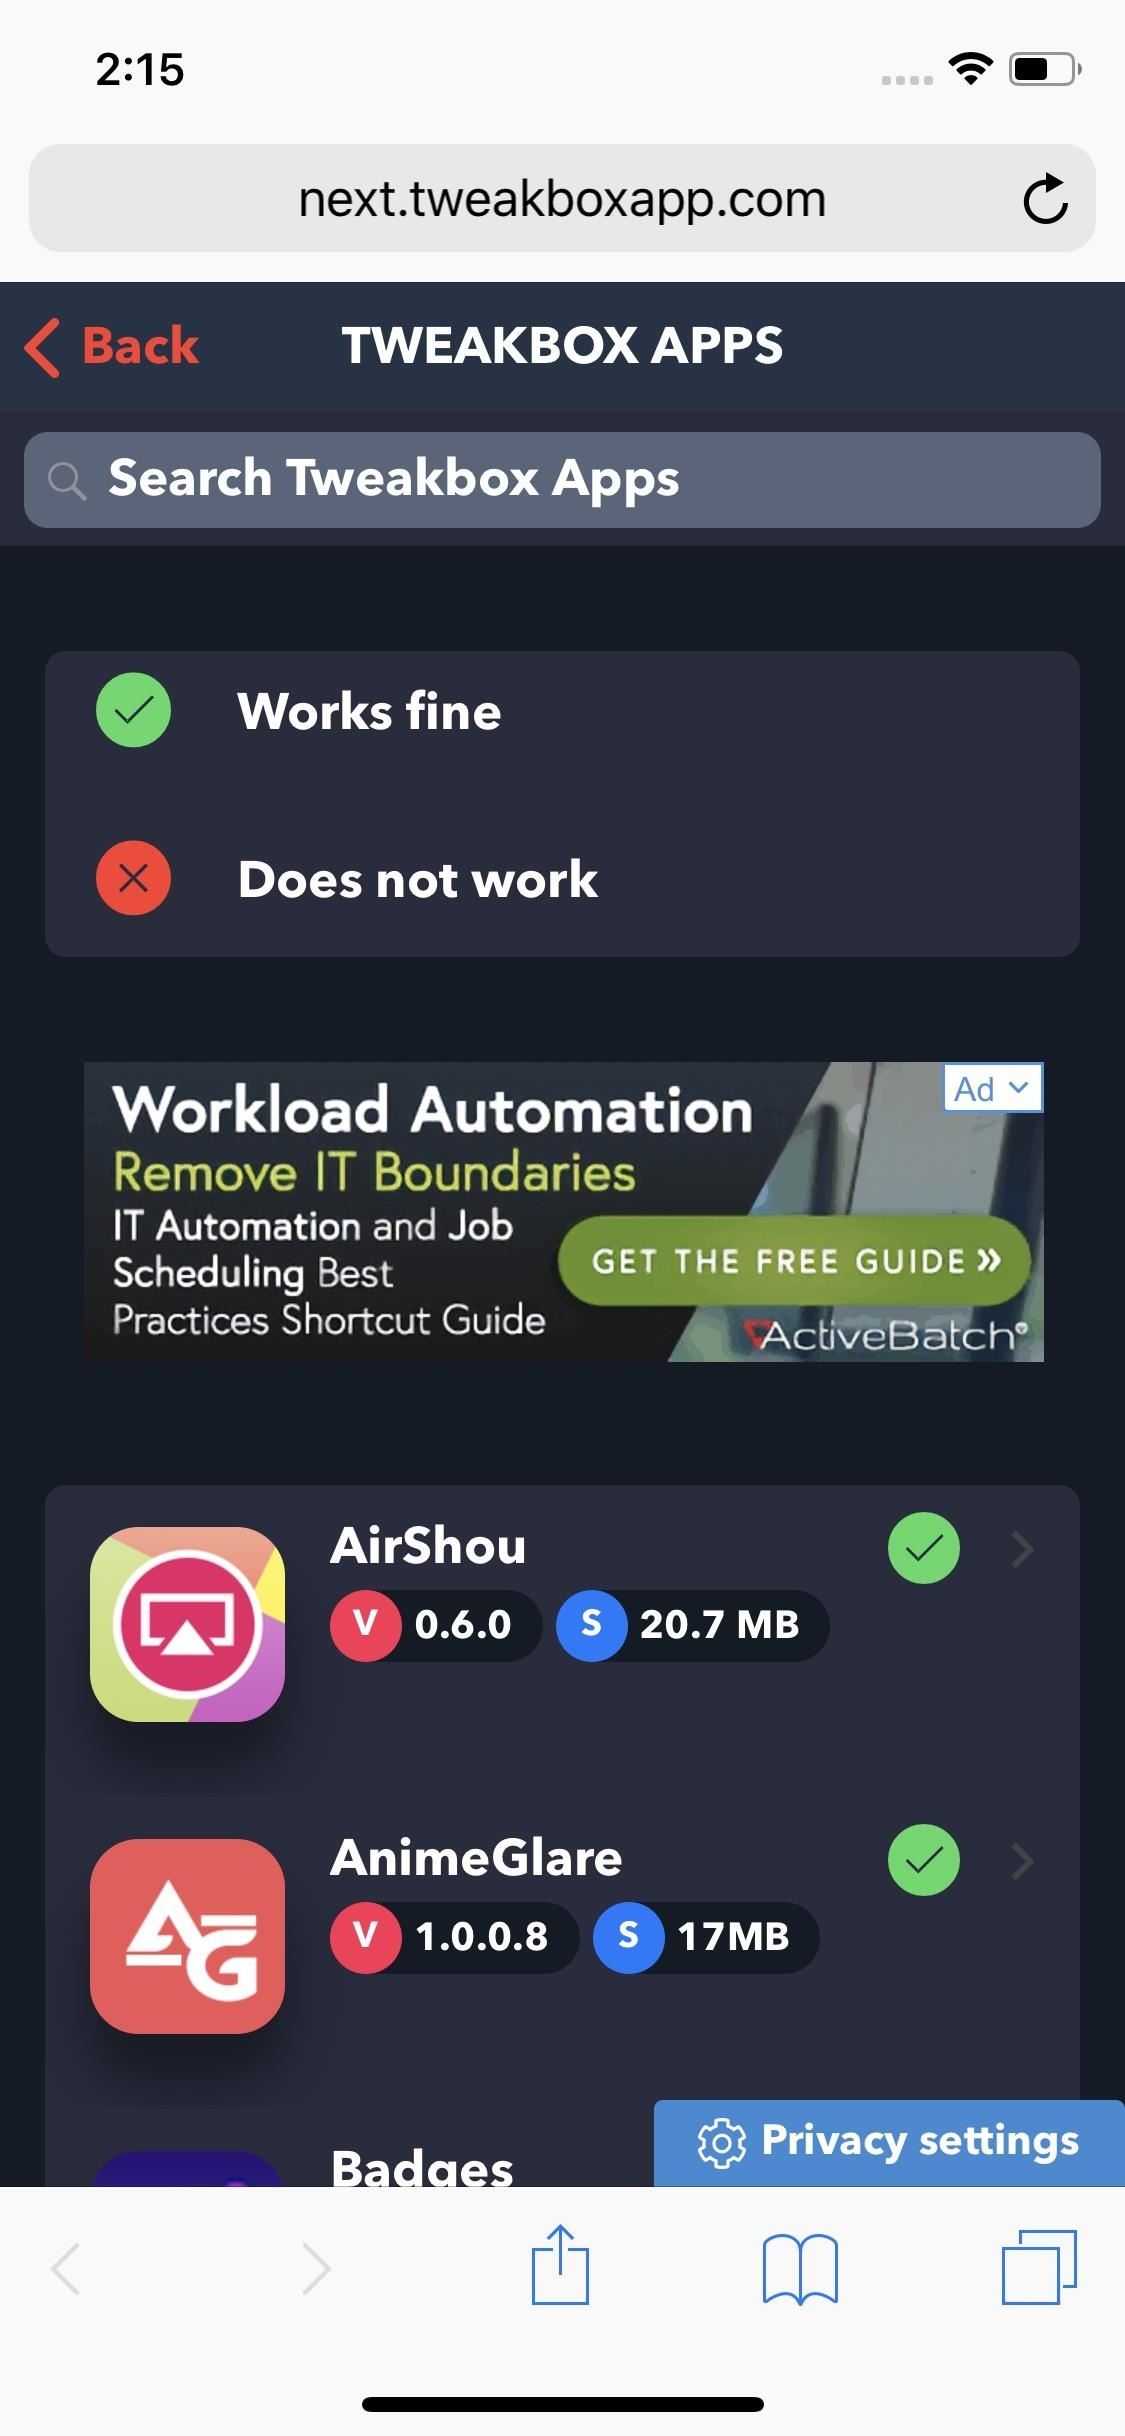
Method 1: Open TweakBox & Install in Safari
Before you go this route, it's crucial to note that Apple will revoke certificates for unauthorized apps from time to time and prevent you from installing Unc0ver over Safari as a result. That said, if this method isn't working for you, be sure to scroll down to the second method to jailbreak your iPhone. We'll post an update once certificates become available again, so stay tuned.
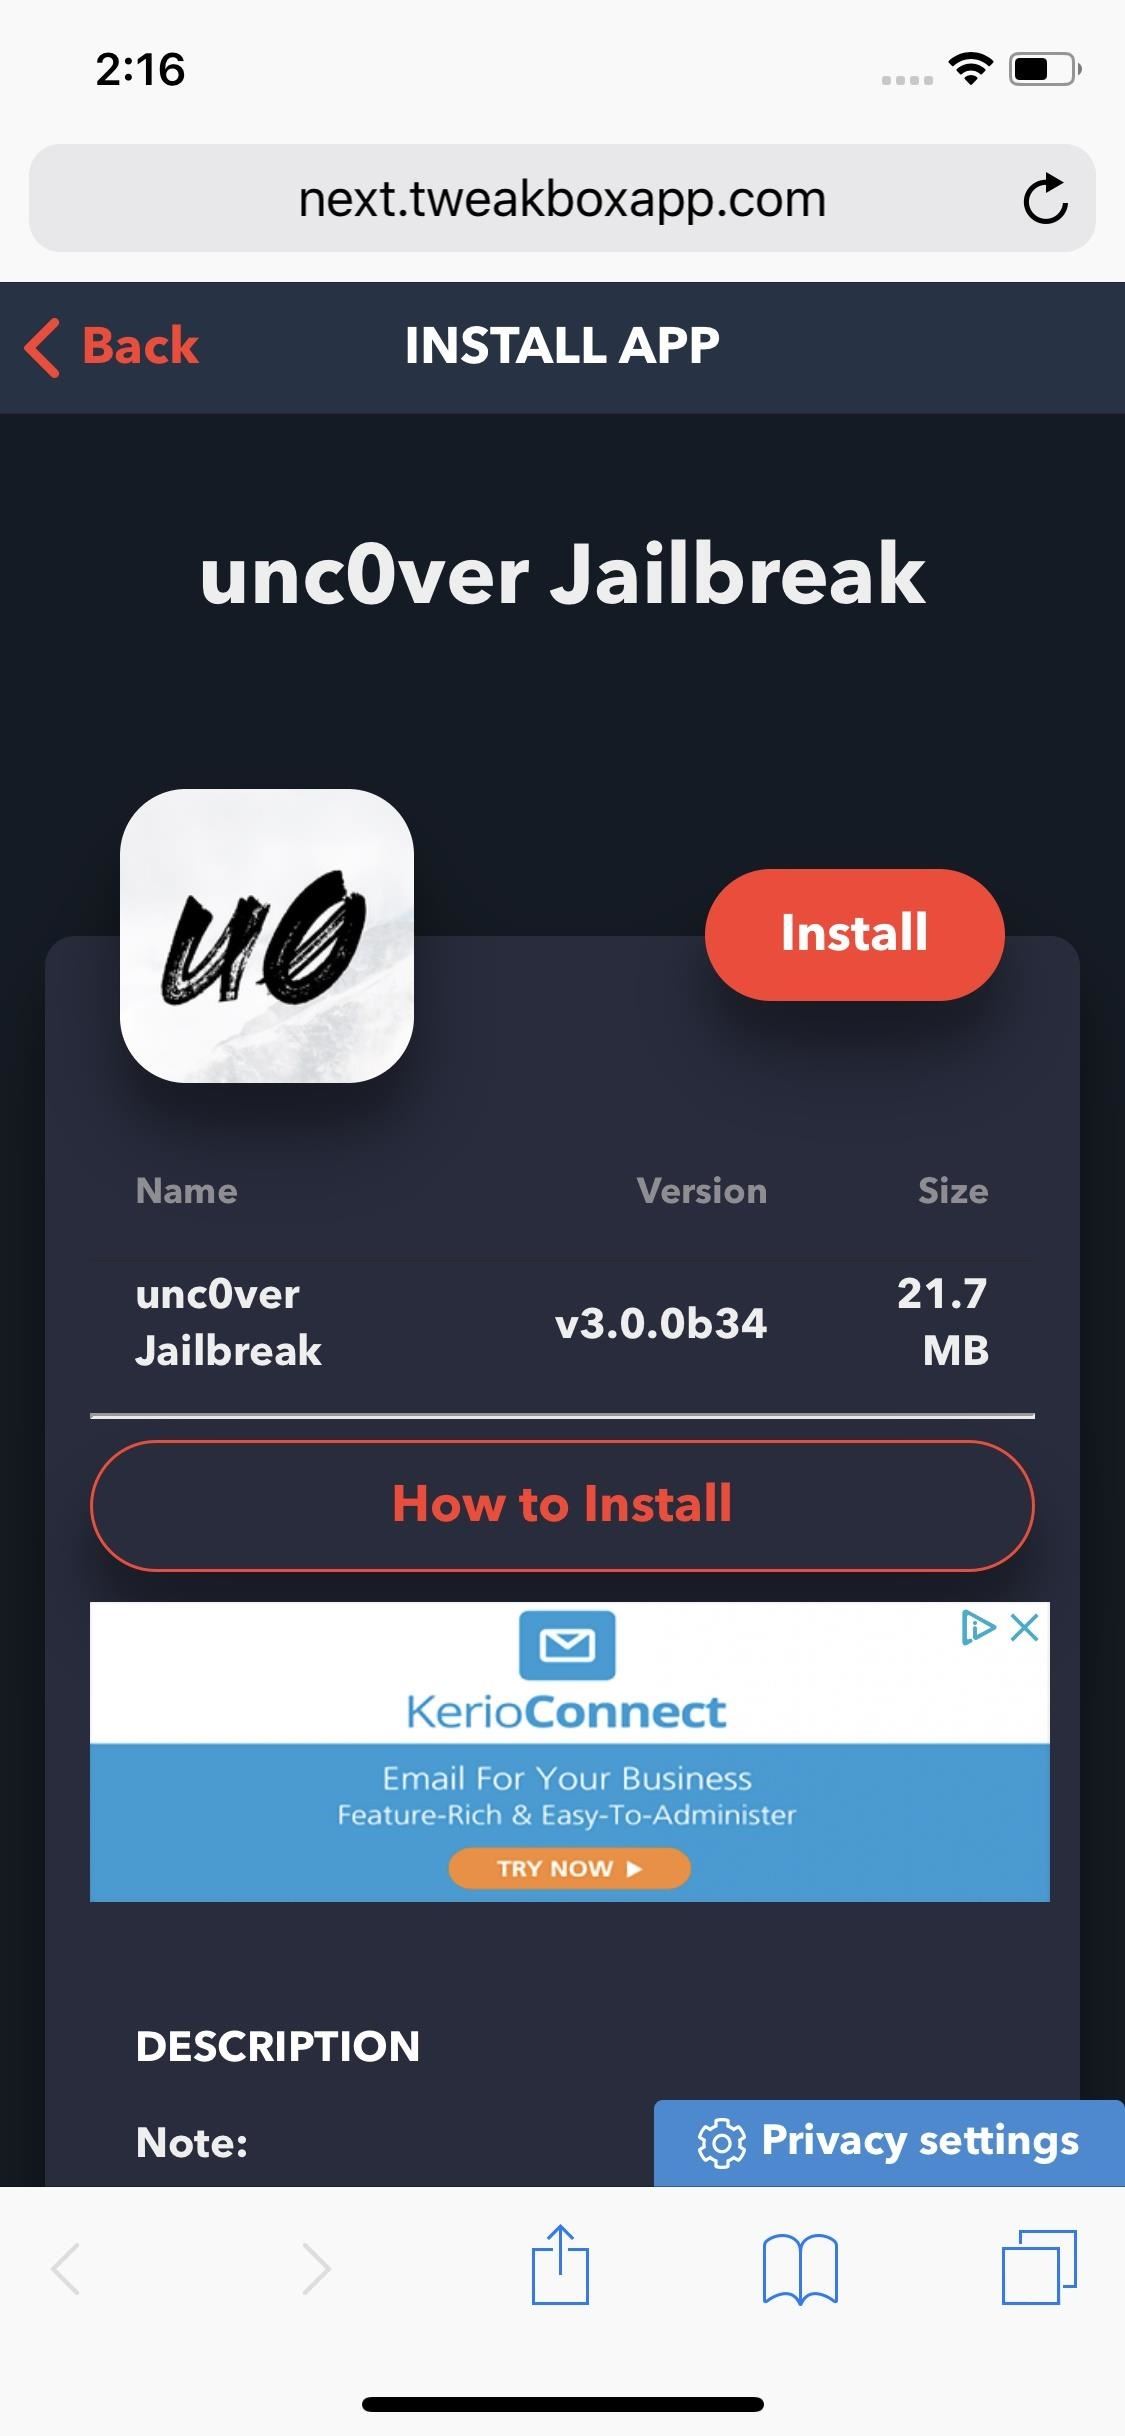
Open Safari on your device to get the ball rolling, and head to next.tweakboxapp.com. Once inside the site, go to the "Apps" tab by either tapping on the "Apps" tab along the top or swiping left. Select the "Tweakbox App" once inside. From there, scroll down and select "unc0ver Jailbreak" or "Chimera Jailbreak" to open to its page. Alternatively, just use the direct links below.
- Direct Link: unc0ver jailbreak tool (latest version)
- Direct Link: Chimera jailbreak tool (latest version)

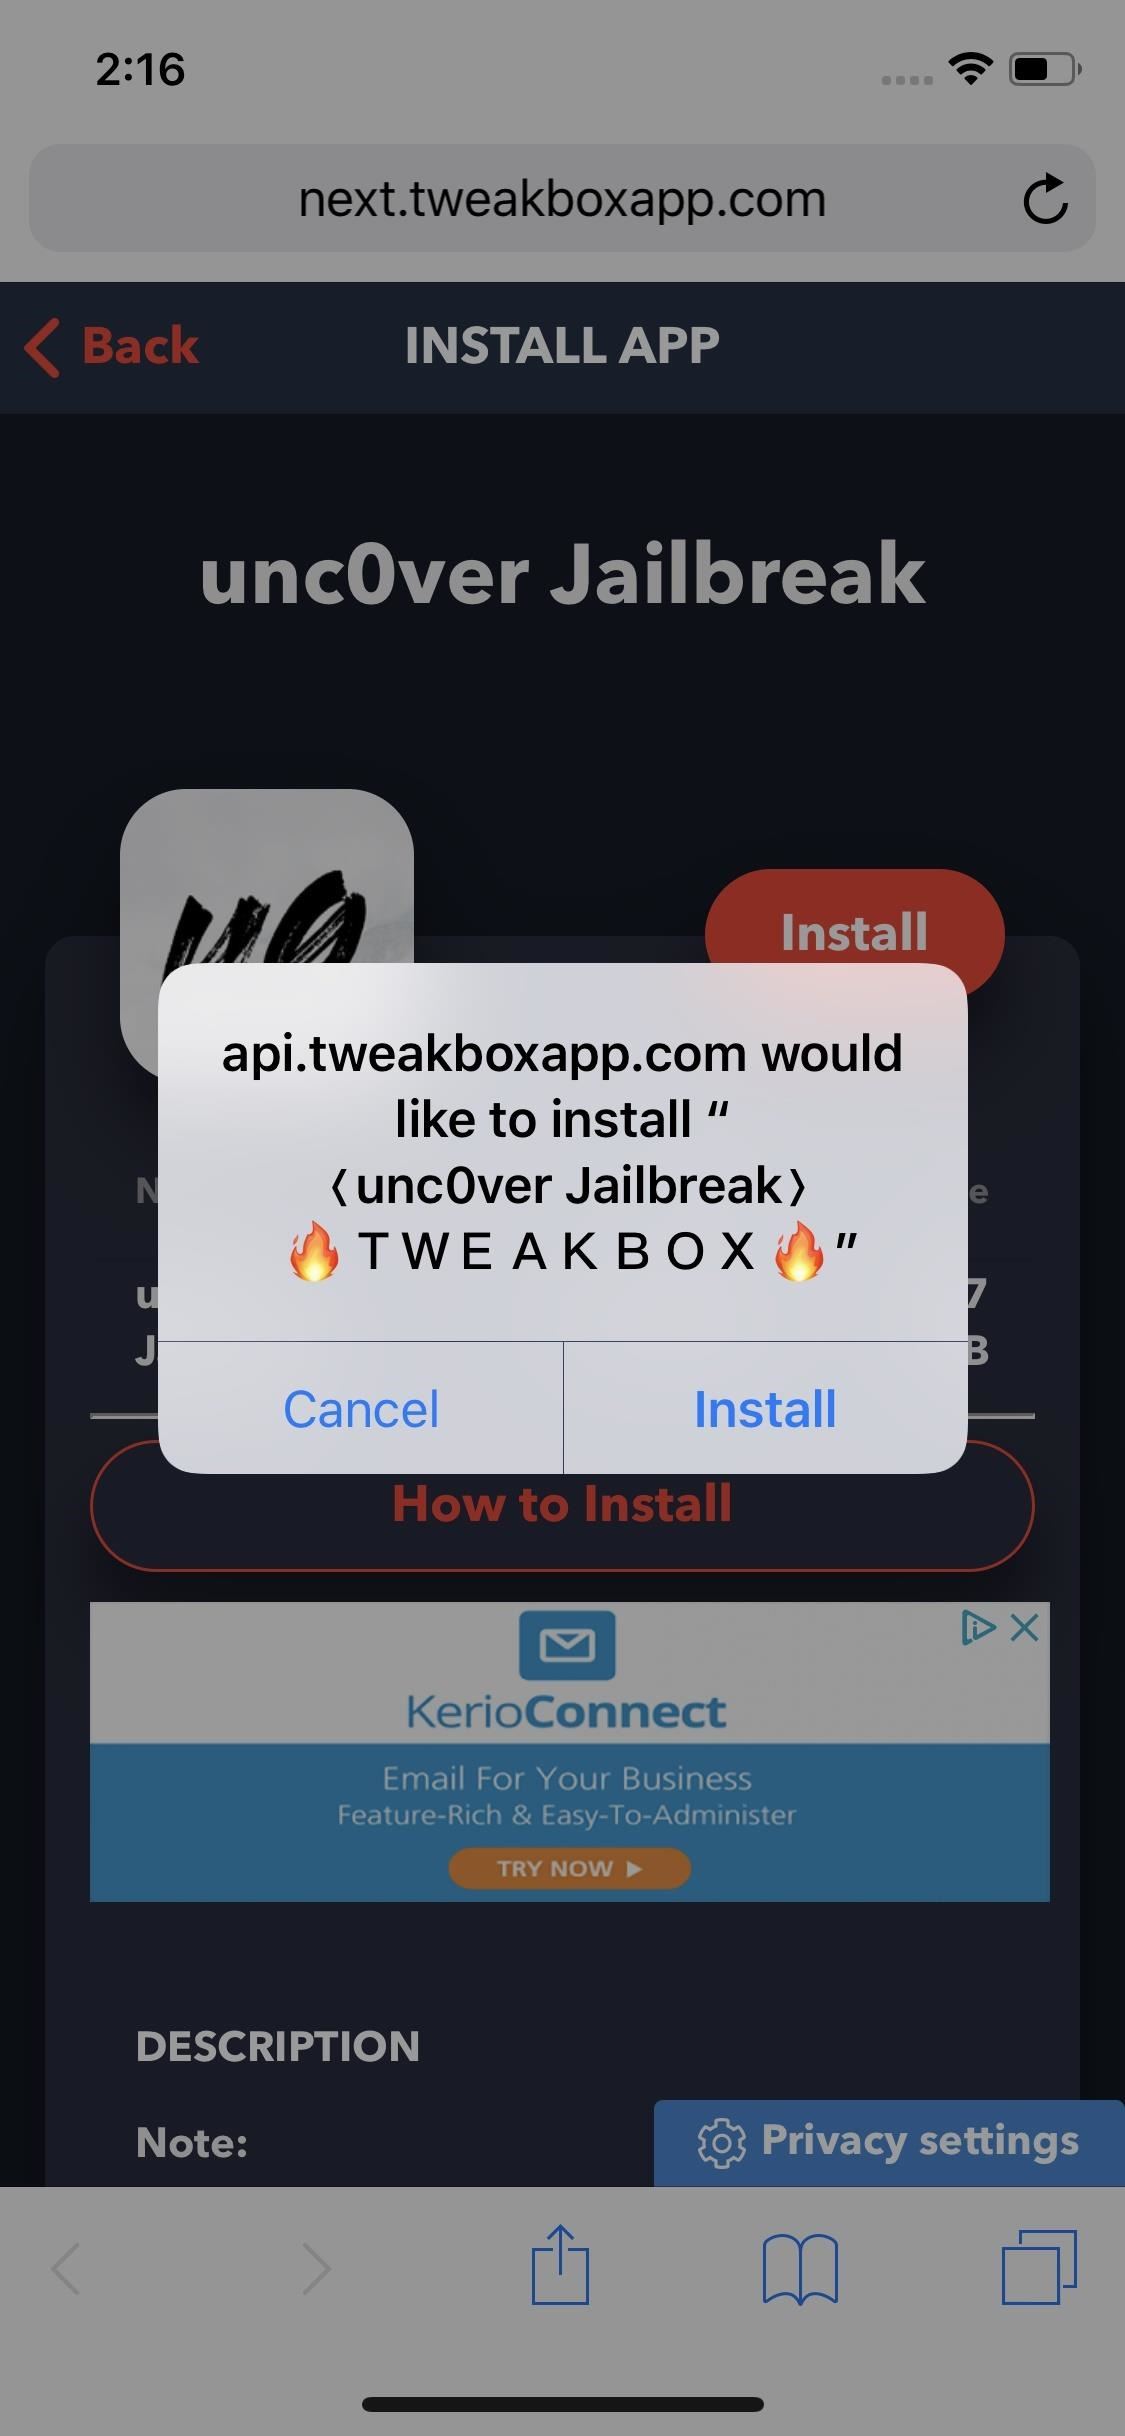
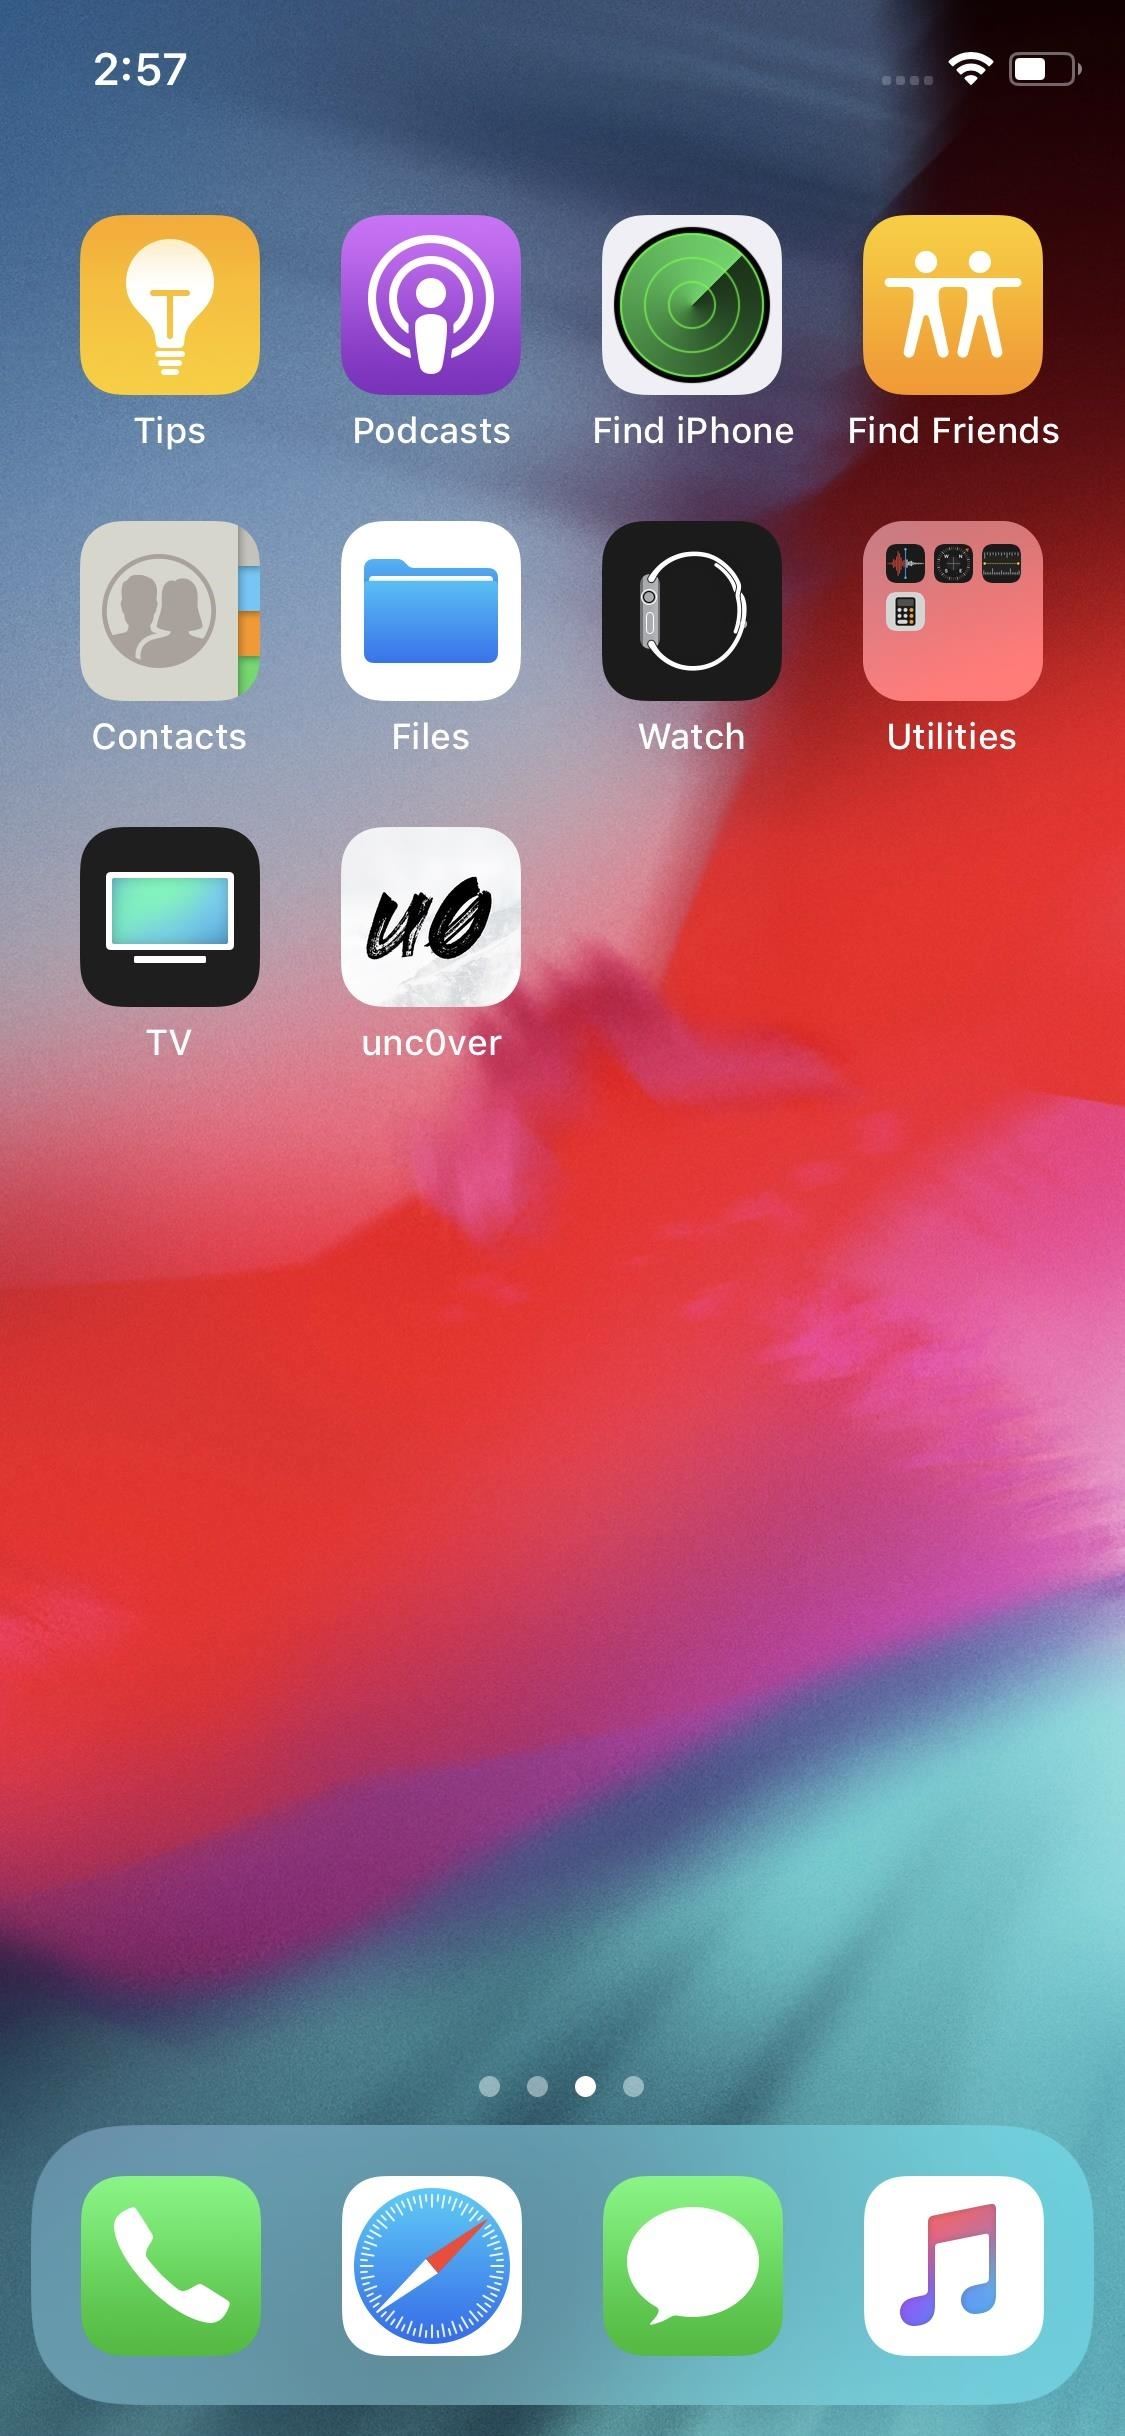
Next, hit the red "Install" button within the tool's page, then tap on "Install" again on the confirmation prompt that pops up. The app will now install on your iPhone, so wait a moment or two for the process to complete. Exit out of Safari, and proceed to the next step once the icon for Unc0ver or Chimera appears on your iPhone's home screen. Don't open the app up yet!
Method 2: Install Using Cydia Impactor
You can install Unc0ver or Chimera using Cydia Impactor to sideload either tool into your iPhone. Of course, you'll need a Mac or PC if you choose to go this route, along with the latest IPA file for either one, which you can download into your computer by clicking on the link below.
- IPA Link: Unc0ver jailbreak tool (v 5.2.0)
- IPA Link: Chimera jailbreak tool (v 1.4.0)
Once you have all the files you need, the process for sideloading either tool using your computer involves easy steps. Plug your iPhone into your Mac or PC using a USB to Lightning cable or USB-C to Lightning cable, open Cydia Impactor, and drag the IPA file for Unc0ver directly into it. Enter your Apple ID when prompted and wait for the process to complete. Be sure to check out our tutorial at the link below if you need a more detailed guide on this topic.
- Full Rundown: Install Modded & Unofficial Apps with Cydia Impactor
If you've chosen this method, please keep in mind that due to Apple's restrictions on free accounts, you'll need to sideload the IPA for either Unc0ver or Chimera every seven days if you used a regular Apple ID. If you have a legitimate Apple Developer ID, on the other hand, you'll only to reinstall once a year.
Ultimately, it doesn't make sense to pay Apple $100 for developer privileges, considering sideloading is relatively fast and easy. Your certificate's weekly limit doesn't affect your iPhone's jailbreak in any way — provided it stays powered on.
If it shuts down for any reason, however, and more than a week has passed, you'll need to drag and drop the IPA file onto Cydia Impactor again and go from there. At any rate, proceed to the second step once you've successfully sideloaded either Unc0ver or Chimera into your iPhone.
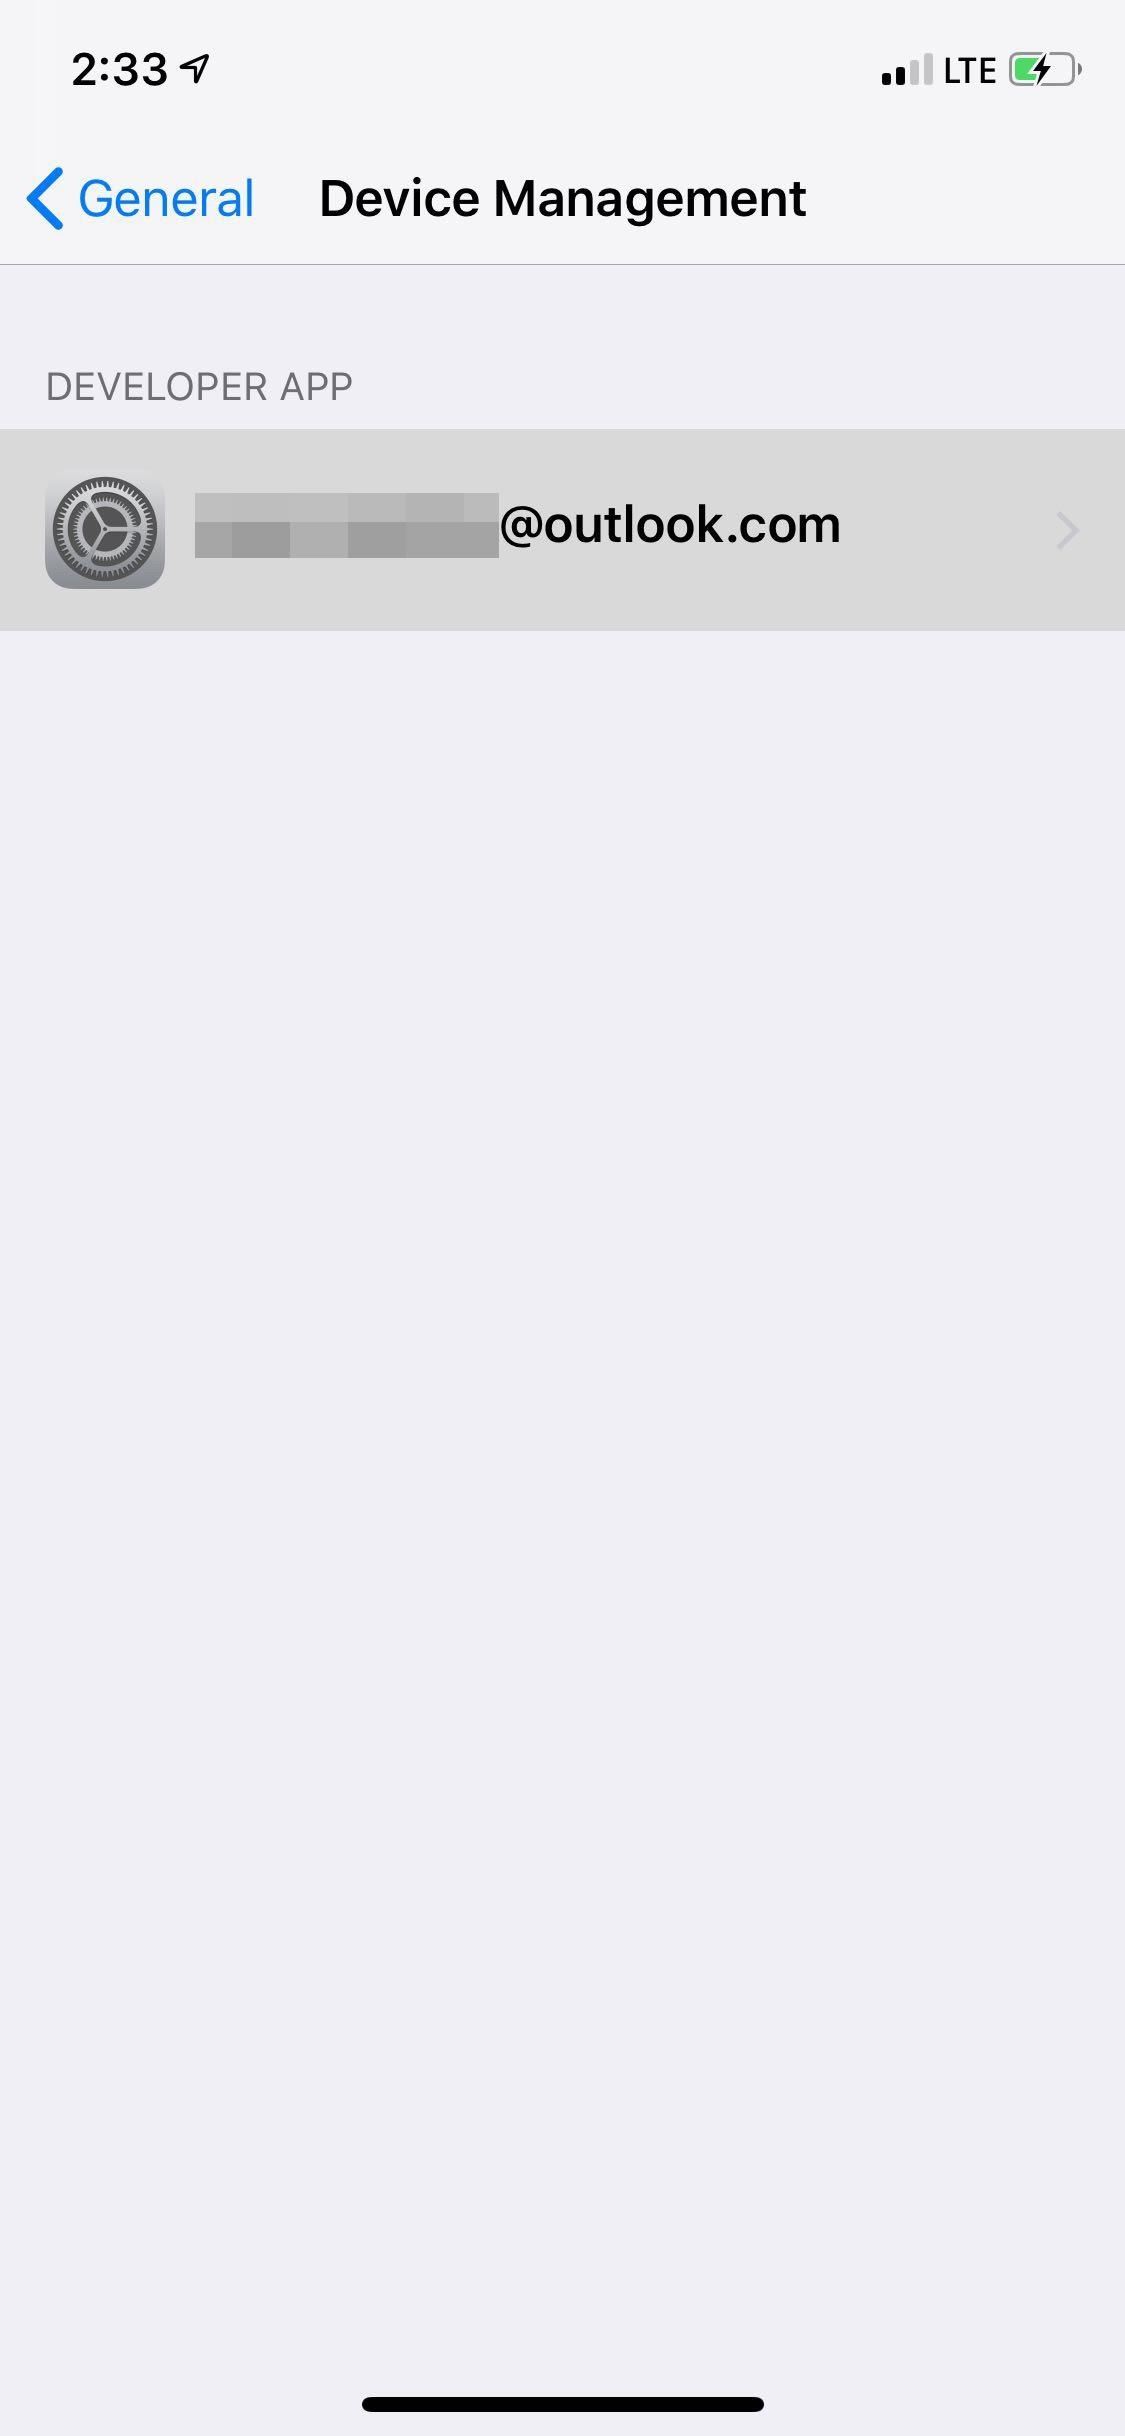
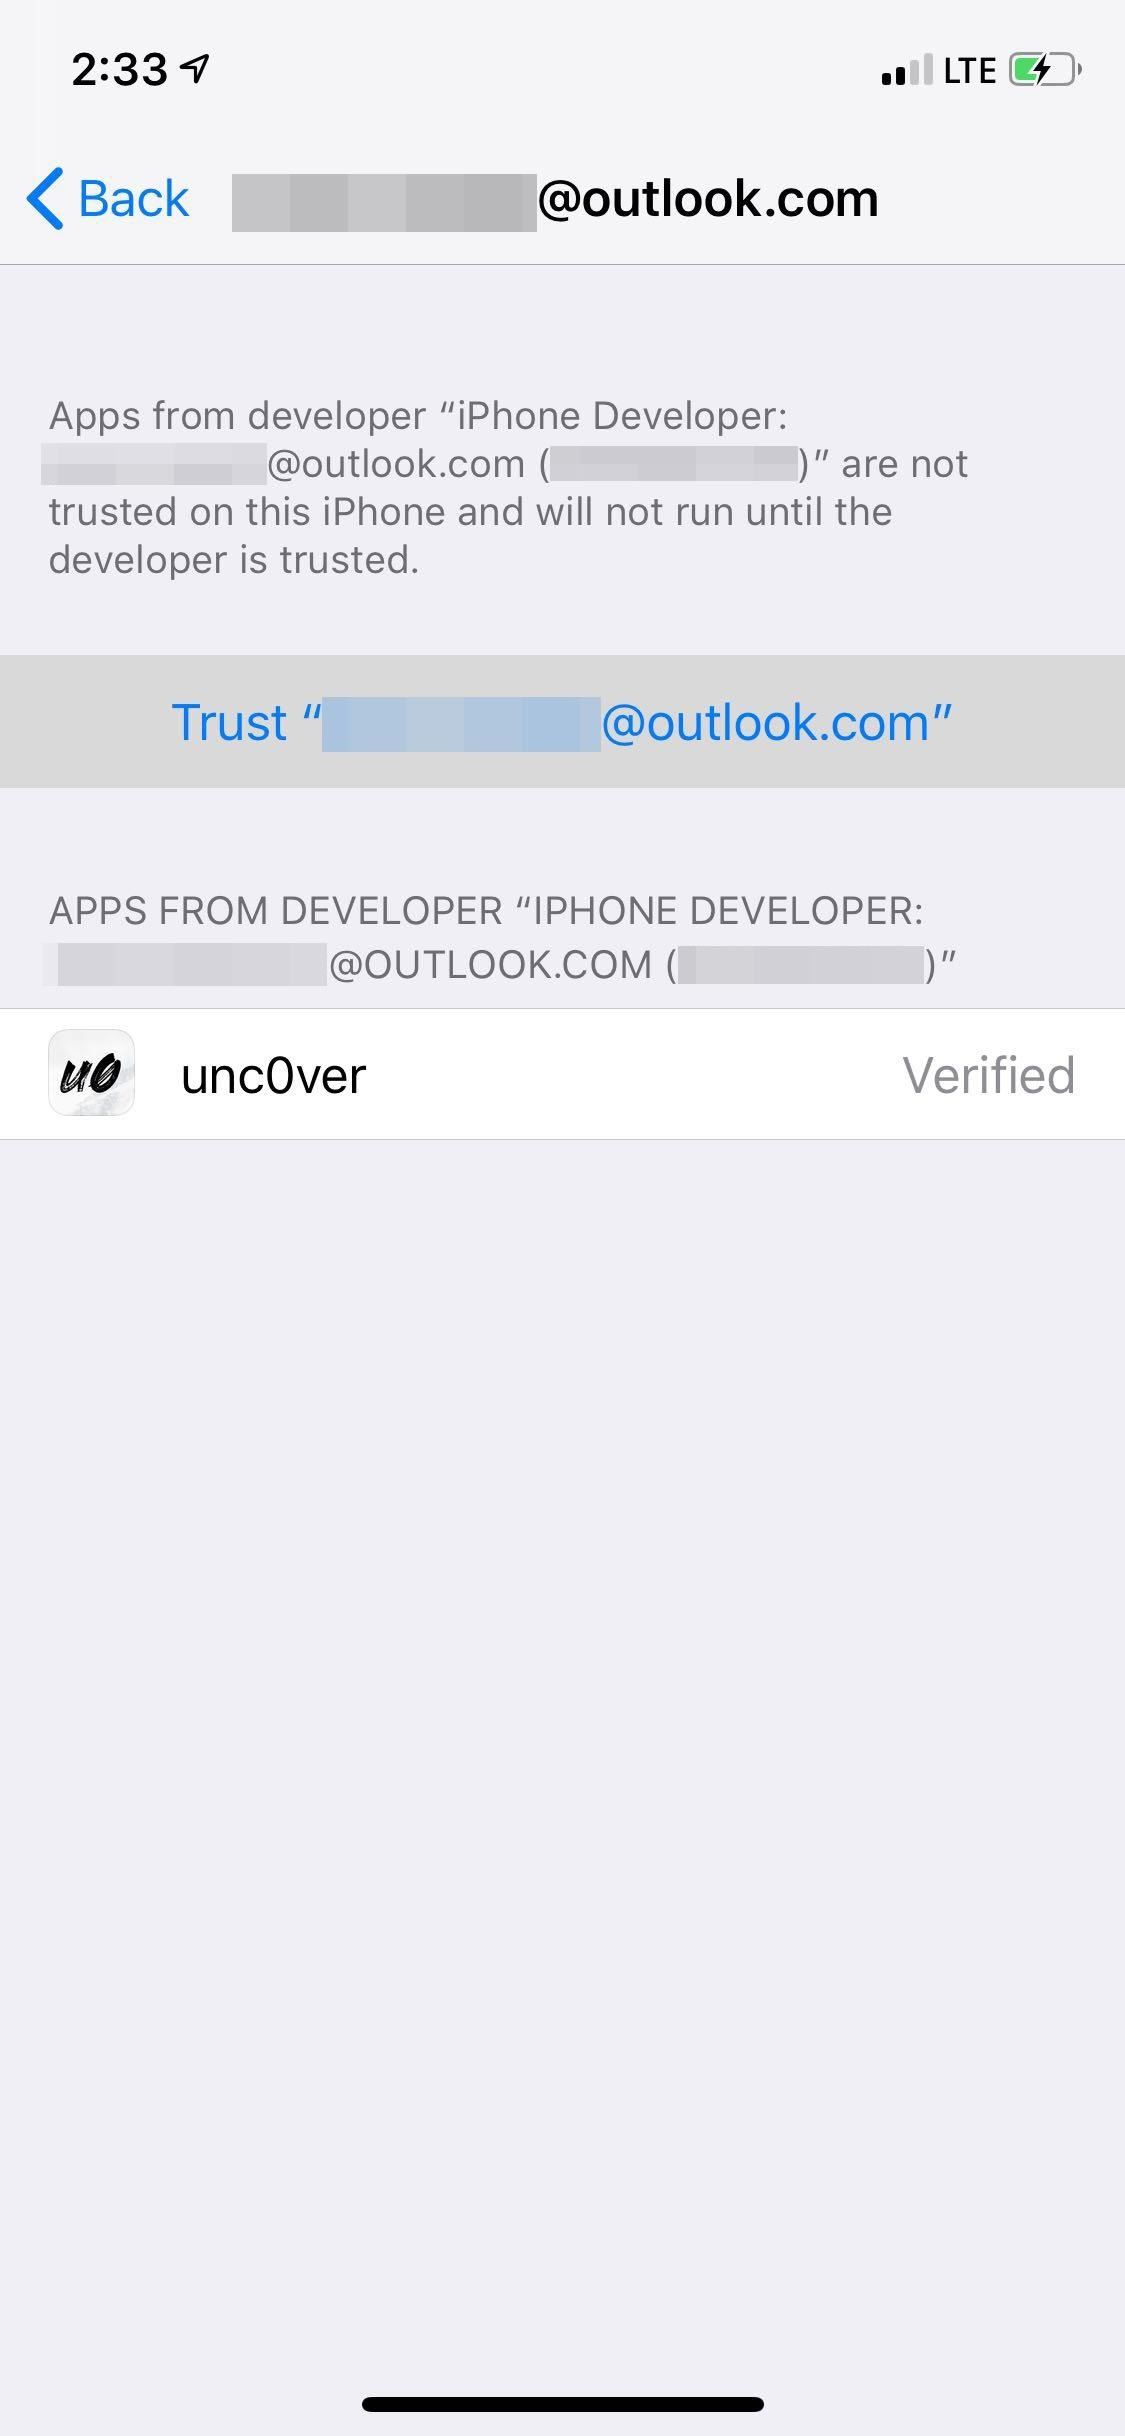
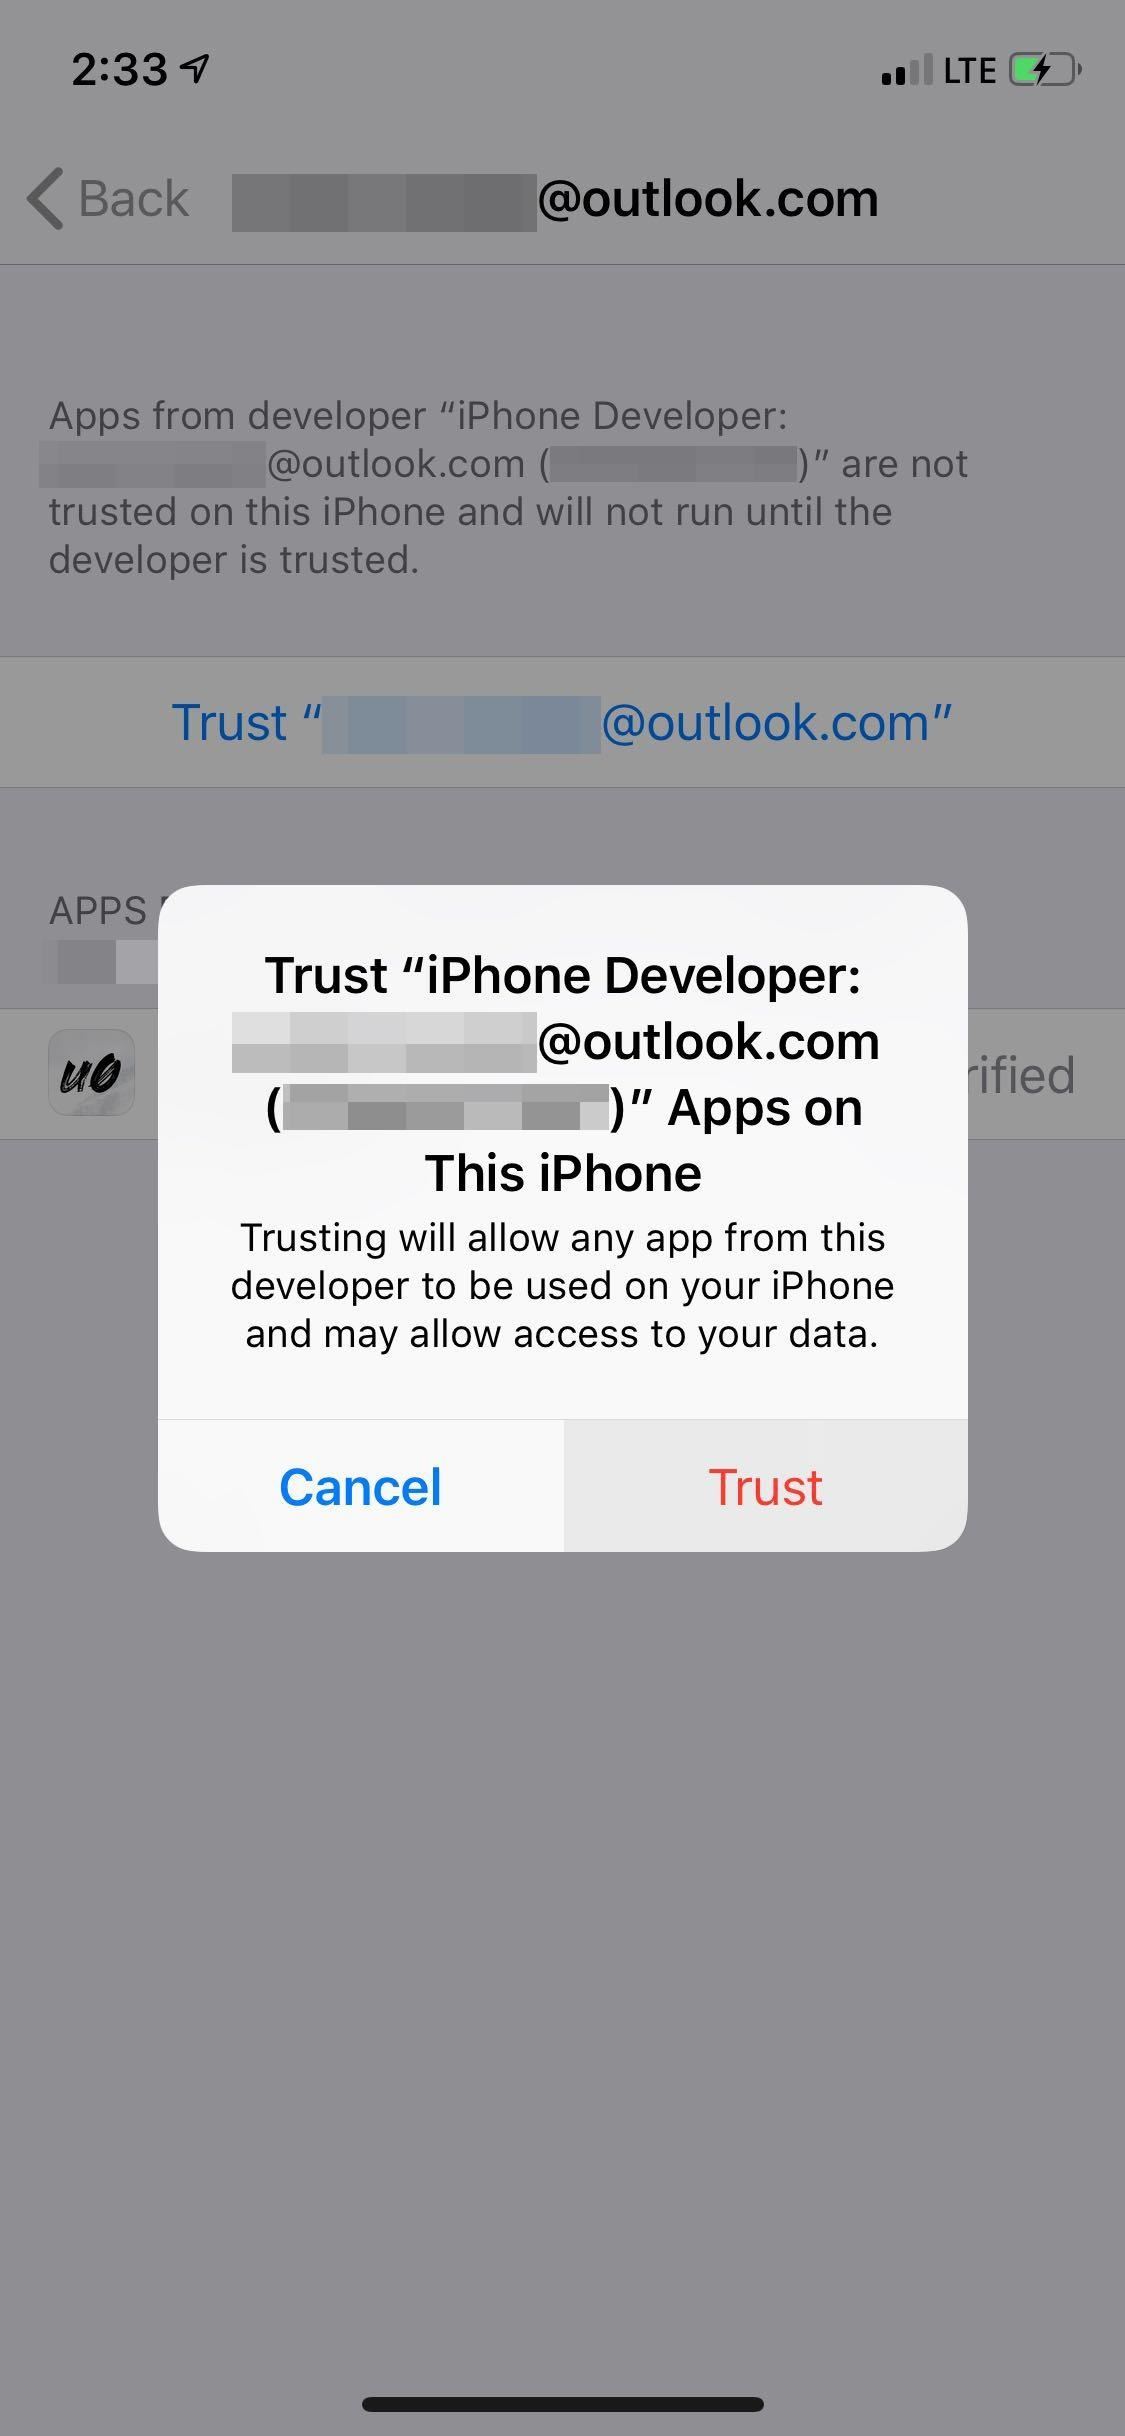
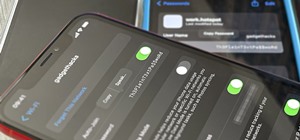
Step 2: Trust Your Profile
You'll still need to trust yourself as a developer before you can open your jailbreak tool of choice — irrespective of what method used in the first step. So don't open the app just yet, and follow the menu below to get into "Device Management."
- Settings –> General –> Device Management
Once there, tap on either "Lebo International Investment Development" if you installed Unc0ver via Safari, or tap the Apple credentials you entered if you sideloaded Unc0ver or Chimera with Cydia Impactor. Next, "Trust" either one on the following page. Now, hit "Trust" one last time from the prompt that appears to finish up, then exit out of Settings, and continue on to the final steps.
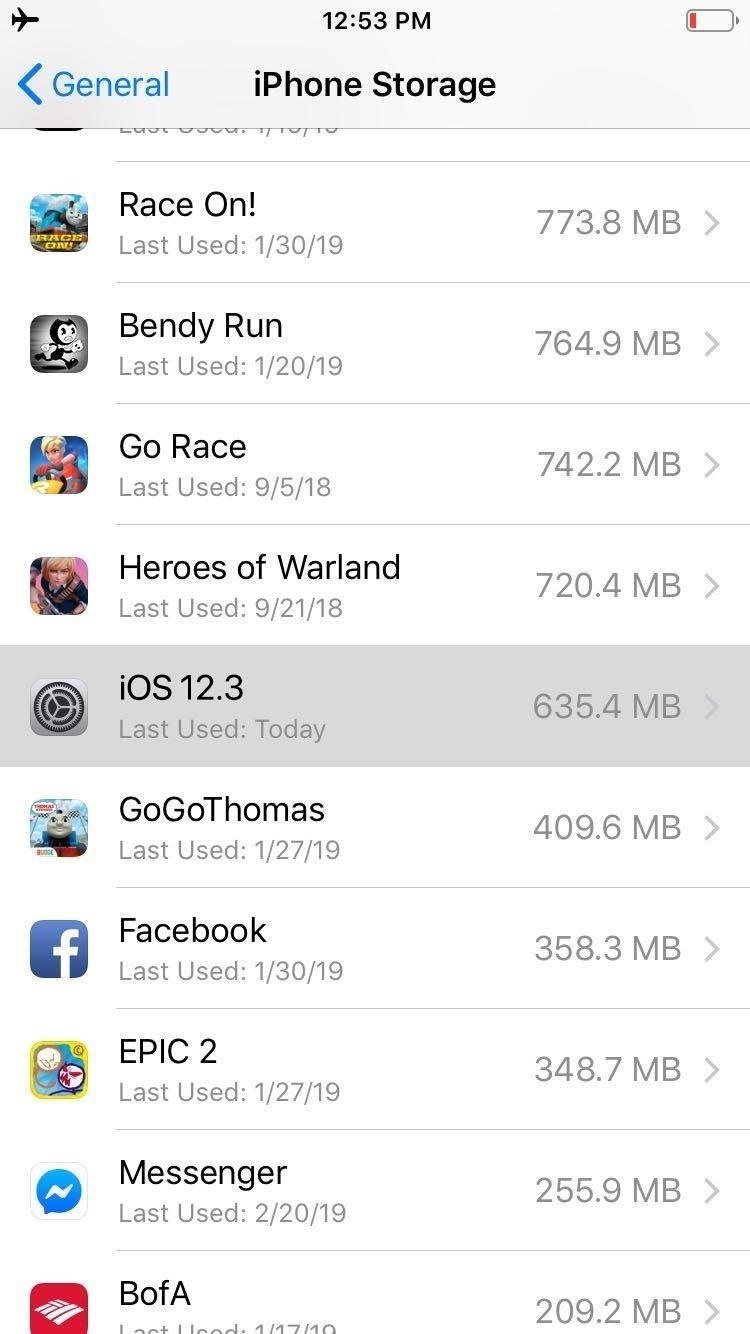
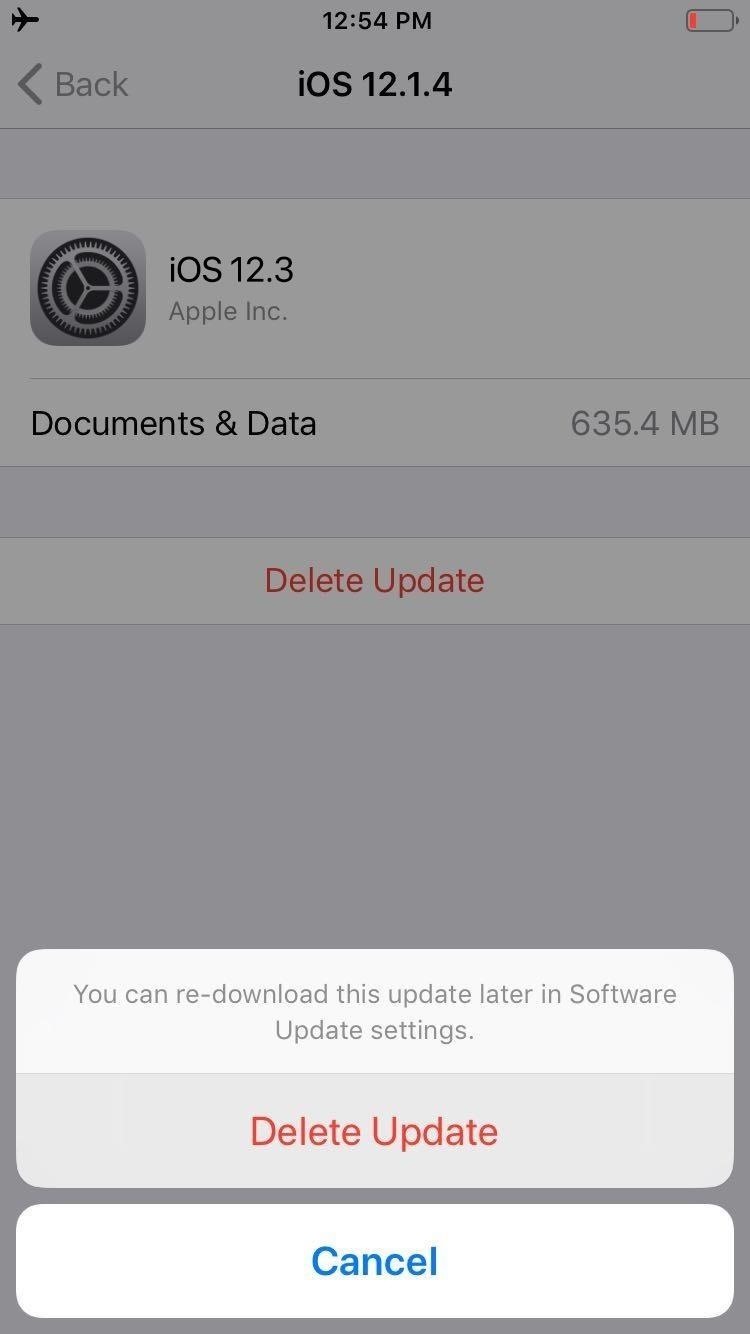
Step 3: Delete iOS Update from Storage (If Needed)
Before you jailbreak your iPhone, you'll still need to get rid of any iOS software updates you may have saved inside your phone's storage. Otherwise, executing a jailbreak will result in a fatal error and failure. That said, we recommend playing it safe to ensure the process is as smooth as possible.
- Settings –> General –> iPhone Storage –> iOS 12.x.x or iOS 13.x.x
Open the "iPhone Storage" menu to check for saved iOS updates. Scroll down and tap on "iOS 12.x.x" or "iOS 13.x.x." From there, hit "Delete Update" and confirm with the prompt.
Step 4: Open Either UncOver or Chimera & Execute the Jailbreak
You're now free to commence with jailbreaking your iPhone, so disable all internet connections and enable Airplane Mode, then open either the Unc0ver or Chimera app, and hit the "Jailbreak" button. Note that the process is done in stages, so you'll need to reopen either app after your iPhone reboots, and repeat the process at least three times for the jailbreak to kick in successfully. You'll see a few "Notice" pop-ups the first couple times that you'll need to hit "OK" on.

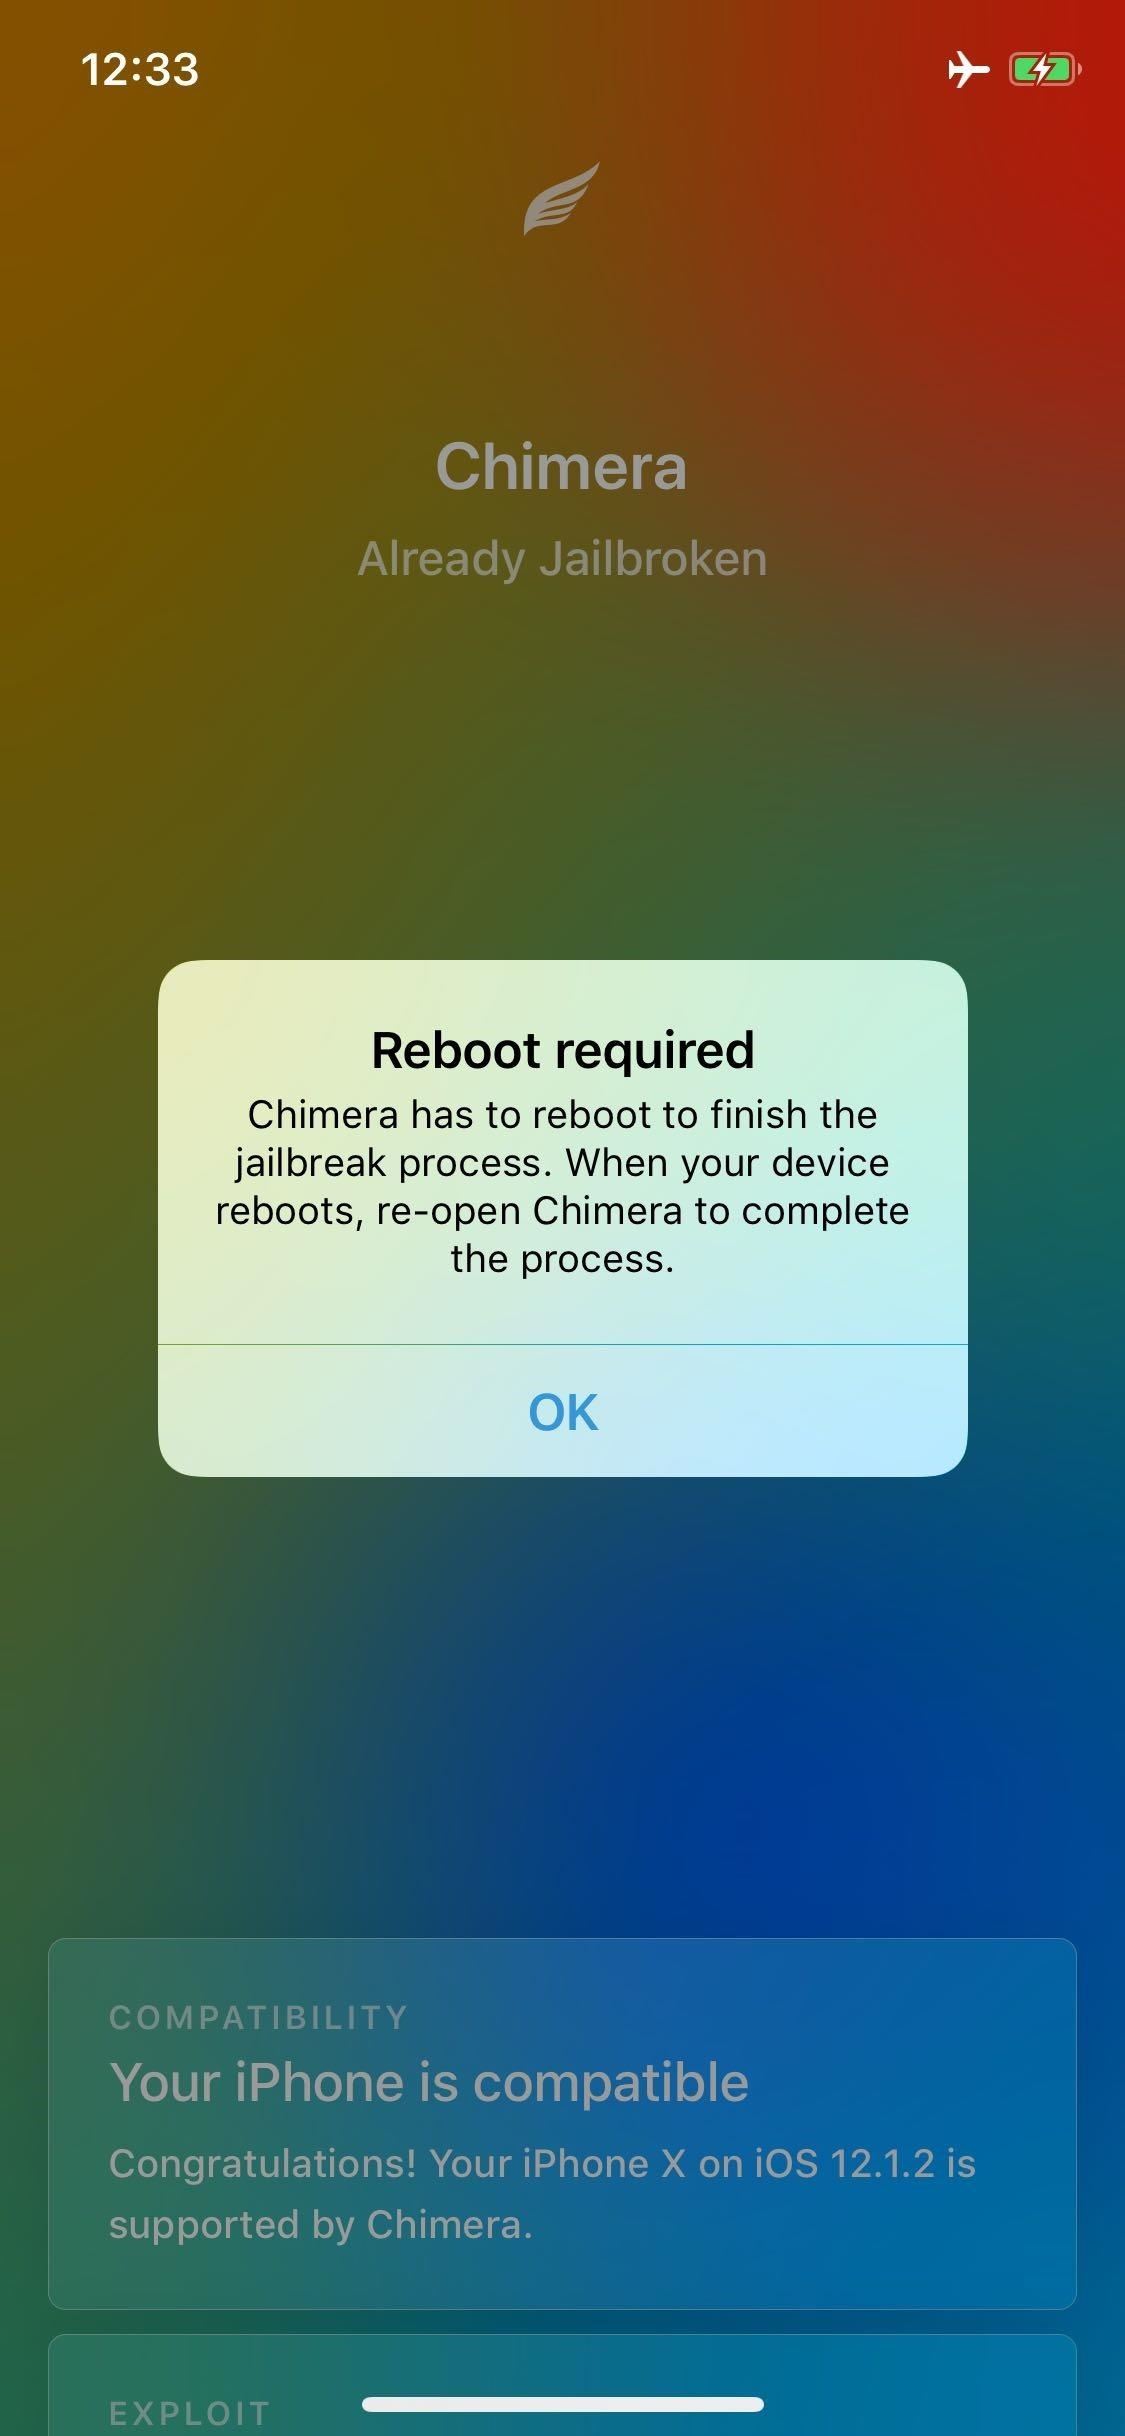
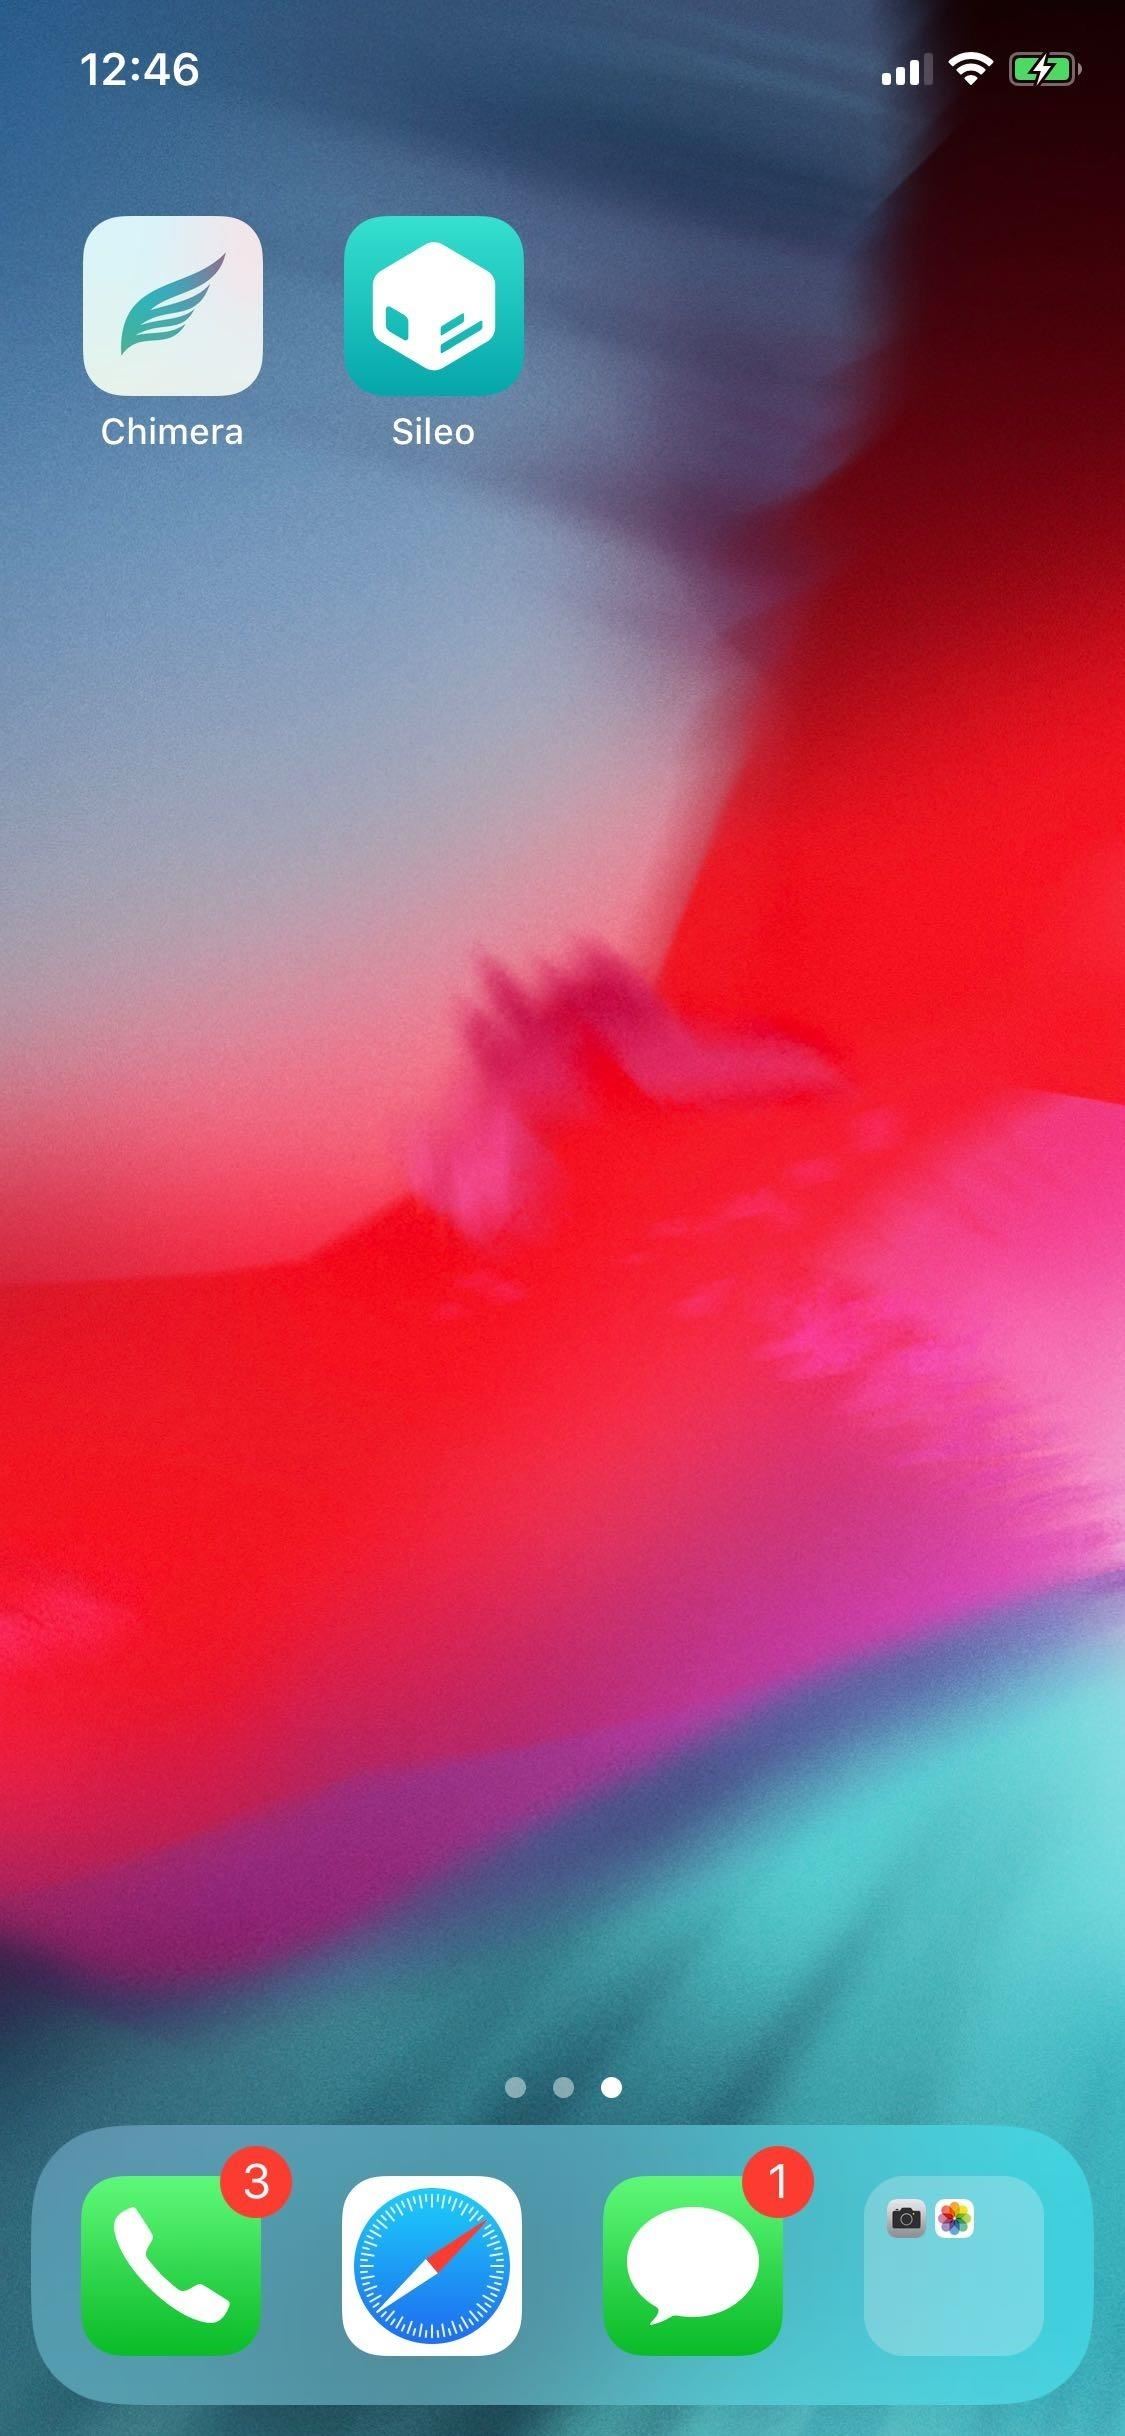
Once your device has been jailbroken successfully, a super-fast full-screen "Jailbreak Completed" notification will briefly flash to notify you (Unc0ver) or just respring outright (Chimera). Once it boots up, an icon for either Cydia (Unc0ver) or Sileo (Chimera) will now be present on your home screen. The way is now clear for you to open either app and start installing various (available) tweaks to customize your iPhone and truly make it your own. You can even install Sileo from Cydia if you'd rather use that over Cydia.
Important Notes
Though we've already mentioned it above, we need to stress that both jailbreak methods are semi-untethered, which means you'll have to re-enable the jailbreak as shown in Step 4 each time your iPhone powers down — intentionally or otherwise. However, you don't need to worry about re-enabling tweaks and mods you've set, as they will automatically work once your jailbreak kicks back in.
Also note that the process may differ slightly between devices, in terms of how many times you'll to repeat the process for the jailbreak to bite. While testing Unc0ver and Chimera on an iPhone X on iOS 12.1.2, for instance, we found that the jailbreak finally installed after four attempts involving multiple reboots on the former, while only taking one try on the latter. So be prepared to try and try again if your iPhone fails to jailbreak the first few attempts.
Finally, it's important to mention that while you can install and use Chimera to override your existing Unc0ver-based jailbreak, doing so will effectively disable Cydia. By extension, it will disable all the tweaks you've installed using that app, so you'll need to reinstall your tweaks again using Sileo.
We'd love to get your feedback regarding this jailbreak method, so don't hesitate to leave a comment below to let us know how smooth (or rough) the process was overall for your particular iPhone. Also, be sure to mention any issues you may have encountered, along with the iOS firmware you're currently on.
Just updated your iPhone? You'll find new emoji, enhanced security, podcast transcripts, Apple Cash virtual numbers, and other useful features. There are even new additions hidden within Safari. Find out what's new and changed on your iPhone with the iOS 17.4 update.


4 Comments
Followed instructions but when going to "Trust Your Profile" the only available choice in Device Management is "Beijing Yuxinyicheng Keji..."
I am not going to "trust" an unknown name that is not "Lebo International Investment..." as indicated in the article! :(
The developer profile changes frequently, so keep that in mind when jailbreaking. On the iPhone SE I've had jailbroken since iOS 11, for example, I've had to "trust" several developer profiles every time I've had to re-enable the jailbreak due to the iPhone turning off after several weeks (or even months!) of being on.
You can read about how profiles work in our detailed guide on certificates/profiles.
Had jb for a few weeks working fine iOS 12.0 iPhone X. Yesterday had to restart phone because it crashed,
tried to open uncover to re-jb, app wouldn't open says need to trust, clicked on verify app no change deleted uncover app now it won't install. When I try to install it doesn't appear on my home screen. Any ideas?
Jailbreaked today and noticed no Tweeks available in my Ipad.. Any suggations?
Share Your Thoughts